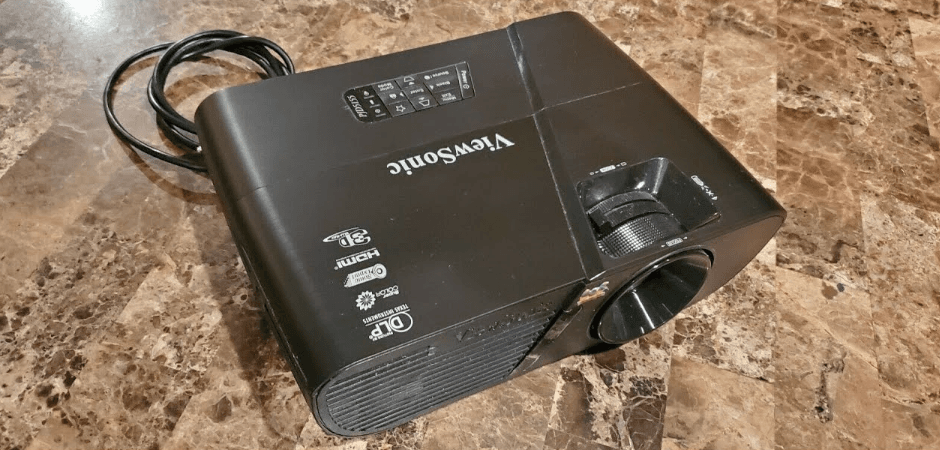
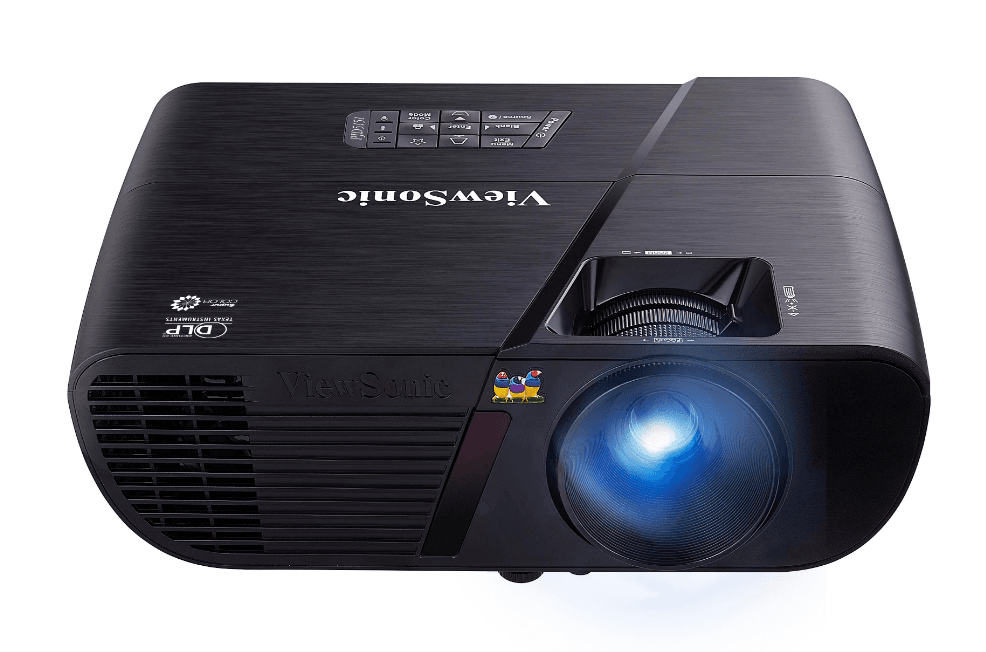
ViewSonic PJD5151 SVGA Projector
Important Safety Instructions
- Read these instructions.
- Keep these instructions.
- Heed all warnings.
- Follow all instructions.
- Do not use this unit near water.
- Clean with a soft, dry cloth.
- Do not block any ventilation openings. Install the unit in accordance with the manufacturer’s instructions.
- Do not install near any heat sources such as radiators, heat registers, stoves, or other devices (including amplifiers) that produce heat.
- Do not defeat the safety purpose of the polarized or grounding-type plug. A polarized plug has two blades with one wider than the other. A grounding type plug has two blades and a third grounding prong. The wide blade and the third prong are provided for your safety. If the provided plug does not fit into your outlet, consult an electrician for replacement of the obsolete outlet.
- Protect the power cord from being walked on or pinched, particularly at plugs. Convenience receptacles and the point where they exit from the unit. Be sure that the power outlet is located near the unit so that it is easily accessible.
- Only use attachments/accessories specified by the manufacturer.
- Use only with the cart, stand, tripod, bracket, or table specified by the manufacturer, or sold with the unit. When a cart is used, use caution when moving the cart/unit combination to avoid injury from tipping over.
- Unplug this unit when unused for long periods of time.
- Refer all servicing to qualified service personnel. Servicing is required when the unit has been damaged in any way, such as: if the power-supply cord or plug is damaged, if liquid is spilled onto or objects fall into the unit, if the unit is exposed to rain or moisture, or if the unit does not operate normally or has been dropped.
Introduction
Projector features
The projector integrates high-performance optical engine projection and a user-friendly design to deliver high reliability and ease of use.
The projector offers the following features.
- Dynamic mode adjusts the power consumption of the lamp according to the brightness of the image being projected
- Power saving function decreases the power consumption of the lamp by up to 30% when no input signal can be detected for a set period of time.
- Presentation timer for better control of time during presentations
- Supports 3D display
- Supports Blu-ray 3D display (for models with HDMI input)
- Color Management allowing color adjustments to your liking
- Less than 0.5W power consumption when power saving mode is turned on
- Screen Color correction allowing projection on surfaces of several predefined colors
- Quick auto search speeding up the signal detecting process
- Color modes providing choices for different projection purposes
- Selectable quick power off function
- One-key auto-adjustment to display the best picture quality
- Digital keystone correction to correct distorted images
- Adjustable color management control for data/video display
- Ability to display 1.07 billion colors
- Multi-language On-Screen Display (OSD) menus
- Switchable normal and economic modes to reduce the power consumption
- Component HDTV compatibility (YPbPr)
- HDMI CEC (Consumer Electronics Control) function allows synchronized power ON/OFF operation between the projector and a CEC-compatible DVD player device connected to the HDMI input of the projector
The apparent brightness of the projected image will vary depending on the ambient lighting conditions, selected input signal contrast/brightness settings, and is directly proportional to projection distance.
The lamp brightness will decline over time and may vary within the lamp manufacturer’s specifications. This is normal and expected behavior.
Shipping contents
Carefully unpack and verify that you have all of the items shown below. If any of these items are missing, please contact your place of purchase.
Standard accessories
The supplied accessories will be suitable for your region, and may differ from those illustrated.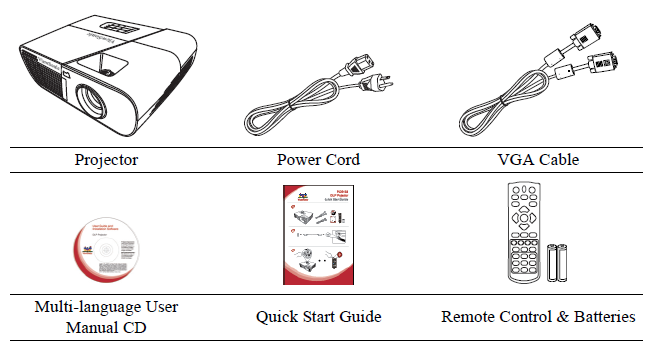
Optional accessories
- Replacement lamp (RLC-092 for PJD5151/PJD5153/PJD5155/PJD5250/PJD5253/ PJD5255. RLC-093 for PJD5555w)
- Soft carry case
- VGA-Component adapter
- Dust filter
- Cable management cover
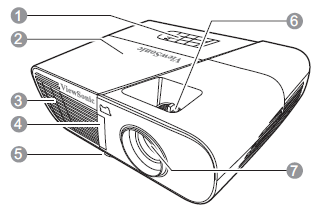
Projector exterior view
Front/upper side
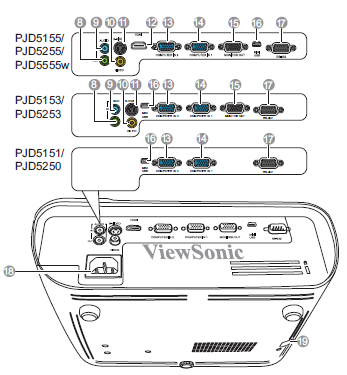
Rear/lower side
- External control panel (See “Projector” on page 7 for details.)
- Lamp cover
- Vent (heated air exhaust)
- Front IR remote sensor
- Adjuster foot
- Focus and Zoom rings
- Projection lens
- Audio signal output socket
- Audio signal input socket
- Video input socket
- S-Video input socket
- HDMI port
- RGB (PC)/Component video (YPbPr/YCbCr) signal input socket-2
- RGB (PC)/Component video (YPbPr/YCbCr) signal input socket-1
- RGB signal output socket
- Mini USB port
- RS-232 control port
- AC power cord inlet
- Security bar for anti-theft lock slot
Warning
THIS APPARATUS MUST BE EARTHED.
When installing the unit, incorporate a readily accessible disconnect device in the fixed wiring, or connect the power plug to an easily accessible socket-outlet near the unit. If a fault should occur during operation of the unit, operate the disconnect device to switch the power supply off, or disconnect the power plug.
Controls and functions
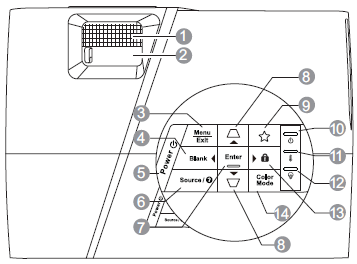
Projector
- Focus ring: Adjusts the focus of the projected image.
- Zoom ring: Adjusts the size of the projected image.
- Menu: Turns on the On-Screen Display (OSD) menu. Exit: Goes back to previous OSD menu, exits, and saves menu settings.
- Blank/ Left: Hides the screen picture.
- Power: Toggles the projector between standby mode and Power ON.
- Source: Displays the source selection bar. (Help) Displays the HELP menu by a long press for 3 seconds.
- Enter: Enacts the selected On-Screen Display (OSD) menu item.
- Keystone keys: Manually corrects distorted images resulting from an angled projection. Up/ Down (Arrow keys)
- My Button: Allows user to define a shortcut key on this button, and the function item is selected in OSD menu.
- Power indicator light: Lights up or flashes when the projector is under operation.
- Temperature indicator light: Lights up red if the projector’s temperature becomes too high.
- Lamp indicator light: Indicates the status of the lamp. Lights up or flashes when the lamp has developed a problem.
- Panel Key Lock: Activates or disables panel key lock by a long press for 3 seconds. Right, When the On-Screen Display (OSD)
menu is activated, the #4, #8, and #13 keys are used as directional arrows to select the desired menu items and to make adjustments. - Color Mode: Selects an available picture setup mode.
Remote control
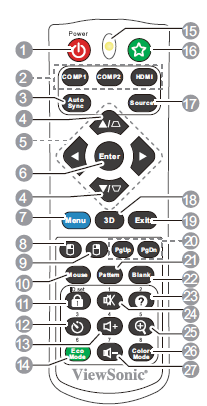
- Power: Toggles the projector between standby mode and Power ON.
- Source selection keys: COMP1/COMP2, Selects D-Sub / Comp. 1 or D-Sub /Comp. 2 source for display. HDMI, Selects HDMI source for display.
- Auto Sync: Automatically determines the best picture timings for the displayed image.
- Keystone keys: Manually corrects distorted images resulting from an angled projection.
- Left/ Right/ Up/ Down: Selects the desired menu items and makes adjustments.
- Enter: Enacts the selected On-Screen Display (OSD) menu item.
- Menu: Turns on the On-Screen Display (OSD) menu.
- Left mouse button: Performs the same function as the left mouse button when the mouse mode is activated. Only available when a PC input signal is selected.
- Right mouse button: Performs the same function as the right mouse button when the mouse mode is activated. Only available when a PC input signal is selected.
- Mouse: Switches between the normal and mouse modes.
PgUp, PgDn, Right mouse button, Left mouse Button: active after pressing Mouse. An icon appears on the screen to indicate the activation of the mouse mode. Only available when a PC input signal is selected. - Panel Key Lock: Activates panel key lock.
- Presentation Timer: Displays the presentation timer settings menu.
- Volume Up: Increases the volume level.
- Eco Mode: Selects a lamp mode.
- LED indicator
- My Button: Allows user to define a shortcut key on the remote control, and the function item is selected in OSD menu.
- Source: Displays the source selection bar.
- 3D: Displays the 3D settings menu.
- Exit: Goes back to previous OSD menu, exits, and saves menu settings.
- PgUp (Page Up)/PgDn (Page Down): Operates your display software program (on a connected PC) which responds to page up/down commands (like Microsoft PowerPoint) when the mouse mode is activated. Only available when a PC input signal is selected.
- Pattern: Displays embedded test pattern.
- Blank: Hides the screen picture.
- Help: Displays the HELP menu.
- Mute: Toggles the projector audio between on and off.
- Zoom: Displays the zoom bar that magnifies or reduces the projected picture size.
- Color Mode: Selects an available picture setup mode.
- Volume Down: Decreases the volume level.
Remote control code
The projector can be assigned to 8 different remote control codes, 1 to 8. When several adjacent projectors are in operation at the same time, switching the remote control codes can prevent interference from other remote controls. Set the remote control code for the projector first before changing that for the remote control.
To switch the code for the projector, select from among 1 to 8 in the SYSTEM SETTING: ADVANCED > Remote Control Code menu.
To switch the code for the remote control, press ID set and the number button corresponding to the remote control code set in the projector OSD together for 5 seconds or more. The initial code is set to 1. When the code is switched to 8, the remote control can control every projector.
If different codes are set on the projector and remote control, there will be no response from the remote control. When that happens, switch the code for the remote control again.
Using the remote mouse control
The capability of operating your computer with the remote control gives you more flexibility when delivering presentations.
- Connect the projector to your PC or notebook with a USB cable prior to using the remote control in place of your computer’s mouse. See “Connecting a computer” on page 16 for details.
- Set the input signal to D-Sub / Comp.. 1 or D-Sub / Comp. 2.
- Press Mouse on the remote control to switch from the normal mode to the mouse mode. An icon appears on the screen to indicate the activation of the mouse mode
- Perform the desired mouse controls on your remote control.
- To move the cursor on the screen, press up/down/left/right.
- To left-click, press left mouse button.
- To right-click, press right mouse button.
- To operate your display software program (on a connected PC) which responds to page up/down commands (like Microsoft PowerPoint), press PgUp/PgDn.
- To return to the normal mode, press Mouse again or other keys except for the mouse-related multi-function keys.
Remote control effective range
The Infra-Red (IR) remote control is located on the front of the projector. The remote control must be held at an angle within 30 degrees perpendicular to the projector’s IR remote control sensor to function correctly. The distance between the remote control and the sensor should not exceed 8 meters (~ 26 feet).
Make sure that there are no obstacles between the remote control and the IR sensor on the projector that might obstruct the infra-red beam.
Replacing the remote control batteries
- To open the battery cover, turn the remote control over to view its back, and press on the finger grip on the cover and pull it up in the direction of the arrow as illustrated.
- Remove any existing batteries (if necessary) and install two AAA batteries observing the battery polarities as indicated in the base of the battery compartment. Positive (+) goes to positive and negative (-) goes to negative.
- Refit the cover by aligning it with the base and pushing it back down into position. Stop when it clicks into place.
WARNING
- Avoid leaving the remote control and batteries in an excessive heat or humid environment like the kitchen, bathroom, sauna, sunroom, or in a closed car.
- Replace only with the same or equivalent type recommended by the battery manufacturer.
- Dispose of the used batteries according to the manufacturer’s instructions and local environment regulations for your region.
- Never throw the batteries into a fire. There may be danger of an explosion.
- If the batteries are drained or if you will not be using the remote control for an extended period of time, remove the batteries to avoid damage to the remote control from possible battery leakage.
Positioning your projector
Choosing a location
Your room layout or personal preference will dictate which installation location you select.
Take into consideration the size and position of your screen, the location of a suitable power outlet, as well as the location and distance between the projector and the rest of your equipment.
Your projector is designed to be installed in one of the following 4 possible installation locations:
Front Table
Select this location with the projector placed near the floor in front of the screen. This is the most common way to position the projector for quick setup and portability.
Front Ceiling
Select this location with the projector suspended upside-down from the ceiling in front of the screen.
Purchase the projector ceiling mount kit from your dealer to mount your projector on the ceiling. Set Front Ceiling in the SYSTEM SETTING: BASIC > Projector Position menu after you turn the projector on.
Rear Ceiling
Select this location with the projector suspended upside-down from the ceiling behind the screen. Note that a special rear projection screen and the projector ceiling mounting kit are required for this installation location.
Set Rear Ceiling in the SYSTEM SETTING: BASIC > Projector Position menu after you turn the projector on.
Rear Table
Select this location with the projector placed near the floor behind the screen. Note that a special rear projection screen is required.
Set Rear Table in the SYSTEM SETTING: BASIC > Projector Position menu after you turn the projector on.
Connection
When connecting a signal source to the projector, be sure to:
- Turn all equipment off before making any connections.
- Use the correct signal cables for each source.
- Ensure the cables are firmly inserted.

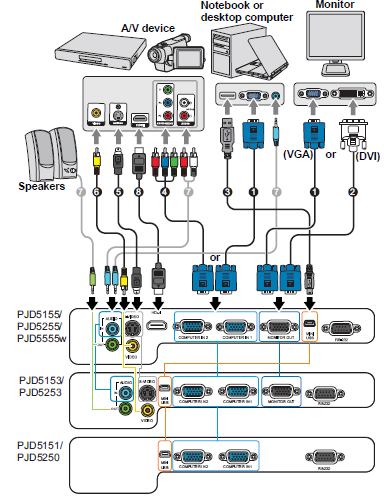
- VGA cable
- VGA to DVI-A cable
- USB cable
- Component Video to VGA (D-Sub) adapter cable
- S-Video cable
- Video cable
- Audio cable
- HDMI cable
Connecting a computer or monitor
Connecting a computer
- Take the supplied VGA cable and connect one end to the D-Sub output socket of the computer.
- Connect the other end of the VGA cable to the COMPUTER IN 1 or COMPUTER IN 2 signal input socket on the projector.
- If you wish to use the remote mouse control function, take a USB cable and connect the larger end to the USB port of the computer, and the smaller end to the MINI USB socket on the projector. See “Using the remote mouse control” on page 10 for details.
Many notebooks do not turn on their external video ports when connected to a projector.
Usually a key combo like FN + F3 or CRT/LCD key turns the external display on/off. Locate a function key labeled CRT/LCD or a function key with a monitor symbol on the notebook. Press FN and the labeled function key simultaneously. Refer to your notebook’s documentation to find your notebook’s key combination.
Connecting a monitor
If you want to view your presentation close-up on a monitor as well as on the screen, you can connect the MONITOR OUT signal output socket on the projector to an external monitor with a VGA cable following the instructions below:
- Connect the projector to a computer as described in “Connecting a computer” on page 16.
- Take a suitable VGA cable (only one supplied) and connect one end of the cable to the D-Sub input socket of the video monitor. Or if your monitor is equipped with a DVI input socket, take a VGA to DVI-A cable and connect the DVI end of the cable to the DVI input socket of the video monitor.
- Connect the other end of the cable to the MONITOR OUT socket on the projector.
The MONITOR OUT output only works when COMPUTER IN 1 connection is made to the projector.
To use this connection method when the projector is in standby mode, turn on the Active VGA Out function under the SOURCE > Standby Settings menu.
For more Manuals by ViewSonic, visit ManualsLibraryy
ViewSonic PJD5151 SVGA Projector-FAQs
What is the ViewSonic PJD5151 projector?
The ViewSonic PJD5151 is an SVGA (800×600) DLP projector with 3,300 ANSI lumens brightness, 15,000:1 contrast ratio, and SuperColor™ technology for vibrant images. It supports 3D-ready/120Hz refresh rate and features SonicExpert™ audio for clear sound.
How do I connect the PJD5151 to a laptop or TV?
HDMI Connection: Plug an HDMI cable from your device (laptop, TV, etc.) into the projector’s HDMI port.
VGA Connection: Use a VGA cable for older devices.
Wireless (if supported): Use a compatible wireless dongle or screen mirroring (Miracast).
Can I use this projector during the day?
Yes! With 3,300 lumens, it works well in moderately lit rooms. For best results, use in low-light environments or with a high-gain screen.
How do I clean the projector lens and vents?
Lens: Gently wipe with a microfiber cloth (no alcohol or harsh cleaners).
Vents: Use a soft brush or compressed air to remove dust. Avoid vacuuming near internal components.
Why is my projector image blurry?
Adjust the focus ring on the lens.
Ensure the projector is properly aligned with the screen.
Check if the resolution settings match the input source.
How long does the lamp last?
The lamp life is up to 15,000 hours in Eco Mode (4,000–5,000 hours in normal mode).
Can I watch Netflix or YouTube on this projector?
Yes, but you’ll need an external streaming device (Fire Stick, Roku, Chromecast) connected via HDMI.
Does it support Bluetooth or Wi-Fi?
No, the PJD5151 does not have built-in Bluetooth/Wi-Fi, but you can use an external adapter for wireless audio.
Why does my projector turn off automatically?
Possible reasons:
Overheating (check vents for blockage).
Auto-shutdown due to inactivity (check settings).
Power-saving mode enabled.

