Richmat H158B Remote Control

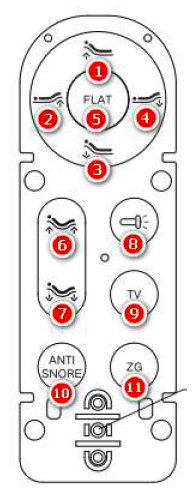
Remote control key diagram

Remote Control Function Description
| Key label | Feature |
| 1 | Back motor extended, release to stop |
| 2 | Foot motor extended, release to stop |
| 3 | Back motor retracts, release to stop |
| 4 | Foot motor retracts, release to stop |
| 5 | One-button reset, all motors retracted to the minimum stroke position, power-on reset |
| 6 | Back motor, foot motor out at the same time, release to stop |
| 7 | Back motor, foot motor retract at the same time, release stop. |
| 8 | Press the flashlight to turn on, release the flashlight to turn off |
| 9 | The motor runs to TV position with one click . Reuse function: Press and hold TV for about 3 seconds, the backlight will flash and the buzzer will sound, and the current motor position will be recorded to TV |
| 10 | The motor runs to SNORE position with one click . Reuse function: Press and hold SNORE for about 3 seconds, the backlight will flash and the buzzer will sound, and the current motor position will be recorded to SNORE |
| 11 | The motor runs to ZG position with one click . |
| Reuse function: Press and hold ZG for about 3 seconds, the backlight will flash and the buzzer will sound, and the current motor position will be recorded to ZG | |
| Coding method: [Remote control foot rise + Back descent+ control box code key] Buzzer sounds, indicating successful code * The control box has a reset function for the code key * The control box is powered on and reset, all motors are reset at the same time, and the reset process cannot be interrupted by any key | |
Caution:
This device complies with Part 15 of the FCC Rules. Operation is subject to the following two conditions:
- (1) This device may not cause harmful interference, and
- (2) This device must accept any interference received, including interference that may cause undesired operation.
- Changes or modifications not expressly approved by the party responsible for compliance could void the user’s authority to operate the equipment.
- This equipment has been tested and found to comply with the limits for a Class B digital device, pursuant to part 15 of the FCC Rules. These limits are designed to provide reasonable protection against harmful interference in a residential installation. This equipment generates uses and can radiate radio frequency energy and, if not installed and used in accordance with the instructions, may cause harmful interference to radio communications. However, there is no
guarantee that interference will not occur in a particular installation. If this equipment does cause harmful interference to radio or television reception,
which can be determined by turning the equipment off and on, the user is encouraged to try to correct the interference by one or more of the following measures- Reorient or relocate the receiving antenna.
- Increase the separation between the equipment and the receiver.
- Connect the equipment into an outlet on a circuit different from that to which the receiver is connected.
- Consult the dealer or an experienced radio/TV technician for help
Richmat H158 Remote Control
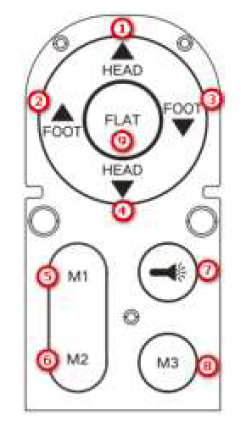
Remote control key diagram

Remote Control Function Description
| Key label | Feature |
| 1 | Back motor extended, release to stop |
| 2 | Foot motor extended, release to stop |
| 3 | Back motor retracts, release to stop |
| 4 | Foot motor retracts, release to stop |
| 5 | The motor runs to M1 position with one click . Reuse function: Press and hold M1 for about 3 seconds, the backlight will flash and the buzzer will sound, and the current motor position will be recorded to M1 |
|
6 | The motor runs to M2 position with one click . Reuse function: Press and hold M2 for about 3 seconds, the backlight will flash and the buzzer will sound, and the current motor position will be recorded to M2 |
| 7 | Press the flashlight to turn on, release the flashlight to turn off |
|
8 | The motor runs to M3 position with one click . Reuse function: Press and hold M3 for about 3 seconds, the backlight will flash and the buzzer will sound, and the current motor position will be recorded to M3 |
| 9 | One-button reset, all motors retracted to the minimum stroke position, power-on reset |
Caution
This device complies with Part 15 of the FCC Rules. Operation is subject to the following two conditions
- (1) This device may not cause harmful interference, and
- (2) This device must accept any interference received, including interference that may cause undesired operation.
- Changes or modifications not expressly approved by the party responsible for compliance could void the user’s authority to operate the equipment.
- This equipment has been tested and found to comply with the limits for a Class B digital device, pursuant to part 15 of the FCC Rules. These limits are designed to provide reasonable protection against harmful interference in a residential installation. This equipment generates uses and can radiate radio frequency energy and, if not installed and used in accordance with the instructions, may cause harmful interference to radio communications. However, there is no guarantee that interference will not occur in a particular installation. If this equipment does cause harmful interference to radio or television reception,
which can be determined by turning the equipment off and on, the user is encouraged to try to correct the interference by one or more of the following measures:- Reorient or relocate the receiving antenna.
- Increase the separation between the equipment and the receiver.
- Connect the equipment into an outlet on a circuit different from that to which the receiver is connected.
- Consult the dealer or an experienced radio/TV technician for help.
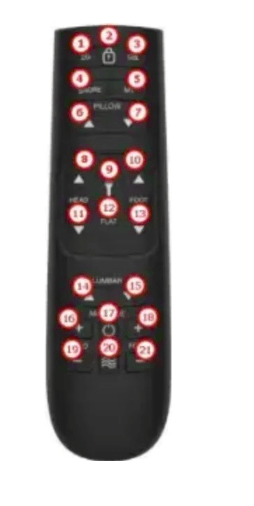
H159 Remote Control
Remote control key diagram

Remote Control Function Description
| Key label | Feature |
| 1 | Underbed light on/off (default: 15 minutes off) |
|
2 | The motor runs to M1 position with one click . Reuse function: Press and hold M1 for about 3 seconds, the backlight will flash and the buzzer will sound, and the current motor position will be recorded to M1 |
|
3 | The motor runs to SNORE position with one click . Reuse function: Press and hold SNORE for about 3 seconds, the backlight will flash and the buzzer will sound, and the current motor position will be recorded to SNORE |
|
4 | The motor runs to M2 position with one click . Reuse function: Press and hold M2 for about 3 seconds, the backlight will flash and the buzzer will sound, and the current motor position will be recorded to M2 |
| 5 | Back motor extended, release to stop |
| 6 | Foot motor extended, release to stop |
| 7 | Back motor retracts, release to stop |
| 8 | Foot motor retracts, release to stop |
| 9 | One-button reset, all motors retracted to the minimum stroke position, power-on reset |
| 10 | Once the external drag rises, release the TILT to stop the third way |
| 11 | Drag outward and lower, release and stop (TILT) the third way |
| 12 | External drag two rises, release and stop (LUMBAR) the fourth way |
| 13 | External drag two descent, release and stop (LUMBAR) the fourth way |
|
14 | Head massager enhancement: Press the button, if the head massager is not activated, start the head massager and enter the “CONSTANT” mode; If the head massage motor has been activated, increase the vibration intensity of the massager, 1 → 2 → 3 → off, and cycle switching. (Default 30 minute shutdown) |
|
15 | Foot massager enhancement: Press the button, if the foot massager is not activated, start the foot massager and enter the “CONSTANT” mode; If the foot massage motor has been activated, increase the vibration intensity of the massager, 1 → 2 → 3 → off, and cycle switching. (Default 30 minute shutdown) |
| 16 | Press the flashlight to turn on, release the flashlight to turn off |
|
17 | Massage motor mode adjustment. After the massager is turned on, press this button to enter the “PULSE” mode for the working massage motor. Press the button again to enter the “WAVE” mode for the massage motor. Press the button again to enter the “CONSTANT” mode for the massage motor. Press the button again to enter the “PULSE” mode and cycle in sequence |
| 18 | The massager is turned off. The working time of the massager is timed, set to 10min, 20min, and 30min respectively, and the timing time is displayed through the indicator light |
| Coding method: [Remote control Back rise + foot rise + control box code key] Buzzer sounds, indicating successful code * The control box has a reset function for the code key * The control box is powered on and reset, all motors are reset at the same time, and the reset process cannot be interrupted by any key | |
Caution
This device complies with Part 15 of the FCC Rules. Operation is subject to the following two conditions:
- (1) This device may not cause harmful interference, and
- (2) This device must accept any interference received, including interference that may cause undesired operation.
- Changes or modifications not expressly approved by the party responsible for compliance could void the user’s authority to operate the equipment.
- This equipment has been tested and found to comply with the limits for a Class B digital device, pursuant to part 15 of the FCC Rules. These limits are designed to provide reasonable protection against harmful interference in a residential installation. This equipment generates uses and can radiate radio frequency
energy and, if not installed and used in accordance with the instructions, may cause harmful interference to radio communications. However, there is no
guarantee that interference will not occur in a particular installation. If this equipment does cause harmful interference to radio or television reception, which can be determined by turning the equipment off and on, the user is encouraged to try to correct the interference by one or more of the following measures:- Reorient or relocate the receiving antenna.
- Increase the separation between the equipment and receiver.
- Connect the equipment into an outlet on a circuit different from that to which the receiver is connected.
- Consult the dealer or an experienced radio/TV technician for help
For more manuals by Richmat, visit ManualsLibraryy
Richmat H158B Remote Control-FAQs
What are the primary features of the Richmat H158 series remote controls?
Richmat H158 series remotes are designed for adjustable beds and other smart home applications. They offer wireless functionality, ergonomic design, and compatibility with various Richmat actuator systems for seamless control of adjustable beds and furniture.
How do I pair my Richmat H158/H159 remote control with the bed base?
To pair the remote:
Unplug the bed from the power source for 30 seconds.
Plug it back in and locate the pairing button on the control box.
Press and hold the pairing button and the “Head Up” and “Foot Up” buttons on the remote simultaneously.
Release the buttons after a beep confirms successful pairing.
Why is my Richmat H158B remote not working?
Common causes include:
Drained or improperly installed batteries.
Signal blockage between the remote and control box.
Activation of the child lock feature. Unlock by holding the “Lock” button for 5 seconds.
Can I reset my Richmat H158/H159 remote control?
Yes, resetting can resolve many issues:
Locate the reset button on the control box under the bed.
Press and hold the “Head Down” and “Foot Up” buttons on the remote while pressing the reset button.
Release after a beep indicates successful reset.
What should I do if the remote control’s buttons are unresponsive?
Check for the following:
Clean the remote buttons and sensor with rubbing alcohol.
Ensure the child lock is disabled.
Replace the batteries and test again.
Is the Richmat H158B compatible with other actuator models?
Yes, the H158B is compatible with various Richmat actuators, including linear and dual actuator systems, enhancing its versatility for different furniture designs.
Can the Richmat H158/H159 control multiple beds?
These remotes are generally designed to pair with one specific control box. For multiple beds, you would need separate remotes or specialized configuration depending on the control system.
What do the indicator lights on the remote signify?
Green light: Normal operation.
Red light flashing: Indicates low battery or an error.
No light: Remote may need new batteries or pairing.
What is the range of the Richmat H158B remote control?
The remote typically works within a range of 10-15 meters, depending on obstructions and interference from other wireless devices.
Where can I get a replacement for a damaged H158B/H159 remote control?
You can purchase replacements from authorized Richmat dealers, online marketplaces, or Richmat’s official website. Always confirm compatibility with your bed model before purchasing.

