Midea MAW05M1WWT Small Window Air Conditioner

Safety Precautions
WARNING
- Plug in power cord plug properly. Otherwise, it may cause an electric shock or fire due to excess heat generation.
- Do not modify the power cord length or share the outlet with other appliances, as it may cause an electric shock or fire due to overheating.
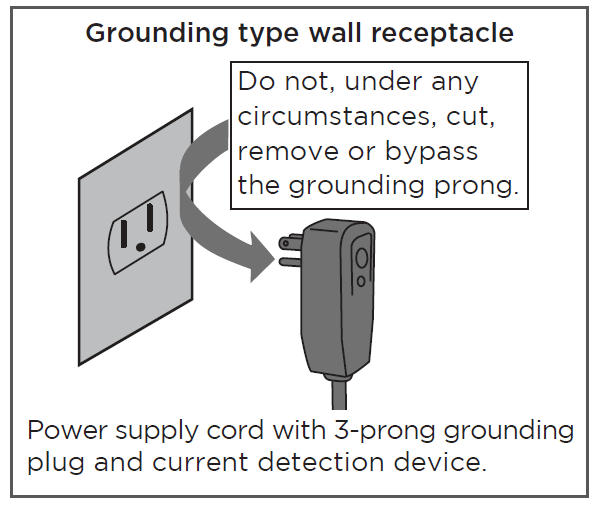
- Always ensure effective grounding. Incorrect grounding may cause an electric shock.
- Unplug the unit if you notice unusual sounds or smells, or if smoke comes from it. A damaged product may cause fire and electric shock.
- Keep firearms away from the unit.
- Ventilate the room before operating the air conditioner if there is a gas leak from another appliance.
- Do not operate or stop the unit by inserting or pulling out the power cord plug.
- Do not operate with wet hands or in very humid environments. It may cause an electric shock.
- Do not allow water to come into contact with any electric parts. It may cause failure or an electric shock.
- Do not use the socket if it is loose or damaged. It may cause fire and electric shock.
- Do not place the power cord close to heating appliances. It may cause fire and electric shock
- Do not disassemble or modify the unit. It may cause failure and an electric shock.
CAUTION
- When the air filter is to be removed, do not touch the metal parts of the unit. It may cause injury.
- When the unit needs cleaning, switch off and turn off the circuit breaker. Do not clean the unit when power is on, as it may cause fire, electric shock, or injury.
- Do not place obstacles around air inlets or inside of air outlet. It may cause failure or an accident.
- Clean with a soft cloth only. Do not use strong detergents that contain wax or thinners, as they may damage the product.
- Use caution when unpacking and installing. Sharp edges could cause injury.
- Do not clean the air conditioner with water. Water may enter the unit and degrade the insulation, which could lead to an electric shock.
Operation of Current Device
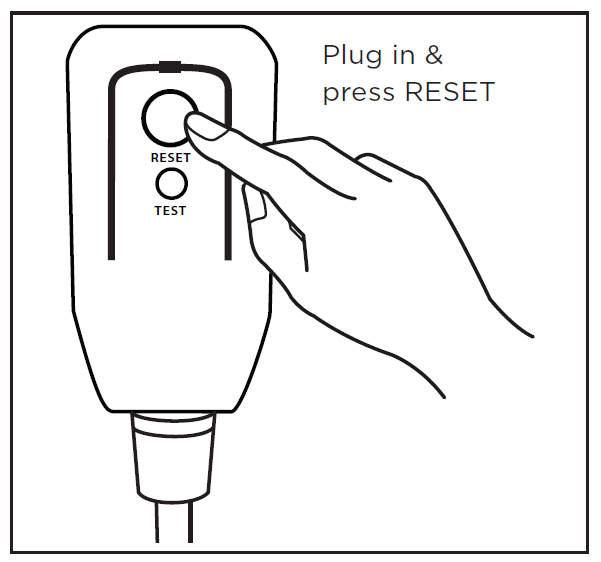
The power supply cord contains a current device that senses damage to the power cord. Test your power supply cord as follows:
- Plug in the air conditioner.
- The power supply cord will have TWO buttons on the plug head. Press the TEST button. You will notice a click as the RESET button pops out.
- Press the RESET Button. You will notice a click as the button engages.
- The power supply cord is now supplying electricity to the unit. (On some products, this is also indicated by a light on the plug head.)


NOTICE
The power supply cord with this air conditioner contains a current detection device designed to reduce the risk of fire. In the event that the power supply cord is damaged, it can not be repaired. It must be replaced with a cord from the manufacturer.
- Do not use this device to turn the unit on or off.
- Always make sure the RESET button is pushed in for correct operation.
- The power supply must be replaced if it fails to reset when either the TEST button is pushed, or it can not be reset. Please contact Customer Service.
Operating Instructions
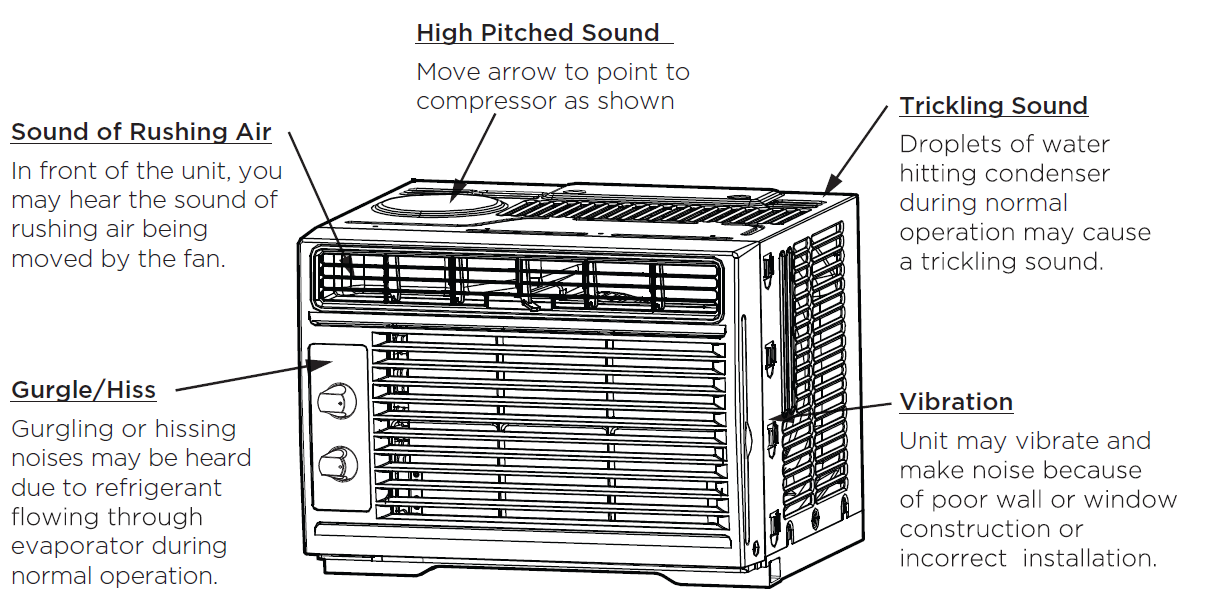
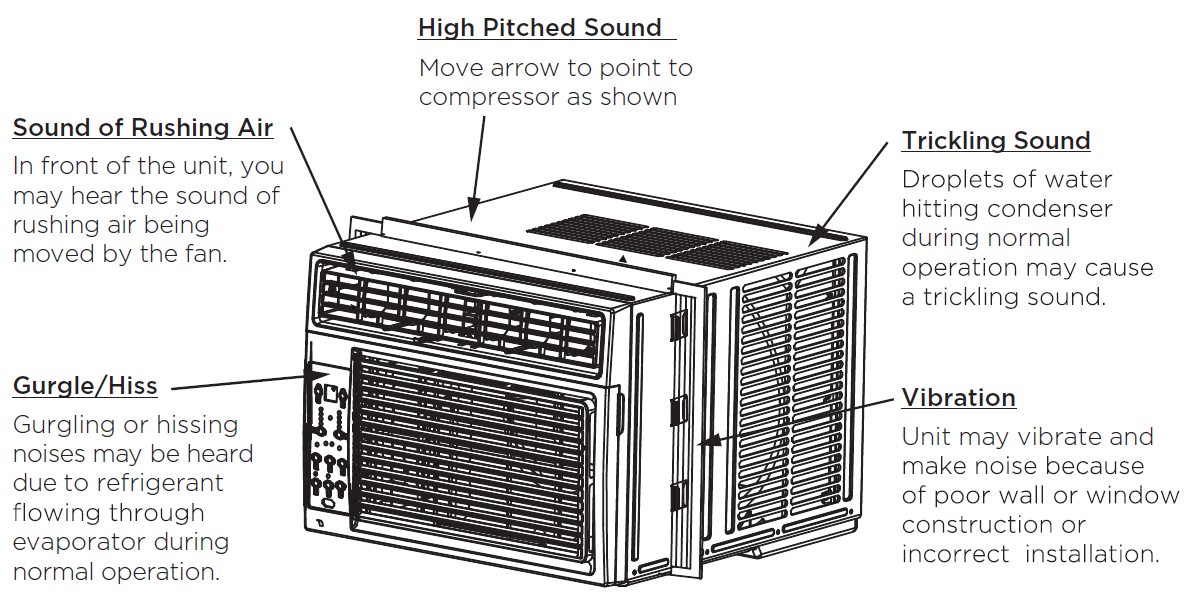
Normal Sounds
MAW05M Model
MAW05R/MAW06R Models
NOTICE
All the pictures in this manual are for illustrative purposes only. The actual appearance of the air conditioner you purchased may vary slightly, but its operation and functions will be similar.
Air Conditioner Operation
This air conditioner is designed to be operated under the following conditions:
WARNING
To reduce the risk of fire, electrical shock, personal injury, or property damage, read the SAFETY PRECAUTIONS before operating this appliance.
NOTE
Always wait 3 minutes when turning the unit off and then on again, or when changing from cool to fan and back to cool. This prevents the compressor from overheating and possibly tripping.
TO BEGIN OPERATING THE AIR CONDITIONER, FOLLOW THESE STEPS:
- Set the temperature to the coldest setting.
- Set the control to HIGH COOL.
- Adjust the louver for comfortable air flow (see Air Directional Louvers).
- Once the room feels cool, adjust the temperature to what you find most comfortable.
- Make sure that the air flow inside and outside is not obstructed by anything.
NOTICE
- The relative humidity of the room should be less than 80%. If the unit is used in a condition with a relative humidity over 80%, there will be condensed water on the surface of the unit.
- Performance may be reduced outside of these operating temperatures.
Before you begin, thoroughly familiarize yourself with the control panel as shown below and all its functions, then follow the symbols for the functions you desire. The unit can be controlled by the unit control panel alone or with the remote control.
Air Conditioner Features – MAW05M Model
NOTICE
The controls featured in this manual are representative of many available models. Your model’s features and appearance may vary slightly.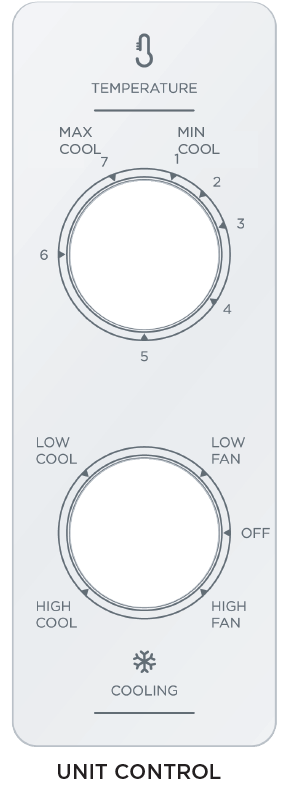
THERMOSTAT
The thermostat is used to set the desired room temperature when the unit is being operated in the COOL MODE. To set the desired room temperature, rotate the thermostat switch to the desired setting. After the set temperature is achieved, the thermostat will automatically start and stop the compressor in order to maintain the desired set temperature. Rotate the thermostat selector clockwise for higher cool settings. Higher cool settings will provide a lower room temperature. Rotate the thermostat selector counterclockwise for lower cool settings. Lower cool settings will provide a higher room temperature.
COOL MODE
The desired cool setting is selected by rotating the knob clockwise to the desired position. High Cool has maximum cooling effect and airflow. Low Cool has a minimum cooling effect and airflow.
FAN MODE
Rotate the knob counterclockwise to select your choice of fan speeds for air circulation.
NOTICE
When selecting a fan speed, the compressor will not run.
Air Conditioner Features – MAW05R/MAW06R Models
ELECTRONIC CONTROL OPERATING INSTRUCTIONS
Before you begin, thoroughly familiarize yourself with the control panel as shown below and all its functions, then follow the symbols for the functions you desire. The unit can be controlled by the unit control alone or with the remote controller.
TO TURN UNIT ON OR OFF: Press the ON/OFF button to turn the unit on or off.
NOTICE
The unit will automatically initiate the Energy Saver function under Cool, Dry, Auto (only Auto-Cooling and Auto-Fan) modes.
TO CHANGE TEMPERATURE SETTING: Press the Power button to turn the unit on or off.
NOTICE
Press or hold either UP/DOWN button until the desired temperature is seen on the display. This temperature will be automatically maintained anywhere between 62°F (17°C) and 86°F (30°C). If you want to display the actual room temperature, see To Operate on Fan Only section.
TO ADJUST FAN SPEEDS: Press to select the Fan Speed in four steps-Auto, Low, Med or High. Each time the button is pressed, the fan speed mode is changed. In dry mode, the fan operates on Low speed automatically.
SLEEP FEATURE:
Press Sleep button to initiate the sleep mode. In this mode the selected temperature will increase by 2°F/1 (or 2)°C 30 minutes after the mode is selected. The temperature will then increase by another 2°F/1 (or 2)°C after an additional 30 minutes. This new temperature will be maintained for 7 hours before it returns to the originally selected temperature. The Sleep mode program can be cancelled at any time during operation by pressing the Sleep button again.
CHECK FILTER FEATURE:
The Check Filter feature is a reminder to clean the air filter for a more efficient operation. The light will illuminate after 250 hours of operation. After cleaning the filter, press the Filter button to reset the Check Filter function, turning the light off.
ENERGY SAVER FEATURE:
Press the Energy Saver button to initiate this function. This function is available on COOL, DRY, and AUTO (only AUTO-COOLING and AUTO-FAN) modes. The fan will continue to run for 3 minutes after the compressor shuts off. The fan then cycles on for 2 minutes at 10-minute intervals until the room temperature is above the set temperature, at which time the compressor turns back on and Cooling resumes.
CCOMFORTSENSE FEATURE:
The ComfortSense function enables the remote control to measure the temperature at its current location. When using AUTO, COOL, or HEAT functions, measuring ambient temperature from the remote control (instead of from the indoor unit itself) will enable the air conditioner to optimize the temperature around you and ensure maximum comfort. This feature can be activated from the remote control ONLY. The remote control will send this signal to the air conditioner every 3 minutes until the ComfortSense button is pressed again. If the unit does not receive the ComfortSense signal during any 7-minute interval, the unit will beep to indicate the ComfortSense mode has ended.
TO SELECT THE OPERATING MODE:
To choose the operating mode, press the Mode button. The unit cycles through the modes, Auto, Cool, Dry, and Fan. The adjacent indicator light will remain on once the mode is selected. The unit will automatically initiate the Energy Saver function under Cool, Dry, Auto (only Auto-Cooling and Auto-Fan) modes. To operate in Auto mode:
- The fan speed is automatically controlled based on the temperature setting and room temperature and cannot be adjusted.
- The air conditioner will control the room temperature automatically according to the temperature you’ve set.
- In this mode, the fan speed cannot be adjusted, as it’s automatically controlled according to the temperature setting and room temperature.
To operate on Fan Only:
- Use this function only when cooling is not desired, such as for room air circulation or to exhaust stale air (on some models). (Remember to open the vent during this function, but keep it closed during cooling for maximum cooling efficiency.) You can choose any fan speed you prefer.
- During this function, the display will show the actual room temperature, not the set temperature as in the cooling mode.
- In Fan Only mode, the temperature is not adjusted.
To operate in Dry mode:
In this mode, the air conditioner will generally function as a dehumidifier. Since the conditioned space is a closed or sealed area, some degree of cooling will occur.
TIMER: AUTO START/STOP FEATURE:
- When the unit is on or off, first press the Timer button. The TIMER ON indicator light illuminates, indicating the Auto Start program has initiated.
- When the time of TIMER ON is displayed, press the Timer button again. The TIMER OFF indicator light illuminates. It indicates the Auto Stop program has initiated.
- Press or hold the UP or DOWN button to change the Auto time by 0.5 hour increments, up to 10 hours, then at 1 hour increments up to 24 hours. The control will count down the time remaining until start.
- The selected time will register in 5 seconds, and the system will automatically revert to display the previous temperature setting or room temperature when the unit is on. (When the unit is off, there is no display.)
- Turning the unit ON or OFF at any time or adjusting the timer setting to 0.0 will cancel the Auto Start/Stop timed program.
- If setting ON 0.5 and OFF 1 at the same time, the unit will be activated for 0.5 hour, operate for 0.5 hour, and then stop.
Displays:
Shows the set temperature in “°C” or “°F” and the Auto-timer settings. While on Fan Only mode, it shows the room temperature.
Error codes:
- AS – Room temperature sensor error – Unplug the unit and plug it back in. If the error repeats, call for service.
NOTE: In Fan only mode, if the room temperature is too low or too high, it will display “LO” or “HI” - ES – Evaporator temperature sensor error – Unplug the unit and plug it back in. If the error repeats, call for service.
NOTICE
If the unit shuts off unexpectedly due to a power outage, it will restart with the previous function setting automatically when the power resumes.
Care and Cleaning
CAUTION
Clean your air conditioner occasionally to keep it looking new. Be sure to unplug the unit before cleaning to prevent shock or fire hazards.
Air Filter Cleaning
The air filter should be checked at least once a month to see if cleaning is necessary. Trapped particles in the filter can build up and cause an accumulation of frost on the cooling coils.
- Push the vent handle to the closed position (where applicable). Open the front panel.
- Take the filter by the center and pull up and out.
- Wash the filter using liquid dishwashing detergent and warm water. Rinse filter thoroughly.
- Gently shake excess water from the filter. Be sure the filter is thoroughly dry before replacing.
- You may also vacuum the filter clean rather than washing.

NOTICE
Never use hot water over 104°F (40°C) to clean the air filter. Never attempt to operate the unit without the air filter.
Cabinet Cleaning
- Be sure to unplug the air conditioner to prevent a shock or fire hazard. The cabinet and front may be dusted with an oil-free cloth or washed with a cloth dampened in a solution of warm water and mild liquid dishwashing detergent. Rinse thoroughly and wipe dry.
- Never use harsh cleansers, wax, or polish on the cabinet front.
- Be sure to wring excess water from the cloth before wiping around the controls. Excess water in or around the controls may cause damage to the air conditioner.
- Plug in the air conditioner.
Winter Storage
If you plan to store the air conditioner during the winter, remove it carefully from the window according to the installation instructions. Cover it with plastic or return it to the original carton.
Troubleshooting Tips
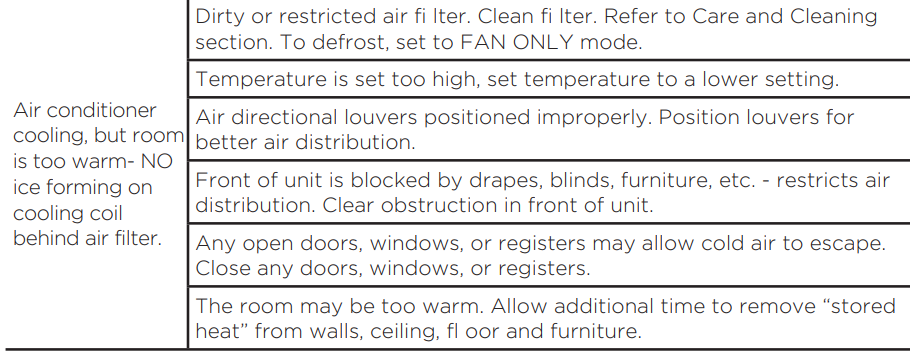
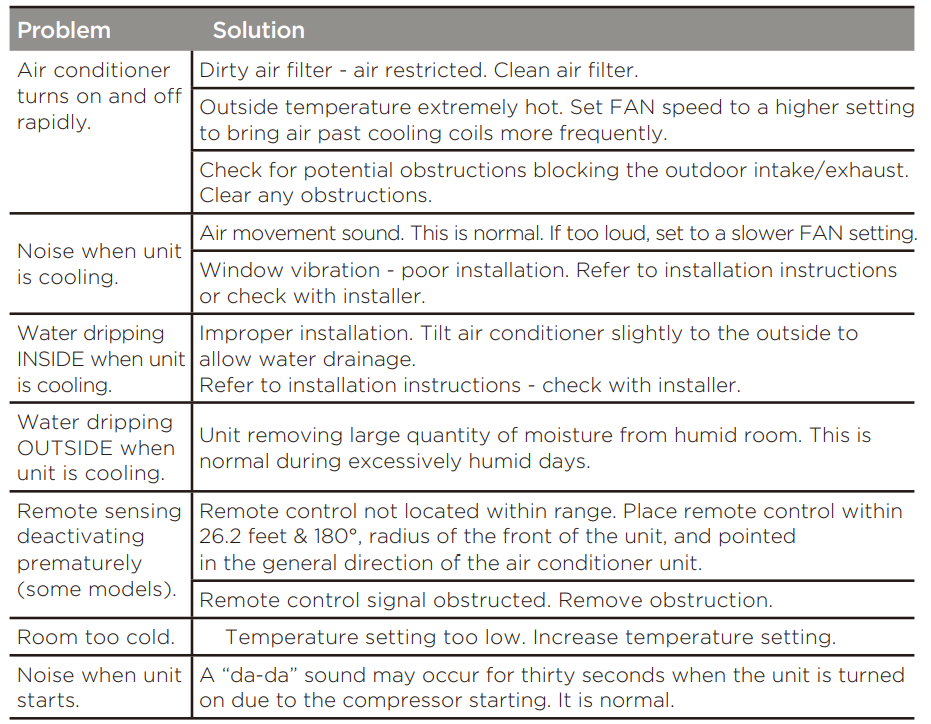
Before calling for service, review this list. It may save you time and expense. This list includes common occurrences that are not the result of defective workmanship or materials in this appliance.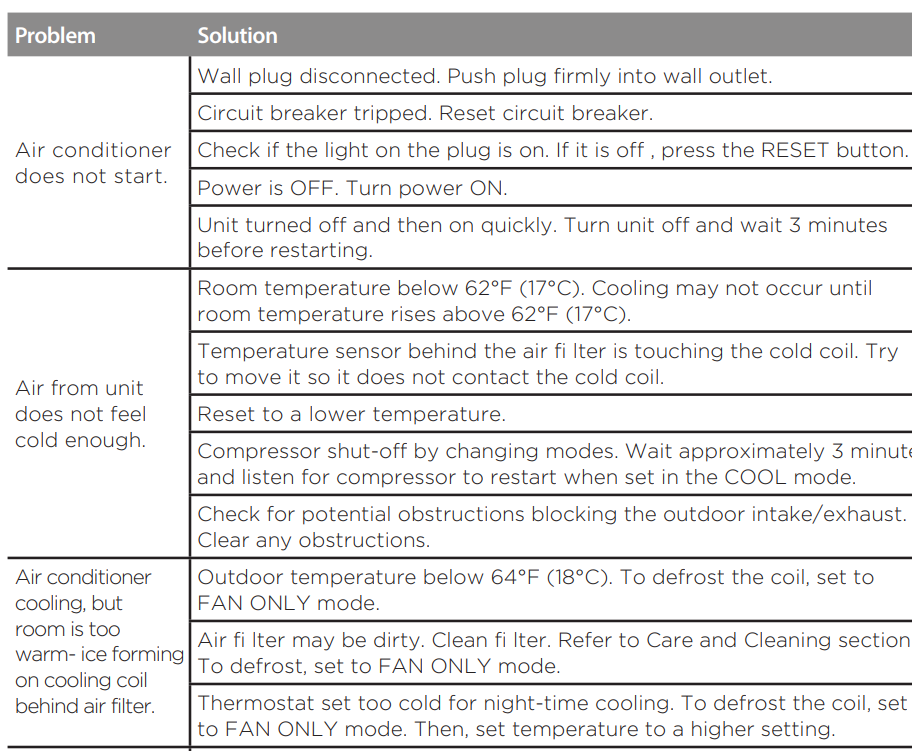
Remote Control Instructions
Handling the Remote Controller
LOCATION OF THE REMOTE CONTROLLER
Use the remote controller within a distance of 26.2 feet (8 meters) from the air conditioner, pointing it towards the receiver. Reception is confirmed by a beep.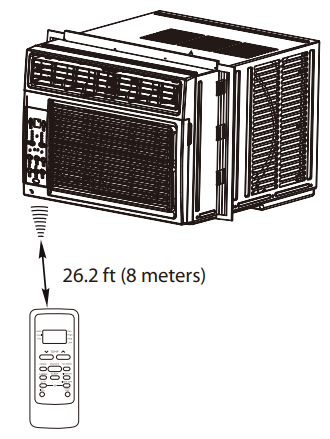
CAUTION
- The air conditioner will not operate if curtains, doors or other materials block the signals from the remote controller to the unit.
- Prevent any liquid from spilling onto the remote controller. Do not expose the remote controller to direct sunlight or heat.
- If the infrared signal receiver on the indoor unit is exposed to direct sunlight, the air conditioner may not function properly. Use curtains to prevent the sunlight from falling on the receiver.
- If other electrical appliances react to the remote controller, either move these appliances or consult your local dealer.
NOTES
- Button design is based on a typical model and may vary slightly from the actual one you purchased.
- All the functions described are accomplished by the unit. If the unit is without a feature, the unit will not respond if the corresponding button on the remote is pressed.
- When there are significant differences between features or operations implied by the remote control illustration and the actual functions described in the USER’S MANUAL, the descriptions in the USER’S MANUAL shall prevail.
Function Buttons

TIMER OPERATION
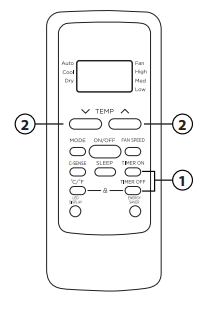
Press the TIMER button to initiate the Auto-start and Auto-stop setting program of the unit. To set the Auto-start/stop time.
- Press the TIMER button. When the TIMER ON indicator is displayed on the LED window of the air conditioner, it indicates the Auto Start setting program is initiated. When the TIMER OFF indicator is displayed on the LED window of the air conditioner, it indicates the Auto Stop setting program is initiated.
- Press or hold the TEMP UP/DOWN to change the Auto time. The control will count down the time remaining until start/stop.
- The selected time will register in 5 seconds, and the air conditioner will automatically revert to display the previous temperature setting.
- Turning the unit ON or OFF at any time will cancel the Auto Start/stop function.
NOTES
To cancel the TIMER setting, push the TIMER button and press or hold the TEMP UP/DOWN until 0 hour is displayed on the LCD window of the air conditioner.
COMBINED TIMER
(Setting both ON and OFF timers simultaneously)
AUTO STOP >AUTO START (On > Stop > Start operation)
This feature is useful when you want to stop the air conditioner after you go to bed, and start it again in the morning when you wake up or when
you return home.
Example:
To stop the air conditioner 2 hours after setting and start it again 10 hours after setting.
- Press the TIMER button until the TIMER OFF indicator is displayed on the LED display of the air conditioner.
- Use the TEMP UP/DOWN button to display “2.0” on the LED display of the air conditioner.
- Press the TIMER button again to display the TIMER OFF on the LED display of the unit.
- Use the TEMP UP/DOWN button to display “10” on the LED display of the unit.
- Wait for 5 seconds until the previous display appears in the LED window.
AUTO START > AUTO STOP (Off > Start > Stop operation)
This feature is useful when you want to start the air conditioner before you wake up and stop it after you leave the house.
Example:
To start the air conditioner 5 hours after setting, and stop it 8 hours after setting.
- Press the TIMER button until the TIMER ON indicator is displayed on the LED display of the air conditioner.
- Use the TEMP UP/DOWN button to display “5.0” on the LED display of the air conditioner.
- Press the TIMER button again to display the TIMER OFF on the LED display of the unit.
- Use the TEMP UP/DOWN button to display “8.0” on the LED display of the unit.
- Wait for 5 seconds until the previous display appears in the LED window.
Warranty
Air Conditioner Limited Warranty
Your product is protected by this Limited Warranty:
Warranty service must be obtained from Midea Consumer Services or an authorized Midea servicer.
Warranty
- One year full warranty from the original purchase date.
Midea, through its authorized servicers, will:
- Pay all costs for repairing or replacing parts of this appliance that prove to be defective in materials or workmanship.
Consumer will be responsible for:
- Diagnostics, removal, transportation, and reinstallation costs are required because of the service.
- Costs of service calls that are a result of items listed under
NORMAL RESPONSABILITIES OF THE CONSUMER**
This warranty applies only to products in ordinary household use, and the consumer is responsible for the items listed below:
- Proper use of the appliance in accordance with the instructions provided with the product.
- Routine maintenance and cleaning are necessary to keep the good working condition.
- Proper installation by an authorized service professional in accordance with instructions provided with the appliance and in accordance with all local plumbing, electrical, and/or gas codes.
- Proper connection to a grounded power supply of sufficient voltage, replacement of blown fuses, repair of loose connections or defects in house wiring.
- Expenses for making the appliance accessible for servicing.
- Damages to finish after installation.
EXCLUSIONS
This warranty does not cover the following:
- Failure caused by damage to the unit while in your possession (other than damage caused by defect or malfunction), by its improper installation, or by unreasonable use of the unit, including, without limitation, failure to provide reasonable and necessary maintenance or to follow the written installation and Operating Instructions.
- Damages caused by services performed by persons other than authorized Midea customer service, or external causes such as abuse, misuse, inadequate power supply or acts of God.
- If the unit is put to commercial, business, rental, or other use or application other than for consumer use, we make no warranties, express or implied, including but not limited to any implied warranty of merchantability or fitness for use or purpose.
- Products without original serial numbers or products that have serial numbers that have been altered or cannot be readily determined.
NOTE: Some states do not allow the exclusions or limitation of incidental or consequential damages. So this limitation or exclusion may not apply to you.
For more manuals by Midea, visit ManualsLibraryy
Midea MAW05M1WWT Small Window Air Conditioner-FAQs
How does the Midea window air conditioner work?
The Midea AC cools air by circulating refrigerant through an evaporator coil, which absorbs heat from the room (like a sponge soaking water). The cooled air is then blown back into the room.
How many watts does the Midea 5000 BTU AC use?
The Midea MAW05M1WWT (5000 BTU) uses around 450–500 watts on average, depending on settings.
What size room can a 5000 BTU AC cool?
A 5000 BTU model is ideal for rooms 100–150 sq. ft. (e.g., small bedrooms or offices).
What does BTU mean?
BTU (British Thermal Unit) measures cooling power. Higher BTUs = larger cooling capacity.
Is the Midea 5000 BTU AC quiet?
Yes! It operates quieter than a refrigerator, making it great for bedrooms.
Does this Midea AC have a washable filter?
Yes, it has a removable & washable filter to trap dust and improve air quality.
Is Midea a reliable brand?
Yes! Midea is the world’s #1 air treatment brand and a global leader in HVAC manufacturing.
How do I make my Midea AC colder?
Set to Cool Mode (not just Fan).
Lower the temperature.
Ensure no obstructions block airflow.
What’s the best temperature setting for efficiency?
24°C (75°F) balances comfort and energy savings.


