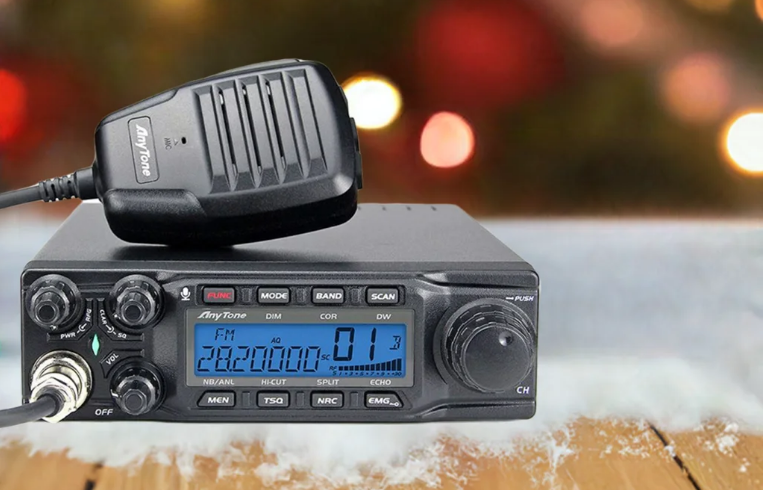
AnyTone AT-6666 Two-Way 10 Meter Radio
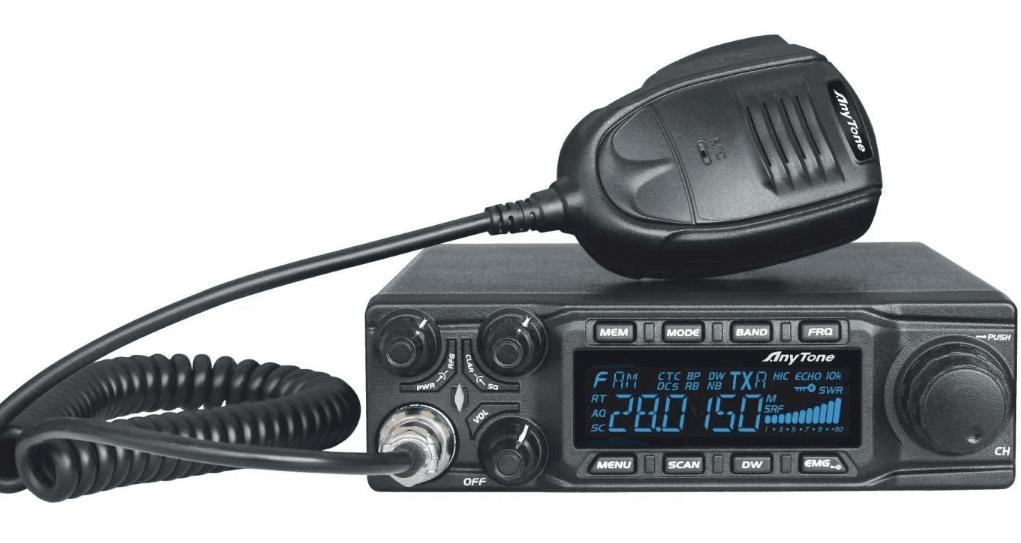
FUNCTIONS & FEATURES
- Big LCD displays frequency and all kinds of information
- FM、AM、USB、LSB 、PA mode
- Frequency Tuning Step 100Hz, 1KHz, 10KHz, 100KHz, 1MHz
- ± 1.5KHz Clarifier
- Flexible menu function and PC programming software
- ECHO Function
- SQ, ASQ Function (FM and AM mode only)
- RF GAIN Adjustment
- RF PWR Adjustment
- SCAN Function
- Programmable RB Function
- NB/ANL Function
- DW DUAL-WATCH Function
- BEEP Voice Prompt
- +10KHZ Function
- SWR、S/RF function
- TOT function
- HI-CUT Function
- EMG CALL
- SWR PROTECTION
- Power Supply Voltage Protection
- Key-Lock Function
- Seven (7) Color LCD Display
- Six(6) Groups Memory Channel
- CTCSS/DCS Code(Optional)
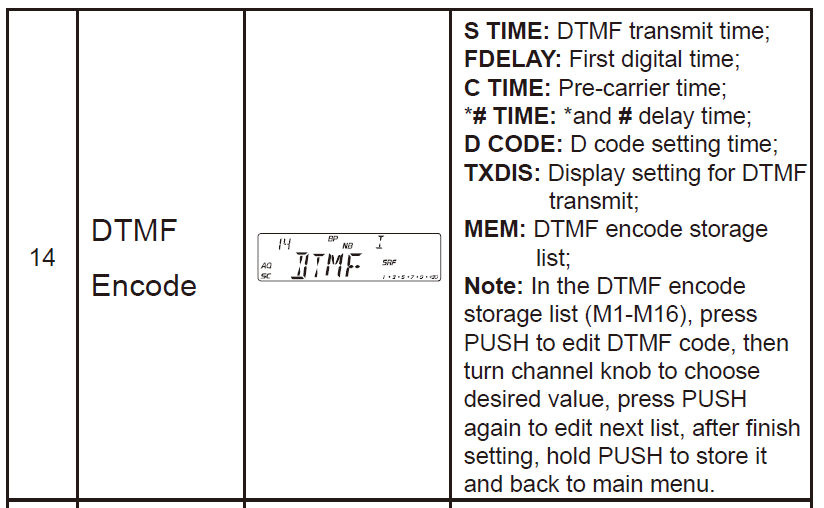
- DTMF Function
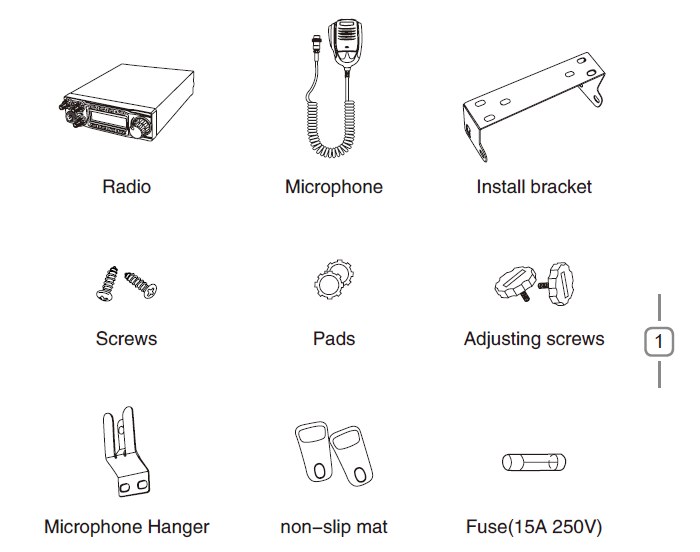
STANDARD ACCESSORIES
INSTALLATION
Choose the most appropriate setting from a simple and practical point of view. Your radio should not interfere with the driver or crash into the driver’s knee or leg when rush brakes.
- Using the self-tapping screws and pads(2 sets) to fix the bracket.
- Put the Non-slip mat on the 2 ends of the bracket and put in the radio. Then insert the adjusting screws and check carefull eachbscrews, make sure the screws and machine will not loosen when the car shakes.
- Choose a suitable angle by the 3 screw holes in the two ends of the bracket.

ANTENNA INSTALLATION
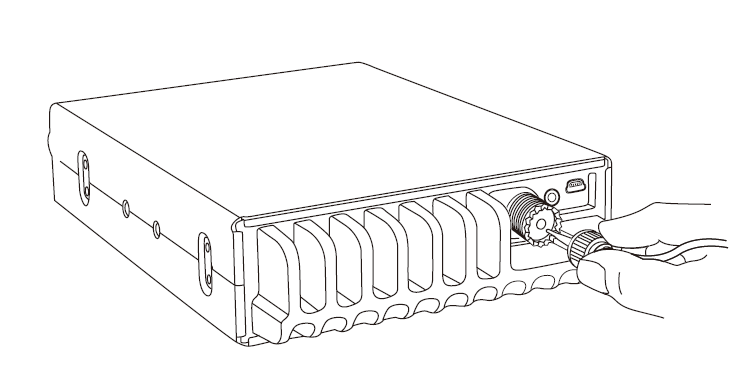
Before using this radio, please install a highly efficient and harmoniously adjusted CB antenna; a suitable antenna type and correct installation will bring excellent communication. To match the radio, the antenna and cable shall have with characteristic impedance of 50 ohms, or the antenna system will not be efficient enough and will disturb TV, radio, or other electronics.
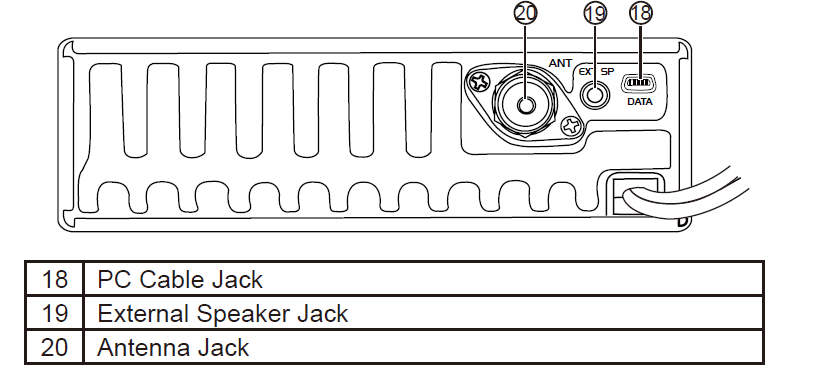
- Screw the antenna connector into the antenna jack.
- Grounding the antenna system ensures the best performance of this radio.

- The position of the antenna can be put as follows example.

POWER CONNECTION
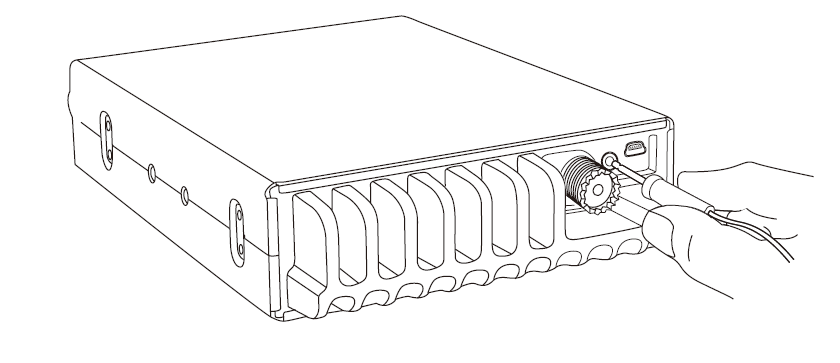
This radio adopts a 13.8V power supply, never connect it to a 24V battery, and the 13.8V car battery shall with sufficient current, or the LCD will become dark and Transmit power will drop down. 111 Connect the positive red power cable with the + terminal of the battery. 222 Connect the negative black power cable with the – terminal of the battery.
- We suggest not using a cigar lighter as it often brings down the voltage.
- Locate the power cable away from high temperatures, moisture, fire, and cable insulators.
- Use a full power cable even if it is longer than needed; do not take off the fuse holder from the cable.
Replacing Fuse
This radio adopts a 15A, 250V fuse. If the fuse blows, determine the reason, then correct the problem. After the problem is resolved, replace the fuse. If newly installed fuses continue to blow, disconnect the power cable and contact your authorized dealer or an authorized service center.
- Pull the two fuse covers in different directions and open them.
- Replace the broken fuse with a good one, and close the fuse holder.
- Be sure to use the suggested fuse, or it might damage the radio.

Install Microphone Hanger
Choose an ideal location which will not interfere with he driver. Using supplied self-tapping screws and pads(2 sets) to fix the hanger
Install External Speaker
If you use an external speaker, please choose 8 8-ohm speaker with a 3.5mm mono band (double cable) plug.
- Locate the external speaker in a suitable place.
- Plug into the speaker jack.

GETTING ACQUAINTED
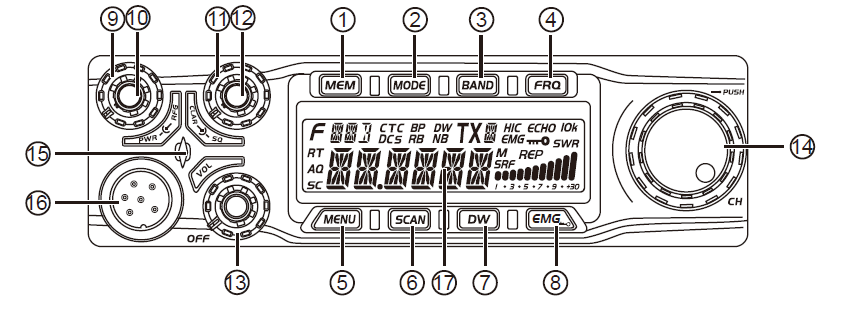
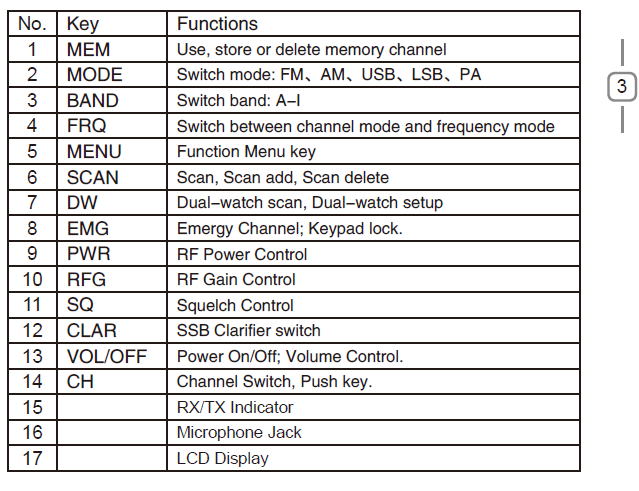
- Front Panel


- Rear Panel

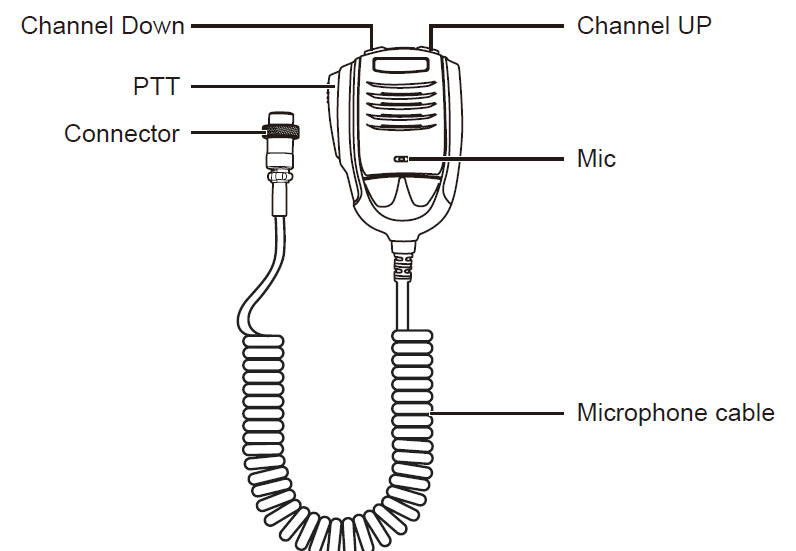
- Microphone

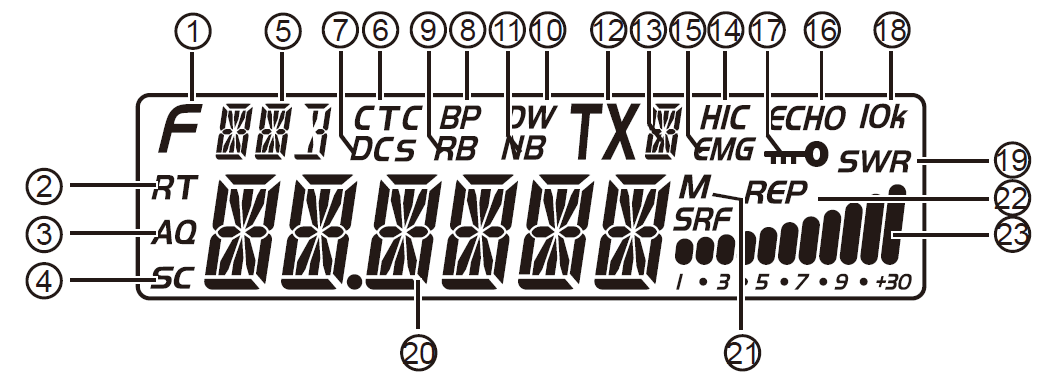
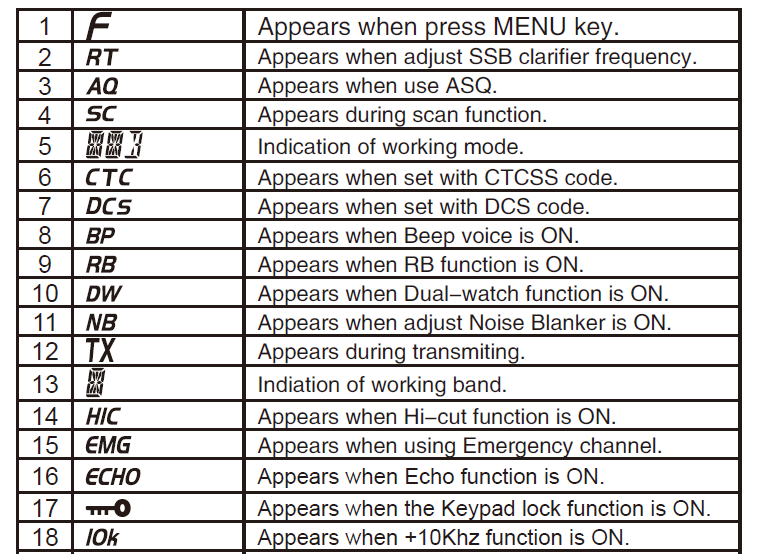
- LCD Display


HOW TO USE YOUR RADIO
OFF/ON Radio
- Turn the VOL clockwise to switch on the radio; the radio emits a beep. When the LCD displays frequency or channel, the radio is on.
- Turn VOL anti-clockwise to switch off the radio, the radio is OFF when you hear Ka Ta from the switch.
Volume Control
When the radio is turned on, turning VOL clockwise will increase the volume, and turning VOL anti-clockwise will reduce the volume. The LCD displays VOL: XX (XX stands for the volume level, a total of 1-36 levels). Note: Adjust the volume during communication to get a suitable level.
RF Power Control
When the radio is transmitting, turn the PWR outer shaft to adjust power. Turn it clockwise to increase power, counterclockwise to reduce power.
RF Gain Control
When the radio is receiving, turn the RFG inner shaft to adjust RF gain. Turn it clockwise to increase gain, anti-clockwise to reduce gain.
SQUELCH Control
When the radio is in standby, turn the SQ outer shaft clockwise to adjust the squelch level. The LCD displays SQ: XX. (XX stands for the squelch level, total 1-36 levels).
SSB Clarifier control
When the radio is transmitting or receiving, turn the CLAR inner shaft to adjust USB/LSB TX or RX frequency. Turn it clockwise to increase frequency, anti-clockwise to reduce frequency.
Channel Selection
When the radio is in channel mode, turn the channel knob to select the desired channel. Clockwise to increase, anti-clockwise to reduce the channel. Note: In channel display mode, each press【PUSH】key will increase the frequency by 10 times of channel step size.
Frequency control
- In frequency mode, press【PUSH】key, then you can adjust the frequency for the present channel.
- When the frequency is flashing, turn CH clockwise to increase frequency, anti-clockwise to reduce frequency.
KEYPAD FUNCTION
【MEM】Using memory channel:
- Short press【MEM】to enter memory channel, turn CH to choose memory channel.M1-M6, Total 6 memory channels.
- Short press【MEM】again to exit memory channel mode.
Store/Delete memory channel:
When the radio is not in memory channel mode, choose the channel to be stored, and hold【MEM】enter storage mode, the channel number flashes. Turn the Channel switch to choose the location to be stored (M1-M6), then hold【MEM】until the flashing channel number disappears, the storage is done.
Delete memory channel:
In channel mode, hold【MEM】for over 2 seconds, the memory channel number flashes, turn the CH switch to choose the memory to be deleted. Then hold【MEM】until the flashing channel number disappears, the delete is done.
【MODE】
- Short press【MODE】to choose mode FM-AM-USB-LSB-PA.
【BAND】
- Short press【BAND】to choose band A-B-C-D-E-F-G-H-I.
【FRQ】
- Short press【FRQ】to switch between frequency display mode and channel display mode.
【MENU】
- Short press【MENU】, the top left of LCD display “F”, Press 【PUSH】 to enter the channel function menu list.
- Long press【MENU】for 2 seconds to enter Background
【SCAN】
- Short press【SCAN】to start the scan function, “SC” flashes in the LCD.
- In scan mode, the Turn Channel switch will change scan direction.
- Short press【SCAN】again to exit scan.
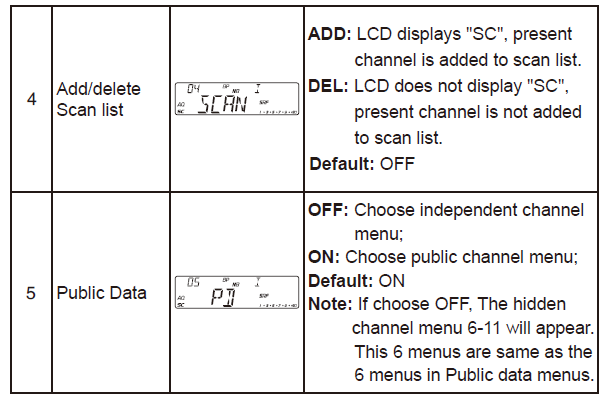
Add/delete scan list
In channel mode, Long press【SCAN】for over 2 seconds will add or delete the present channel from the scan list.
- When LCD displays “SC”, the present channel is added to the scan list.
- When LCD does not display “SC”, the present channel is not added to the scan list.
Note: This function is equal to the operation in the Channel data
【DW】Dual-Watch function
- Short press【DW】to turn on Dual watch, LCD displays “DW”;
- Short press【DW】again or press PTT to exit DW mode;
Dual-Watch channel setup
- Choose first Dual-Watch channel.
- Hold【DW】for 2 seconds, LCD displays “DW”;
- Turn the Channel switch to choose the second dual watch channel. Long-press DW again to store and exit.
【EMG】
Choose EMG channel:
Short press【EMG】 to use Emergency channel, LCD displays “EMG”.
- Short press【EMG】once to choose CH9;
- Short press【EMG】again to choose CH19;
- Short press【EMG】thrice to return to last normal channel.
Keypad Lock Function:
- Long press【EMG】to lock keys, LCD displays

- Long press【EMG】again to unlock the keys.
Note: When this function is turned on, only the PTT button is valid.
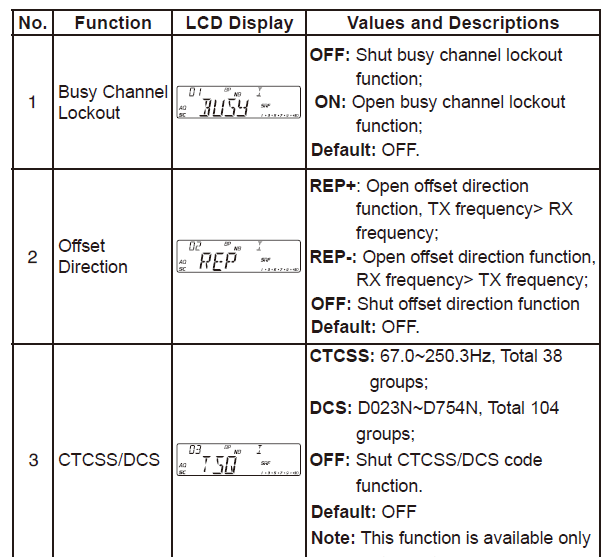
CHANNEL FUNCTION MENU OPERATION
- Press【MENU】, the top left of the LCD display “F”, Press【PUSH】 to enter the menu list.
- Turn the Channel switch to find No.1- No.5 menus.
- Press【PUSH】to choose the menu.
- Turn the Channel switch to choose the desired value.
- Press【PUSH】to return to the previous menu, press any other key, or wait 5 seconds; the setting will be stored and exit.


PUBLIC DATA FUNCTION MENU OPERATION
- Hold【PUSH】for 2 seconds to enter the menu list;
- Turn the Channel switch to find menu 1-6;
- Press【PUSH】to choose the menu.
- Turn the channel switch to choose the desired value.
- Press【PUSH】to return to the previous menu, press any other key, or wait 5 seconds; the setting will be stored and exit.


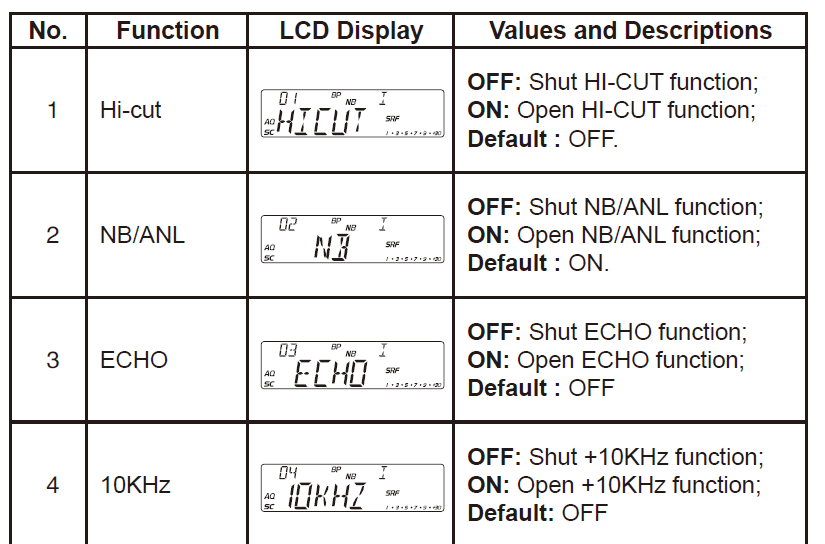
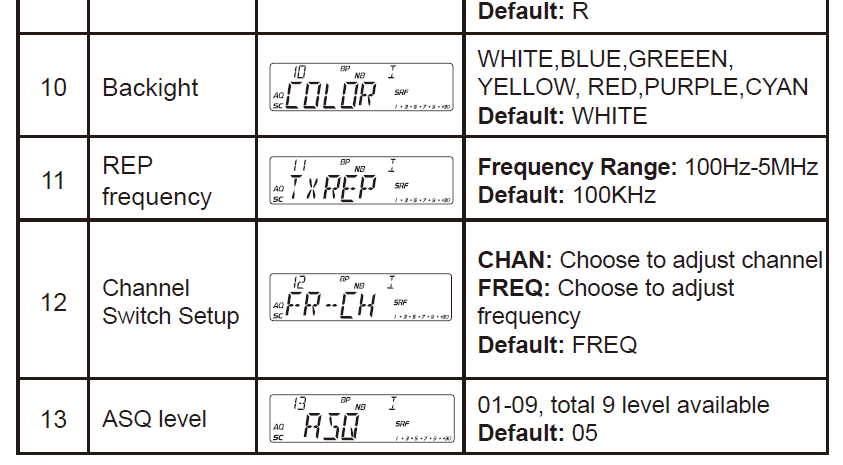
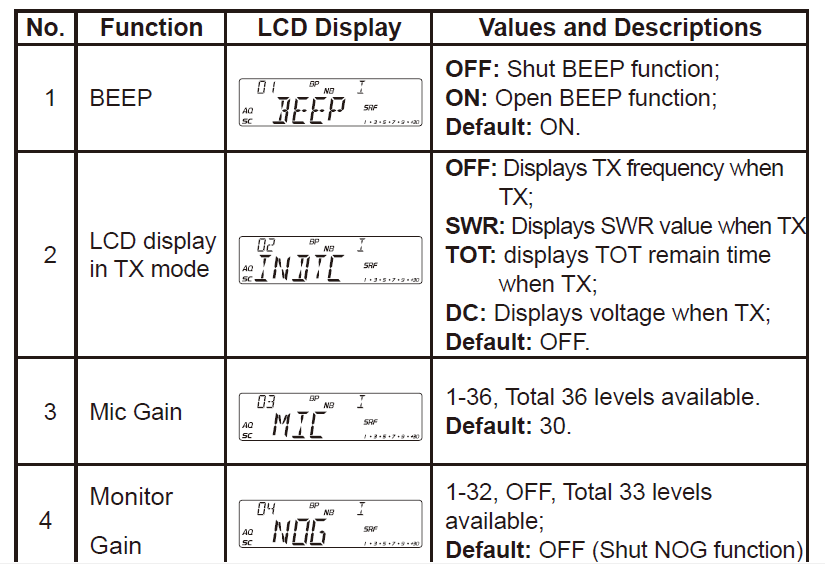
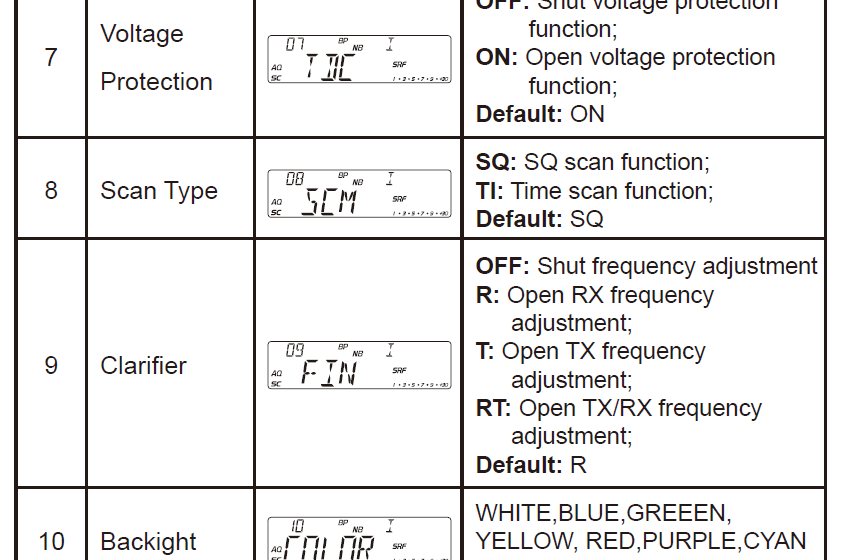
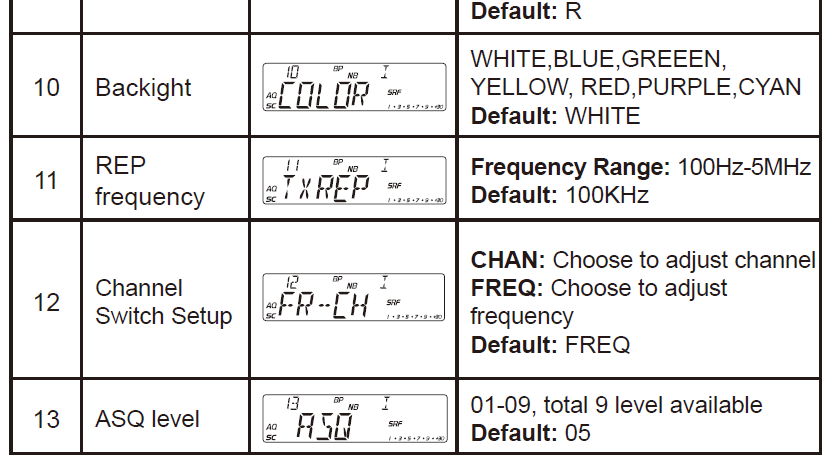
BACKGROUND FUNCTION MENU OPERATION
- Hold【MENU】for 2 seconds to enter the menu list;
- Turn the Channel switch to Ind menu No.1 to No.15;
- Press【PUSH】to choose the menu.
- Turn the channel switch to choose the desired value.
- Press【PUSH】to return to the previous menu, press any other key, or wait 5 seconds; the setting will be stored and exit.


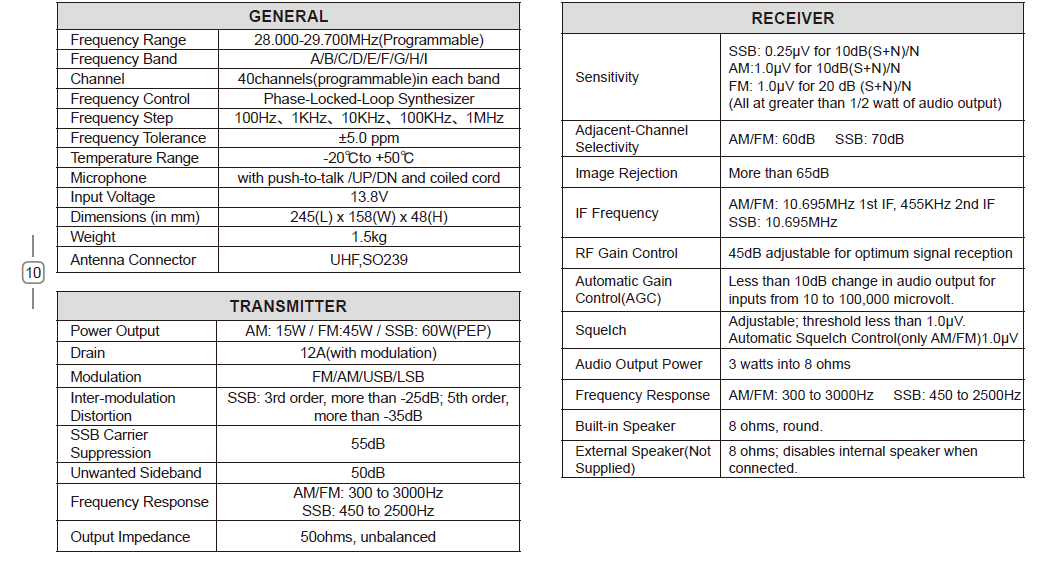
SPECIFICATIONS
For More Manuals By Anytone, Visit ManualsLibraryy.
AnyTone AT-6666 Two-Way 10 Meter Radio-FAQs,
What is the frequency range of the AnyTone AT-578?
The AT-D578UV Pro covers:
VHF: 136–174 MHz
UHF: 400–480 MHz
What is DMR radio?
DMR (Digital Mobile Radio) is a digital two-way radio standard allowing different brands to interoperate. It supports voice, text, and data.
What software programs the AnyTone AT-778UV?
Use the ATP-778UV software (Windows) for channel programming and settings.
What is the GMRS frequency range?
GMRS (General Mobile Radio Service) uses 462–467 MHz, with 30 channels available.
Why is my radio not powering on?
Possible causes:
Blown fuse
Loose/disconnected wiring
Dead battery
Faulty power supply
How do I reset my AnyTone radio?
Soft reset: Power cycle the radio.
Factory reset: Check the manual for menu-based reset options.
What’s the difference between kHz and MHz?
1 kHz = 1,000 Hz
1 MHz = 1,000 kHz
(Example: FM radio uses 88–108 MHz, while AM uses 530–1700 kHz)
How far can a 10-meter radio transmit?
Local range: 5–20 miles (depending on terrain & antenna)
Long-distance (via skip): Hundreds to thousands of miles
Can the AnyTone AT-6666 work with DMR?
No, the AT-6666 is analog-only (AM/FM/SSB). For DMR, consider the AT-D578UV Pro.

