
Breville BGR700 Sear and Press Grill
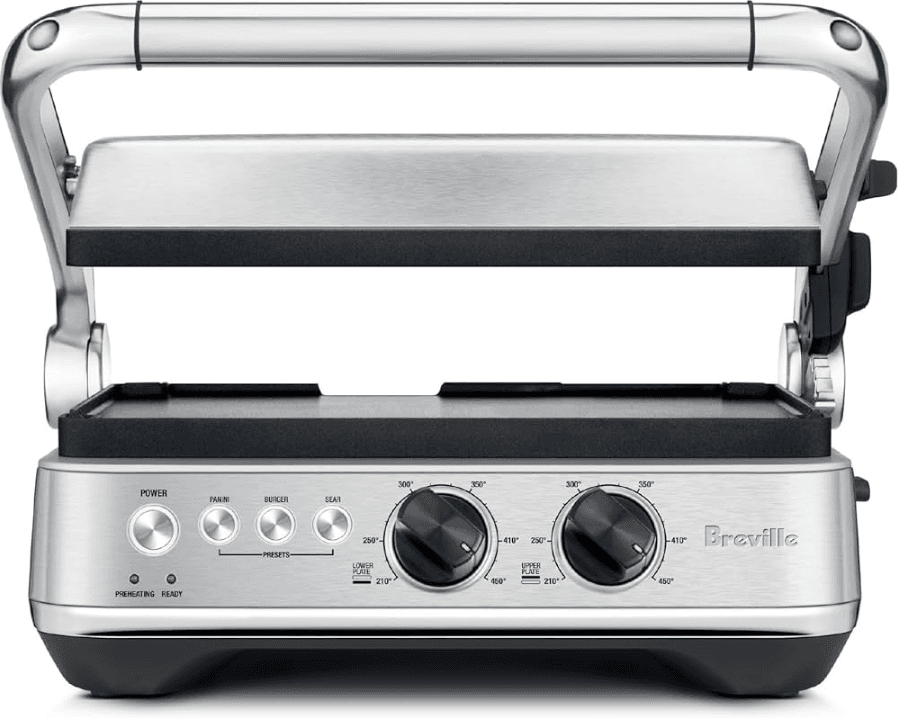
Components
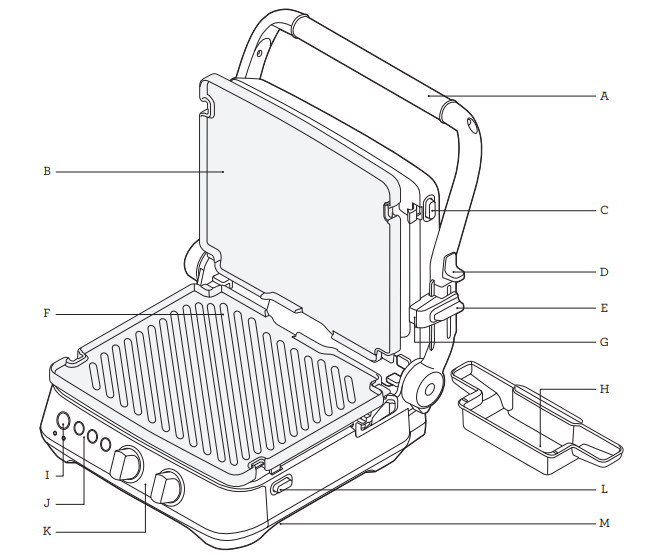
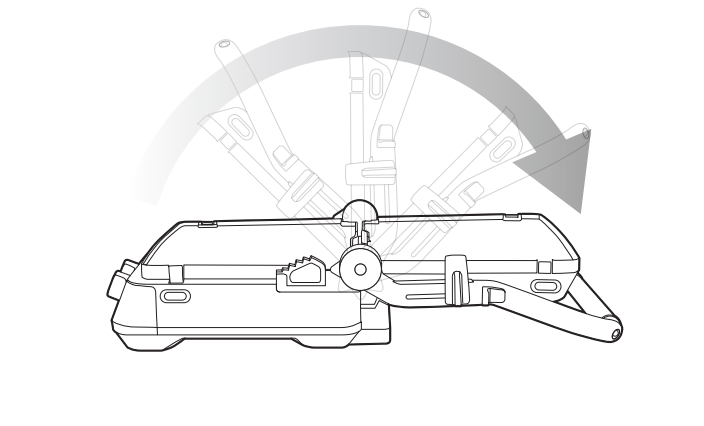
Open Flat BBQ Mode Opens flat into a 240 sq. inch grilling surface.
- Stainless Steel Handle With Die-Cast Arms.
- Ceramic, Reversible Non-Stick Plates Reversible Plates Coated in Ceramic Fusion HR for oil-free cooking and easy cleaning. PFOA and PTFE free.
- Top Plate Release Removes the top cooking plate. Independently remove the top and bottom cooking plates for easy cleaning or to interchange plate positions.
- BBQ Lock Release
- 6 Adjustable Height Settings Reduces the weight of the top plate on delicate foods or can be set high enough
for open melts. - Removable, Dishwasher Safe Plates Flat side for eggs and pancakes, ribbed side to sear meats
- Locking Storage Clip Locks the plates closed for upright storage.
- Integrated, Removable Drip Tray Catches excess fat for healthier cooking. In BBQ mode, the unique design drains fat from both plates into the same drip tray.
- POWER ON/OFF Button
- PANINI, SEAR AND BURGER settings
- Independent Plate Temperature Control
- Bottom Plate Release Removes the bottom cooking plate.Independently remove the top and bottom cooking plates for easy cleaning or to interchange plate positions.
- Cord Storage Located on the underside of the grill.
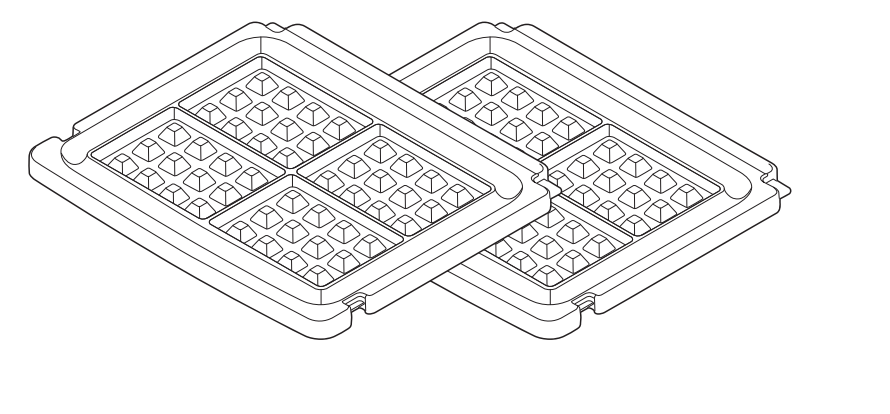
Waffle Plates Accessory (Sold Separately) Belgian waffle plates with premium non-stick coating – BGR001
 Assembly
BEFORE FIRST USE
- Remove and safely discard any packing material and promotional labels from the grill.
- Wipe the cooking plates and drip tray with a soft damp sponge. Dry thoroughly.
- Ensure the drip tray is correctly inserted into the grill.
- Ensure the cooking plates are correctly inserted and securely locked into position.
- Place the grill on a flat, dry surface. Ensure there is a minimum distance of 8 inches (20cm) of space on both sides of the appliance.
- Unwind the power cord completely and insert the power plug into a grounded wall outlet.
- The grill alert will sound and the POWER light will go on.
- Press the POWER button. The grill will beep and the POWER light wil go on. The grill is now ready for the preheating cycle.
- Always allow the grill to completely preheat to the selected temperature before cooking.
- The grill will beep twice when the plates have reached the chosen temperature.
HOW TO USE THE GRILL
The grill features 2 x PLATE RELEASE. These allow you to independently remove the top and bottom cooking plates for easy cleaning, or to interchange plate positions. To use the PLATE RELEASE:
- Always ensure the grill is completely cool.
- Use the handle to open the top plate to a 90 degree position.
- Use the ‘Plate Release’ on the front, right side of the top plate to remove the top cooking plate, and the ‘Plate Release’ on the right side of the control panel to remove the bottom cooking plate
- Once released, gently slide the plates off the grill.
- When using the grill as a contact grill or sandwich press, release the clip and simultaneously lift the handle
![]() NOTE
NOTE
When the grill is turned on and heating for the first time, it may emit a fine smoke haze. This is due to the protective substances on the heating elements. It is safe and not detrimental to the performance of the grill.
![]() WARNING
WARNING
Do not use spray-on, non-stick coatings as these will affect the performance of the non-stick cooking plates. Never use metal or sharp utensils as these can cause damage to the non-stick coating of the cooking plates
 Functions
USE AS A CONTACT GRILL OR PANINI PRESS
- Ensure the drip tray is correctly inserted into the grill.
- Ensure the cooking plates are correctly inserted and securely locked into position.
- Place the grill on a flat, dry surface. Ensure there is a minimum distance of 8″ (20cm) of space on both sides of the appliance.
- Unwind the power cord completely and insert the power plug into a grounded wall outlet.
- Press the POWER button. The grill alert will sound and the POWER light will go on.
- To preheat the grill:
- Ensure the top plate of the grill is closed. This will ensure faster, more efficient preheating.
- Turn the temperature dials to 450°F on both lower and upper plates. Alternatively, press the PANINI
or BURGER preset buttons for fast preheating. The grill will start to heat and the ‘PREHEATING’ red light will go ON. - Allow the grill to preheat.
- Once the grill has preheated to the selected temperature, the grill alert will sound and PREHEATING’ will no longer illuminate. The ‘READY’ light will go ON
- Place food on the bottom cooking plate.
- Use the handle to close the top cooking plate. The top cooking plate has two features designed to produce optimum cooking results:
- Floating top plate. The top cooking plate is hinged, allowing the top plate to be positioned horizontally on the food surface. This ensures the front of the food is as evenly cooked as the back. It also allows the top plate to float above the food surface, radiating heat to create open sandwich style ‘melts’.
- Adjustable height control. This feature reduces the weight of the top plate on delicate foods like fish and accommodates varying thicknesses of food like artisan breads. Located on the right side of the top plate, the clip fixes the top plate to a range of positions above the bottom plate. To set the adjustable height control, use the handle to lift the top plate and simultaneously move the adjustable height control clip to the desired height. Then slowly lower the top plate until it rests on the adjustable height control clip.
- When the food is cooked, remove from the cooking plates using heat proof plastic or wooden utensils.
USE IN OPEN FLAT BBQ MODE
The grill opens flat into a 240 sq. inch grilling surface. The ribbed cooking plate is perfect for searing meats while the flat cooking plate is ideal for eggs, pancakes and vegetables.
- Ensure the drip tray is correctly inserted into the grill.
- Ensure the cooking plates are correctly inserted and securely locked into position.
- Place the grill on a flat, dry surface. Ensure there is a minimum distance of 8 inches (20cm) of space on both sides of the appliance.
- Unwind the power cord completely and insert the power plug into a grounded wall outlet.
- Press the POWER button. The grill will beep and the POWER light wil go on.
- To preheat the grill:
- Ensure the top plate of the grill is closed. This will ensure faster, more efficient preheating. Turn the temperature dials to 450°F on both lower and upper plates. Alternatively, press the SEAR preset button for fast preheating. When using he SEAR preset, this will allow the plates to reach 500°F for 2 minutes
for a fast searing. After 2 minutes, the temperature of the grill will automatically adjust to 450°F. - The grill will start to heat and the ‘PREHEATING’ red light will go ON.
- c) Allow the grill to preheat.
- Ensure the top plate of the grill is closed. This will ensure faster, more efficient preheating. Turn the temperature dials to 450°F on both lower and upper plates. Alternatively, press the SEAR preset button for fast preheating. When using he SEAR preset, this will allow the plates to reach 500°F for 2 minutes
- Once the grill has preheated to the selected temperature, the grill alert will sound and ‘PREHEATING’ will no longer illuminate. The ‘READY’ green light will go ON.
- To open the grill into BBQ mode:
- Ensure the grill has completely preheated and the ‘PREHEATING’ red light is no longer illuminated.
- Ensure the top cooking plate is closed. The adjustable height control clip, located on the right side of the top plate, should be in the OPEN position
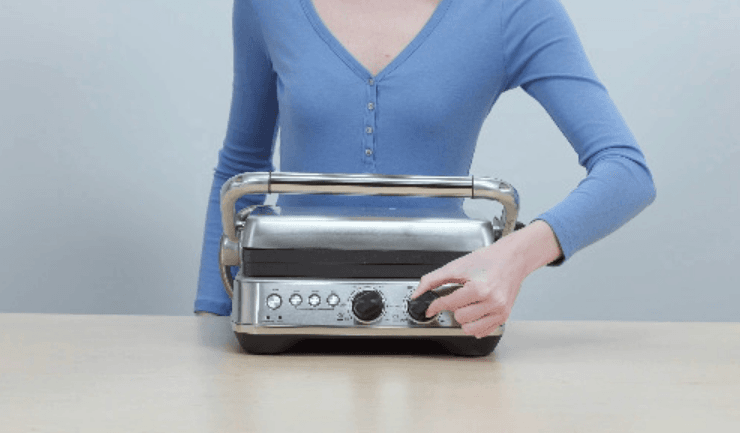
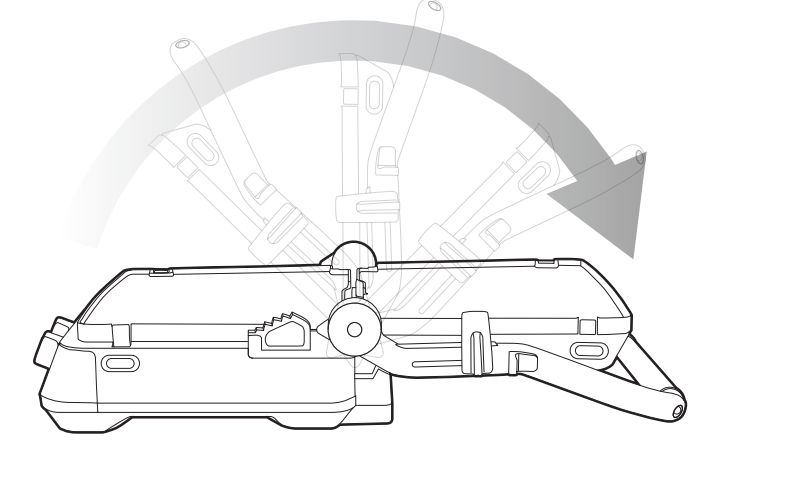
- With your left hand, grip the handle. With your right hand, pull the adjustable height control clip towards you, into the BBQ mode position. Continue to pull the clip forward and simultaneously lift the handle to open, then gently lower the top plate into the horizontal BBQ mode position

- Place food on either or both of the cooking plates. Refer to Grilling Tips (page 11).
- When the food is cooked, remove from the cooking plates using heat proof plastic or wooden utensils.
 Tips
Tips
GRILLING TIPS
Meats
Recommended cuts:
- Beef – Sirloin, New York, Rib Eye, Fillet.
- Lamb – Trim Lamb Leg Steaks, Fillet, Eye of Loin, Cutlets and Diced Lamb.
- Pork – Pork Chops, Tenderloin.
- It is not recommended to cook items with thick bones such as T-bone steaks.
- Tougher cuts such as flat iron steak, lamb forequarter or neck chops can be used. To tenderize these cuts, marinate them for a few hours or overnight in a marinade with wine or vinegar to help break down the connective tissue.
- If using a marinade recipe or pre-marinated meats from your meat retailer, drain excess marinade off and dab the meat with paper towels before placing on the grill. Some marinades contain high sugar levels which can scorch on the cooking plate.
- Do not salt meat before cooking. Salt will draw out the juices, toughening the meat.
- Do not pierce meat with a fork or cut meat while cooking. This will let the juices escape, resulting in a tougher, dry steak. Use silicon tongs instead.
- Do not over cook meat. Some meats are better served pink and juicy.
- Parboiling sausages can alleviate the need to pierce sausages before cooking.
- When removing fish pieces from the grill, use a flat heat resistant plastic spatula to support the food.
JUDGING DONENESS
There is an art to determining when your steak, lamb chop or cutlet is cooked to the correct degree of doneness rare, medium rare, medium, medium well or well done – but it is easily mastered with these handy hints and tips.
![]() NOTE
NOTE
USDA Recommended Internal Temperatures are as follows:
- Medium 145°F
- Medium Well 160°F
- Well Done 170°F
Rare
Cook for a few minutes per side, depending on thickness. Turn once only. Cook until steak feels very soft with back of tongs. A meat thermometer will show the internal temperature of a rare steak as 130–140°F (55–60°C).
Medium rare Cook on one side until moisture is just visible on top surface. Turn once only. Cook on the other side until surface moisture is visible. Steak will be cooked to medium rare when it feels soft with back of tongs. A meat thermometer will show the internal temperature of a medium rare steak as 140–150°F (60-65°C).
Medium
Cook on one side until moisture is pooling on top surface. Turn once only. Cook on second side until moisture is visible. Steak will be cooked to medium when it feels springy with back of tongs. A meat thermometer will show the internal temperature of a medium steak as 150–160°F (65–70°C).
Medium well
Cook on one side until moisture is pooling on top surface. Turn and cook on second side until moisture is pooling on top. Reduce heat slightly and continue to cook until steak feels firm with back of tongs. A meat thermometer will show the internal temperature of a medium well steak as 160–170°F (70–75°C).
Well done
Cook on one side until moisture is pooling on top surface. Turn and cook on second side until moisture is pooling on top. Reduce heat slightly and continue to cook until steak feels very firm with back of tongs. A meat thermometer will show the internal temperature of a well done steak as 170°F (75°C).
![]() NOTE
NOTE
Steaks do not need turning if cooking in contact position. Turn steaks once only when grilling in open flat BBQ mode.
PANINI SANDWICHES
For best cooking results when toasting paninis:
- Always place paninis on the center of the bottom plate.
- Toasting should take approximately 5–8 minutes. Exact toasting time will be a matter of preference and the type of bread and fillings used.
Bread
The grill is ideal for toasting most types of bread (white, wholemeal, kibbled wheat, wholegrain etc), as well as artisan breads (Focaccia, flat bread, baguettes, bread rolls, etc). Raisin bread, brioche or other sweet breads which contain high sugar content will tend to brown quicker.
Fillings
Try to use canned or pre-cooked fruit as fresh fruit may release excessive juices when heated. Be careful when biting into sandwiches containing fillings such as cheese and tomato or jam as they retain heat and can burn if eaten too quickly.
Toasting bread
The flat plate makes the grill ideal for toasting plain breads and flat bread, without any fillings or spreads. Try toasting flat bread for a great alternative to standard breads at breakfast.
Fat free snacks
Due to the non-stick flat plate, it is not necessary to use any butter or margarine on the outside of your toasted snacks.
 Care & Cleaning
Ensure the grill is turned OFF by pressing the POWER button. Remove the power plug from the wall outlet. Allow the grill to cool completely before disassembling and cleaning. Always clean the outer body, drip tray and cooking plates after each use to prevent a build-up of ingredients
![]() NOTE
NOTE
Do not use abrasive cleansers or metal scouring pads on any of the interior or exterior surfaces of the grill. These will scratch the surfaces and damage the non-stick coating on the cooking plates.
![]() WARNING
WARNING
Do not immerse the body, power cord or power plug in water or any other liquid as this may cause electrocution.
CLEANING THE OUTER BODY
Wipe the outer body with a soft, damp sponge. A non-abrasive liquid cleanser or mild spray solution may be used to avoid build-up of stains. Apply the cleanser to the sponge, not the grill surface, before cleaning. Rinse. Let all surfaces dry thoroughly prior to inserting the power plug into a wall outlet.
CLEANING THE DRIP TRAY
After each use, slide out the drip tray and discard contents. Wash the tray in warm soapy water with a soft, damp sponge. A non-abrasive liquid cleanser may be used to avoid build-up of stains. Apply the cleanser to the sponge,
not the tray, before cleaning. Rinse and dry thoroughly. Always ensure to re-insert the drip tray into the grill after cleaning and prior to inserting the power plug into a wall outlet.
![]() NOTE
NOTE
The drip tray can also be washed in a dishwasher.
![]() WARNING
WARNING
Extreme caution must be used when handling the drip tray containing hot fats and juices.
CLEANING THE COOKING PLATES
- Wipe the cooking plates with a soft cloth to remove food residue.
- Alternatively, release and remove the cooking plates:
- Always ensure the grill is completely cool.
- Use the handle to open the top plate to a 90 degree position.
- Use the PLATE RELEASE on the front, right side of the top plate to remove the top cooking plate, and the PLATE RELEASE on the right side of the control panel to remove the bottom cooking plate.
- Once released, gently slide the plates off the grill.
- Place the cooking plates in the dishwasher (top shelf only).
- Alternatively, wash the cooking plates in hot soapy water with a soft, damp sponge. A non-abrasive liquid cleanser may be used to avoid build-up of stains. Apply the cleanser to the sponge, not the plate, before cleaning. Remove stubborn residue with a non-abrasive plastic scouring pad or nylon washing brush.
- Rinse and dry thoroughly. Always ensure the cooking plates are correctly re-inserted and securely locked back into position after cleaning and prior to inserting the power plug into a wall outlet.
![]() NOTE
NOTE
Do not use abrasive cleansers or metal scouring pads to clean the cooking surface of the plates. These will damage the non-stick coating on the cooking plates.
STORAGE
- Ensure the grill is turned OFF by turning the temperature dial to the OFF position. Remove the power plug from the wall outlet.
- Allow the grill, cooking plates and drip tray to cool completely.
- Ensure the grill, cooking plates and drip tray are clean and dry.
- Ensure the drip tray is correctly re-inserted into the grill.
- Ensure the cooking plates are correctly re-inserted and securely locked into position.
- Ensure the cooking plates are locked together by sliding the adjustable height control clip to the LOCK position.
- Wrap the power cord in the cord storage located on the underside of grill.
- Store on a flat, dry, level surface. Alternatively, the grill may be stored in an upright position.
for more manuals by BREVILLE, visit ManualsLibraryy
How do I cook steak on the Breville Sear & Press Grill?
Preheat the grill until the green ‘READY’ light comes on. Place the steak on the hot plate and cook according to your preference: 4–5 minutes per side for rare, 5–6 minutes for medium-rare, and up to 8–10 minutes for well done.
Do I need to preheat the Breville grill before cooking?
Yes. Always preheat until the green ‘READY’ light illuminates. This ensures proper searing and even cooking.
Can I cook burgers on the Breville Sear & Press Grill?
Yes. Preheat the grill, place patties on the bottom plate, and allow the top plate to rest on them. Cook for about 4–5 minutes depending on thickness.
Can I grill bacon, eggs, or vegetables on it?
Absolutely. The grill can cook bacon, eggs, paninis, and vegetables like zucchini, eggplant, or capsicum for quick meals.
How do I clean the Breville Sear & Press Grill?
After each use, slide out the drip tray and empty it. Wash the tray in warm, soapy water with a soft sponge. For stubborn stains, use a mild non-abrasive cleanser applied to the sponge, not directly to the grill.
Is the Breville Sear & Press Grill dishwasher safe?
Yes. The removable drip tray and premium quick-release non-stick plates are dishwasher safe for easy cleaning.
How often should I clean the grill?
Clean the cooking plates and drip tray after every use to prevent build-up. A deeper clean may be done weekly if used frequently.
Do I need to use oil when cooking on the grill?
The non-stick plates usually don’t require oil. However, lightly brushing oil on food items can improve flavor and prevent sticking.
What does the green light on the grill mean?
The green light indicates that the grill has reached the proper cooking temperature and is ready to use.
What is the warranty on the Breville Sear & Press Grill?
The grill is backed by a 2-year manufacturer’s warranty covering defects in material and workmanship.

 Functions
 Tips
Tips Care & Cleaning