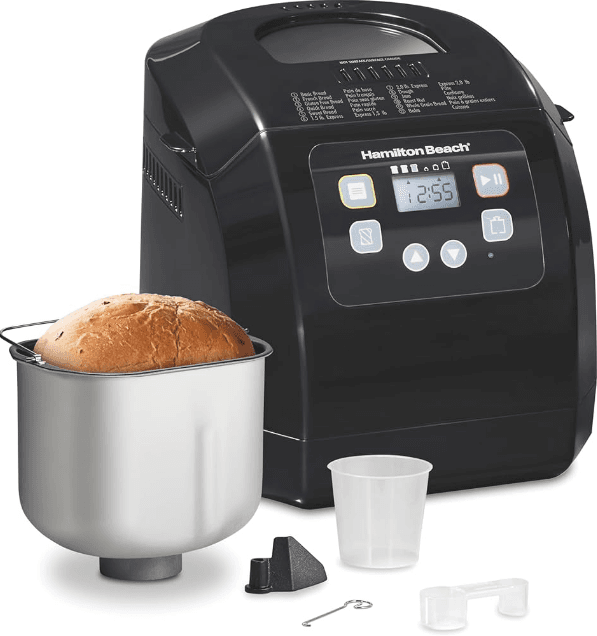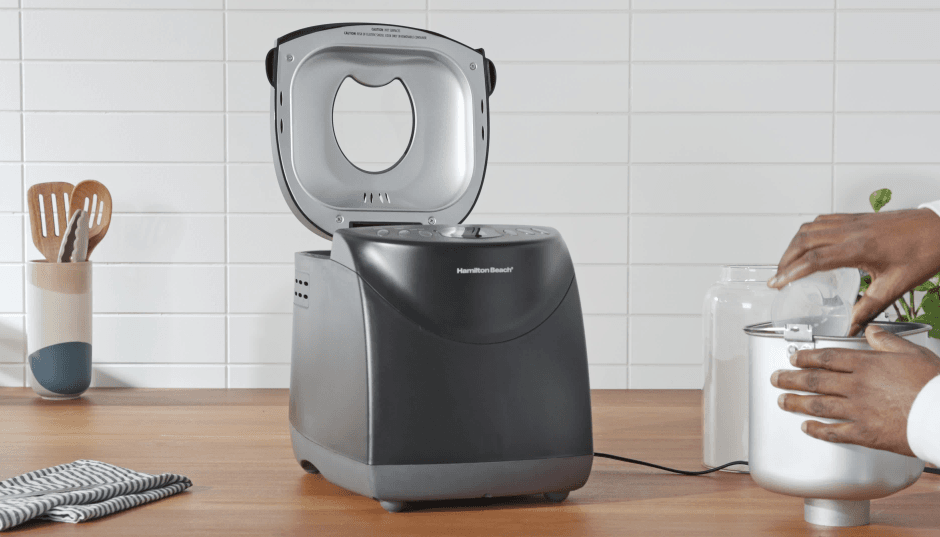
Hamilton Beach 29982 Artisan Bread Maker Machine

IMPORTANT SAFEGUARDS
When using electrical appliances, basic safety precautions should always be followed to reduce the risk of fire, electric shock, and/or injury to persons, including the following:
- Read all instructions.
- This appliance is not intended for use by persons (including children) with reduced physical, sensory, or mental capabilities or lack of experience and knowledge unless they are closely supervised and instructed concerning the use of the appliance by a person responsible for their safety.
- Close supervision is necessary when any appliance is used by or near children. Cleaning and user maintenance shall not be made by children unless they are supervised. Children should be supervised to ensure that they do not play with the appliance.
- Do not touch hot surfaces. Use handles or knobs. Always use oven mitts to handle a hot bread pan or hot bread.
- Avoid contact with moving parts.
- Do not put your hand inside the bread pan while the bread maker is mixing. Use a rubber spatula to scrape the sides of the pan.
- Do not put your hand inside the baking chamber after the bread pan is removed. The heating unit will still be hot.
- To protect against electrical shock, do not immerse cord, plug, or bread maker in water or other liquid.
- Unplug from outlet when not in use and before cleaning. Allow to cool before cleaning appliance and putting on or taking off parts.
- Do not operate any appliance with a damaged supply cord or plug, or after the appliance malfunctions or has been dropped or damaged in any manner. Supply cord replacement and repairs must be conducted by the manufacturer, its service agent, or similarly qualified persons in order to avoid a hazard. Contact Customer Service for information on examination, repair, or adjustment as set forth in the Limited Warranty.
- The use of accessory attachments not recommended by the appliance manufacturer may cause injuries.
- Do not use outdoors.
- Do not let the cord hang over the edge of the table or counter or touch hot surfaces.
- Do not place on or near a hot gas or electric burner or in a heated oven.
- Extreme caution must be used when moving an appliance containing hot oil or other hot liquids.
- To disconnect, turn all controls to off; then remove plug from wall outlet.
- Use extreme caution when removing the bread pan.
- To turn the bread maker off, press and hold the (start/pause) until it beeps. See the “Control Panel” section for more information.
- Do not place eyes or face in close proximity to a tempered safety glass door in the event that the safety glass breaks.
- Do not use the appliance for anything other than its intended use.
- Clean the interior carefully. Do not scratch or damage the eating element tube.
- Do not leave it unattended.
- Do not operate the appliance by means of an external timer or separate remote-control system.
CAUTION: HOT SURFACE. The temperature of accessible surfaces may be high when the appliance is operating.
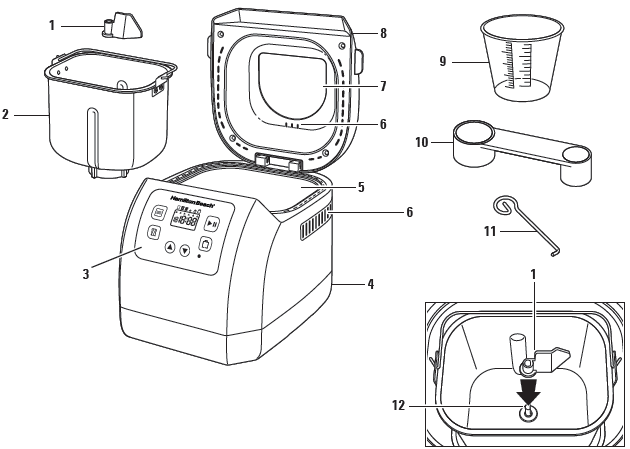
Parts and Features
- Kneading Paddle
- Nonstick Bread Pan
- Control Panel
- Base
- Baking Chamber
- Ventilation Holes
- Viewing Window
- Lid
- Measuring Cup
- Measuring Spoon
- Paddle Hook
- Drive Shaft
To order parts, visit: hamiltonbeach.com/parts
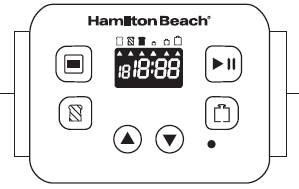
Control Panel
Menu
Press the Menu button to select your desired cycle. The corresponding cycle number is shown on the display.
Crust Color
Press the Crust Color button to move the arrow to the desired setting: (light), (medium), or (dark). Crust color is an option in cycles 1–7 and 11.
NOTES:
Set Delay Timer after selecting Cycle, Loaf Size, and Crust Color. The Delay Timer can be set on Cycles 1, 2, 5, and 11.
Do not use the Delay Timer with recipes that include dairy or other ingredients, such as eggs, milk, cream, or cheese.
Start/Pause
Press the start/pause button once to start a cycle. A short beep will be heard, “:” will begin to flash, and the cycle will start. To pause a cycle, press the start/pause button, and the display will flash. If the start/pause button is not pressed again within 10 minutes to restart the cycle, the cycle will cancel.
To cancel a cycle, press and hold the start/pause button. Bread Maker will beep and automatically turn off.
Loaf Size
Press the loaf size button to move the arrow to 1.0 lb. (454 g),1.5 lb. (680 g), or 2.0 lb. (907 g) loaf size. Loaf size is an option in cycles 1, 2, 5, and 11.
Delay Timer
Use the Delay Timer feature to start the Bread Maker at a later time. Press the up and down buttons to adjust the cycle time shown on the display. Add up to 15 hours, including delay time and breadmaking cycle.
Power Interruption
In event of a power outage, the process of making bread will continue automatically if power is restored within 10 minutes. If dough has started rising, discard ingredients in Bread Pan and start over. If dough has not entered rising phase, you can press start/pause button to continue cycle from beginning.
Warm
After baking cycle is complete, machine will beep 10 times and shift to Warm setting for 1 hour. Unplug when not in use. To cancel Warm setting, press and hold start/pause button until it beeps.
Tip: Removing the bread immediately after the baking cycle is complete will prevent the crust from becoming darker.
Program Cycles
Tips:
- Use a rubber spatula to scrape the sides of the pan while the Bread Maker is mixing to ensure all ingredients are blended.
- Remove the Bread Pan from the Bread Maker when the cycle is complete. Let the Bread Pan cool for 5 to 10 minutes on a wire cooling rack before removing the bread, and let the quick bread cool 10 minutes before removing it to a wire cooling rack.
- Basic Bread For white and mixed breads consisting mainly of basic bread flour.
- French Bread For light breads made from fine flour. Normally, bread is fluffy and has a crispy crust. This is not a suitable setting for recipes requiring butter, margarine, or milk.
- Gluten-Free Bread For gluten-free breads and mixes.
- Quick Bread: For packaged quick breads or quick-bread recipes that do not use yeast for rising and instead may use baking powder or soda. It kneads, rises, and baking in less time than yeast bread. Tip: Spray Pan with nonstick cooking spray before adding ingredients for easy removal of baked Quick Bread.
- Sweet Bread For breads with yeast and additives such as fruit juices, grated coconut, raisins, dry fruits, chocolate, or added sugar. Due to a longer phase of rising, bread will be light and airy.
- 1.5 lb. (680 g) Express Kneading, rising, and baking occurs. Bread will be heavier and not as high as bread in other cycles.
- 2.0 lb. (907 g) Express Same as 1.5 lb. (680 g) Express except cycle takes longer.
- Dough This cycle prepares yeast dough for buns, pizza crust, etc., to be baked in a conventional oven. There is no baking in this cycle.
- Jam For making jams with fresh fruit.
- Roast Nut For roasting nuts or making a roasted nuts recipe.
- Whole Grain Bread For breads with heavy varieties of flour that require a longer phase of kneading and rising (whole wheat flour, rye flour). Bread will be more compact and heavy.
- Bake Bread can be baked with this cycle; or use when additional baking of breads is needed because a loaf is too light or not baked through. There is no kneading or resting.
Care and Cleaning
WARNING Electrical Shock Hazard.
Disconnect the power before cleaning. Do not immerse cord, plug, or housing in any liquid. Allow the bread maker to cool down completely before cleaning.
To Clean Kneading Paddle: If Kneading Paddle is difficult to remove from Bread Pan, add water to bottom of Bread Pan and allow to soak for up to 1 hour. Wipe Paddle carefully with a damp cloth. Kneading Paddle is dishwasher-safe.
To clean Bread Pan: Carefully lift up Bread Pan Handle and turn Bread Pan counterclockwise; then pull Pan out of Bread Maker. Wipe inside and outside of Bread Pan with a damp cloth. Do not use any abrasive agents, in order to protect nonstick coating. Bread Pan must be dried completely before installation.
NOTE: The Bread Pan, Kneading Paddle, Measuring Cup, Measuring Spoon, and Paddle Hook are dishwasher-safe. Outside of Bread Pan and Base may discolor. This is normal.
To clean Base and Lid: After use, unplug and allow the unit to cool. Use a damp cloth to wipe the Lid, Base, Baking Chamber, and interior of Viewing Window. Do not use any abrasive cleaners for cleaning, since this will degrade high polish of surface. Never immerse Base into water for cleaning.
Before the Bread Maker is packed for storage, ensure that it has completely cooled down, is clean and dry, and the Lid is closed.
Frequently Asked Questions
May I use a sugar substitute in place of sugar?
Sugar is necessary for yeast to produce a light loaf with a good height. Results may vary with the type and amount of sugar substitute used.
May I omit salt or sugar from the recipe?
No, both sugar and salt play an important role in the breadmaking process. Salt prevents yeast from overreacting and bread from overrising. A combination of sugar, salt, and yeast is a key part of the breadmaking process. Remember that total sugar and salt amounts are divided among all the slices, so the amount of sugar and salt per serving is small.
When do I add raisins, nuts, etc., to bread?
For add-ins (nuts, raisins), the machine will beep 12 times. Open the Lid and pour in your add-ins.
Can I open the Lid while the Bread Maker is operating?
This Bread Maker is designed with a window in the Lid to let you watch your bread’s progress. Quick checks are OK in the early stages of kneading and adding ingredients when the beep sounds. Use a rubber spatula to scrape the sides of the pan while the Bread Maker is mixing to ensure all ingredients are blended. However, the temperature in the Baking Chamber adjusts for the rising and baking stages. Opening the Lid during these steps could cause the loaf to fall or not bake properly. Sometimes, condensation forms on the Window after initial mixing and kneading. It usually disappears once the baking cycle starts, so you should be able to get a clear view of your loaf.
What if bread dough looks dry and lumpy?
Add the same liquid as in recipe 1 teaspoon at a time and mix before adding more. Dough should cleanly pull away from the Bread Pan sides.
What if the bread dough looks too wet?
Add the same flour as in recipe 1, tablespoon at a time, and mix a few minutes before adding more. Dough should cleanly pull away from the Bread Pan sides.
Can I use my favorite bread recipes in my Bread Maker?
Yes, but you will need to experiment to get the right proportion of ingredients. Become familiar with the unit and make several loaves of bread with the recipes provided before you begin experimenting. Never exceed a total amount of 4 1/2 cups (540 g) of dry ingredients (that includes flours, oats, cornmeal, etc.). Use the recipes in this book to help determine the ratio of dry ingredients to liquid and amounts of yeast, sugar, salt, and butter/margarine to use.
What will happen if I leave bread in the Bread Pan after baking?
This unit has a 1 hour Warm setting that lets you leave bread in pan for up to an hour after baking is complete. Once Warm setting is over, it is best to remove bread immediately or bottom of your loaf will absorb moisture and become soggy.
Can the recipe be cut in half?
No, it is not recommended. Ingredient proportions work better in full amounts.
How can bread mixes be used in the machine, and at what setting?
The package instructions will list the amount of water and amount of yeast to use. Be sure to add the liquid, then the dry ingredients, followed by the yeast. Do not allow yeast to sit in liquid. Bread type setting is dependent upon type of bread mix being used (i.e., White bread uses Basic bread setting; Sweet Bread setting is for use with dried fruit, cheese, or nuts; whole-wheat or multigrain should use Whole Grain setting; Crust setting, either Light, Medium, or Dark, is a personal preference). Do not use bread mixes that exceed 2 lb. (907 g) loaf size.
What is the difference between American flour and Canadian Flour?
Canadian flour has a higher protein or gluten content than American flour. You can substitute US flour in even amounts for Canadian flour. However, Canadian flour may absorb more moisture. Check your dough during the first kneading cycle. If it appears dry, you may add up to 1 tablespoon (15 g) of additional water per cup of flour in the recipe. Add water 1 tablespoon (15 g) at a time until the desired consistency of a soft and supple dough is reached.
Limited Warranty
We exclude all claims for special, incidental, and consequential damages caused by the breach of express or implied warranty. All liability is limited to the amount of the purchase price. Every implied warranty, including any statutory warranty or condition of merchantability or fitness for a particular purpose, is disclaimed except to the extent prohibited by law, in which case such warranty or condition is limited to the duration of this written warranty. This warranty gives you specific legal rights. You may have other legal rights that vary depending on where you live. Some states or provinces do not allow limitations on implied warranties or special, incidental, or consequential damages, so the foregoing limitations may not apply to you.
To make a warranty claim, do not return this appliance to the store. Please write Hamilton Beach Brands, Inc., Customer Service Department, 4421 Waterfront Dr., Glen Allen, VA 23060, or visit hamiltonbeach.com/customer-service in the U.S. or hamiltonbeach.ca/customer-service in Canada. For faster service, locate the model, type, and series numbers on your appliance.
For more Manuals by Hamilton Beach, visit ManualsLibraryy
Hamilton Beach 29982 Artisan Bread Maker Machine-FAQs
What does “HHH” mean on my Hamilton Beach bread maker?
“HHH” indicates the bread pan is too hot. Unplug the unit, open the lid, and let it cool completely before restarting.
How can I reset the bread maker?
If the unit won’t turn on, unplug it, wait a few seconds, and plug it back in to reset.
How long does the sandwich maker take to cook?
You can make a hot, ready-to-eat breakfast sandwich in about 5 minutes using eggs, cheese, pre-cooked meat, and your favorite bread.
How long can I delay the baking process?
The delay timer allows you to set baking to begin up to 15 hours in advance, with a 1-hour keep-warm function after baking.
Why does the bread maker display “rest”?
This is part of the whole wheat setting, allowing the flour to absorb water properly for better texture and flavor.
What temperature should the water be when using the bread maker?
Use water at 80°F (27°C) for optimal dough consistency.
How do I clean my Hamilton Beach bread toaster?
Turn the toaster on its side, open the crumb tray, brush out crumbs, wipe with a damp cloth, and dry. For tough spots, use a plastic scouring pad with sudsy water.
What does the 1–4 cup option do on the coffee maker?
This setting adjusts the brew cycle for smaller batches, ensuring 1 to 4 cups are as flavorful as a full 12-cup pot. The bold setting enhances extraction for richer flavor.


