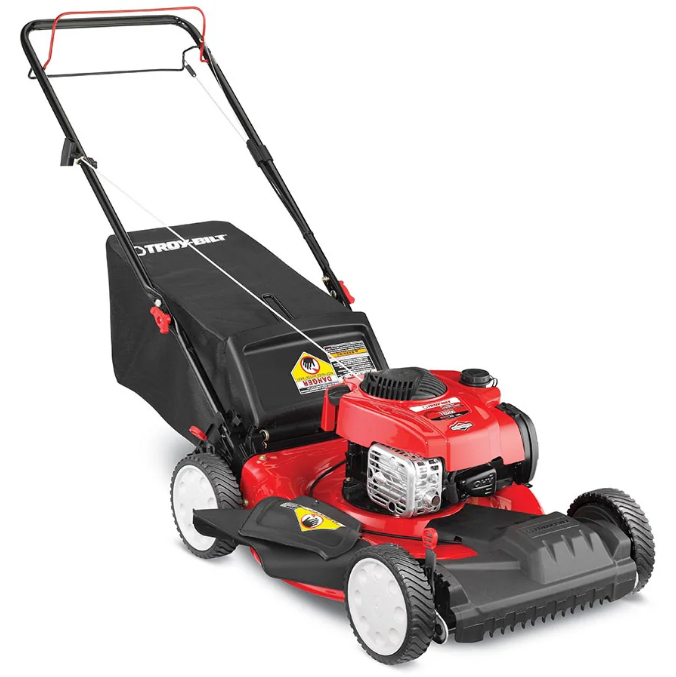
Troy-Bilt TB200 Self Propelled Lawn Mower
Assembly & Set-Up
Contents of Carton
- One Lawn Mower
- One Grass Catcher
- One Bottle of Oil
- One Lawn Mower Operator’s Manual
- One Engine Operator’s Manual
- One-Side Discharge Chute
Assembly
Handle
- Remove any packing material that may be between the upper and lower handles.
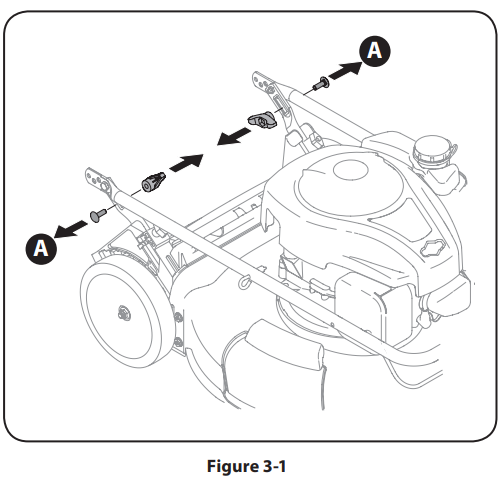
- a. Remove wing nuts and carriage bolts from the handle as shown in Figure 3-1. Do not loosen or remove adjacent hex head screws.

- b. While stabilizing the mower so it doesn’t move, pivot the upper handle up as shown in Figure 3-2. Do not crimp the cable while lifting the handle up.

- a. Remove wing nuts and carriage bolts from the handle as shown in Figure 3-1. Do not loosen or remove adjacent hex head screws.
- Remove the T-bolts from the handle brackets, as shown in Figure 3-3
 .
. - Follow the steps below to complete the handle assembly:
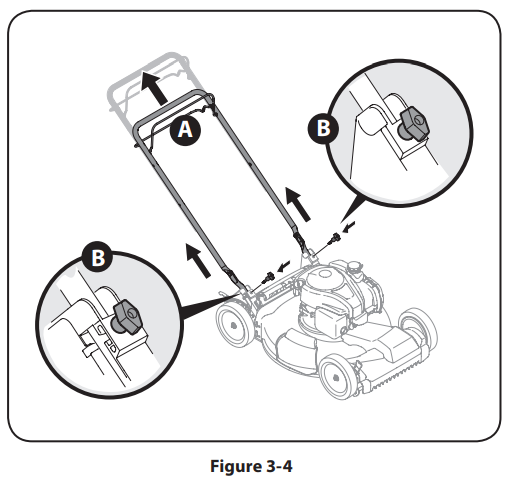
- a. Pull upward on the handle until the holes in the lower handle (shown in Figure 3-3 deck cutaway) line up with the holes in the handle bracket. See Figure 3-4.

- b. Insert the T-bolts removed earlier through the handle brackets and lower handle and tighten securely to secure the handle in place. See Figure 3-4.
- c. Reattach wing nuts and carriage bolts removed earlier into the lower holes of the handle as shown in Fig. 3-5.

- a. Pull upward on the handle until the holes in the lower handle (shown in Figure 3-3 deck cutaway) line up with the holes in the handle bracket. See Figure 3-4.
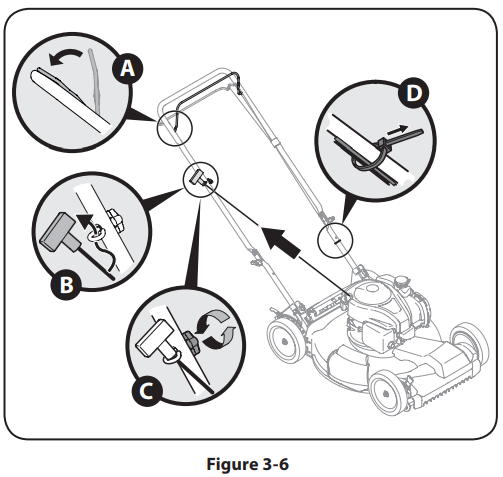
- The rope guide is attached to the right side of the upper handle. Loosen the wing knob, which secures the rope guide. See Figure 3-6.

- a. Hold the blade control against the upper handle.
- b. Slowly pull the starter rope handle from the engine and slip the starter rope into the rope guide. See Figure 3-6.
- c. Tighten the rope guide wing knob.
- d. Use cable tie(s) to secure cable(s) to the lower handle.
Grass Catcher
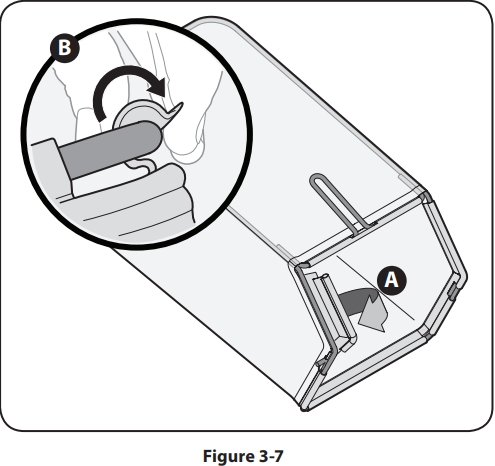
- Follow the steps below to assemble the grass catcher (if needed). Make certain the bag is turned right side out before assembling (the warning label will be on the outside).
- a. Place the bag over the frame so that its black plastic side is at the bottom.
- b. Slip the plastic channel of the grass bag over the hooks on the frame. See Figure 3-7.

- Follow the steps below to attach the grass catcher:
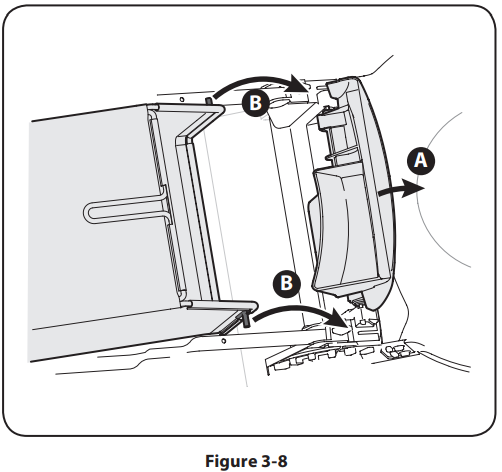
- a. Lift rear discharge door.
- b. Place the grass catcher into the slots in the handle brackets as shown in Figure 3-8. Let go of the discharge door so that it rests on the grass catcher.

To remove the grass catcher, lift the rear discharge door on the mower. Lift the grass catcher up and off the slots in the handle brackets. Release the rear discharge door to allow it to close the rear opening of the mower.
Side Discharge Chute
Your mower is shipped as a mulcher. To convert to side discharge, ensure the grass catcher is removed from the unit and the rear discharge door is closed.
- On the side of the mower, lift the side mulching plug. See Figure 3-9.

- Slide two hooks of the side discharge chute under the hinge pin on the mulching plug assembly. Lower the mulching plug. Do not remove the side mulching plug at any time, even when you are not mulching.
Adjustments
Cutting Height
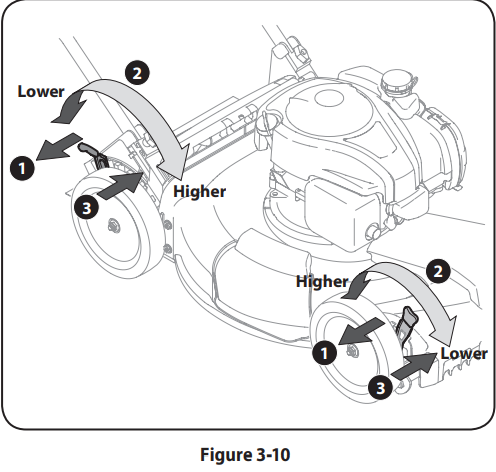
There is a cutting height adjustment lever located above the front and rear right wheel.
- Pull the height adjustment lever towards the wheel (unit will tend to fall when lever is moved outward).
- Move the lever to the desired position for a change in cutting height. See Figure 3-10.

- Release the lever towards the deck.
Handle Pitch
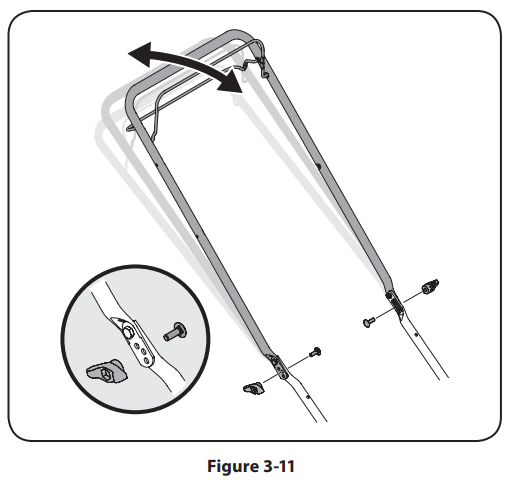
For the convenience of operation, you may adjust the pitch of the handle as follows:
- Remove wing nuts and carriage bolts from the handle. See Figure 3-11.

- Position the handle in one of the three positions that is most comfortable. See Figure 3-11 inset.
- Secure into position with wing nuts and carriage bolts removed earlier.
Set-Up
Gas and Oil Fill-Up
Refer to the separate engine owner’s manual for additional engine information.
- Add the oil provided before starting the unit for the first time out of the box.
- Service the engine with gasoline as instructed in the separate engine owner’s manual.
- Charge battery as instructed in the Service section of this manual (Electric Start Units).
Controls & Features
Blade Control
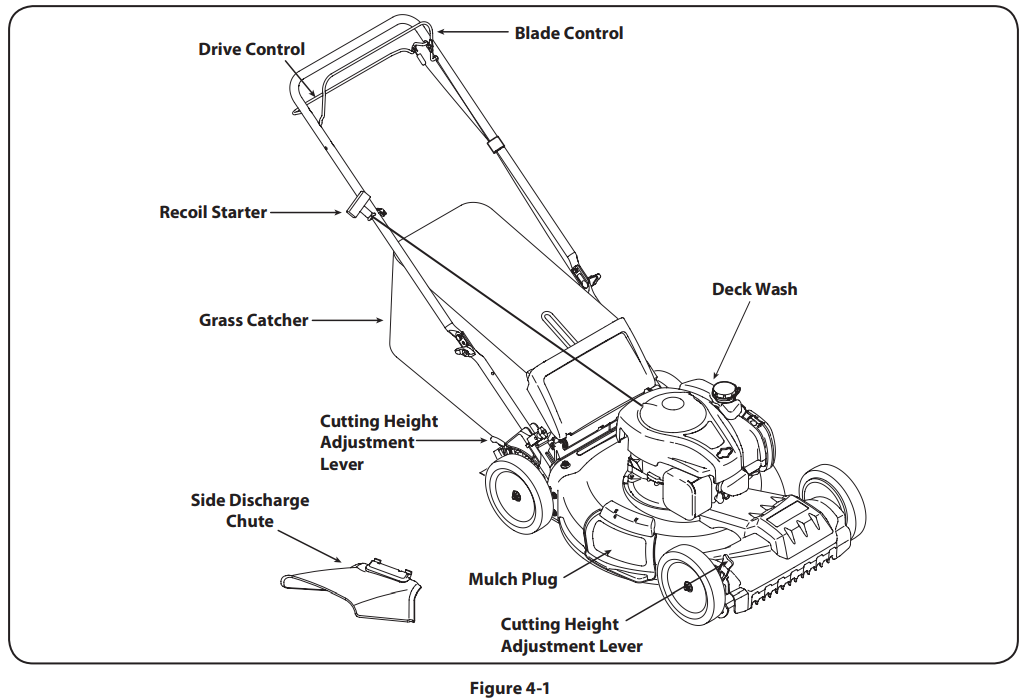
The blade control is attached to the upper handle of the mower. Depress and squeeze it against the upper handle to operate the unit. Release it to stop the engine and blade.
Drive Control
The drive control is located on the underside of the upper handle and is used to engage the drive. Squeeze it against the upper handle to engage the drive; release it to slow down or stop the mower from propelling.
Cutting Height Adjustment Lever
One adjustment lever is located on the right rear wheel, and one is located on the right front wheel. Both levers have to be at the same relative position to ensure a uniform cut. To adjust the cutting height, refer to the “Assembly & Set-Up” Section.
Deck Wash
Your mower’s deck may be equipped with a water port on its surface as part of its deck wash system. Use the deck wash to rinse grass clippings from the deck’s underside.
Side Discharge Chute
Your mower is shipped as a mulcher. To discharge the grass clippings to the side instead, follow the instructions in the “Assembly & Set-Up” section to attach the side discharge chute.
Recoil Starter
The recoil starter is attached to the right upper handle. Stand behind the unit and pull the recoil starter rope to start the unit.
Electric Starter Button (If Equipped)
The electric starter button is located on the right side of the upper handle. It is used only for the electric starter.
Operation
Starting Engine
Refer to the engine manual for help with the engine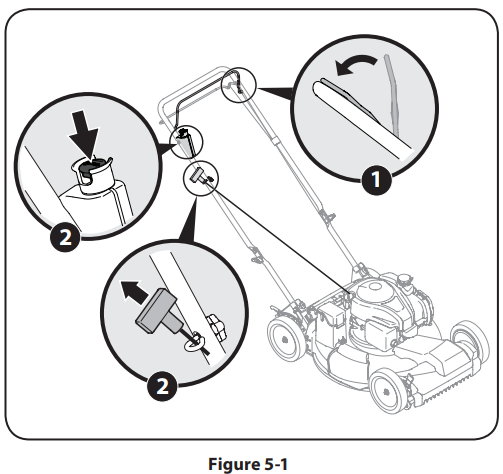
- Standing behind the mower, squeeze the blade control against the upper handle. See Figure 5-1.
- Recoil Start: Holding these two handles together firmly, grasp the recoil starter handle and pull the rope out with a rapid, continuous, full arm stroke. See Figure 5-1. Keeping a firm grip on the starter handle, let the rope rewind slowly. Repeat until the engine cranks. Let the rope rewind slowly each time. Electric Start (If Equipped): Insert the plastic push key into the starter button until it snaps in. Push the electric starter button to start the engine. See Figure 5-1.
Stopping Engine
- Release the blade control to stop the engine and blade.
Using Your Lawn Mower
Be sure the lawn is clear of stones, sticks, wire, or other objects that could damage the lawn mower or engine. Such objects could be accidentally thrown by the mower in any direction and cause serious personal injury to the operator and others.
- Once the engine is running, squeeze the drive control against the upper handle to propel the mower.
Using as a Mulcher
For mulching grass, remove the grass catcher and allow the rear discharge door to close the rear opening of the mower. For effective mulching, do not cut wet grass. If the grass has been allowed to grow in excess of four inches, mulching is not recommended. Use
The grass catcher to the bag instead.
Using Grass Catcher
You can use the grass catcher to collect clippings while you are operating the mower.
- Attach the grass catcher following the instructions in the “Assembly & Set-Up” section. Grass clippings will automatically collect in the bag as you run the mower. Operate the mower till the grass bag is full.
- Stop the engine completely by releasing the blade control. Make sure that the unit has come to a complete stop.
- Lift the discharge door and pull the grass bag up and away from the mower to remove the bag. Dispose of the grass clippings and reinstall the bag when complete.
Maintenance & Adjustments
Maintenance
General Recommendations
- Always observe safety rules when performing any maintenance.
- The warranty on this lawn mower does not cover items that have been subjected to operator abuse or negligence. To receive full value from the warranty, the operator must maintain the lawn mower as instructed here.
- Changing of engine-governed speed will void the engine warranty.
- All adjustments should be checked at least once each season.
- Periodically check all fasteners and make sure these are tight.
Lubrication
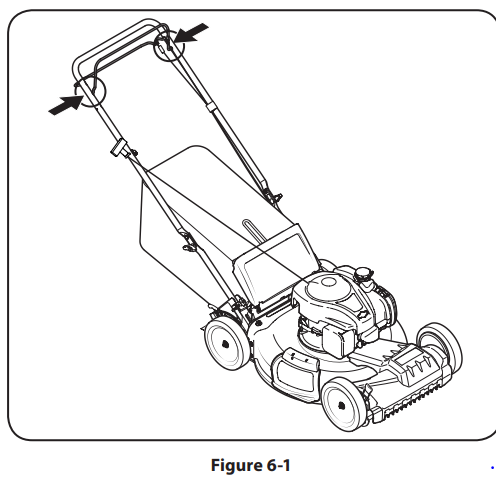
- Lubricate pivot points on the blade and drive controls at least once a season with light oil. These controls must operate freely in both directions. See Figure 6-1.

- The transmission is pre-lubricated and sealed at the factory and does not require lubrication.
- Follow the accompanying engine manual for the lubrication schedule and instructions for engine lubrication.
Deck Care
Clean the underside of the mower deck after each use to prevent the build-up of grass clippings or other debris. Follow the steps below for this job.
- Disconnect the spark plug wire. Drain gasoline from the lawn mower or place a piece of plastic under the gas cap.
- Tip the mower so that it rests on the housing. Keep the side with the air cleaner facing up. Hold the mower firmly.
- Scrape and clean the underside of the deck with a suitable tool.
- Put the mower back on its wheels on the ground. If you had put plastic under the gas cap earlier, make sure to remove it now.
Deck Wash
Your mower’s deck may be equipped with a water port on its surface as part of its deck wash system. Use the deck wash to rinse grass clippings from the deck’s underside and prevent the buildup of corrosive chemicals. Complete the following steps AFTER EACH MOWING:
- Push the mower to a level, clear spot on your lawn, near enough for your garden hose to reach.
- Thread the hose coupler (packaged with your mower’s Operator’s Manual) onto the end of your garden hose.
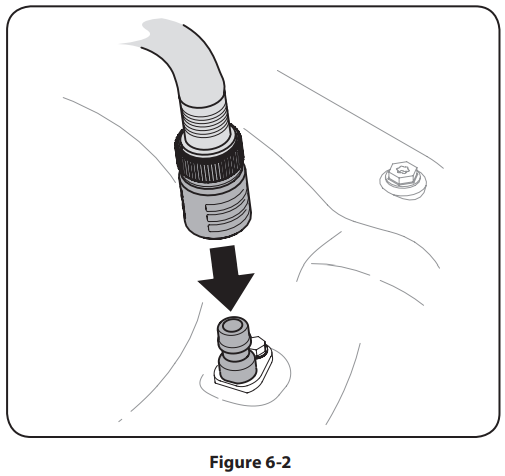
- Attach the hose coupler to the water port on your deck’s surface. See Figure 6-2.

- Turn the water on.
- Start the engine as described in the Operation section.
- Run the engine for a minimum of two minutes, allowing the underside of the cutting deck to thoroughly rinse.
- Release the blade control to stop the engine and blade.
- Turn the water off and detach the hose coupler from the water port on your deck’s surface.
After cleaning your deck, restart the mower. Keep the engine and blade running for a minimum of two minutes, allowing the underside of the cutting deck to thoroughly dry.
Engine Care
A list of key engine maintenance jobs required for good performance by the mower is given below. Follow the accompanying engine manual for a detailed list and instructions.
- Maintain oil level as instructed in the engine manual.
- Service the air cleaner every 25 hours under normal conditions. Clean every few hours under extremely dusty conditions. Poor engine performance and flooding usually indicate that the air cleaner should be serviced. To service the air
cleaner, refer to the engine manual. - Clean the spark plug and reset the gap once a season. Spark plug replacement is recommended at the start of each mowing season. Check the engine manual for the correct plug type and gap specifications.
- Clean the engine regularly with a cloth or brush. Keep the top of the engine clean to permit proper air circulation. Remove all grass, dirt, and combustible debris from the muffler area.
- Engines stored between 30 and 90 days need to be treated with a gasoline stabilizer such as STA-BIL® to prevent deterioration and gum from forming in the fuel system or on essential carburetor parts.
Service
Blade Care
Periodically inspect the blade adapter for cracks, especially if you strike a foreign object. Replace when necessary. Follow the steps below for blade service.
- Disconnect the spark plug boot from the spark plug. Turn the mower on its side, making sure that the air filter and the carburetor are facing up (not pointed toward the ground).
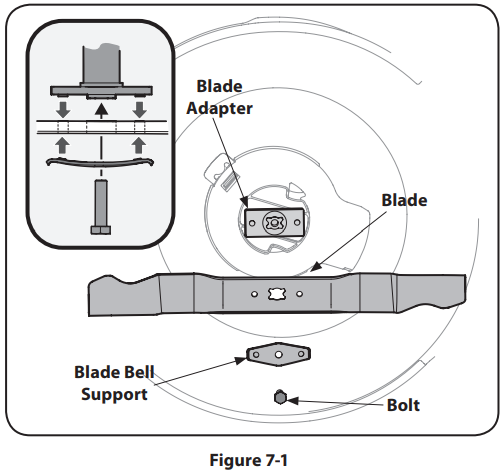
- Remove the bolt and the blade bell support that hold the blade and the blade adapter to the engine crankshaft. See Figure 7-1.

- Remove the blade and adapter from the crankshaft. See Figure 7-1.
- Remove the blade from the adapter for testing balance. Balance the blade on a round shaft screwdriver to check. Remove metal from the heavy side until it balances evenly. When sharpening the blade, follow the original angle of grind. Grind each cutting edge equally to keep the blade balanced.
- Lubricate the engine crankshaft and the inner surface of the blade adapter with light oil. Slide the blade adapter onto the engine crankshaft. Place the blade on the adapter such that the side of the blade marked “Bottom” (or with part number) faces the ground when the mower is in the operating position. Make sure that the blade is aligned and seated on the blade adapter flanges. See Figure 7-1 inset.
- Place the blade bell support on the blade. Align notches on the blade bell support with small holes in the blade.
- Replace the hex bolt and tighten the hex bolt to a torque: 450 in. lbs. min., 600 in. lbs. max.
To ensure safe operation of your mower, periodically check the blade bolt for correct torque.
Belt Care
Replacing Battery (If Equipped)
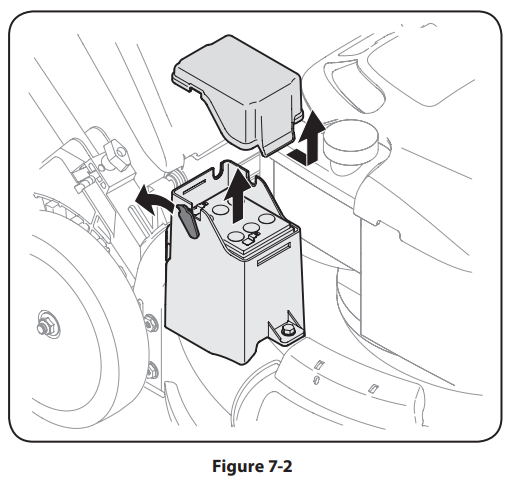
- Unhinge the cover seal and lift off the battery cover.
- Remove positive and negative leads from the battery, and pull up on the battery to remove it. See Figure 7-2.

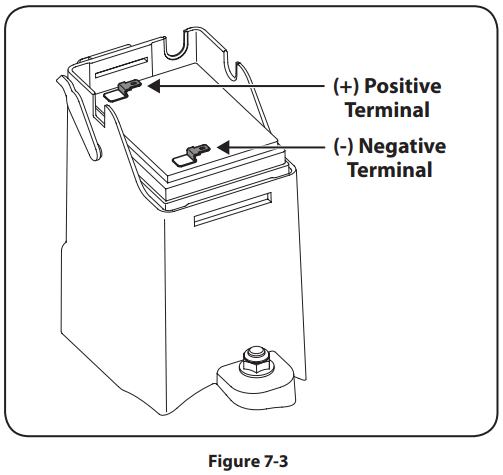
- Replace with a new battery. Connect the positive lead (red) to the positive side of the battery pack, then connect the negative lead (black) to the negative side. See Figure 7-3.

- Reattach the battery cover and cover seal
Charging Battery (If Equipped)
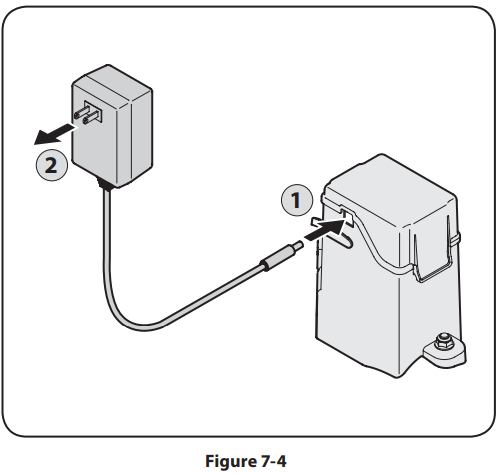
- Unhinge the cover seal and plug the battery charger into the port on the side of the battery housing. See Figure 7-4.

- Insert the battery charger plug into a standard 120-volt household outlet. Charge battery for 8 to 10 hours before initial use. Do not charge longer than 12 hours. The battery should only need to be charged upon initial setup, at the end of the season, after any other extended periods of non-use, and as needed. NOTE: If you frequently stop and restart the mower during each cut throughout the season (for instance, when bagging), more frequent charging may be necessary.
- After charging, disconnect the charger plug from the outlet first, then disconnect the charger lead from the battery and reattach the cover seal.
Replacing Fuse (If Equipped)
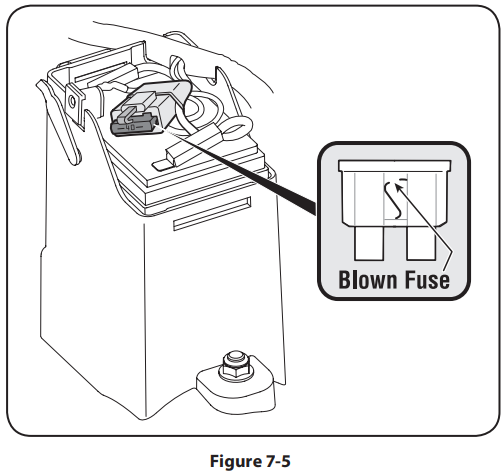
The electric starter circuit and battery are protected by a 40-ampere fuse. If the fuse burns out, the electric starter will not operate. If the unit fails to start with the electric starter, perform the following steps to check the fuse inside the battery housing:
- Open the battery cover as described in Replacing Battery.
- Remove the fuse from the socket and inspect as shown in Figure 7-5. If it is burned out, replace it with a standard automotive 40-ampere fuse.

- Carefully place the wiring back into the housing, and reattach the battery cover
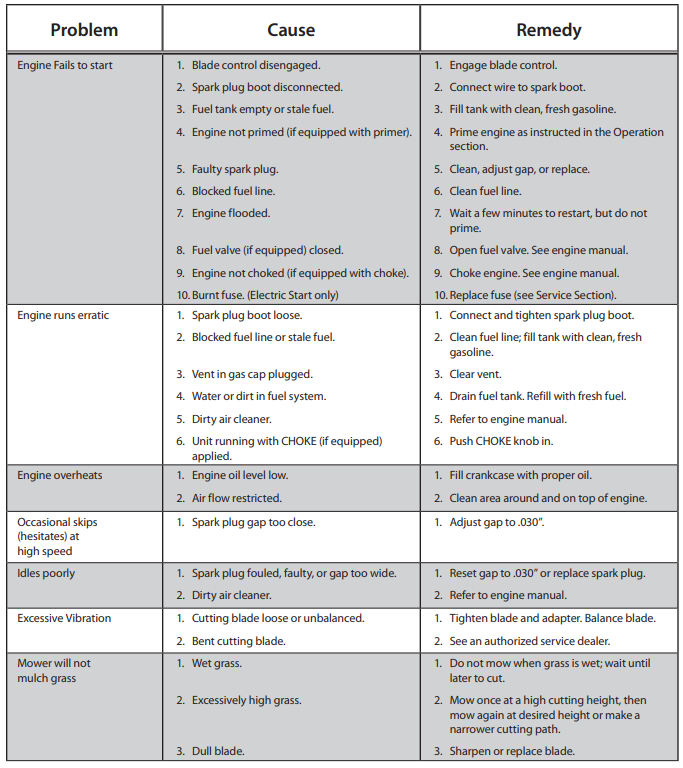
Troubleshooting

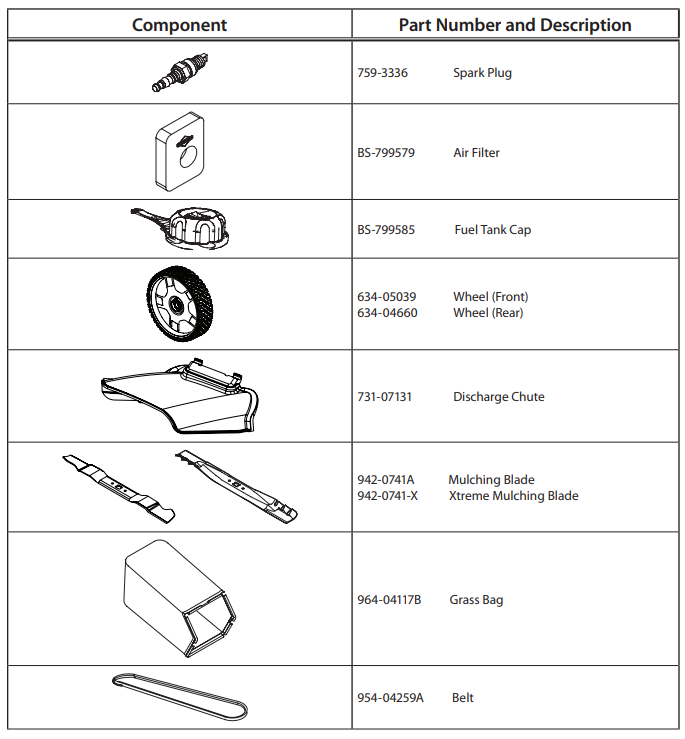
Replacement Parts
FOR MORE MANUALS BY Troy-Bilt, VISIT MANUALSLIBRARYY
Troy-Bilt TB200 Self Propelled Lawn Mower-FAQs
How do I use a self-propelled lawn mower like the Troy-Bilt TB200?
Engage the drive control handle while pushing the mower forward. The self-propelled system will assist in moving, reducing the effort needed.
Where can I find the Troy-Bilt TB200 user manual?
You can download the operator’s manual for free from the Troy-Bilt website by entering your model and serial number.
What is the cutting height range of the Troy-Bilt TB200?
The mower offers a 6-position dual-lever adjustment, allowing cutting heights from 1.25 inches to 3.75 inches.
How do I start the Troy-Bilt TB200?
Check fuel and oil levels, press the primer bulb if equipped, set the choke, and pull the starter rope. Ensure the drive control is disengaged before starting.
Why won’t my Troy-Bilt TB200 start?
Common reasons include low or stale fuel, dirty air filter, spark plug issues, or the brake not being engaged. Always use fresh fuel for best performance.
What type of engine powers the Troy-Bilt TB200?
It is equipped with a reliable 140cc Briggs & Stratton EX 550 Series™ engine.
What kind of oil does the Troy-Bilt TB200 require?
Use SAE 5W-30 or SAE 10W-30 oil depending on your climate. The oil capacity is about 18–20 ounces.
Can I manually push the Troy-Bilt TB200 if needed?
Yes, you can push it like a standard mower even if the self-propelled feature is not engaged.


 .
.