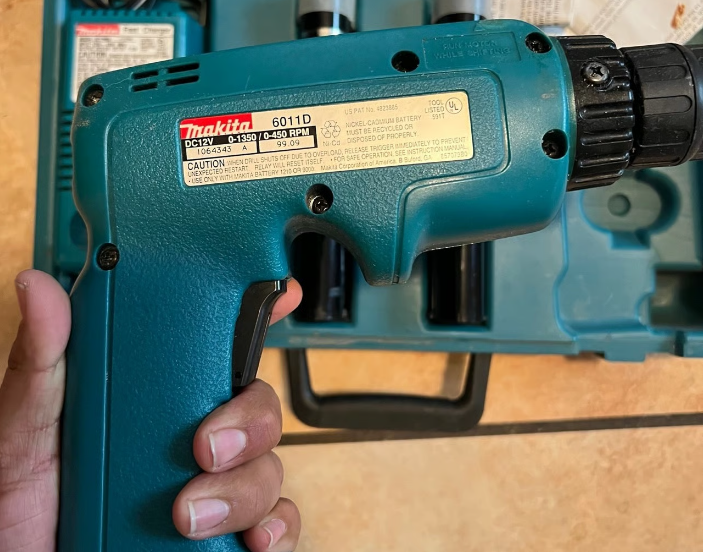
Makita 6011D Cordless Drill Machine
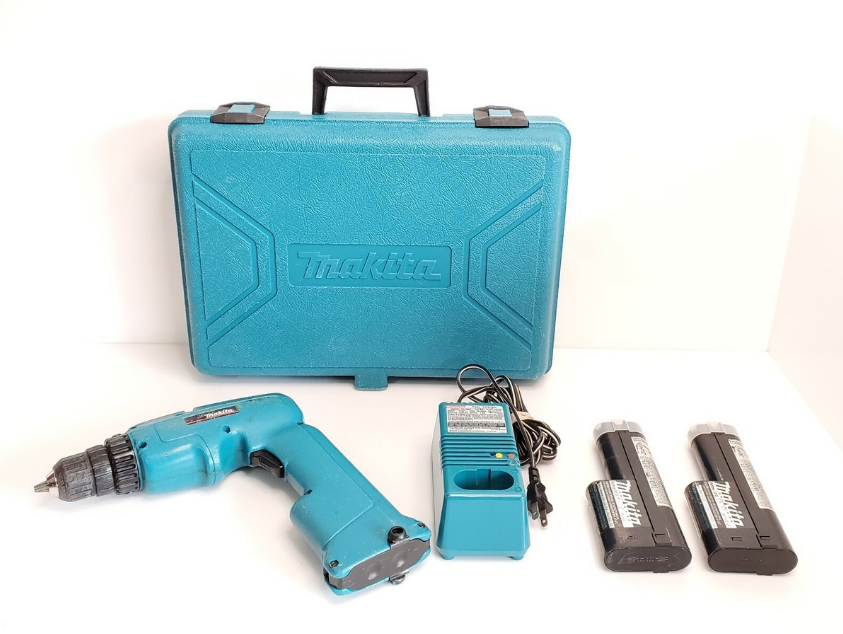
IMPORTANT SAFETY INSTRUCTIONS
- KEEP WORK AREA CLEAN. Cluttered areas and benches invite injuries. CONSIDER WORK AREA ENVIRONMENT. Don’t use power tools in damp locations. Keep the work area well-lit. Don’t expose power tools to rain.
- Don’t use the tool in the presence of flammable liquids or gases.
- KEEP CHILDREN AWAY. All visitors should be kept away from the work area.
- Don’t let visitors contact the tool or extension cord.
- STORE IDLE TOOLS. When not in use, tools should be stored in a dry, high, or locked-up place – out of reach of children.
- DON’T FORCE TOOL. It will do the job better and safer at the rate for which it was intended.
- USE THE RIGHT TOOL. Don’t force a small tool or attachment to do the job of a
heavy-duty tool. Don’t use the tool for a purpose not intended. - DRESS PROPERLY. Don’t wear loose clothing or jewelry. They can be caught in moving parts. Rubber gloves and non-skid footwear are recommended when working outdoors. Wear a protective hair covering to contain long hair.
- USE SAFETY GLASSES. Also, use an ace or dust mask if the cutting operation is
dusty. - DON’T ABUSE THE CORD. Never carry a tool by the cord or yank it to disconnect from the receptacle. Keep cord from heat, oil, and sharp edges.
- SECURE WORK. Use clamps or a vise to hold work. It’s safer than using your hands to operate the tool.
- DON’T OVERREACH. Keep proper footing and balance at all times. MAINTAIN TOOLS WITH CARE. Keep tools sharp and clean for better and safer performance.
- Follow instructions for lubricating and changing accessories. Inspect tool cords periodically and if damaged, have them repaired by an authorized service facility.
- Inspect extension cords periodically and replace them if damaged. Keep handles dry, clean, and free from oil and grease.
- DISCONNECT TOOLS. When not in use, before servicing, and when changing accessories, such as blades, bits, and cutters.
Installing or removing a battery cartridge
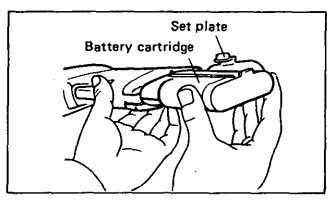
- Always switch off the tool before insertion or removal of the battery cartridge.
- To remove the battery cartridge, pull out the set plate on the tool and grasp both
sides of the cartridge while withdrawing it from the tool. - To insert the battery cartridge, align the tongue on the battery cartridge with the
groove in the housing and slip it into place. Snap the set plate back into place. Be sure to close the set plate fully before using the tool. - Do not use force when inserting the battery cartridge. If the cartridge does not slide in easily, it is not being inserted correctly.
Charging
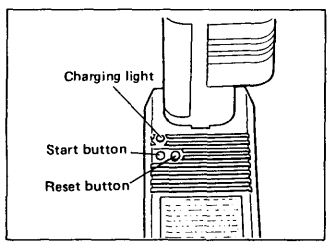
- Plug the fast charger into your power source. Insert the battery cartridge so that the plus and minus terminals on the battery cartridge are on the same sides as their respective markings on the fast charger.
- Insert the cartridge fully into the port so that it rests on the charger port floor.
- Press the start button (red). The charging light will come on, and charging will begin.
- If the charging light does not come on, press the reset button (yellow) first, then
the start button (red). If the charging light goes out within 10 seconds even after pressing the reset button and start button a couple of times, the battery cartridge is dead. (CAUTION: Wait for more than 5 seconds after the charging light goes out to press the reset button again.) Replace it with a new one. - When the charging light goes out after about one hour, you may remove the fully charged battery cartridge.
- After charging, unplug the charger from the power source.
CAUTION :
- Your new battery cartridge is not charged. You will need to charge it before use.
- Do not keep the button pressed in with tape, etc., or the circuit will not function properly. Also, a malfunction of the charger may result possibly causing overheating, etc.
- If you try to charge a cartridge from a just-operated tool, sometimes the charging light will not come on. If this occurs, let the cartridge cool off for a while. Then reinsert it and try to charge it once more.
- When you charge a new battery cartridge or a battery cartridge that has not been used for a long period, it may not accept a full charge. This is a normal condition and does not indicate a problem. You can recharge the battery cartridge fully after discharging it almost completely a couple of times.
- If you wish to charge two battery cartridges, allow 15 minutes between chargings on the fast charger.
Installing or removing driver bit or dirll bit
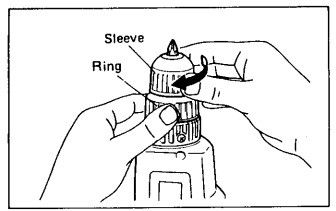
Hold the ring and turn the sleeve counterclockwise to open the chuck jaws. Place the bit in the chuck as far as it will go. Hold the ring firmly and turn the sleeve clockwise to tighten the chuck. To remove the bit, hold the ring and turn the sleeve counterclockwise.
Storage of driver bit
When not using the driver bit, keep it in the storage cavity on the tool.
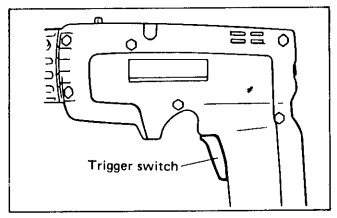
Switch action
Tool speed is increased by increasing pressure on the trigger. To start the tool, simply pull the trigger. Release the trigger to stop.
Reversing switch action
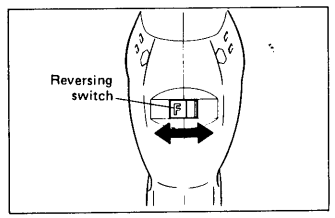
This tool has a reversing switch to change the direction of rotation. Slide the reversing switch to the right for clockwise rotation or to the left for counterclockwise.
Speed change
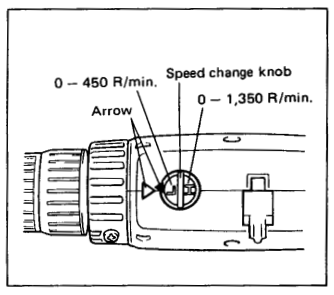
To change the speed, turn the speed change knob 180′ while the tool is running. Be sure that the speed change knob is turned to the correct speed setting before you begin operation. See the arrow indication. Use the right speed for the job.
Adjusting fastening torque
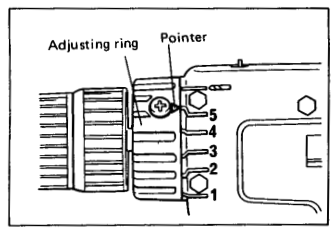
The fastening torque can be adjusted in six stages by turning the adjusting ring so that the pointer on the adjusting ring points to a number on the tool body. The fastening torque is minimum when the pointer points to the number 1 and maximum when it points to the -8- marking. The clutch will slip at varying torque levels when the pointer is set at the numbers 1 to 5. The crutch is designed not to slip at the Speed change knob 0 – 450 Rlmin. o – 1,350 Rlmin. Before the actual operation, drive a trial screw into your material or a piece of duplicate material to determine which torque level is required for a particular application.
Screwdriving operation
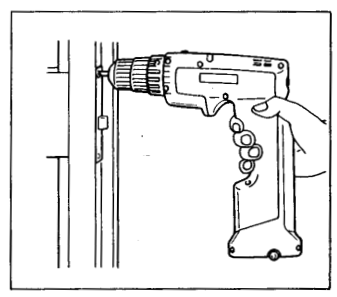
Place the point of the driver bit in the screw head and apply pressure to the tool. Start the tool slowly and then increase the speed gradually. Release the trigger as soon as the clutch cuts in.
- When driving wood screws, predrill Pilot holes to make driving easier and to prevent splitting of the workpiece. See the chart
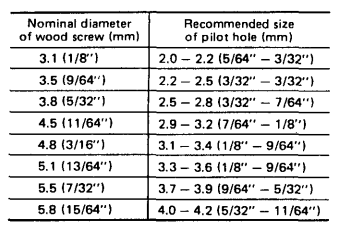
Drilling operation
- Drilling in wood. When drilling in wood, the best results are obtained with wood drills equipped with a guide screw. The guide screw makes drilling easier by pulling the bit into the workpiece.
- Drilling in metal. To prevent the bit from slipping when starting a hole, make an indentation with a center punch and hammer at the point to be drilled. Place the point of the bit in the indentation and start drilling. Use a cutting lubricant when drilling metals. The exceptions are iron and brass, which should be drilled dry.
MAINTENANCE
To maintain product SAFETY and RELIABILITY, repairs, maintenance, or adjustment
should be performed by Makita Authorized or Factory Service Centers, always using
Makita replacement parts.
ACCESSORIES
CAUTION :
These accessories or attachments are recommended for use with your Makita tool specified in this manual. The use of any other accessories or attachments might present a risk of injury to persons. The accessories or attachments should be used only in the proper and intended manner.
Bits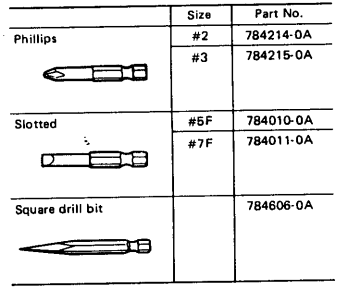
Rubber ped assembly Part No. 123001-2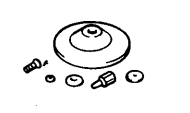
Wool bonnet Part No. 743401-6
Foam polishing pad Part No. 743023-2
Fast charger Model DCl290 Part No. 113119-108
Battery cartridge 1210 Part No. 632277-5
Battery cover Part No. 414938-7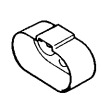
Battery holster. Holster holds extra battery. Part No. 823033-3C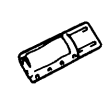
Plastic carrying case Part No. 824401-6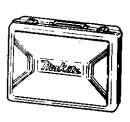
FOR MORE MANUALS BY MAKITA, VISIT MANUALSLIBRARYY
Makita 6011D Cordless Drill Machine-FAQs
How do I maintain my Makita cordless drill?
Check for wear, clean off dust and debris, lubricate moving parts, tighten loose screws, and always store the drill in a cool, dry place.
How is the power of a cordless drill measured?
Power is based on battery voltage. Higher voltage means more torque and better performance for tougher jobs.
What do the settings on a Makita drill mean?
The settings control speed and torque. Low speed/high torque is for driving screws, while higher speeds are for drilling holes efficiently.
What is the function of a cordless drill?
It’s mainly used for drilling holes and driving screws, powered by rechargeable batteries for portable and flexible use.
How do I know when my Makita drill battery is fully charged?
The charger’s indicator light will show a steady green light when the battery is fully charged and ready to use.
What voltage is best for a cordless drill?
For light DIY work, 10.8V–12V is sufficient. For heavy-duty tasks, 18V or higher is recommended.
What is a good torque level for drilling?
For general household tasks, 5–15 Nm is enough, while tougher jobs may require up to 30 Nm or more.
How long does it take to charge a Makita drill battery?
With a rapid charger, most Makita lithium-ion batteries take about 45–60 minutes to fully charge.

