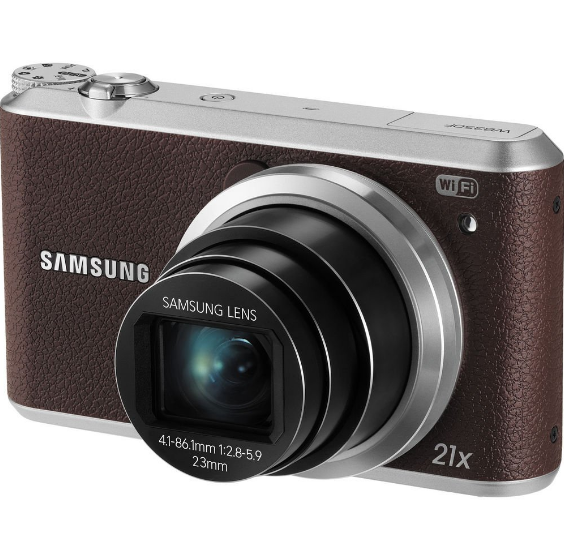
Samsung WB350F 16MP Digital Camera
Health and safety information
Always comply with the following precautions and usage tips to avoid dangerous situations and ensure peak performance of your camera.
Warning—situations that could cause injury to yourself or others
- Do not disassemble or attempt to repair your camera.
- You can damage the camera and expose yourself to the risk of an electric shock.
- Do not use your camera near flammable or explosive gases and liquids.
- This may cause a fire or explosion.
- Do not insert flammable materials into the camera or store these materials near the camera.
- This may cause a fire or electric shock.
- Do not handle your camera with wet hands.
- This may result in an electric shock.
- Prevent damage to the subjects’ eyesight.
- Do not use the flash in close proximity (closer than 1 m/3 ft) to people or animals.
- If you use the flash too close to your subject’s eyes, this can cause temporary or permanent eyesight damage.
- Keep your camera away from small children and pets.
- Keep your camera and all accessories out of the reach of small children and animals.
- Small parts may cause choking or serious injury if swallowed. Moving parts and accessories may present physical dangers as well.
- Do not expose the camera to direct sunlight or high temperatures for an extended period of time.
- Prolonged exposure to sunlight or extreme temperatures can cause permanent damage to your camera’s internal components.
Unpacking
The following items are included in your product box.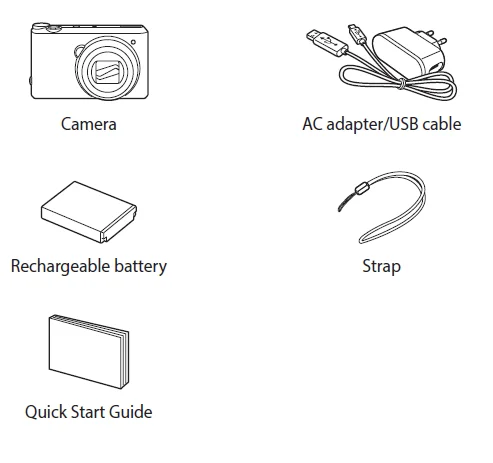
Optional accessories
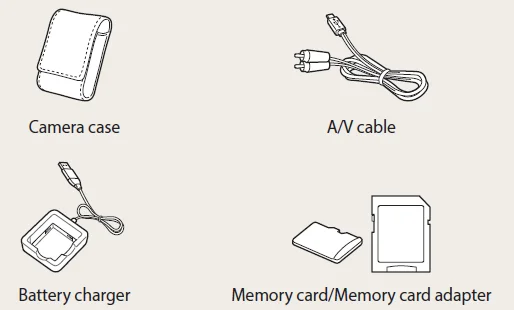
- The illustrations may differ slightly from the items shipped with your product.
- The items included in the box may differ depending on the model.
- You can purchase optional accessories at a retailer or a Samsung service center. Samsung is not responsible for any problems caused by using unauthorized accessories.
Camera layout
Before you start, familiarize yourself with your camera’s parts and their functions.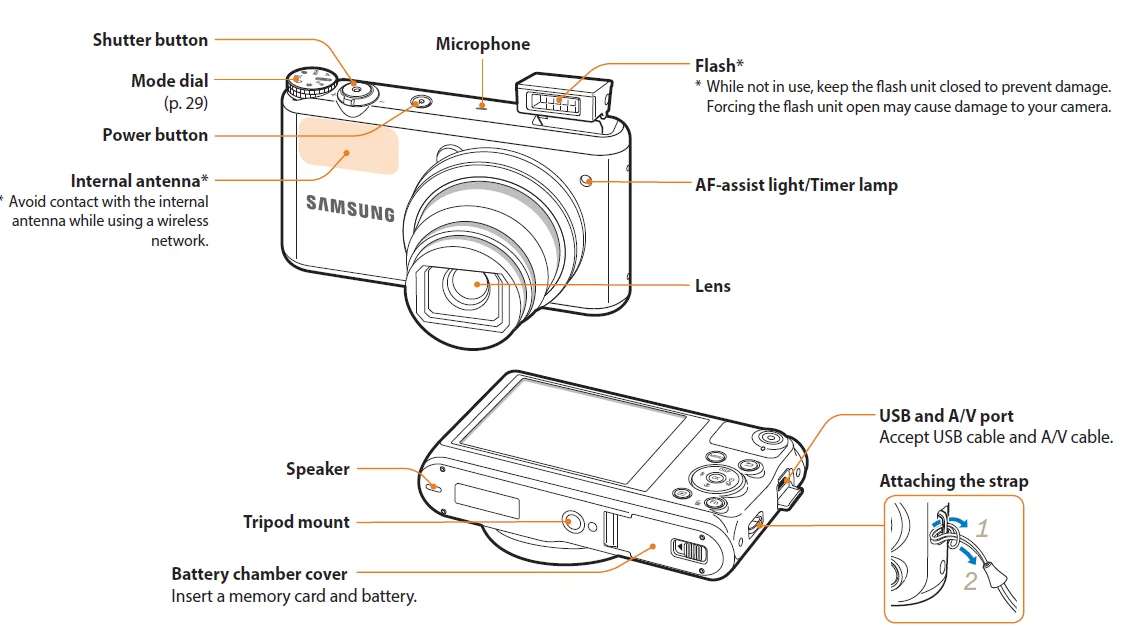
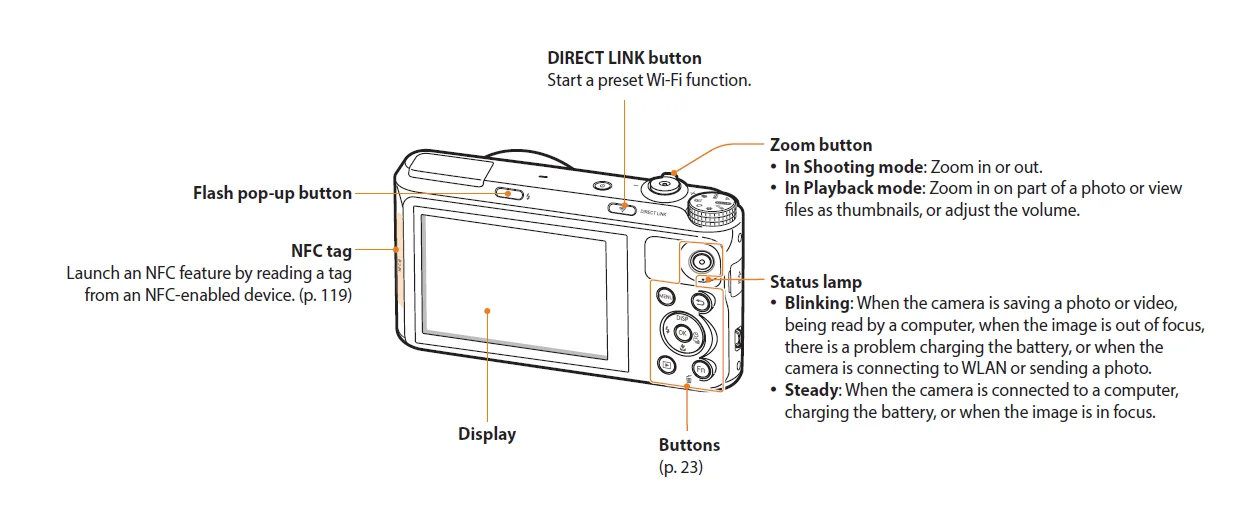
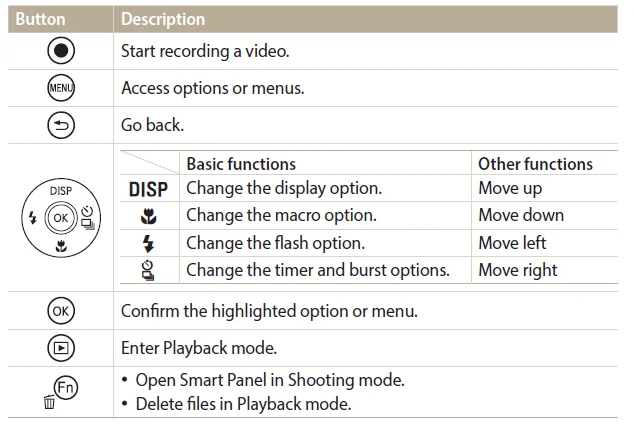
Buttons
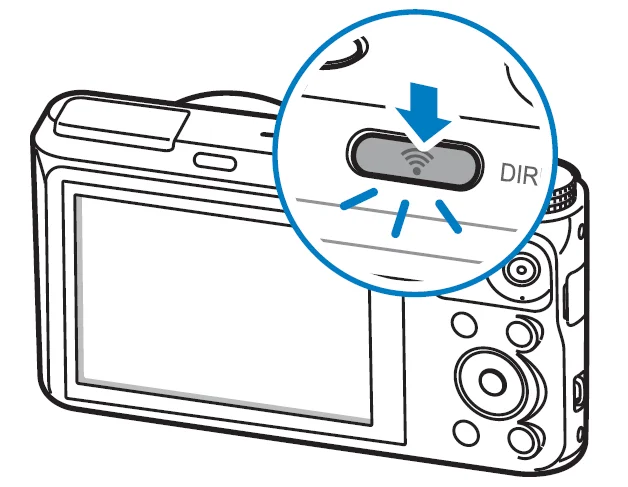
Using the DIRECT LINK button
- You can turn on the Wi-Fi feature conveniently with [DIRECT LINK].
- Press [DIRECT LINK] to activate the Wi-Fi function that you have designated. Press [DIRECT LINK] again to return to the previous mode.

Setting a DIRECT LINK button option
You can select a Wi-Fi function to launch when you press [DIRECT LINK].
- Rotate the mode dial to
 .
. - Select General → DIRECT LINK (Wi-Fi Button).
- Select a Wi-Fi feature. (p. 142)
Inserting the battery and memory card
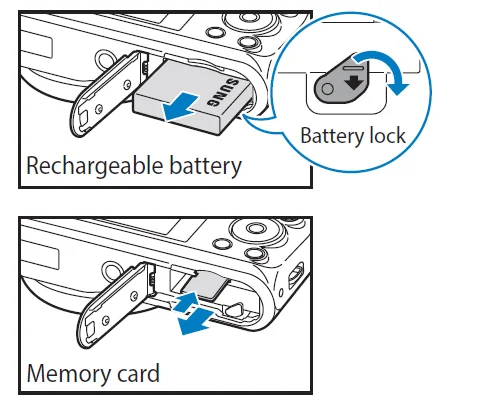
Learn how to insert the battery and an optional memory card into the camera.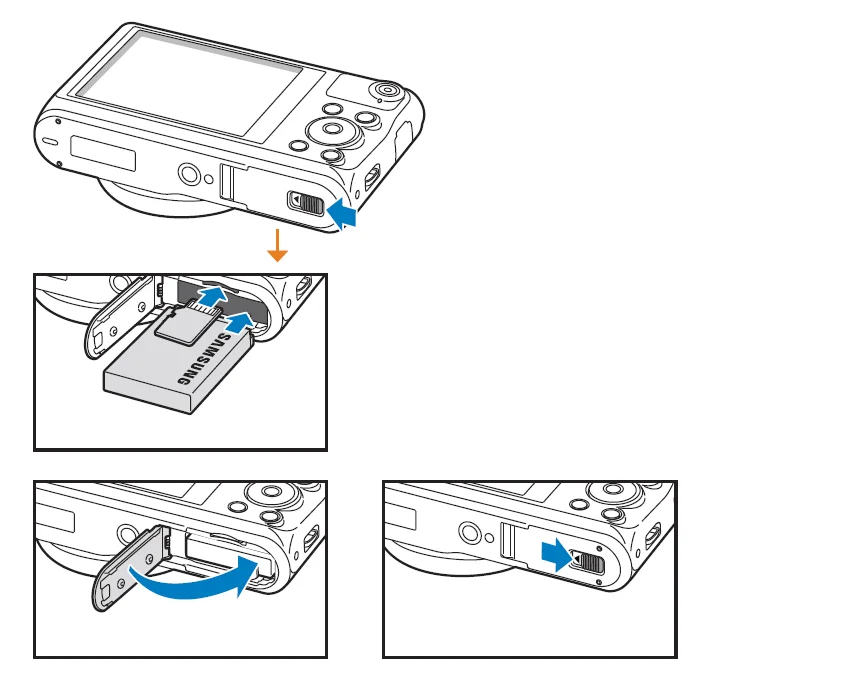
- Insert a memory card with the gold- colored contacts facing up.
- Insert the battery with the Samsung logo facing up.
Removing the battery and memory card
- Slide the lock down to release the battery.
- Push the card gently until it disengages from the camera, and then pull it out of the slot.

You can use the internal memory for temporary storage if a memory card is not inserted.
Charging the battery and turning on your camera
Charging the battery
Before using the camera for the first time, you must fully charge the battery. Plug the small end of the USB cable into your camera, and then plug the other end of the USB cable into the AC adapter.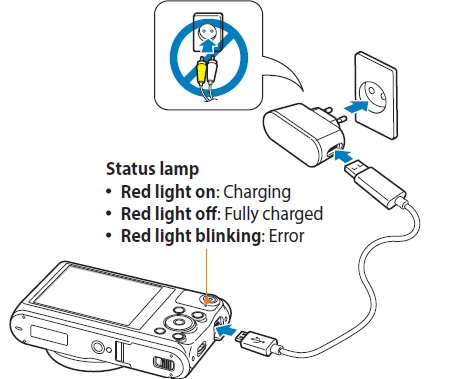
Use only the AC adapter and USB cable supplied with your camera. If you use another AC adapter (such as SAC-48), the camera battery may not charge or work properly.
Turning on your camera
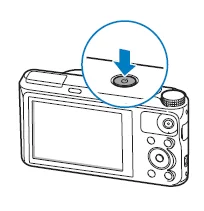
- Press [
 ] to turn your camera on or off.
 - The initial setup screen appears when you turn on the camera for the first time. (p. 26)

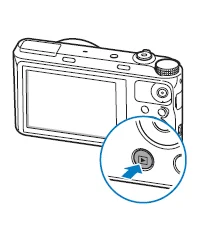
Turning on your camera in Playback mode
- Press [
 ]. The camera turns on and immediately accesses Playback mode.
Extended functions
Using the Smart Auto mode
In Smart Auto mode, your camera automatically chooses the appropriate camera settings based on the type of scene it detects. The Smart Auto mode is helpful if you are not familiar with the camera settings for various scenes.
- Rotate the mode dial to AUTO.
- Align your subject in the frame.
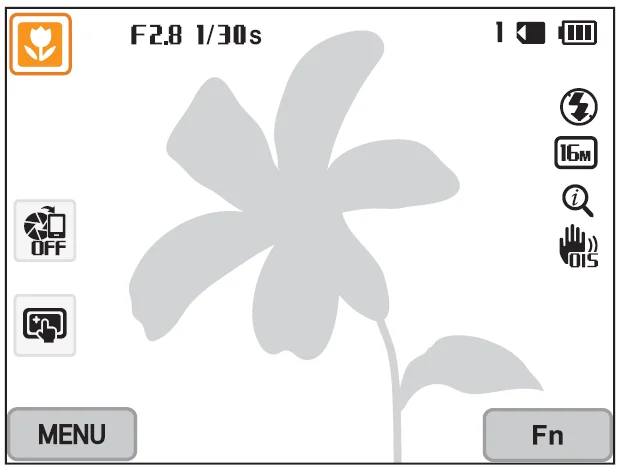
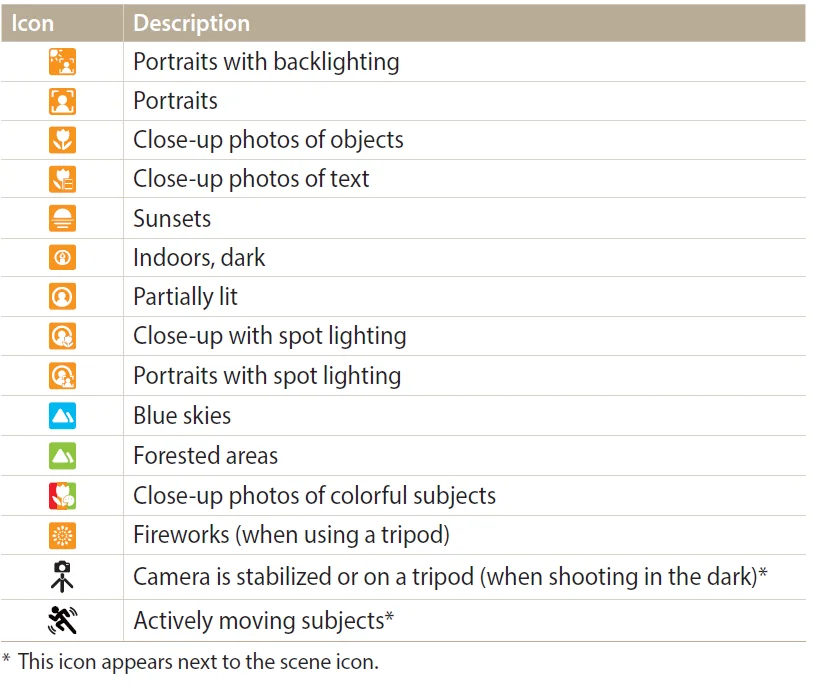
- The camera automatically selects a scene. An appropriate scene icon appears at the top left of the screen. The icons are listed below.


- The camera automatically selects a scene. An appropriate scene icon appears at the top left of the screen. The icons are listed below.
- Half-press [Shutter] to focus.
- Press [Shutter] to capture the photo.
- If the camera does not recognize an appropriate scene mode, it uses the default settings for the Smart Auto mode.
- Even if it detects a face, the camera may not select a portrait mode depending on the subject’s position or lighting.
- The camera may not select the correct scene depending on the shooting conditions, such as camera shake, lighting, or distance to the subject.
- Even if you use a tripod, the camera may not detect the mode
 if the subject is moving.
 - The camera consumes more battery power because it changes settings often to select appropriate scenes.
Using the Program mode
In Program mode, you can set most options, except the shutter speed and aperture value, which the camera sets automatically.
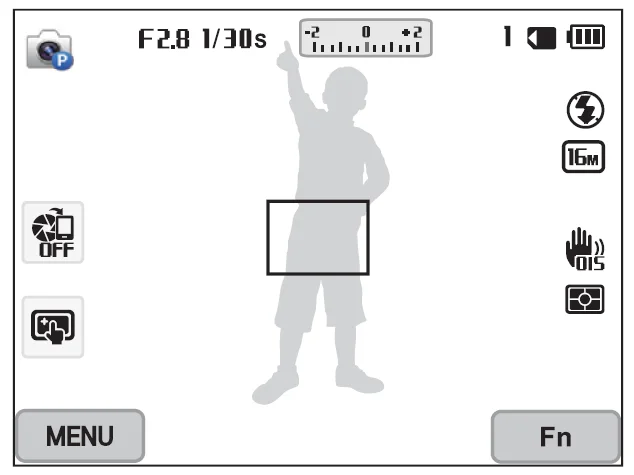
- Rotate the mode dial to p.
- Set the desired options.
- For a list of options, refer to “Shooting options”. (p. 66)

- For a list of options, refer to “Shooting options”. (p. 66)
- Align your subject in the frame, and then half-press [Shutter] to focus.
- Press [Shutter] to capture the photo.
Using the Aperture Priority, Shutter Priority, or Manual mode
Adjust the aperture value or shutter speed to control the exposure of your photos. You can use these options in the Aperture Priority, Shutter Priority, and Manual modes.
Aperture value
The aperture is a hole that lets light into the camera. The aperture housing contains thin, metal plates that open and close, widening or narrowing the aperture, and controlling the amount of light that enters the camera. The size of the aperture is closely related to the brightness of a photo: the larger the aperture, the brighter the photo; the smaller the aperture, the darker the photo. Note that the larger the aperture value, the smaller the aperture size. For example, an aperture set to 5.6 is larger than an aperture set to 11.
Shutter speed
Shutter speed, which is an important factor in the brightness of a photo, refers to the amount of time it takes to open and close the shutter. A slow shutter speed allows more time to let light in. All things being equal, photos are brighter, but fast-moving objects tend to blur. On the other hand, a fast shutter speed allows less time to let light in. Photos are darker, but objects in motion are captured more clearly.
Shooting options
Selecting a resolution and quality
Learn how to change the image resolution and quality settings.
Selecting a resolution
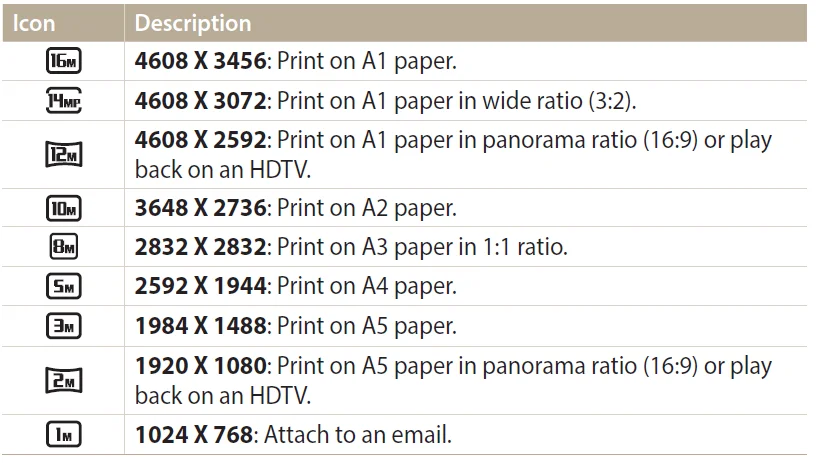
As you increase the resolution, your photo or video will include more pixels, so it can be printed on larger paper or displayed on a larger screen. When you use a high resolution, the file size will also increase.
Setting the photo resolution
- In Shooting mode, press [MENU].
- Select Photo Size.
- Select an option.

Setting the video resolution
- In Shooting mode, press [MENU].
- Select Movie Size.
- Select an option.

Selecting a photo quality
Set a photo quality setting. Higher image quality settings will result in larger file sizes. The camera compresses and saves the photos you capture in the JPEG format.
- In Shooting mode, press [MENU].
- Select Quality.
- Select an option.

Playback/Editing
Viewing photos or videos in Playback mode
Learn how to play back photos or videos and how to manage files.
Starting Playback mode
View photos or play videos stored in your camera.
- Press [
 ].
].- The most recent file will be displayed.
- If the camera is off, it will turn on and display the most recent file.
- Press
 to scroll through files.
- You can also drag the image left or right to move to another file.
- Press and hold
 to scroll through files quickly.
- If you want to view files stored in the internal memory, remove your memory card.
- You may not be able to edit or play back files that were captured with other cameras, due to unsupported sizes (image size, etc) or codecs. Use a computer or another device to edit or play back these files.
- Photos or videos captured in portrait orientation do not rotate automatically and are displayed in landscape orientation by the camera and other devices.
Photo file information
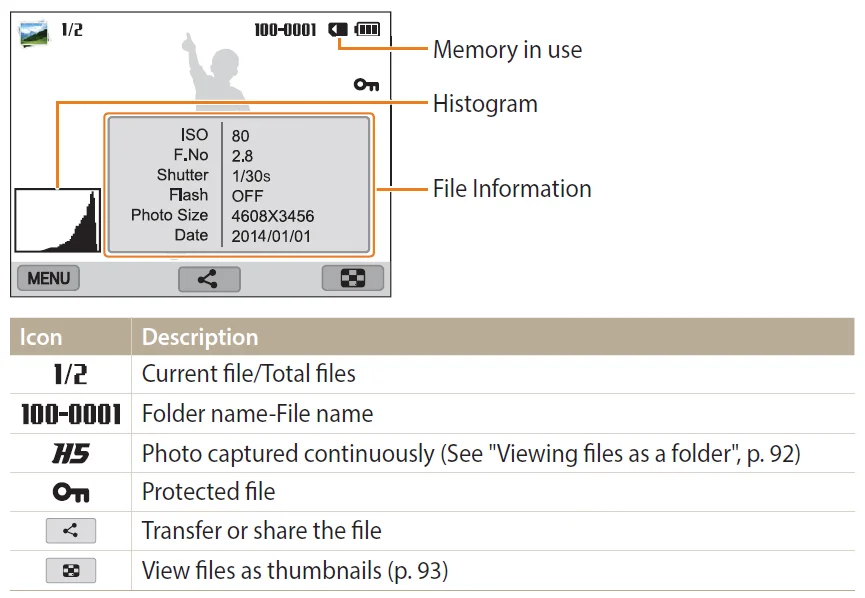
- To display file information on the screen, press [DISP].
Viewing files on a TV
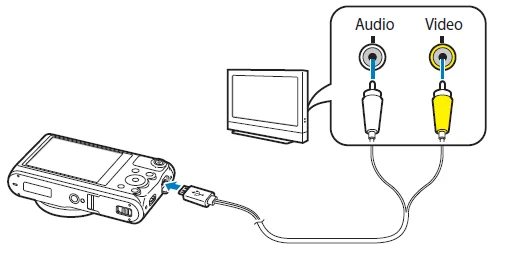
Play back photos or videos by connecting your camera to a TV with the A/V cable.
- Rotate the mode dial to
 .
. - Select Connectivity → Video Out.
- Select the video signal output for your country or region. (p. 140)
- Turn off your camera and TV.
- Connect your camera to your TV with the A/V cable.

- Turn on your TV, and then select the A/V video source with the TV remote control.
- Turn on your camera.
- The camera automatically enters Playback mode when you connect it to a TV.
- View photos or play videos using the camera buttons.
- Depending on the TV model, you may see some digital noise, or part of an image may not appear.
- Images may not be centered on the TV screen, depending on your TV settings.
Transferring files to a computer
Connect the camera to a computer to transfer files from the camera’s memory card to the computer.
Transferring files to your Windows OS computer
Connect the camera to your computer as a removable disk.
- Your computer must be running Windows XP, Windows Vista, Windows 7, or Windows 8 for you to connect the camera as a removable disk.
- Rotate the mode dial to
 .
. - Select Connectivity → i-Launcher → Off.
- Turn off the camera.
- Connect the camera to your computer with the USB cable.
You must plug the small end of the USB cable into your camera. If the cable is reversed, it may damage your files. The manufacturer is not responsible for any loss of data.
- Turn on the camera.
- The computer recognizes the camera automatically.
- On your computer, select My Computer → Removable Disk →DCIM → 100PHOTO.
- Drag or save files to your computer.
Disconnecting the camera (for Windows XP)
With Windows Vista, Windows 7, and Windows 8, the methods for disconnecting the camera are similar.
- If the status lamp on your camera is blinking, wait until it stops.
- Click
 on the toolbar at the bottom right of your computer screen.
- Click the pop-up message.
- Click the message box that indicates the camera can be removed safely.
- Remove the USB cable.
Transferring files to your Mac OS computer
When you connect the camera to your Mac OS computer, the computer will automatically recognize the device. You can transfer files directly from the camera to the computer without installing any programs.
- Mac OS 10.5 or later is supported.
- Turn off the camera.
- Connect your camera to your Mac OS computer with the USB cable.
- You must plug the small end of the USB cable into your camera. If the cable is reversed, it may damage your files. The manufacturer is not responsible for any loss of data.

- You must plug the small end of the USB cable into your camera. If the cable is reversed, it may damage your files. The manufacturer is not responsible for any loss of data.
- Turn on the camera.
- The computer recognizes the camera automatically and displays a removable disk icon.
- On your computer, open the removable disk.
- Drag or save files to your computer.
Wireless network
Connecting to a WLAN and configuring network settings
Learn to connect via an access point (AP) when you are in range of a WLAN. You can also configure network settings.
Connecting to a WLAN
- Rotate the mode dial to w.
- Select
 .
. - Follow the on-screen instructions until the Wi-Fi Settings screen appears.
- The camera automatically searches for available AP devices.
- In some modes, press [m], and then select Wi-Fi Settings.
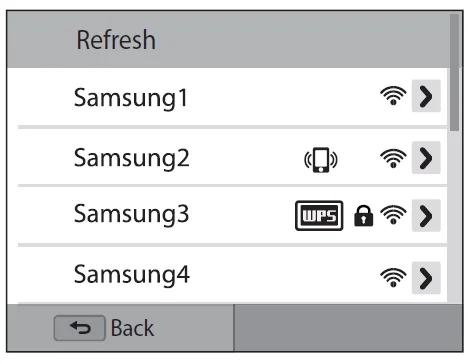
- Select an AP.

- Select Refresh to refresh the list of connectable APs.
- Select Add wireless network to add an AP manually. The AP name must be in English to add the AP manually.

- When you select a secured AP, a pop-up window appears. Enter the required passwords to connect to the WLAN. For information about entering text, refer to “Entering text”. (p. 118)
- When a login page appears, refer to “Using the login browser”. (p. 116)
- When you select an unsecured AP, the camera will automatically connect to the WLAN.
- If you select a WPS profile supported AP, select >→ WPS PIN connection, and then enter a PIN on the AP device. You can also connect to a WPS profile supported AP by selecting >→ WPS button connection on the camera, and then pushing the WPS button on the AP device.
- If a pop-up message about data collection regulations appears, read and agree to it.
Using the NFC Feature (Tag & Go)
Place a smartphone’s NFC antenna near the camera’s NFC tag to launch the feature for saving photos to a smartphone automatically or the feature for using a smartphone as a remote shutter. You can also transfer files to an NFC-enabled device in Playback mode.
- This feature is supported by NFC-enabled smartphones running Android OS. It is recommended that you use the latest version. This feature is not available for iOS devices.
- You should install the Samsung SMART CAMERA App on your phone or device before using this feature. You can download the application from Samsung Apps or the Google Play Store. Samsung SMART CAMERA App is compatible with Samsung camera models manufactured in 2013 or later.
- To read an NFC tag, place the NFC-enabled device near the camera’s NFC tag for more than 2 seconds
- Do not modify the tag information in any way.
Using NFC features in Shooting mode
Launch AutoShare or Remote Viewfinder by reading a tag from an NFC-enabled device. (p. 120, 123). Press to launch the Wi-Fi function by reading a tag on an NFC-enabled device. (p. 142)
Using NFC features in Playback mode(Photo Beam)
In Playback mode, the camera transfers the current file to the smartphone automatically when you read a tag from an NFC-enabled device.
- To transfer multiple files, select files from the thumbnail view, and then read a tag from an NFC-enabled device.
Using NFC features in Wi-Fi mode
Select Mobile Link or Remote Viewfinder from the pop-up window that appears by reading a tag from an NFC-enabled device. (p. 121, 123)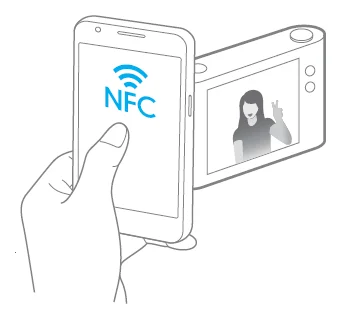
Saving files to a smartphone automatically
The camera connects to a smartphone that supports the Auto Share feature via a WLAN. When you capture a photo with your camera, the photo is saved to the smart smartphone automatically.
- The Auto Share feature is supported by smartphones or tablets running Android OS or iOS. Some features may not be supported by some models. Before using this feature, update the device’s firmware to the latest version. If the firmware version is not the most recent, this function may not perform properly.
- You should install the Samsung SMART CAMERA App on your phone or device before using this feature. You can download the application from Samsung Apps, the Google Play Store, or the Apple App Store. Samsung SMART CAMERA App is compatible with Samsung camera models manufactured in 2013 or later.
- This feature is not available with the internal memory in some Shooting modes.
- If you set this function, the setting is maintained even when you change the Shooting mode.
- This feature may not be supported in some modes.
- On the camera, in Shooting mode, press [MENU].
- On the camera, select Auto Share → On.
- If the pop-up message that prompts you to download the application appears, select Next.
- To require PIN verification when connecting the smartphone to the camera, select Security Settings. (p. 143)
- On the smartphone, turn on the Samsung SMART CAMERA App.
- For iOS devices, turn on the Wi-Fi feature before turning on the application.
- To start the application automatically on an NFC-enabled smartphone, turn on the function and place the smartphone near the NFC tag (p. 22) on the camera.
- Select the camera from the list and connect the smartphone to the camera.
- The smartphone can connect to only one camera at a time.
- If the Wi-Fi Privacy lock is enabled, enter the PIN displayed on the camera to the smartphone.
- On the camera, allow the smartphone to connect to your camera.
- If the smartphone has been connected to your camera before, it is connected automatically.
- An icon that shows the connection status
 will appear on the camera’s screen.
- On the camera, capture a photo.
- The captured photo is saved to the camera and then transferred to the smartphone.
- If you recorded a video, it is saved only to the camera.
- A GIF file captured in Motion Photo mode is not saved on the smartphone.
- The image file captured while recording a video is not saved on the smartphone.
- If the GPS feature is activated on the smartphone, the GPS information will be saved with the captured photo.
Settings
Settings menu
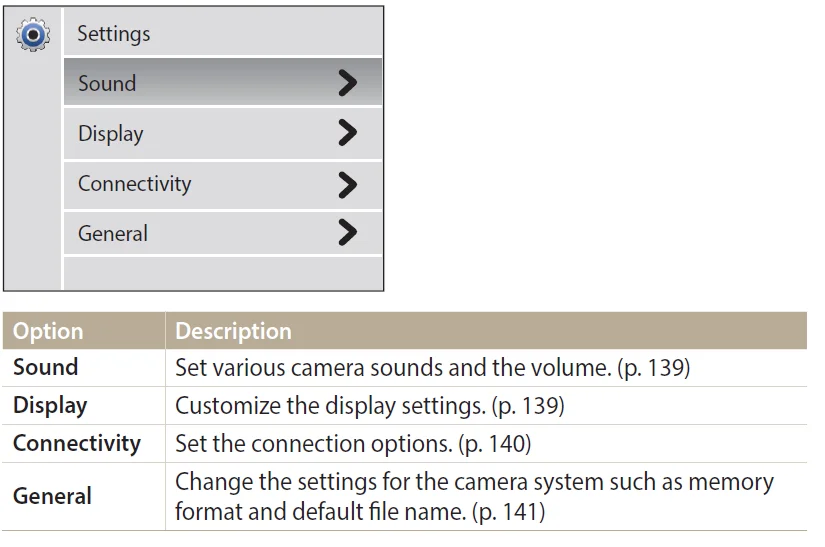
Learn to configure your camera’s settings.
Accessing the settings menu
- Rotate the mode dial to
 .
. - Select a menu.

- Select an item.

- Select an option.

- Press
 to return to the previous screen.
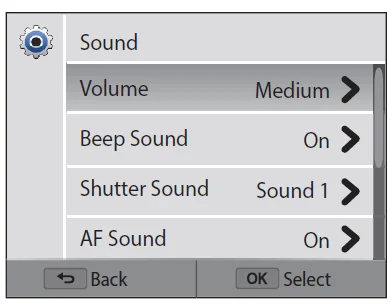
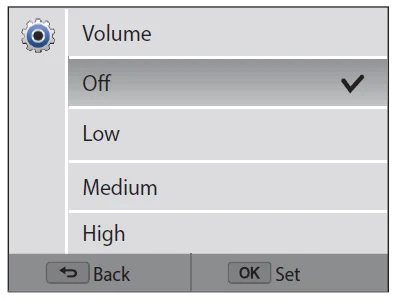
Sound

Display
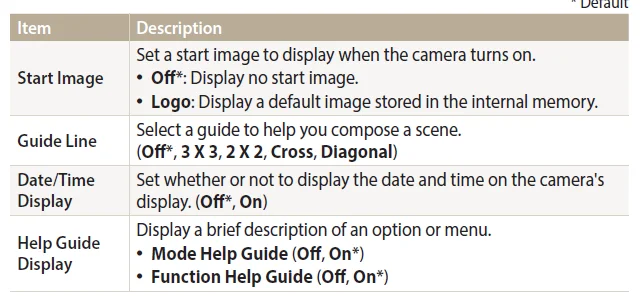
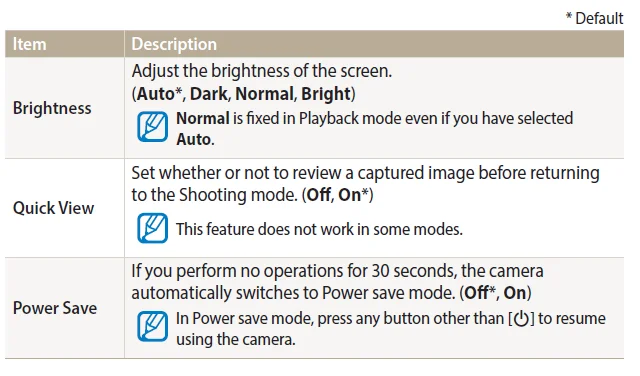
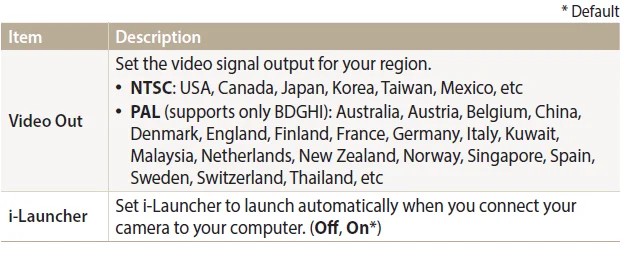
Connectivity
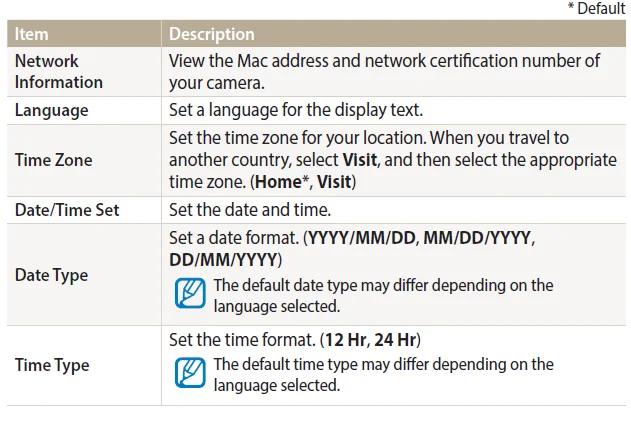
General
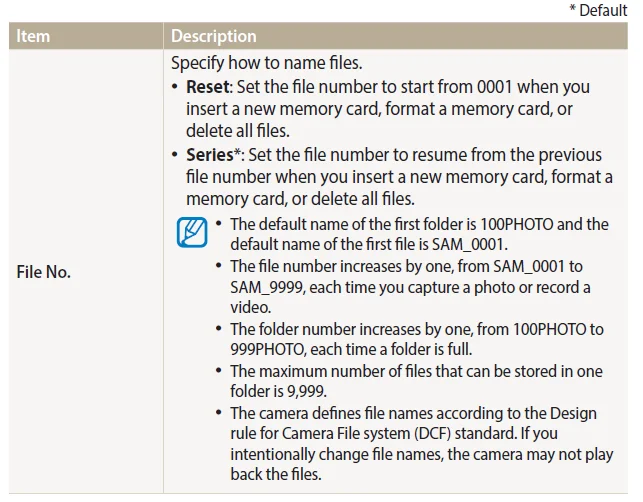
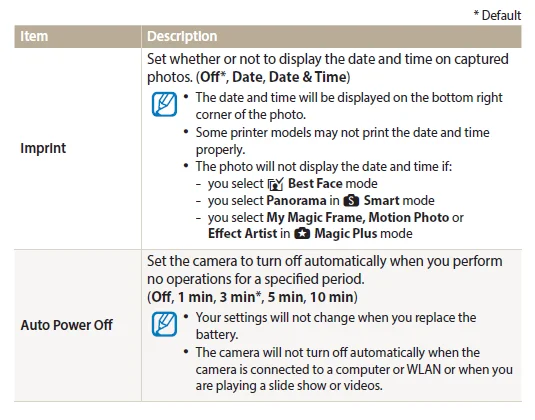
Camera maintenance
Cleaning your camera
Camera lens and display
Use a blower brush to remove dust and wipe the lens gently with a soft cloth. If any dust remains, apply lens cleaning liquid to a piece of lens cleaning paper and wipe gently.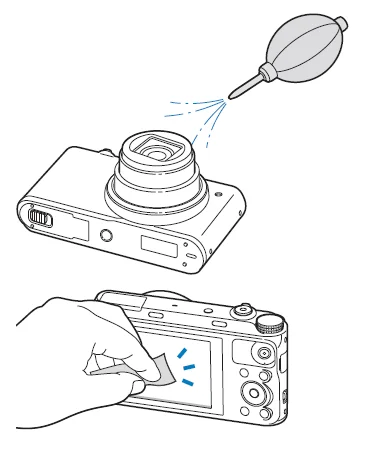
Camera body
Wipe gently with a soft, dry cloth.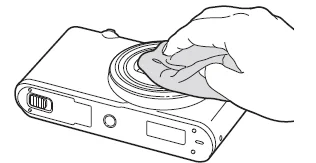
- Never use benzene, thinners, or alcohol to clean the device. These solutions can damage the camera or cause it to malfunction.
- Do not press on or use a blower brush on the lens cover. This can damage the camera.
Using or storing the camera
Inappropriate places to use or store the camera
- Avoid exposing the camera to very cold or very hot temperatures.
- Avoid using your camera in areas with extremely high humidity or where the humidity changes drastically.
- Avoid exposing the camera to direct sunlight and storing it in hot, poorly ventilated areas, such as in a car during summer.
- Protect your camera and the display from impact, rough handling, and excessive vibration to avoid serious damage.
- Avoid using or storing your camera in dusty, dirty, humid, or poorly ventilated areas to prevent damage to moving parts and internal components.
- Do not use your camera near flammable materials, such as fuels, combustibles, or chemicals. Do not store or carry flammable liquids, gases, or explosive materials in the same compartment as the camera or its accessories.
- Do not store the camera near mothballs.
Using on beaches or shores
- Protect your camera from sand and dirt when you use it on beaches or in similar areas.
- Your camera is not waterproof. Do not handle the battery, adapter, or memory card with wet hands. Operating the camera with wet hands may cause damage to your camera.
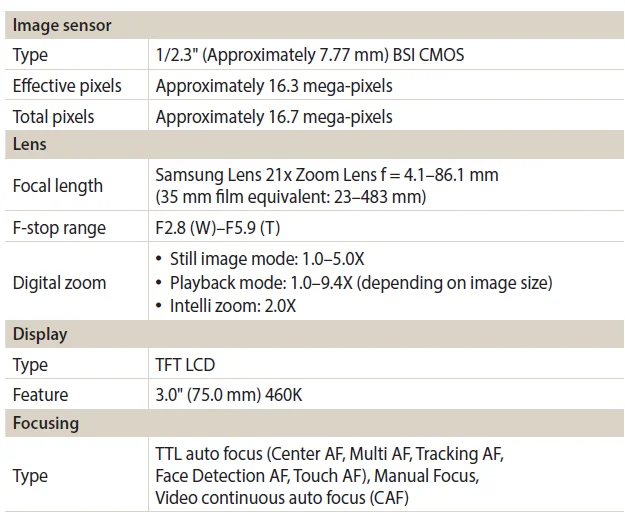
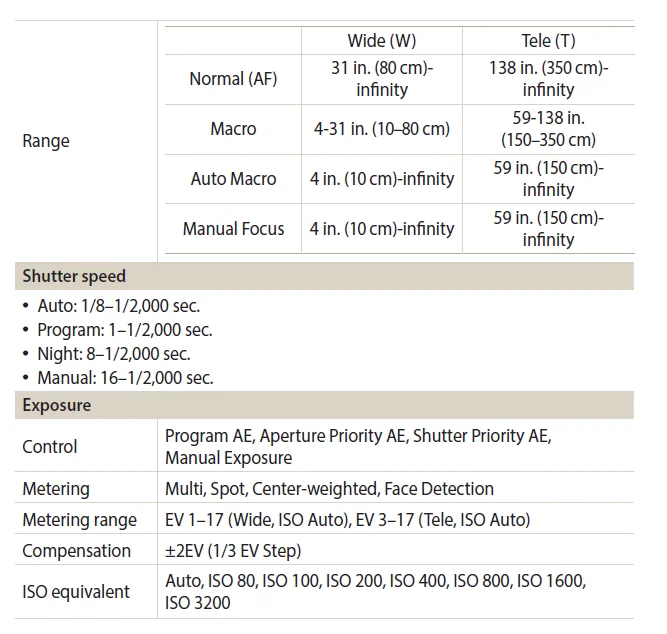
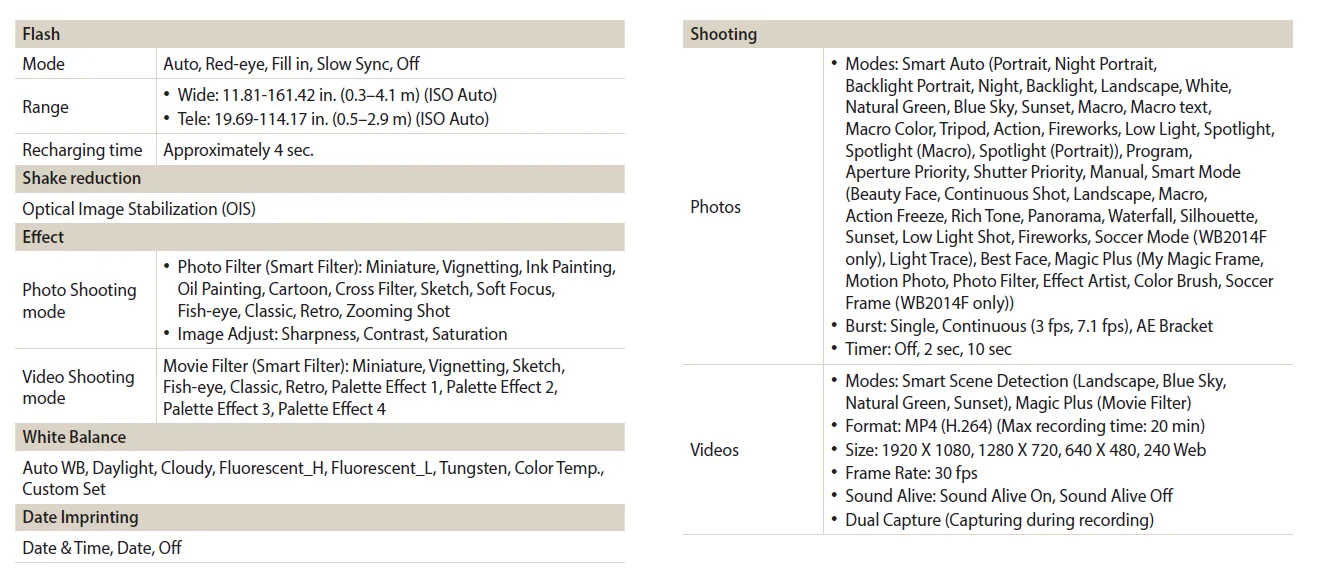
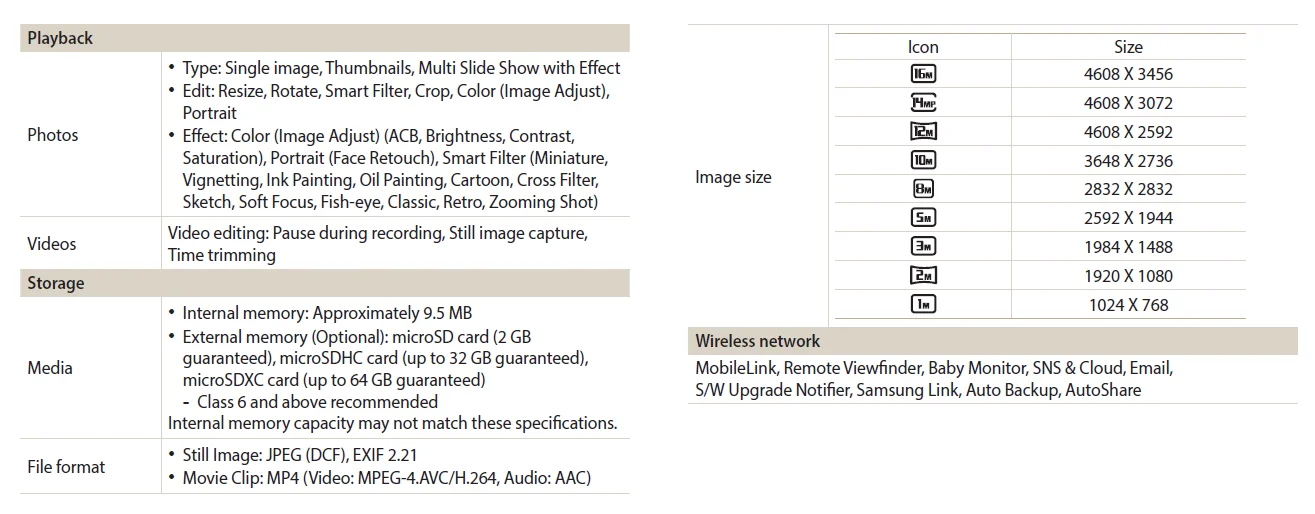
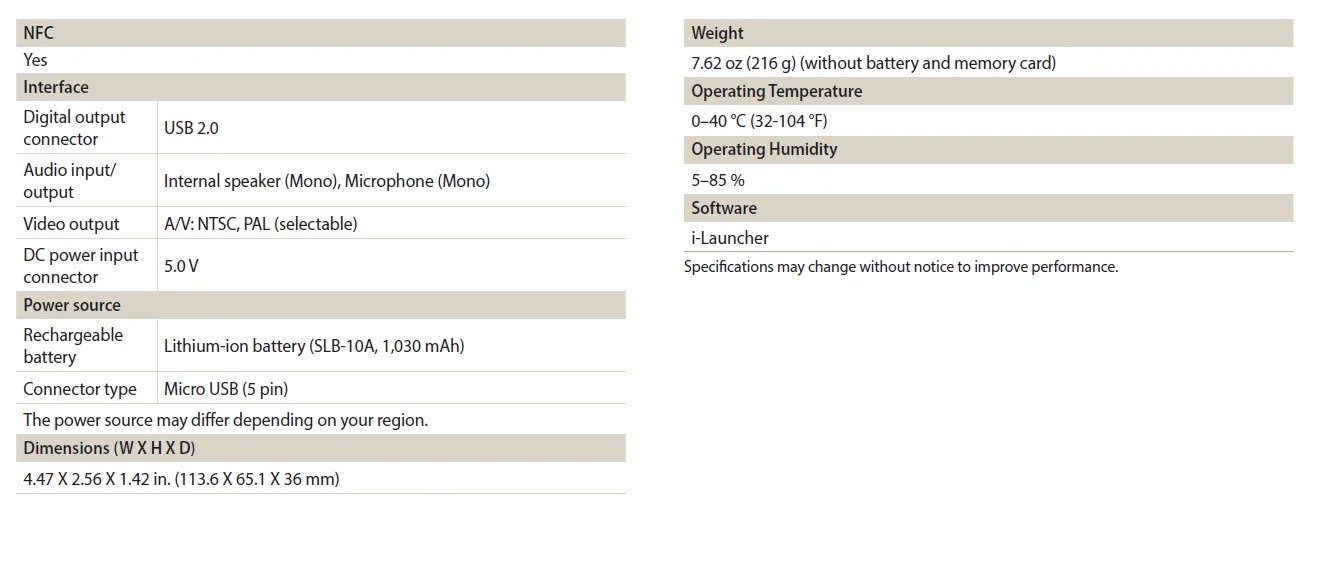
Camera specifications
For more manuals by Samsung, visit ManualsLibraryy
Samsung WB350F 16MP Digital Camera-FAQs
How good is the Samsung WB350F’s zoom?
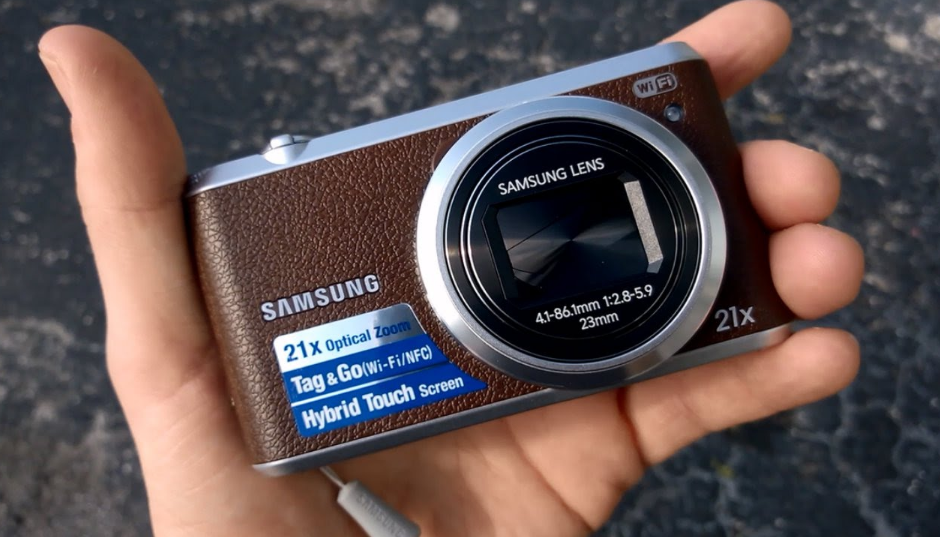
The WB350F features a 21x optical zoom lens (23–483mm equivalent), offering a wide range from wide-angle to telephoto.
When was the Samsung WB350F released?
It was launched on January 7, 2014.
How many megapixels does the WB350F have?
It offers a 16.3-megapixel CMOS sensor for detailed photos.
What is the battery life of the Samsung WB350F?
On a full charge, it can take around 310 shots or record about 2 hours of video.
Does the Samsung WB350F record video?
Yes, it records smooth Full HD 1080p video.
Is the Samsung WB350F waterproof?
No, it is not water-resistant and should be kept away from moisture.
Does the WB350F have Wi-Fi?
Yes, it has Wi-Fi and NFC, making it easy to share photos and videos wirelessly.
What type of memory card does the WB350F support?
It uses MicroSD and MicroSDXC memory cards.
How much does the Samsung WB350F weigh?
It weighs approximately 276 grams.

