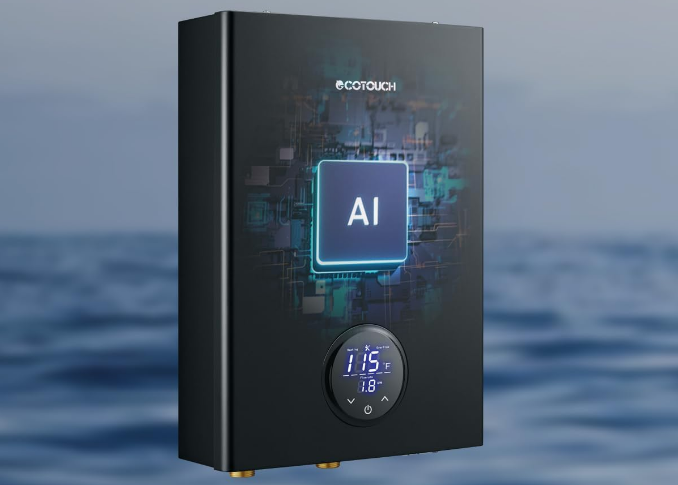
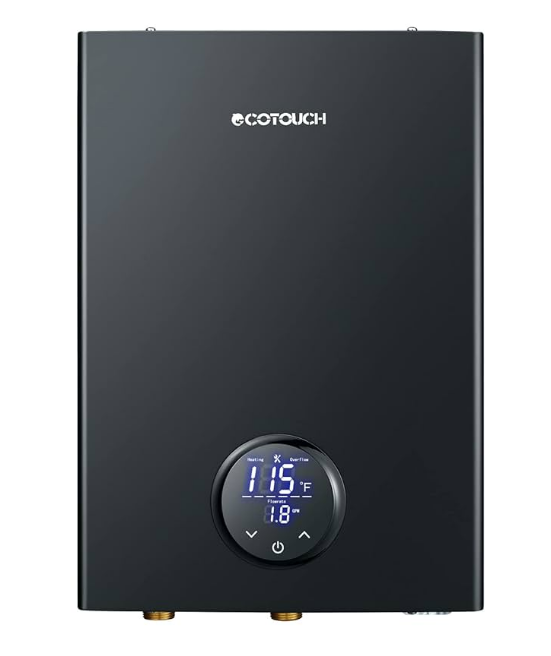
EcoTouch ECO140B Electric Tankless Water Heater
Customer Service
At GREATBEAR, we think highly of product quality, excellent performance, and the pleasant experience of valued customers. If you have any questions about the unit or anything unexpected occurs, please feel free to contact us at [email protected]. We will try our best to serve and help. We also strive for continuous improvement, so your comments, feedback, and suggestions are highly welcome.
Important Safety Information
- The installation must be done professionally, in compliance with the National Electrical Code and your local electrical and plumbing codes.
- All wiring and installation must be supervised by a qualified electrician.
- CAUTION: This product has more than one power-supply connection point. Under no circumstances should you attempt to install, inspect, clean, repair, disassemble, or otherwise service this water heater without first shutting off all power to the unit directly at the circuit breaker box. SERIOUS INJURY OR DEATH COULD OCCUR IF YOU IGNORE THIS WARNING.
- This appliance MUST be permanently connected to a fixed double-pole circuit breaker, and it must be installed vertically. DO NOT install this appliance near a strong magnetic field or a strong magnetic field.
- This appliance must be EARTHED.
- This appliance is forbidden to be switched on if you think it might be frozen, as this could result in serious damage to the unit. Wait until you are sure that it has completely thawed out before you switch it on.
- Please feel the outgoing hot water temperature with your hand to make sure it is suitable for a shower. As a result, you will avoid getting scalded.
- DO NOT install this hot water unit in a location where it may be subjected to freezing temperatures. IF YOU IGNORE THIS WARNING, THE UNIT MAY SUSTAIN PERMANENT DAMAGE DUE TO FREEZING INSIDE.
- If there is damage to the wire, you must contact a qualified electrician to replace it with a specific wire.
- CAUTION: FOR HOUSEHOLD AND INDOOR USE ONLY.
- CAUTION: Risk of electric shock. CONNECT ONLY TO A CIRCUIT THAT IS PROTECTED BY A GROUND-FAULT CIRCUIT INTERRUPTER (GFCI).
- If the hot water unit has been paused during use, you may initially get a short burst of very hot water when you turn it on again. Please run water through for a few seconds to settle down the water temperature. Check the water temperature with your hand before showering again with it.
Quick Start Guide
1. Mounting
Plot the holes for the mounting screws onto the wall. Mount vertically on a flat surface (i.e., board or wall) larger than the unit itself. Make sure the heater is secure by utilizing a stud or the provided wall anchors. Keep away from any potential splashing or leaking water and strong magnetic fields.
2. Water Connections
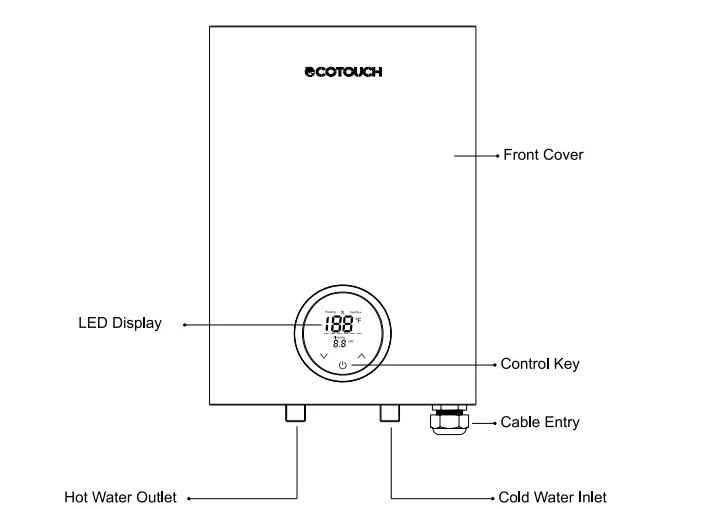
Plumbing connections are 1/2″ NPT for ECO140B, 3/4″ NPT for ECO180B, and both the inlet and outlet can be found at the bottom of the unit. When installing your water connections, make sure to use the right fittings. Please use the provided gaskets to prevent leaks if it has a leaking issue. The cold water inlet is on the right side; it should be preceded by a high-pressure discharge valve and a shut-off valve (ball valve) in that order.
For the best service and lifespan of the hot water unit, it is advised that a descaler device should be installed in line to the supply line (cold) to avoid any potential damage due to scale build-up. The hot water outlet is on the left side and runs to your hot water source. NEVER USE PVC ON A HOT WATER OUTLET. Use instead CPVC or other high-temperature-rated materials. Run water through the heater for a few minutes to purge all air from the system. Shut off the flow at the faucet to pressurize the system. At this point, check for and fix any leaks. If no leaks are present, move to the next step.
3. Electrical Connections
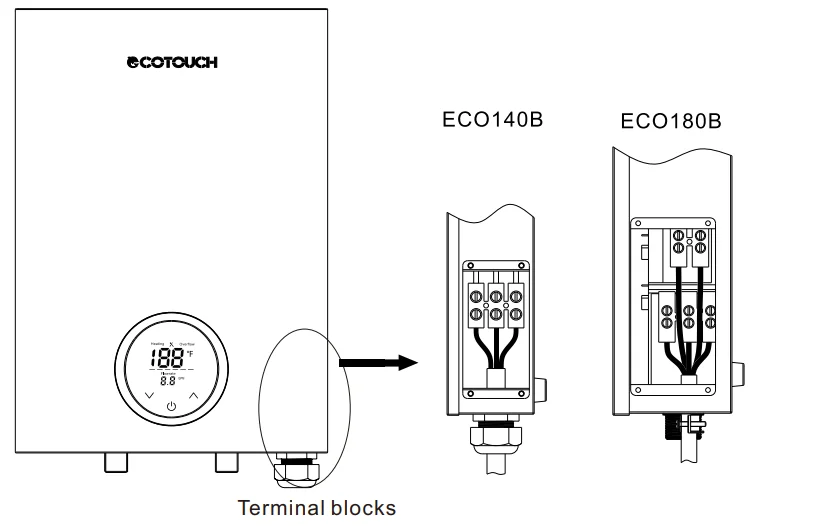
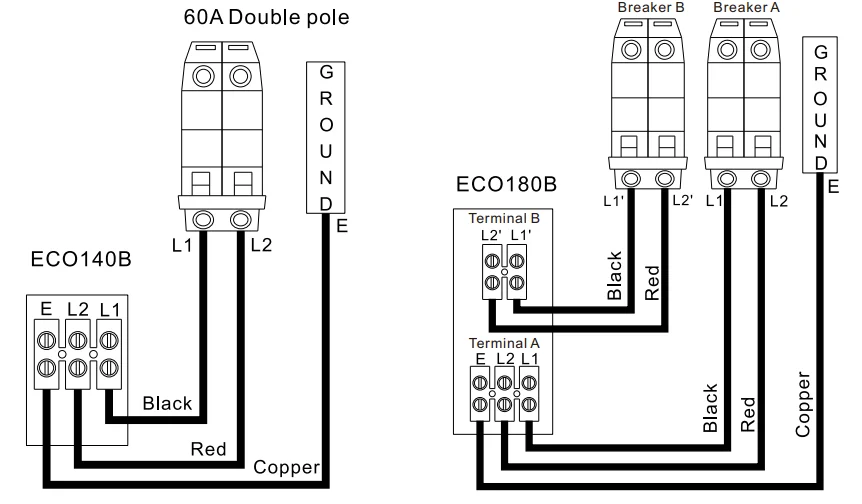
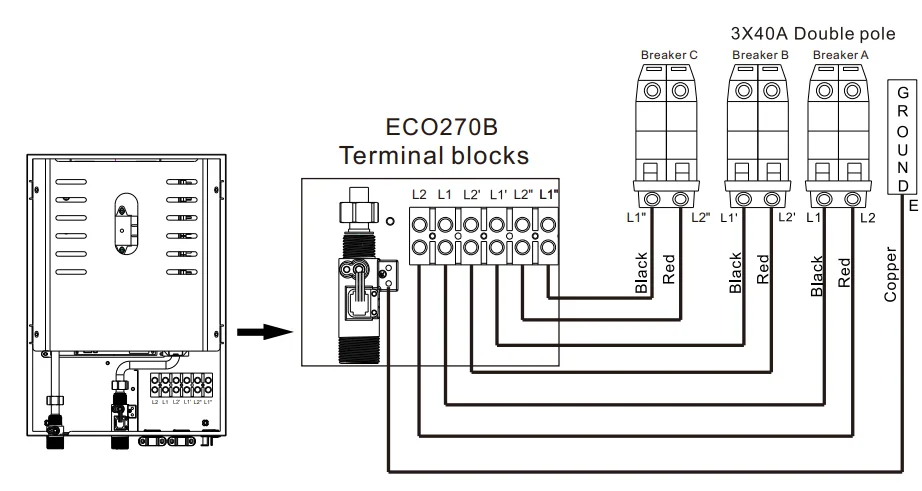
For the model ECO140B, power wires and grounding wire come into the unit from the bottom right-hand side of the unit. Use 6 AWG/2 wires with a grounding wire, running from the terminal block marked “E” in the unit all the way to the grounding bar in the circuit breaker panel. Run one 6 AWG wire from each of the “L1” and “L2” terminal blocks of the unit to the double-pole 60-amp breaker at your circuit breaker panel. You will need two sets of 8 AWG/2 wires to run separately for model ECO180B. Please check the diagram for detailed information.
4. Operation
When installation is done, prior to switching on the power supply, open the water faucet or showerhead to run water through the hot water heater system to purge all the air out of the unit. When power is supplied, a beep sound can be heard, and the display lights up. Press the power button on the panel of the unit to start up and set the temperature between 86 to 131 degrees with the UP and DOWN buttons. Please test the water temperature with your hand before a shower or other use; this could avoid scald risk.
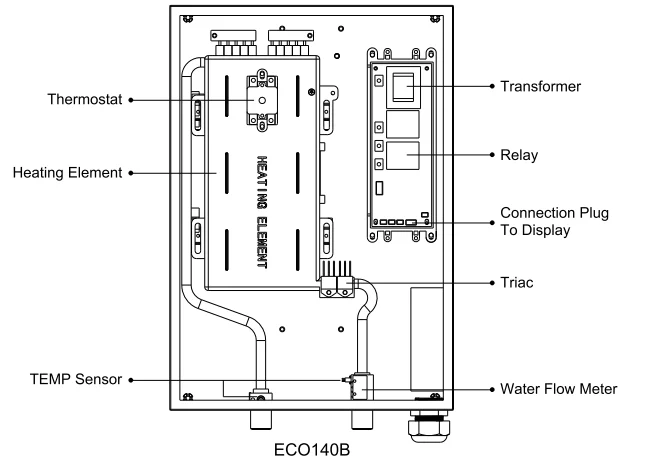
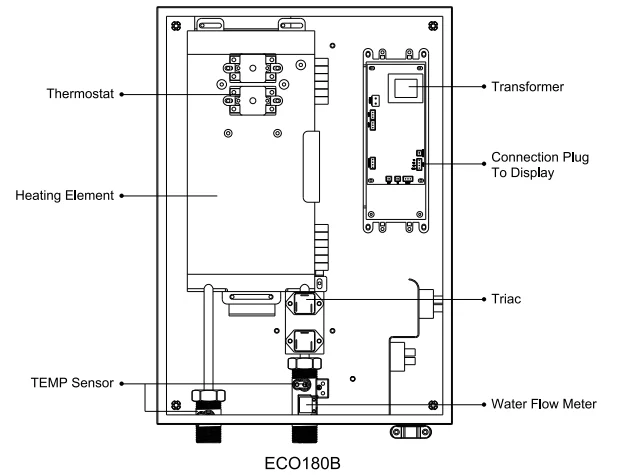
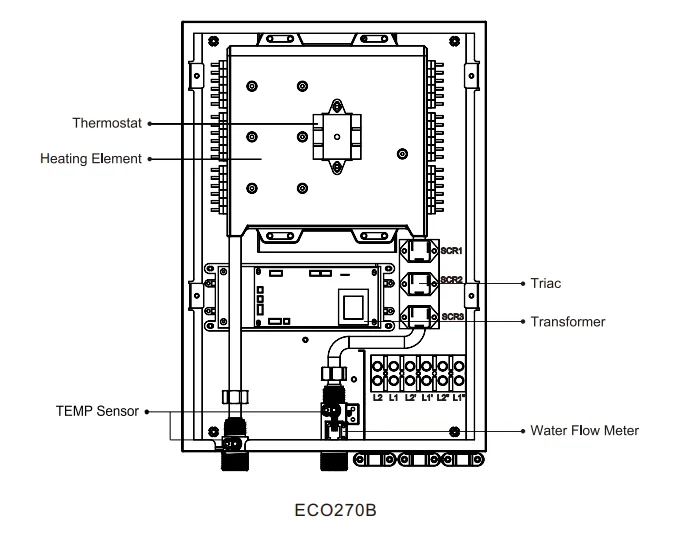
Product Inner Structure


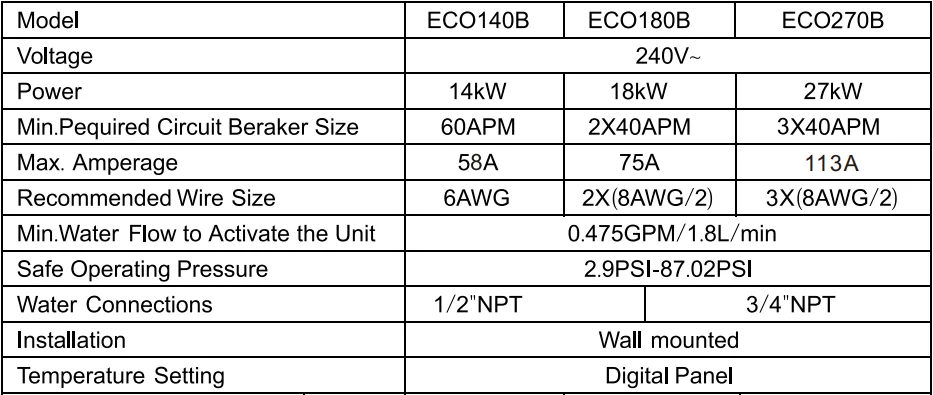
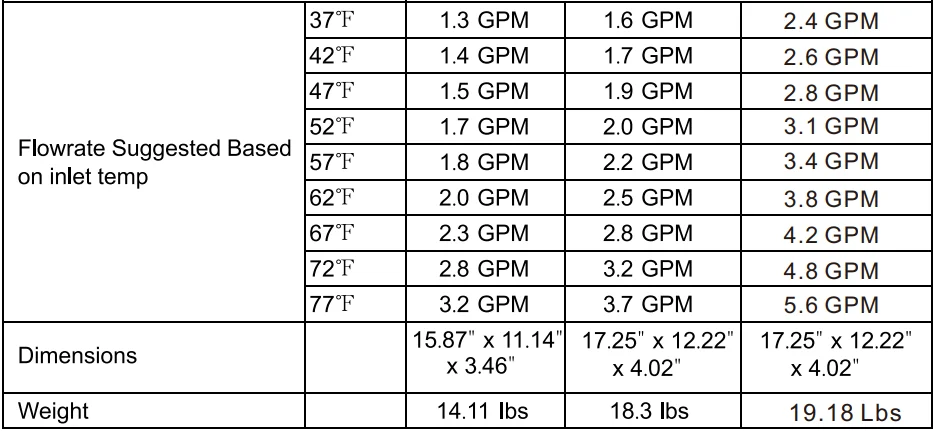
Technical Specifications

Remarks:
- The above wire size and circuit breaker size are for the ECO140B, ECO180B, and ECO270B units only. If you need other high-power appliances, please do further research for that.
- For the best user experience, the ECO140B unit is recommended for faucets and as a booster for a tank heater. Works for showers in the Middle Southern US only.
Installation Instructions
Installation Guideline:
- This product is designed to be installed indoors only. You may install your unit in an outdoor location so long as it is mounted in a suitable enclosure that protects it from rain, splashed water, freezing temperatures, direct sunlight, debris, and insects.
- DO NOT install this product in a location where it may be subjected to freezing temperatures. If the water inside your tankless water heater freezes, it can cause severe and permanent damage that is not covered under your warranty.
- DO NOT locate the water heater in a location that is difficult to access.
- Make sure that the water heater and hot water outlet pipe are out of reach of children so they are unable to tamper with the temperature controls or injure themselves by touching the hot water outlet pipe. The outlet water pipe can get very hot.
- Avoid installing your tankless water heater in a location prone to excessive humidity, moisture, or dust, or in an area where it may be splashed with water or other liquids.
- DO NOT install under water pipes or air conditioning lines that might leak or condense moisture that could then drip onto the heater.
- DO NOT install above electrical boxes or junctions.
CAUTION: The water heater should not be located in an area where leakage will result in damage to the area adjacent to it or to lower floors of the structure. Where such areas cannot be avoided, it is recommended that a suitable catch pan, adequately drained, be installed under the water heater. The installation must be in compliance with the National Electrical Code and your local electrical and plumbing codes.
- Make sure the appliance is intact, and the fittings are complete.
- Make sure the main power supply, water pressure, grounding condition, ammeter, and wire meet the standard of installation requirements.
- The appliance must be connected to properly grounded dedicated branch circuits of proper voltage rating. Ground must be brought to the “ground bar” at the circuit breaker.
- This appliance MUST be permanently connected to the fixed circuit breaker. If you do not use the heater, please switch off the circuit breaker.
- DO NOT install this appliance near tinder or a strong magnetic field. The unit must only be assembled in a VERTICAL position near the water fittings. Please test the unit after getting the water flow.
Installation Diagram
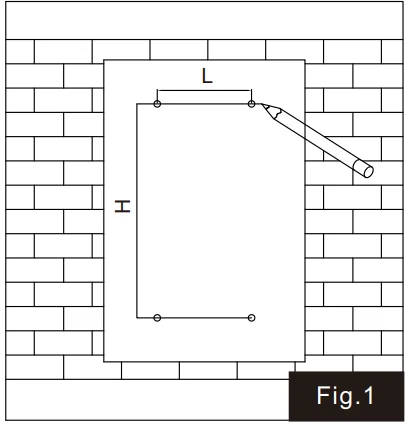
- Figure out where to mount the water heater unit, and mark 4 mounting holes on the wall according to the installation template (Fig.1).

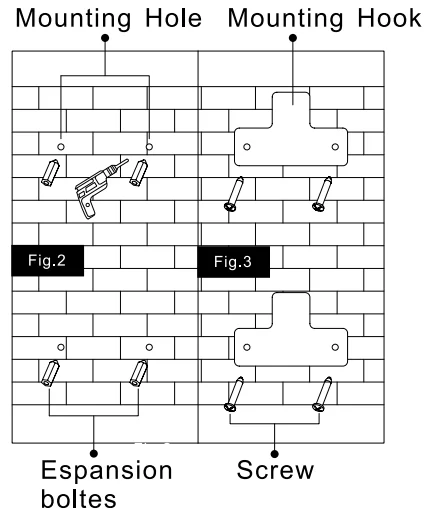
- Drill holes (Φ6x32mm) into the wall on those 4 marked positions, put expansion bolts into the mounting holes, and then fix the 2 mounting brackets with screws and a Phillips screwdriver (Fig.2 and Fig.3).

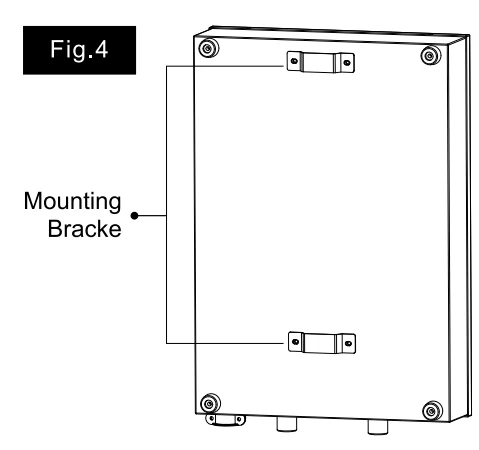
- The water heater has 2 mounting brackets on the back side, so all you need to do is hang the water heater on those fixed brackets on the wall, pull the water heater unit down to sit it tight (Fig.4).

Water Connections
- All water pipes must comply with national and applicable state and local water pipe codes.
- The unit should be connected directly to the main water supply. Flush the pipe with water to remove any debris or loose particles before pipe connections to avoid clogging.
- It is required to use ½” NPT pipe fittings to fit the model ECO140B, and the ECO180B model requires 3/4″ NPT pipe fittings.
- Flexible water hoses are recommended to use with your hot water heater as part of the installation; it makes future maintenance more convenient. Please remember to place rubber seal rings at the connections. When all water connections are completed, check for leaks and take necessary actions before proceeding.
- Install a shut-off valve (not supplied) and descale device (not supplied) to prevent any particles from entering the unit that may clog or damage the internal parts.
- When you connect pipes to the unit, use a wrench to hold the connection of the unit, and use another wrench to tighten the flexible water hose to the hot water unit. Over-tightening must be avoided.
Electrical Connections
- All electrical work must comply with national and applicable state and local electrical codes.
- This water heater must be permanently connected to the direct main breaker panel. The use of a plug and socket is forbidden.
- The unit must be connected to a properly grounded dedicated branch circuit of proper voltage rating.
- Before beginning any work on the electric connections, make sure that the main breaker panel switch is OFF to avoid any danger of electric shock.
- All mounting and plumbing must be completed before proceeding with the electrical hook-up.
- While connecting the wires to the terminal blocks, please make sure the metal wire ends and the terminal blocks touch completely. Then tighten the screws to make sure the full current can go through.
- Connect the wires to the terminal block and fully tighten them as follows (Fig.3b).


Caution: For ECO180B, ECO270B, each set of wires (L1, L2) must be connected to its own individual 40A double-pole breaker. If you mix them up, the unit will not work properly, or serious damage to property may be caused!
Operating Instructions
IMPORTANT WARNING: Open the water source and allow water to run through the water heater for at least 2 to 3 minutes. This will purge the air out of the unit and must be performed prior to turning on the power at the unit. Failure to do so will cause serious damage to the heating elements.
- Open the water faucet for 3 minutes until the water flow is continuous and all the air has been purged from the water pipes.
- Turn on the circuit breaker to supply electrical power to the unit.
- After the unit is supplied with power, a beep sound can be heard, and the LED lights up and stays; if there is no other command, the appliance stays in standby.
- Press the Power button
 on the unit to turn ON/OFF the appliance. When the unit is working, the LED display shows “Actual Temp”.
 - Press /\ and V to adjust the outlet water temperature. The temperature setting range is 86-131°F (30-55°C).
If the unit has been paused, you may initially get a short burst of very hot water when you turn it on again. Please run the water through for a few seconds to let the temperature settle down. Please check the hot water with your hand before taking a shower. If the unit is not used in winter, drain out the water completely so that the heater does not freeze. Please clean the inlet filter and the shower periodically to keep proper water flow.
Normal Maintenance
Note: Do not attempt to repair this water heater yourself if the unit is not working properly. Call a technician for assistance. The power supply always needs to be shut off before these operations are carried out. To ensure consistent maximum performance of the unit, it is recommended to follow these instructions:
- Periodically remove scale and dirt that may build up at the aerator of the faucet or in the showerhead.
- There is a built-in filter at the inlet connection, which should be cleaned from time to time. Please cut the water supply before doing this. You can reverse the inlet and outlet pipe connections, open the faucet to the max to flush the filter. Remember to reverse back after you get it done.
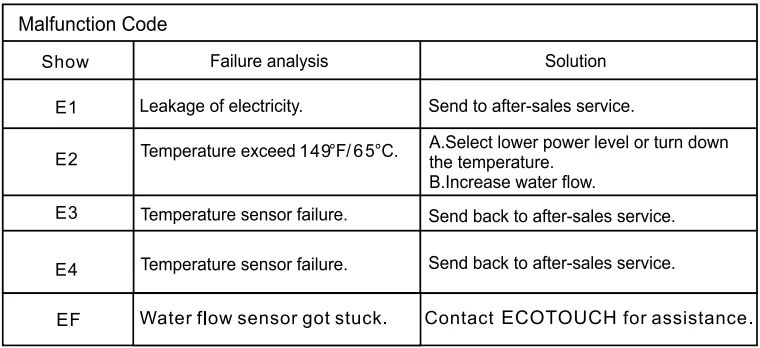
- If the water heater gets an EF code or doesn’t heat up water, you could try cleaning the water flow sensor with instructions from ECOTOUCH Appliances. We also suggest a pre-filter be installed if you don’t have a whole-house water filter.
Important Note
- Any maintenance performed on the water heater unit may introduce air into plumbing pipes. It is important to purge all the air out before powering on again. Failure to do so could cause serious damage to the heating element.
- If you have a water supply with a high level of mineralization (hard water), you should increase the frequency of your maintenance. Check the descale device regularly to see if it is functional.
- Do not use thinner, alcohol, petrol, or any other organic solutions to clean the set. Use only a damp cloth with mild detergent.
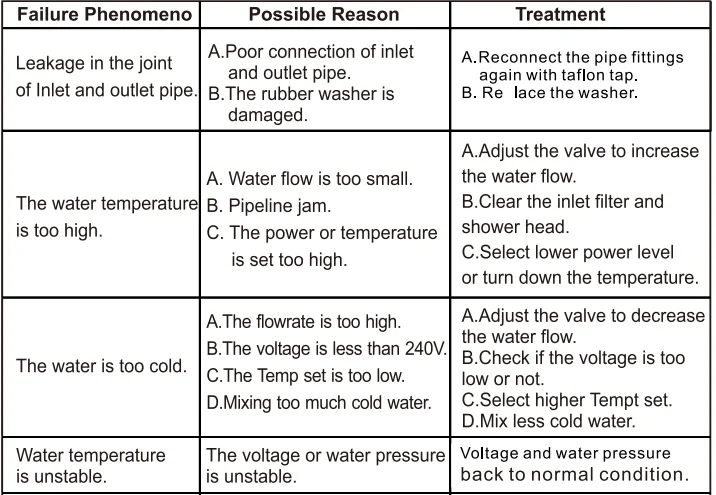
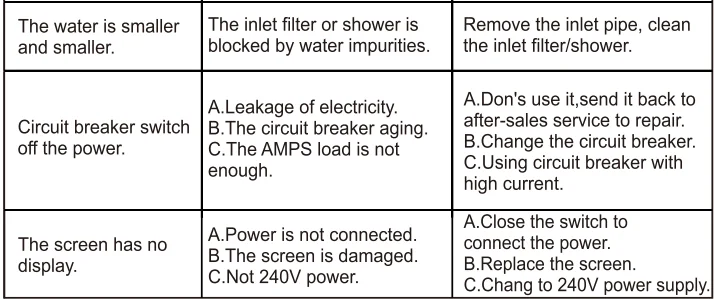
Troubleshooting / Diagnostic Chart


After Sales Service
- One-year warranty for the main unit, and we provide professional after-sales service coverage for its whole lifespan.
- If there is something wrong with your machine, please feel free to contact us; don’t repair it by yourself.
- Please contact us via e-mail: [email protected] with the following information included:
- The product’s name, model, and purchase date.
- The detailed problem of the unit.
- We will do our best to serve and help. Please be assured that you will not suffer any loss from this.
- Please read the warranty card for more details.
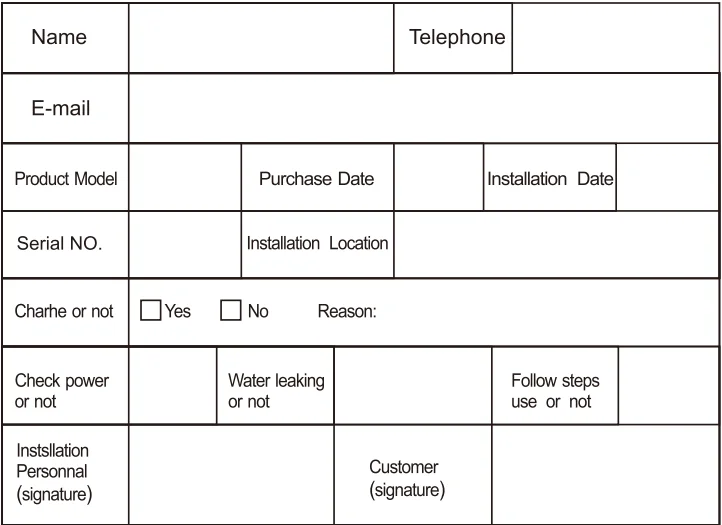
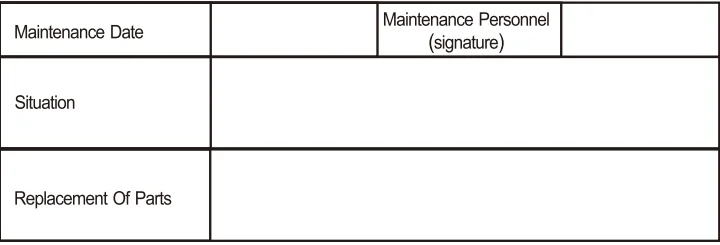
- To protect your right to after-sales service, please fill in the warranty card carefully.
Product packing list.
Product warranty

Customer Need To Know!
When installation is finished, please check and make sure it is in good condition, and then fill in the warranty card. When you need assistance, please send a picture of the warranty card to our customer service: [email protected] with a description of the issue you are having. We will do our best to serve and help. Ensure you will not suffer any loss from this, even though it may exceed the return window or warranty period.
For More Manuals By EcoTouch, Visit ManualsLibraryy.

