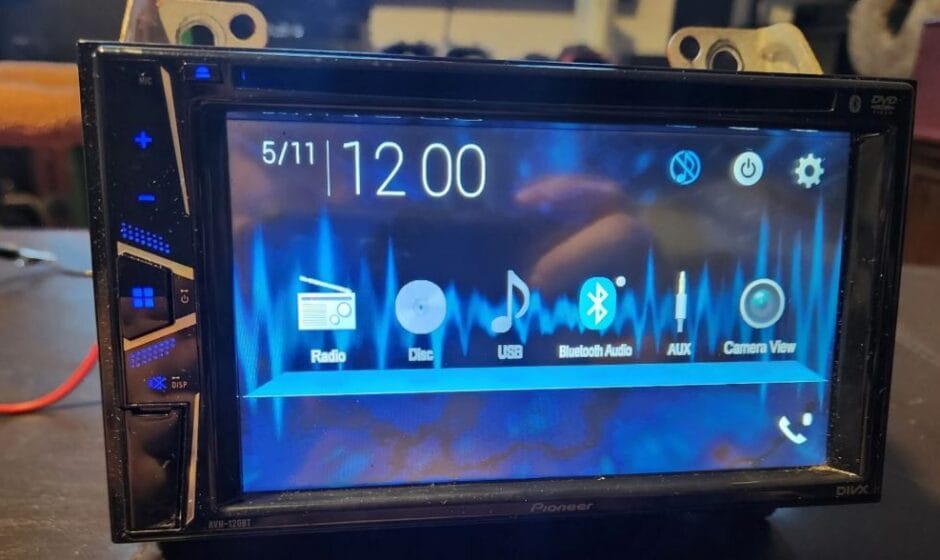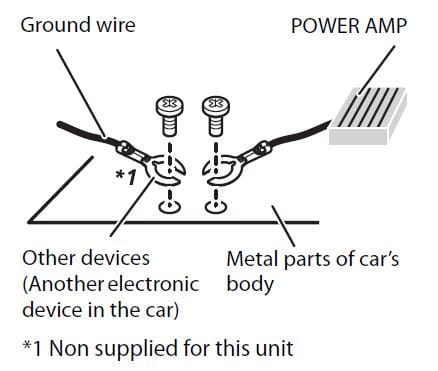
Pioneer AVH-120BT DVD RDS AV Receiver
Precaution
Information to user
- MODEL NO.: AVH-120BT
FCC ID: AJDK106
IC: 775E-K106 - This device contains licence-exempt transmitters)/receiver(s) that complies with Part 15 of FCC Rules and Innovation, Science, and Economic Development Canada licence-exempt RSS(s).
Operation is subject to the following two conditions:- this device may not cause interference, and
- this device must accept any interference, including interference that may cause undesired operation of this device.
- The Bluetooth antenna cannot be removed (or replaced) by user.
- This equipment complies with FCC/ISED radiation exposure limits set forth for an uncontrolled environment and meets the FCC radio frequency (RF) Exposure Guidelines and RSS-102 of the ISED radio frequency (RF) Exposure rules. This equipment has very low levels of RF energy that it deemed to comply without maximum permissive exposure evaluation (MPE).
- This transmitter must not be co-located or operated in conjunction with any other antenna or transmitter.
- Alteration or modifications carried out without appropriate authorization may invalidate the user’s right to operate the equipment.
- NOTE: This equipment has been tested and found to comply with the limits for a Class B digital device, pursuant to Part 15 of the FCC Rules. These limits are designed to provide reasonable protection against harmful interference in a residential installation. This equipment generates, uses and can radiate radio frequency energy and, if not installed and used in accordance with the instructions, may cause harmful interference to radio communications. However, there is no guarantee that interference will not occur in a particular installation. If this equipment does cause harmful interference to radio or television reception, which can be determined by turning the equipment off and on, the user is encouraged to try to correct the interference by one or more of the following measures:
- Reorient or relocate the receiving antenna.
- Increase the separation between the equipment and receiver.
- Connect the equipment into an outlet on a circuit different from that to which the receiver is connected.
- Consult the dealer or an experienced radio/TV technician for help.
CAUTION: USE OF CONTROL OR ADJUSTMENT OR PERFORMANCE OF PROCEDURES OTHER THAN THOSE SPECIFIED HEREIN MAY RESULT IN HAZARDOUS RADIATION EXPOSURE.
CAUTION: THE USE OF OPTICAL INSTRUMENTS WITH THIS PRODUCT WILL INCREASE EYE HAZARD.
Important safety information
WARNING
- Do not attempt to install or service this product by yourself. Installation or servicing of this product by persons without training and experience in electronic equipment and automotive accessories may be dangerous and could expose you to the risk of electric shock, injury or other hazards.
- Do not allow this product to come into contact with liquids. Electrical shock could result. Also, damage to the product, smoke, and overheating could result from contact with liquids.
- If liquid or foreign matter should get inside this product, park your vehicle in a safe place, turn the ignition switch off (ACC OFF) immediately and consult your dealer or the nearest authorized Pioneer Service Station. Do not use this product in this condition because doing so may result in a fire, electric shock, or other failure.
- If you notice smoke, a strange noise or odor from this product, or any other abnormal signs on the LCD screen, turn off the power immediately and consult your dealer or the nearest authorized Pioneer Service Station. Using this product in this condition may result in permanent damage to the system.
- Do not disassemble or modify this product, as there are high-voltage components inside which may cause an electric shock. Be sure to consult your dealer or the nearest authorized Pioneer Service Station for internal inspection, adjustments or repairs. Before using this product, be sure to read and fully understand the following safety information: Do not operate this product, any applications, or the rear view camera option (if purchased) if doing so will divert your attention in any way from the safe operation of your vehicle. Always observe safe driving rules and follow all existing traffic regulations. If you experience difficulty in operating this product, pull over, park your vehicle in a safe location and apply the parking brake before making the necessary
adjustments. - Never set the volume of this product so high that you cannot hear outside traffic and emergency vehicles.
- To promote safety, certain functions are disabled unless the vehicle is stopped and the parking brake is applied.
- Keep this manual handy as a reference for operating procedures and safety information.
- Do not install this product where it may
- obstruct the driver’s vision,
- impair the performance of any of the vehicle’s operating systems or safety features, including air bags or hazard lamp buttons or
- impair the driver’s ability to safely operate the vehicle.
- Please remember to fasten your seat belt at all times while operating your vehicle. If you are ever in an accident, your injuries can be considerably more severe if your seat belt is not properly buckled.
- Never use headphones while driving.
- Rear visibility systems (backup cameras) are required in certain new vehicles sold in the U.S. and Canada. U.S. regulations began according to a two year phase-in on May 1, 2016, and both the U.S. and Canada require that all such vehicles manufactured on or after May 1, 2018 have rear visibility systems. Owners of vehicles equipped with compliant rear visibility systems should not install or use this product in a way that alters or disables that system’s compliance with applicable regulations. If you are unsure whether your vehicle has a rear visibility system subject to the U.S. or Canadian regulations, please contact the vehicle manufacturer or dealer.
If your vehicle has a compliant backup camera that displays the backup view through the factory receiver, do not use the Pioneer receiver unless it is connected to and displays the same view as the factory backup camera. Connection to the factory backup camera will require an adaptor, sold separately. Not all vehicles may be able to connect. Please check with a qualified professional installer for installation options specific to your vehicle.
Parts and control:
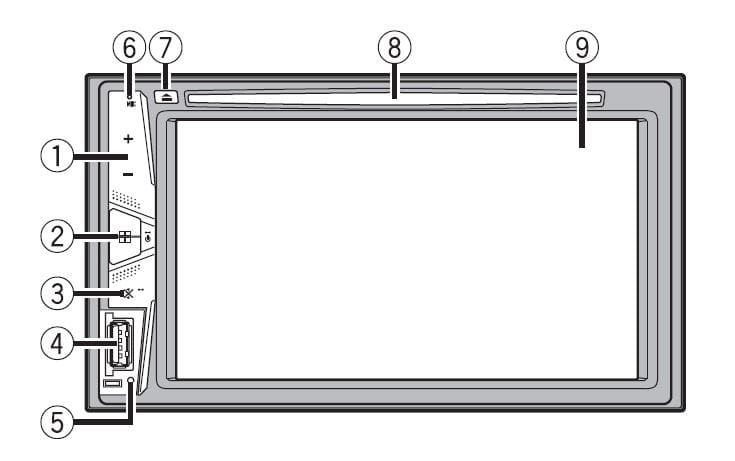


Basic operation
Resetting the microprocessor
CAUTION
- Pressing the feet the reset button reset settings and recorded the content of factory settings.
- Some of the settings and recorded contents will not be reset.
- The microprocessor must be reset under the following conditions:
- Prior to using this product for the first time after installation.
- If this product fails to operate properly.
- If there appear to be problems with the operation of the system.
- Turn the ignition switch OFF.
- Press RESET with a pen tip or other pointed tools. Settings and recorded contents are reset to the factory settings.
Remote control
The remote control is sold separately. For details concerning operations, see the remote
control manual.
Starting up the unit
- Start the engine to boot up the system. The [Select Program Language] screen appears.
NOTE: From the second time on, the screen shown will differ depending on the previous conditions. - Touch the language.
- Touch →
The top menu screen appears.
Using the touch panel
You can operate this product by touching the keys on the screen directly with your fingers.
NOTE: To protect the LCD screen from damage, be sure to touch the screen only with your finger gently.
Common touch panel keys
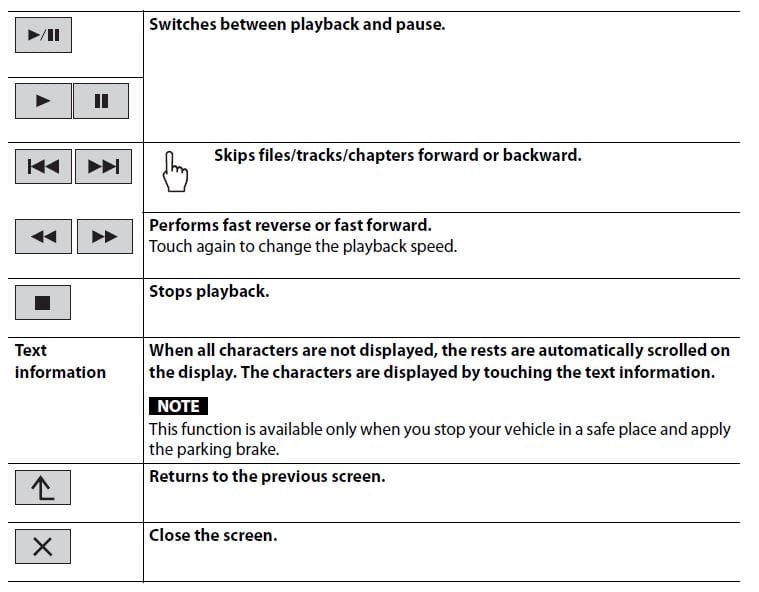
Operating lists screens

Top menu screen
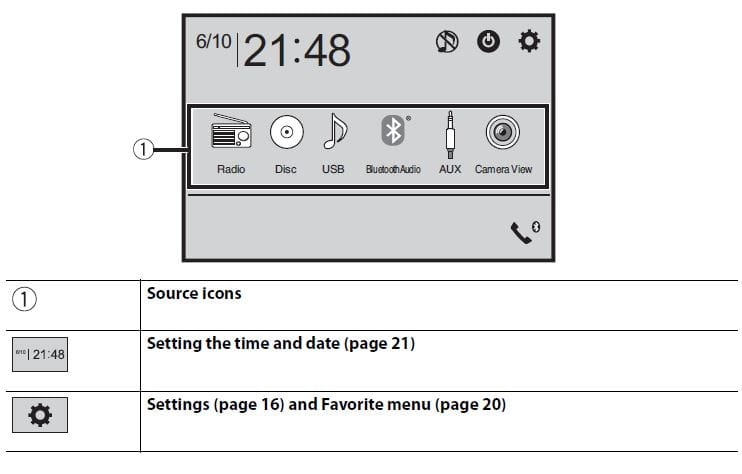
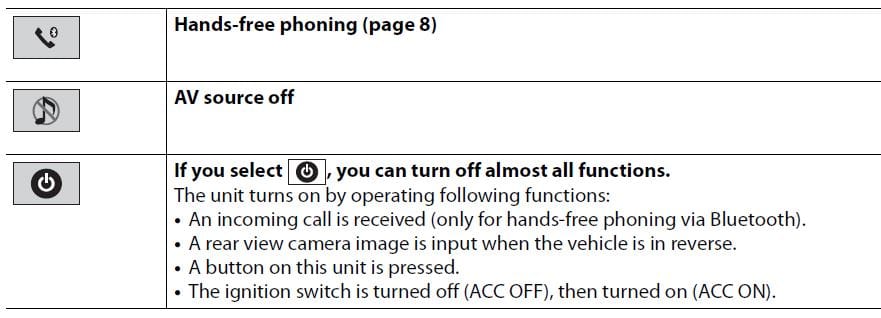
Bluetooth
Bluetooth connection
- Turn on the Bluetooth function on the device.
- Press
 .
. - Touch the Settings icon then the Bluetooth icon.
The Bluetooth menu screen appears. - Touch [Connection].
- Touch the Search icon.
The unit starts to search for available devices, then displays them in the device list. - Touch the Bluetooth device name.
After the device is successfully registered, a Bluetooth connection is established by the
system. Once the connection is established, the device name is displayed on the list.
NOTES:
- If three devices are already paired, [Memory Full) is displayed. Delete a paired device first (page 8).
- If your device supports SSP (Secure Simple Pairing), a six-digit number appears on the display of this product. Touch [Yes) to pair the device.
- The search icon is invalid when the device is already connected, during connection or disconnected.
- Before connecting from the Bluetooth device, make sure that the connection of this product and
other Bluetooth devices is disconnected.
Bluetooth settings
- Press

- Touch the Settings icon then the Bluetooth icon.
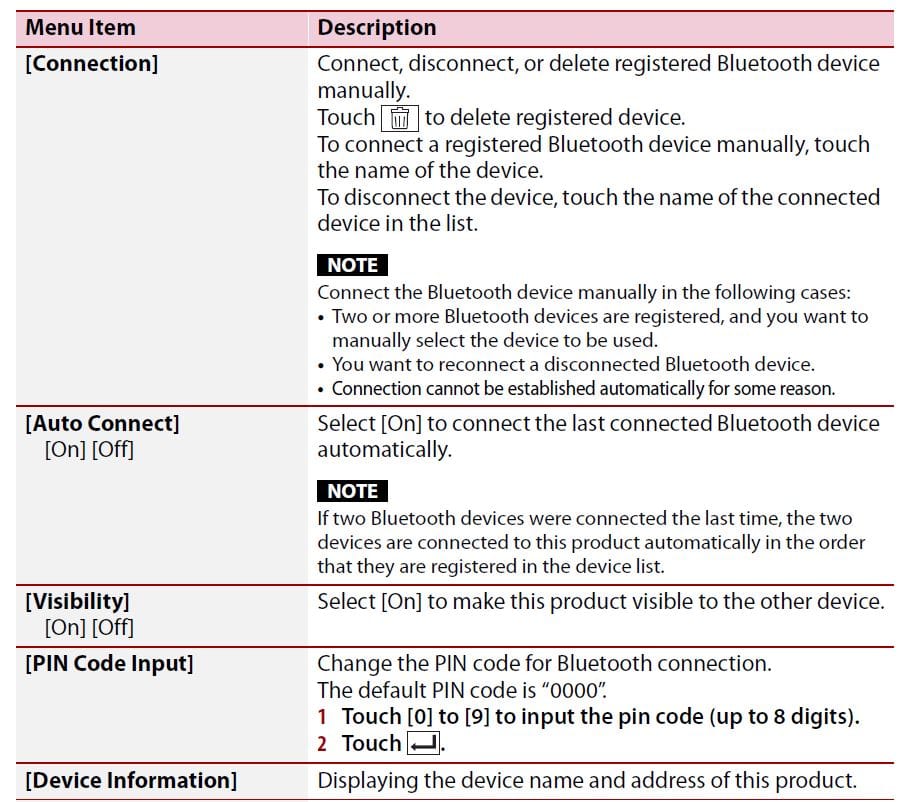
CAUTION
Never turn this product off and disconnect the device while the Bluetooth setting operation is being processed.
Switching the connected Bluetooth device
You can switch among the connected Bluetooth devices using the switch devices key in the Bluetooth menu.
- You can register up to three Bluetooth devices on this product (page 7).
- The Bluetooth audio player can be switched to other Bluetooth devices on the Bluetooth audio playback screen.
- Only one device can be connected as a hands-free phoning.
- The hands-free phoning is also switched when the connected device via Bluetooth is switched.
Hands-free phoning
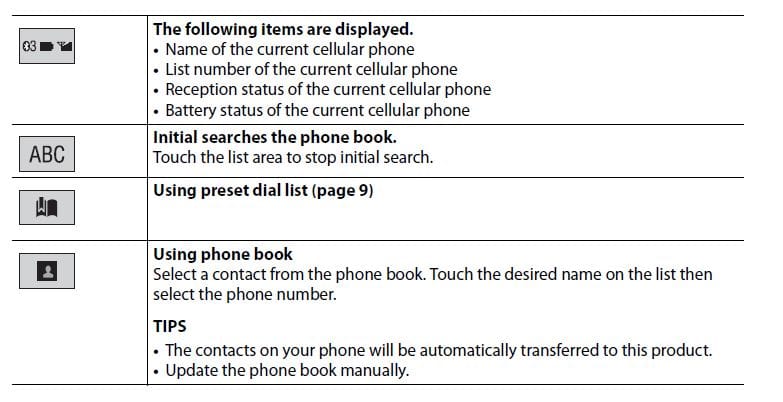
To use this function you need to connect your cellular phone to this product via Bluetooth in advance (page 7).
Making a phone call
- Press , then touch
 &
& . The phone menu screen appears.
 - Touch one of the call icons on the phone menu screen.

AV source
Supported AV source
You can play or use the following sources with this product.
- Radio
- CD
- ROM (Compressed audio or video files on discs)
- DVD-Video
- USB
The following sources can be played back or used by connecting an auxiliary device. - Blutooth® audio
- AUX
Selecting a source
Source on the AV source selection screen
- Press

- Touch the source icon.
When you select![]() the AV source is turned off.
the AV source is turned off.
Source on the source list
- Touch
 on the AV Source screen.
 - Touch the source key.
When you select (Source OFF), the AV source is turned off.
Smartphone connection for AV source
When using a smartphone with this product, the settings are automatically configured according to the device to be connected.
NOTES:
- Operating method may vary depending on the smartphone and its software version.
- depending on the version of smartphone OS, it may not be compatible with this unit.
Smartphone (Android™™ device)
These are the methods to connect a smartphone to this product. The available sources vary depending on the connection method.
- Connecting via Bluetooth (page 11)
- Connecting via USB (page 11)
Compatible smartphones
Compatibility with all smartphones is not guaranteed. For details about smartphone compatibility with this product, refer to the information on our website.
Connecting via Bluetooth
The following sources are available when a smartphone is connected to the unit viaBluetooth.
- Bluetooth audio
- Connect a smartphone with this product via Bluetooth (page 7).
- Press

- Touch compatible desired source.
Connecting via USB
The following sources are available when a smartphone is
- connected to the unit via USB.
- connect a smartphone with this product via USB (page 23)
- Press

- Touch compatible desired source.
Radio
Starting procedure
- Press

- Touch (Radio).
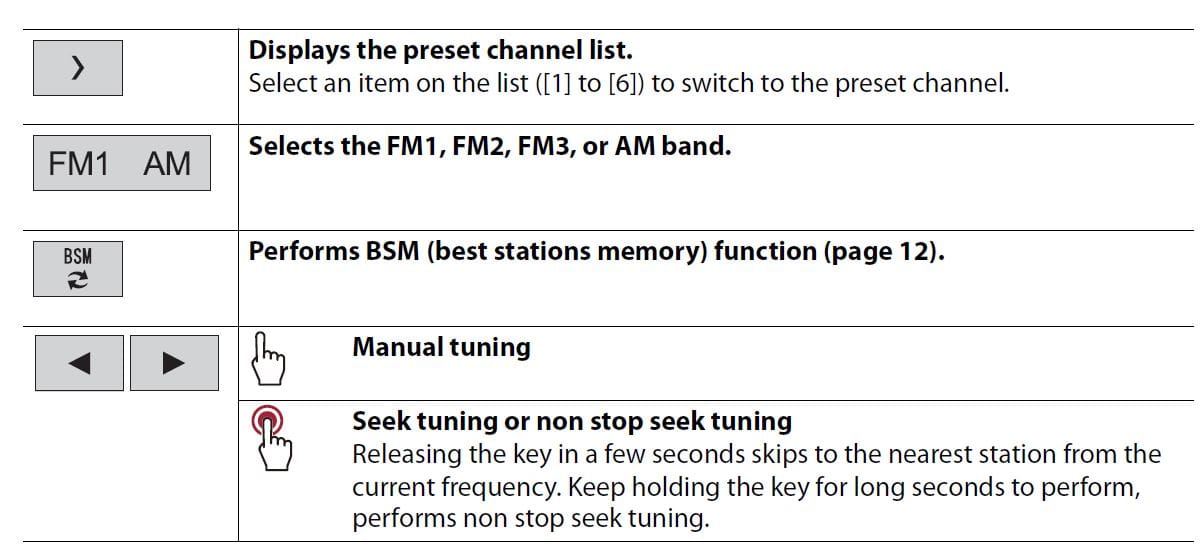
The Radio screen appears.

Storing the strongest broadcast frequencies (BSM)
The BSM (best stations memory) function automatically stores the six strongest broadcast frequencies under the preset channel keys (1) to (6).
NOTES
- Storing broadcast frequencies with BSM may replace those you have already saved.
- Previously stored broadcast frequencies may remain stored if the number of frequencies stored has
not reached the limit.- Touch
 ₴ to begin search.
While searching, the six strongest broadcast frequencies will be stored under thevpreset channel keys in the order of their signal strength.
- Touch
To cancel the storage process
- Touch [Cancel].
Radio settings
- Press

- Touch the Settings icon then tools. The system setting screen appears.
- Touch [AV Source Settings].
- Touch [Radio settings).
The menu items vary according to the source.
Disc
Inserting and ejecting a disc
You can play a normal music CD, Video-CD, or DVD-Video using the built-in drive of this product.
CAUTION: Do not insert anything other than a disc into the disc-loading slot.
Insert the disc
- Insert a disc into the disc-loading slot. The source changes and then playback will start.
NOTE: If the disc is already set, select (Disc) as the playing source.
Ejecting a disc
- Press
 .
.
Basic operation
TIPS
- If a Video-CD with PBC (playback control) ON is being played,
 appears.
 - You can set the screen size for the video image (page 21).|
Audio source
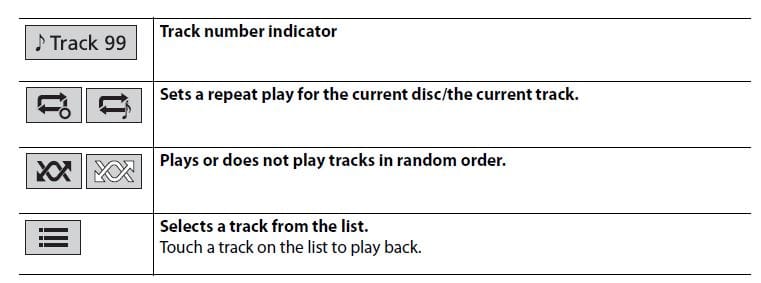
Description of Audio source screen
Video source
CAUTION
For sales reasons video images pyot be veng while your vehicle 5 in motion. To view video
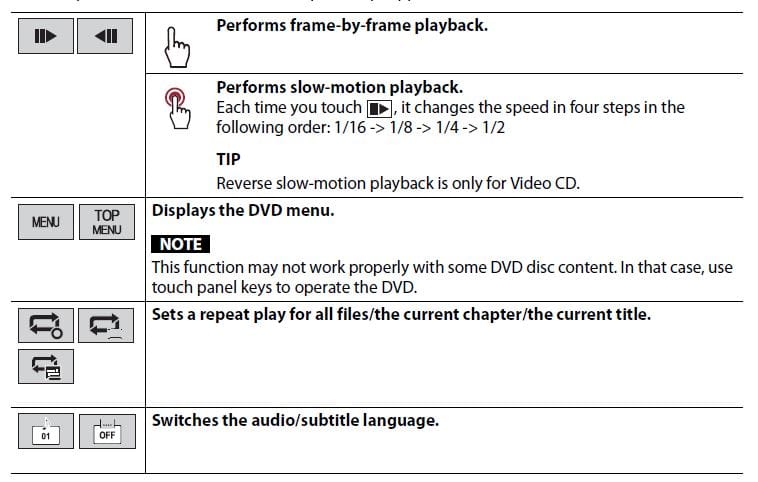
Description of Video source screen
TIP
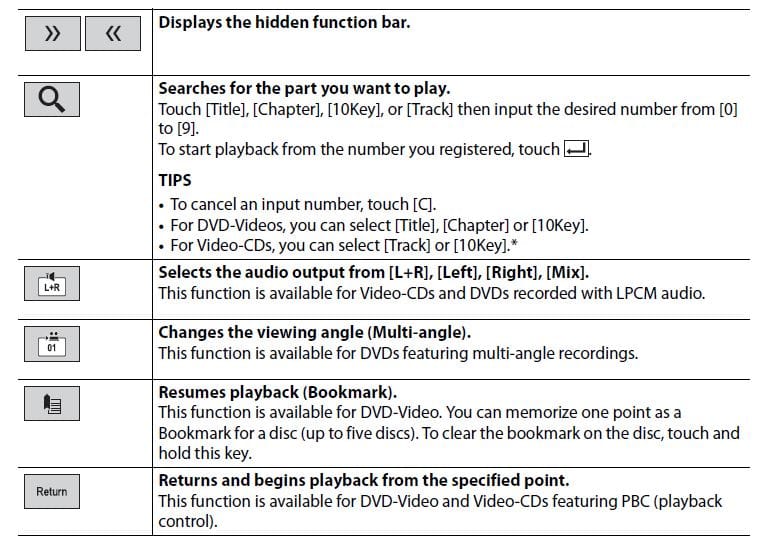
Touch anywhere on the screen, the touch panel keys appear.
Connection
Precautions
Your new product and this manual
- Do not operate this product, any applications, or the rear view camera option (if purchased) if doing so will divert your attention in any way from the safe operation of your vehicle. Always observe safe driving rules and follow all existing traffic regulations. If you experience difficulty in operating this product, pull over, park your vehicle in a safe location and apply the parking brake before making the necessary adjustments.
- Do not install this product where it may
- obstruct the driver’s vision,
- impair the performance of any of the vehicle’s operating systems of safety features, including airbags, hazard lamp buttons, or
- impair the driver’s ability to safely operate the vehicle. In some cases, it may not be possible to install this product because of the vehicle type or the shape of the vehicle interior.
Important safeguards
WARNING
Pioneer does not recommend that you install this product yourself. This product is designed for professional installation only. We recommend that only authorized Pioneer service personnel, who have special training and experience in mobile electronics, set up and install this product. NEVER SERVICE THIS PRODUCT YOURSELF. Installing or servicing this product and its connecting cables may expose you to the risk of electric shock or other hazards, and can cause damage to this product that is not covered by warranty.
Precautions before connecting the system
WARNING
Do not take any steps to tamper with or disable the parking brake interlock system which is in place for your protection. Tampering with or disabling the parking brake interlock system could result in serious injury or death.
CAUTION
- Secure all wiring with cable clamps or electrical tape. Do not allow any bare wiring to remain exposed.
- Do not directly connect the yellow lead of this product to the vehicle battery. If the lead is directly connected to the battery, engine vibration may eventually cause the insulation to fail at the point where the wire passes from the passenger compartment into the engine compartment. If the yellow lead’s insulation tears as a result of contact with metal parts, short-circuiting can occur, resulting in considerable danger.
- It is extremely dangerous to allow cables to become wound around the steering column or shift lever. Be sure to install this product, its cables, and wiring away in such so that they will not obstruct or hinder driving.
- Make sure that the cables and wires will not interfere with or become caught in any of the vehicle’s moving parts, especially the steering wheel, shift lever, parking brake, sliding seat tracks, doors, or any of the vehicle’s controls.
- Do not route wires where they will be exposed to high temperatures. If the insulation heats up, wires may become damaged, resulting in a short circuit or malfunction and permanent damage to
the product. - Do not shorten any leads. If you do, the protection circuit (fuse holder, fuse resistor or filter, etc.) may fail to work properly.
- Never feed power to other electronic products by cutting the insulation of the power supply lead of this product and tapping into the lead. The current capacity of the lead will be exceeded, causing overheating.
Before installing this product
- Use this unit with a 12-volt battery and negative grounding only. Failure to do so may result in a fire or malfunction.
- To avoid shorts in the electrical system, be sure to disconnect the (–) battery cable before installation.
To prevent damage
WARNING
- When speaker output is used by 4 channels , use speakers over 50 W (Maximum input power) and between 4 Ω to 8 Ω (impedance value). Do not use 1 Ω to 3 Ω speakers for this unit.
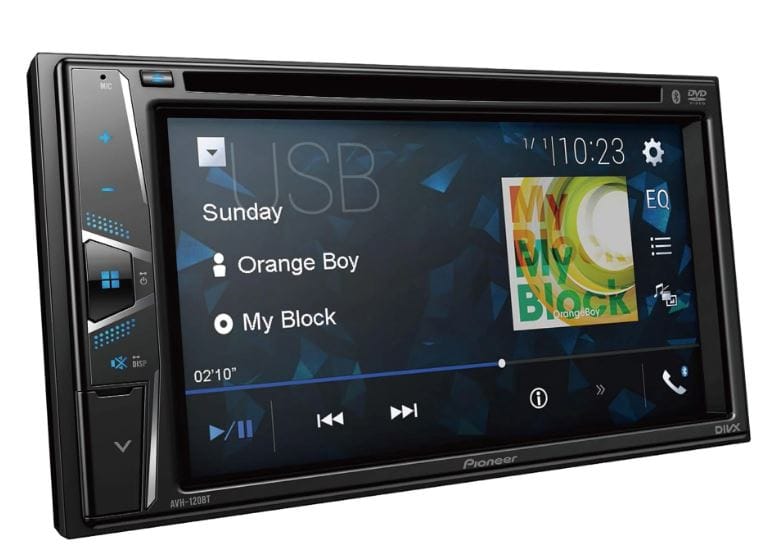
- The black cable is ground. When installing this unit or power amp (sold separately), make sure to connect the ground wire first. Ensure that the ground wire is properly connected to metal parts of the car’s body. The ground wire of the power amp and the one of this unit or any other device must be connected to the car separately with different screws. If the screw for the ground wire loosens or falls out, it could result in fire generation of smoke or malfunction.

- When replacing the fuse, be sure to only use a fuse of the rating prescribed on this product.
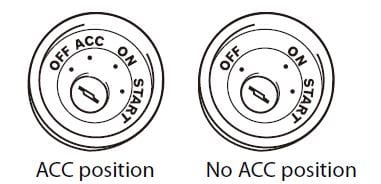
- This product cannot be installed in a vehicle without ACC (accessory) position on the ignition switch.
- To avoid short-circuiting, cover the disconnected lead with insulating tape. It is especially important to insulate all unused speaker leads, which if left uncovered may cause a short circuit.
- For connecting a power amp or other devices to this product, refer to the manual for the product to be connected.
- The graphical symbol
 placed on the product means direct current.
Notice for the blue/white lead
- When the ignition switch is turned on (ACC ON), a control signal is output through the blue/white lead. Connect to an external power amp’s system remote control terminal, the auto-antenna relay control terminal, or the antenna booster power control terminal (max. 300 mA 12 V DC). The control signal is output through the blue/white lead, even if the audio source is switched off.
Rear panel
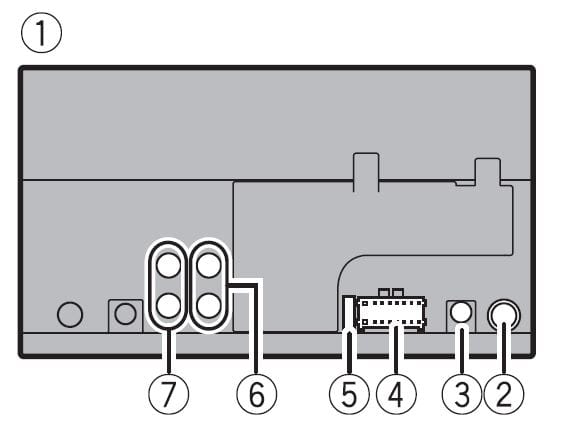
- This product
- Antenna jack
- Wired remote input Connect to steering wheel control interface of your vehicle. For more details, consult your dealer.
- Power supply
- Fuse (10 A)
- Front output
- Rear/Subwoofer output
Power cord
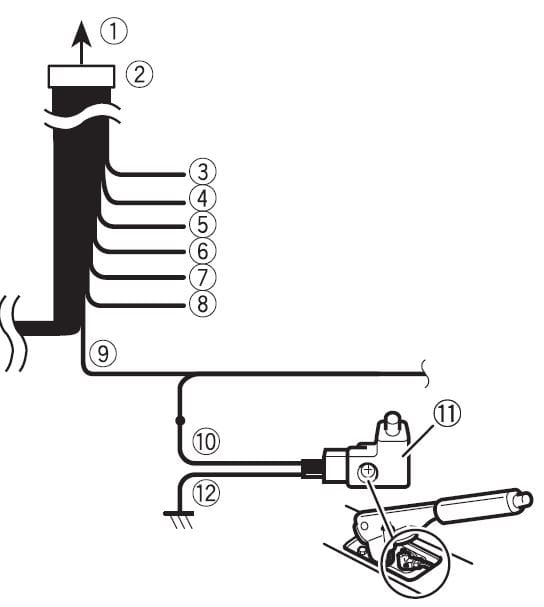
- To power supply
- Power cord
- Yellow
To terminal supplied with power regardless of ignition switch position. - Red
To electric terminal controlled by ignition switch (12 V DC) ON/OFF - Orange/white
To lighting switch terminal. - Black (ground)
To vehicle (metal) body. - Violet/white
Of the two lead wires connected to the back lamp, connect the one in which the voltage changes when the gear shift is in the REVERSE (R) position. This connection enables the unit to sense
whether the car is moving forward or backward. - Blue/white
Connect to system control terminal of the power amp (max. 300 mA 12 V DC). - Light green
Used to detect the ON/OFF status of the parking brake. This lead must be connected to the power supply side of the parking brake switch. - power supply side.
- parking brake switch.
- ground side.
Speaker leads:
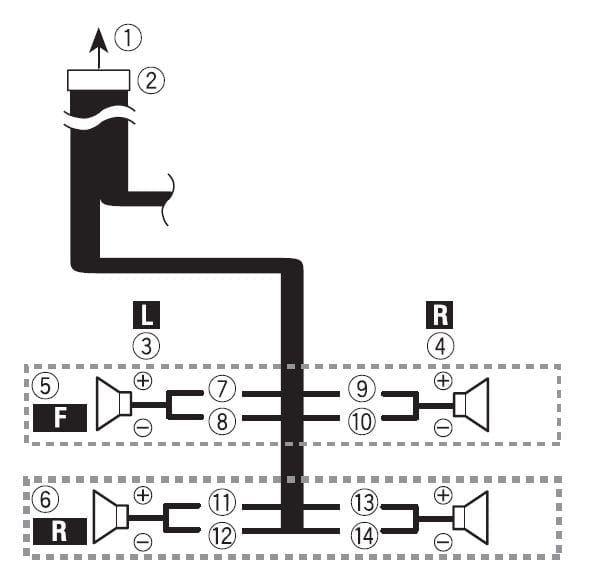
- To power supply
- Power cord
- Left
- Right
- Front speaker
- Rear speaker
- White
- White/black
- Gray
- Green
- Gray/black
- Green/black
- Violet
- Violet black
Note:
With a two-speaker system, do not connect anything to the speaker leads that are not connected to speakers.
Power amp (sold separately)
without internal amp
Important
The speaker leads are not used when this connection is in use.
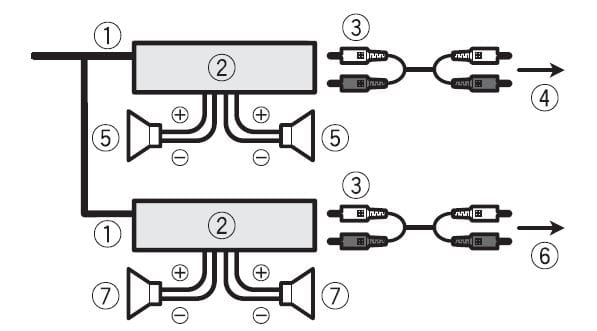
with internal amp
Important
Front speaker and Rear speaker are output from the speaker leads when this connection is in use
- System remote control(Connect to Blue/white cable
- Power amp (sold separately)
- Connect with RCA cable (soldseparately)
- To Rear or subwoofer output)
- Rear speaker or subwoofer
- To Front output
- Front speaker
- Subwoofer
NOTES
- You can change the RCA output of the subwoofer depending on your subwoofer system
- The subwoofer output of this product is monaural.
Smartphone (Android device)
Compatible smartphones
Compatibility with all smartphones is not guaranteed.
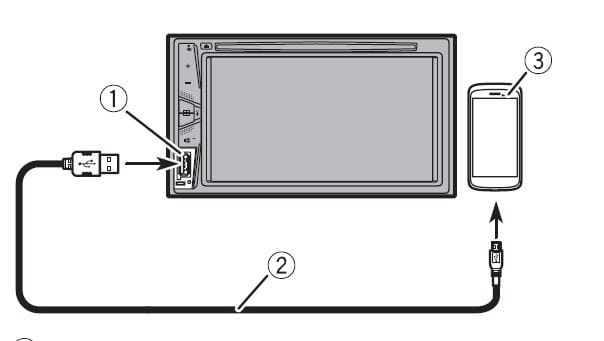
Connecting via the USB port
- USB port
- USB – micro USB cable (Type USB A – micro USB B) (supplied with CD-MU200 (sold separately) USB Type-C cable (Type USB A – USB C) (supplied with CD-CU50 (sold separately)
- Smartphone
NOTE: The length of Type USB A – micro USB B cable cannot exceed 2m (6 ft. 6 in.) and Type USB A – USB C cannot exceed 4 m (13 ft. 1in.) according to the USB cable standard. When using a cable other than the above conditions, the main unit function may not operate properly.
Camera
About rear view camera
When you use the rear view camera, the rear view image is automatically switched from the video by moving the shift lever to REVERSE (R). Camera View mode also allows you to check what is behind you while driving.
warning
USE INPUT ONLY FOR REVERSE OR MIRROR IMAGE REAR VIEW CAMERA. OTHER USE MAY RESULT IN INJURY OR DAMAGE.
caution
- The screen image may appear reversed.
- With the rear view camera you can keep an eye on trailers, or back into a tight parking spot. Do not use for entertainment purposes.
- Objects in rear view may appear closer or more distant than in reality.
- The image area of full-screen images displayed while backing or checking the rear of the vehicle may differ slightly.
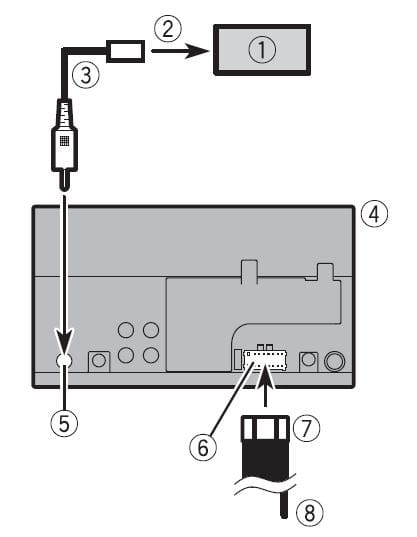
- Rear view camera (ND-BC8) (soldseparately)
- To video output
- RCA cable (supplied with ND-BC8)
- This product
- Rear view camera input (R.C IN)
- Power supply
- Power cord
- Violet/white (REVERSE-GEAR SIGNAL INPUT)
Refer to Power cord on page 23.
Note:
- For mounting the camera, follow the instructions for mounting the camera. Use a camera whose power lead is connected to the ACC switch.
- Connect only the rear view camera to R.C IN. Do not connect any other equipment.
- Some appropriate settings are required to use rear view cameras. For details, refer to [Camera Settings] (page 16).
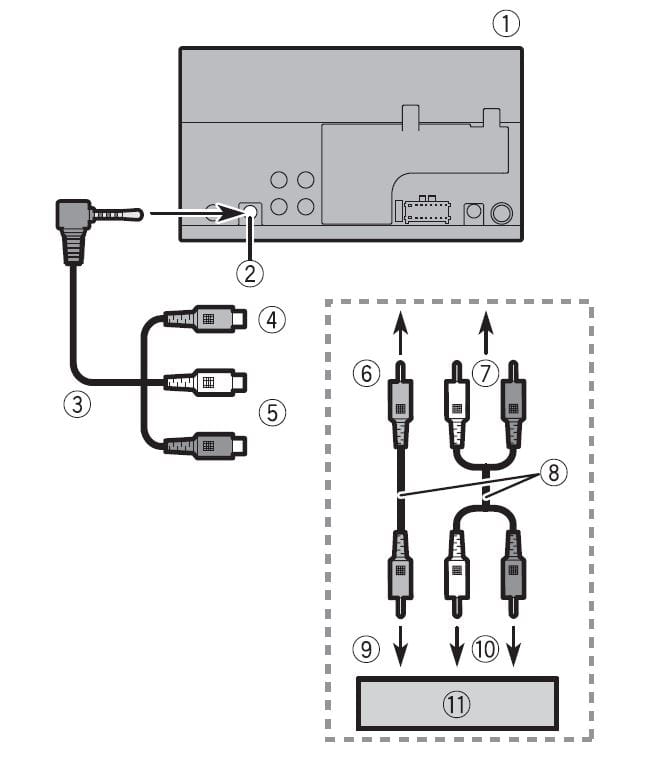
- This product
- AUX input
- Mini-jack AV cable (sold separately
- Yellow
- Red, white
- To Yellow
- To Red, white
- RCA cables (sold separately)
- To video output
- To audio outputs
- External video components (sold separately)
For more manuals by Pioneer visit, ManualsLibraryy
Pioneer AVH-120BT DVD RDS AV Receiver-FAQs
How do I reset a Pioneer receiver?
Set the receiver to “Source Off,” then access the settings menu via the gear icon. Wait for the restore process to finish, and the receiver will reboot.
How do I clear Bluetooth memory?
On Android, go to Settings > Apps > Bluetooth > Storage > Clear Data, and confirm by tapping OK.
What is the mute wire on a Pioneer radio?
The mute wire is used to pause audio or media playback when a connected device signals the receiver to mute.
How do I fix a stereo receiver that’s not making sound?
1. Check the power connections.
2. Verify speaker/source selection.
3. Inspect speaker wires and speakers.
4. Test the source components.
How do I uninstall Bluetooth?
Open Device Manager, find the Bluetooth adapter, right-click, and select Uninstall Device > Uninstall to remove it.
What is Bluetooth Legacy?
Legacy pairing, used in Bluetooth 2.0 and earlier, involves entering a shared PIN code for secure device connections.
Where is the Bluetooth cache located?
On Android, go to Settings > Apps > Bluetooth > Storage, then tap Clear Cache to reset Bluetooth data.
How do I delete my Pioneer DJ account?
Visit the Pioneer DJ account cancellation page at Pioneer DJ Account Cancelation, log in, and follow the prompts.
How do I connect speaker wires to a speaker?
1. Locate the speaker terminals.
2. Strip 0.5 inches of insulation from the wire ends.
3. Insert the bare wire into the terminals.
4. Repeat for all speakers in your system.
How do I delete my audio account (e.g., Amazon Audible)?
Log in to your Amazon account, go to Close Your Amazon Account, check the box to confirm, and click Close My Account.

