Nordson PatternJet Adhesive Dispensing Gun
Safety Information
- Research and evaluate safety information from all applicable sources, including the owner-specific safety policy, best industry practices, governing regulations, material manufacturer’s product information, and this document.
- Make safety information available to equipment users in accordance with governing regulations. Contact the authority having jurisdiction for information.
- Maintain safety information, including the safety labels affixed to the equipment, in readable condition.
Instructions, Requirements, and Standards
- Ensure that the equipment is used in accordance with the information provided in this document, governing codes and regulations, and best industry practices.
- If applicable, receive approval from your facility’s engineering or safety department, or other similar function within your organization, before installing or operating the equipment for the first time.
- Provide appropriate emergency and first aid equipment.
- Conduct safety inspections to ensure required practices are being followed.
- Re-evaluate safety practices and procedures whenever changes are made to the process or equipment.
User Qualifications
Equipment owners are responsible for ensuring that users:
- Receive safety training appropriate to their job function as directed by governing regulations and best industry practices
- are familiar with the equipment owner’s safety and accident prevention policies and procedures
- receive, equipment- and task-specific training from another qualified individual
NOTE: Nordson can provide equipment-specific installation, operation, and maintenance training. Contact your Nordson representative for information - possess industry- and trade-specific skills and a level of experience appropriate to their job function
- are physically capable of performing their job function and are not under the influence of any substance that degrades their mental capacity or physical capabilities.
Safety Labels and Tags
Figure 1 illustrates the location of the product safety labels and tags affixed to the equipment. Table 2 provides an illustration of the hazard identification symbols that appear on each safety label and tag, the meaning of the symbol, or the exact wording of any safety message.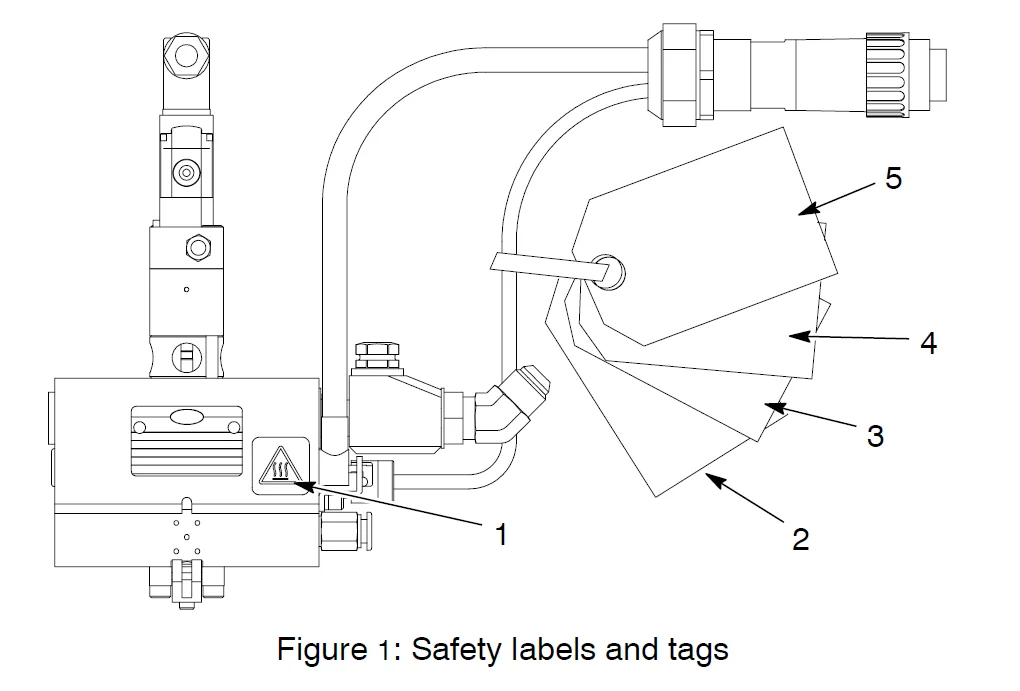
Description
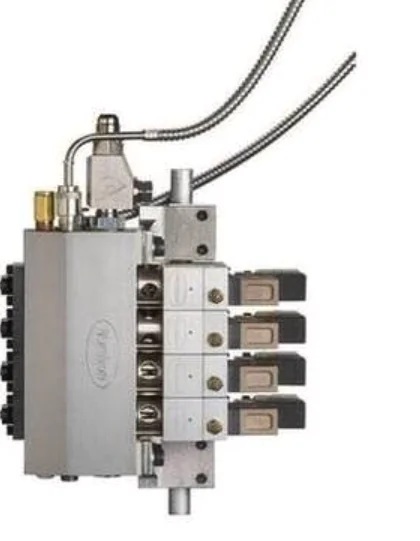
The PatternJet gun accurately applies adhesives on high-speed labeling applications. Available nozzles include Universal Controlled Fiberization (CF), Universal Summit, MiniBead, and slot. Figure 2 shows the key components of the PatternJet module parts family.
Theory of Operation
Adhesive is heated to application temperature, which is typically about 177 °C (350 °F), in a melter. The melter pumps the adhesive through a heated hose to the gun. The gun then dispenses the adhesive through dispensing modules onto a product. The type of nozzle used on the modules determines the type of adhesive pattern produced. The gun requires two air supplies: one to actuate the modules (module-actuating air) and one to supply the air that shapes or fiberizes the adhesive exiting the modules (pattern air). The module-actuating air is controlled through solenoid valves that are installed on the gun and connected to a module-actuating air supply line with an air pressure regulator. The pattern air is usually controlled through an air pressure regulator installed in a pattern air supply line. The adhesive manifold and heated air manifold are heated by cartridge-type heaters. Power is supplied to the heaters through a cord set, which is electrically connected to the hose or to a combination of splitter and extension cables. Resistance temperature detectors (RTDs) sense the temperature of the adhesive or air in the manifolds and relay the temperature through the cordsets and hoses to a melter control system or to a standalone temperature controller. The pattern in which adhesive is dispensed onto the product is determined by: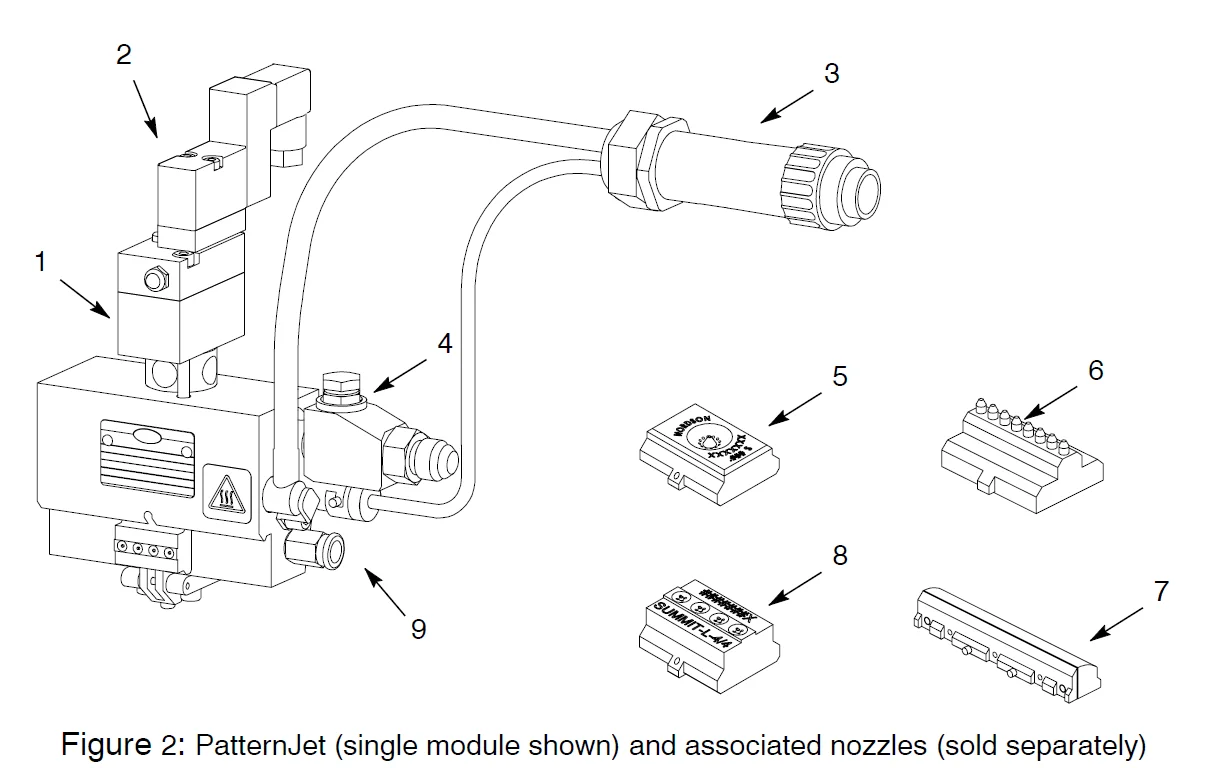
- the number and spacing of the modules
- the choice of the nozzle
- The distance at which the nozzle is placed above the product
- the production line speed
- the adhesive add-on weight (melter pump speed and pressure)
- the pattern of air pressure
- the pattern of air temperature
- the adhesive application temperature
- the type of adhesive used
- The viscosity of the adhesive used
- PatternJet control module
- Solenoid valve
- Cordset
- Saturn filter
- Universal CF nozzle
- MiniBead nozzle
- Slot nozzle
- Summit nozzle
- Pattern air inlet adapter
Module Overview
The PatternJet gun is air-actuated (or air-open), meaning that an air supply controlled by a solenoid valve is required to open the module. The actuating air lifts the needle-and-piston assembly inside the module, thus opening the module and allowing adhesive to flow through the nozzle onto the product. Modules are also air-closed. In air-open, air-close (AOAC) modules, the actuating air (rather than a spring) returns the needle-and-piston assembly to the closed position. A separate air supply is used to supply pattern air to the module; this air enters the pattern air inlet and is directed onto the adhesive exiting the nozzle, creating the desired spray pattern.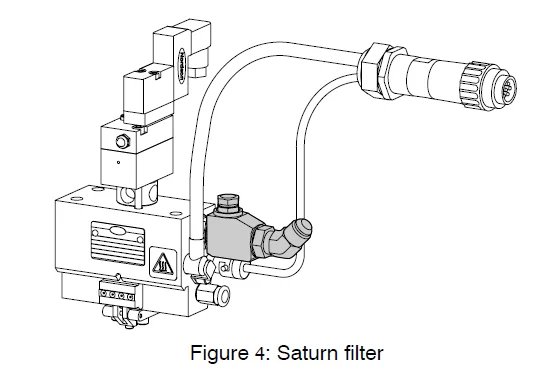
Installation
Mount the Gun
Mounting the gun includes selecting an appropriate mounting location and installing any necessary mounting hardware on the production line.
- Select a mounting location. Use the following guidelines:
- Make sure there will be enough clearance to
- Service the Saturn filter
- drain adhesive
- replace heaters, sensors, or thermostats
- replace a solenoid valve, module, or nozzle
- route and replace air tubing and hoses
NOTE: Refer to the gun reference drawing in Parts for the gun dimensions. - Choose a location that will not subject the gun to extreme temperature variations or equipment vibration. The ambient temperature should be 0−49 °C (32−120 °F).
- Choose a location that will allow you to properly route the hoses from the gun to the melter.
- Choose a location close to a supply of dry, regulated, unlubricated air.
- Secure the gun at the mounting location. Adjust the gun height and angle as appropriate.
NOTE: The gun should be parallel to the surface onto which the adhesive is to be applied.
Connect the Hose
Do not connect the hose cordsets at this time.
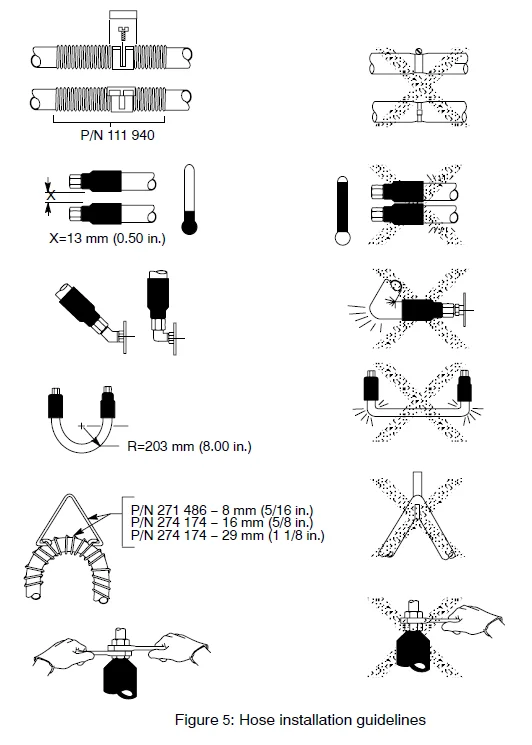
- Observe the guidelines in Figure 5.
See Figure 4. - Connect the hose to the Saturn filter adhesive supply port on the gun.

CAUTION: Risk of equipment damage. Do not use nonconductive pipe compound or tape on hose fittings.
CAUTION: Improper routing and venting of hoses could result in overheating, damage, and poor adhesive flow. To ensure proper operation, do not bundle or tie-wrap hoses, do not bend hoses at sharp angles, and do not allow hoses to lie on concrete floors or other cool surfaces that could conduct heat away from the hoses. - Route the hose to the melter and connect it to the melter hydraulically and electrically as directed in the melter manual.
Operation
WARNING: Allow only personnel with appropriate training and experience to operate or service the equipment. The use of untrained or inexperienced personnel to operate or service the equipment can result in injury, including death, to themselves and others, and damage to the equipment.
This section provides procedures for operating the gun. Before you operate the gun for the first time, make sure you have
- completed the installation procedures in Installation
- flushed the gun
- optimized the gun output for your application as described in Gun Testing in Installation.
Before you perform any operating procedures, review the Safety section of this manual.
Starting and Shutting Down the Gun
Because the melter supplies the adhesive and the electrical power to the gun, the procedures for starting and stopping the gun vary depending on the type of melter you are using. Refer to the melter manual for complete startup and shutdown procedures.
Start the Gun
Starting the gun involves starting the melter and enabling the module-actuating and pattern air supplies. Refer to the melter manual as needed to operate the melter.
- Start the melter and heat the system to application temperature.
- Turn on the pattern air.
- Turn on the module-actuating air.
- Start the melter pump(s).
- Start the production line.
NOTE: Pneumatic and hydraulic pressure ranges are provided in Specifications.
Shut Down the Gun
- Stop the production line.
- Stop the melter pump(s).
- Relieve system pressure. Refer to Safety.
- Shut off the pattern air.
- Shut off the module-actuating air.
- Shut down the melter.
Adjust the Adhesive Pattern
Use the following techniques to modify the adhesive pattern:
- Adjust the adhesive add-on weight (melter pump speed and pressure)
- Adjust the electronic control device (timer or pattern controller)
- Adjust the pattern air pressure
- Adjust the pattern air temperature
- Adjust the adhesive application temperature
- change the type of adhesive used
- \change the nozzle type or size
- Adjust the gun height
If you experience problems obtaining the desired adhesive pattern, refer to the pattern control troubleshooting table in Troubleshooting.
Maintenance
WARNING: Allow only personnel with appropriate training and experience to operate or service the equipment. The use of untrained or inexperienced personnel to operate or service the equipment can result in injury, including death, to themselves and others, and damage to the equipment.
This section contains a list of recommended maintenance activities and a recommended schedule for performing those activities. Attempting any other maintenance procedures can result in equipment damage, improper system operation, or personal injury. Before you perform any maintenance procedures, review the Safety section.
Required Tools and Supplies
To perform maintenance or repairs, you will need:
- a set of metric Allen (hex) wrenches
- a set of metric T-handle hex keys
- a set of metric open-ended wrenches
- drain pans and large waste containers
- other tools and supplies as noted
Recommended Maintenance Schedule
Table 4 provides a list of recommended maintenance activities. Base how often you perform these activities on your specific operating needs. The frequency shown is for reference only.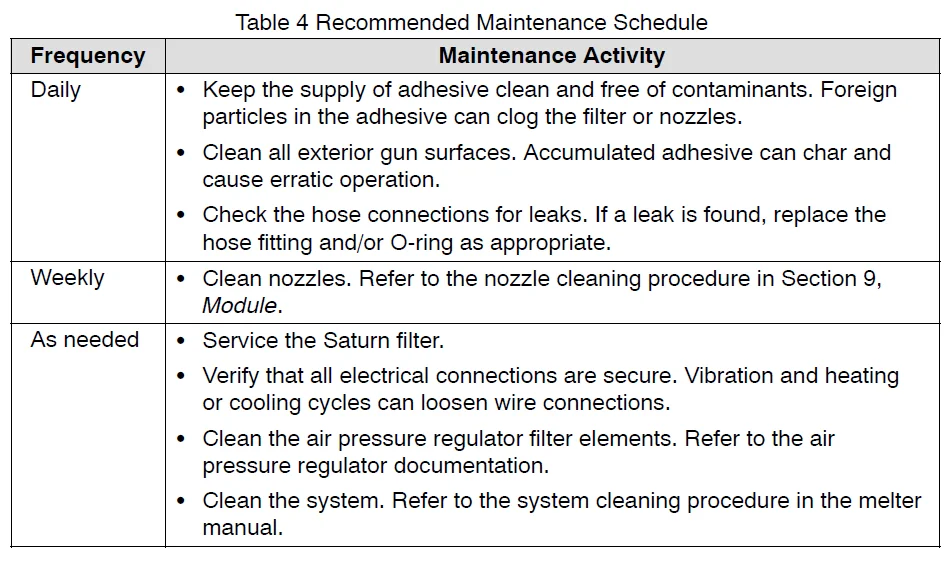
Troubleshooting
WARNING: Allow only personnel with appropriate training and experience to operate or service the equipment. The use of untrained or inexperienced personnel to operate or service the equipment can result in injury, including death, to themselves and others, and damage to the equipment.
This section contains troubleshooting procedures. These procedures cover only the most common problems that you may encounter. If you cannot solve the problem with the information given here, contact your Nordson representative for assistance. Troubleshooting begins when the flow of adhesive from the gun stops or diminishes unexpectedly or when a control system alerts you of a problem through an alarm or visual display.
Troubleshooting Tables
The troubleshooting tables in this section describe the kinds of problems you may encounter and provide corrective actions for those problems. When necessary, the tables refer to more detailed troubleshooting procedures located in either the Troubleshooting Procedures part of this section. Refer to the appropriate troubleshooting table for the type of problem you are experiencing:
- Gun Heating Problems
- Adhesive Output Problems
- Adhesive Leakage Problems
- Air Supply Problems
- Pattern Control Problems
To troubleshoot melter or hose problems, refer to the melter manual.
NOTE: Some of the problems listed in this troubleshooting table may not apply to the adhesive application you are troubleshooting. Contact your Nordson representative as needed for troubleshooting assistance.
Gun Heating Problems
Refer to this troubleshooting table if the gun does not heat, underheats, or overheats.
NOTE: Each heated component in a hot melt system (typically the grid, the reservoir, each hose, and each gun) is referred to as a heated zone. The gun heated zones are the gun adhesive manifold and the heated air manifold.
WARNING: Risk of personal injury or death. Allow only qualified personnel to perform electrical installation, troubleshooting, or repair procedures. Before performing any electrical procedure, review the Safety and disconnect and lock out the electrical power to the system.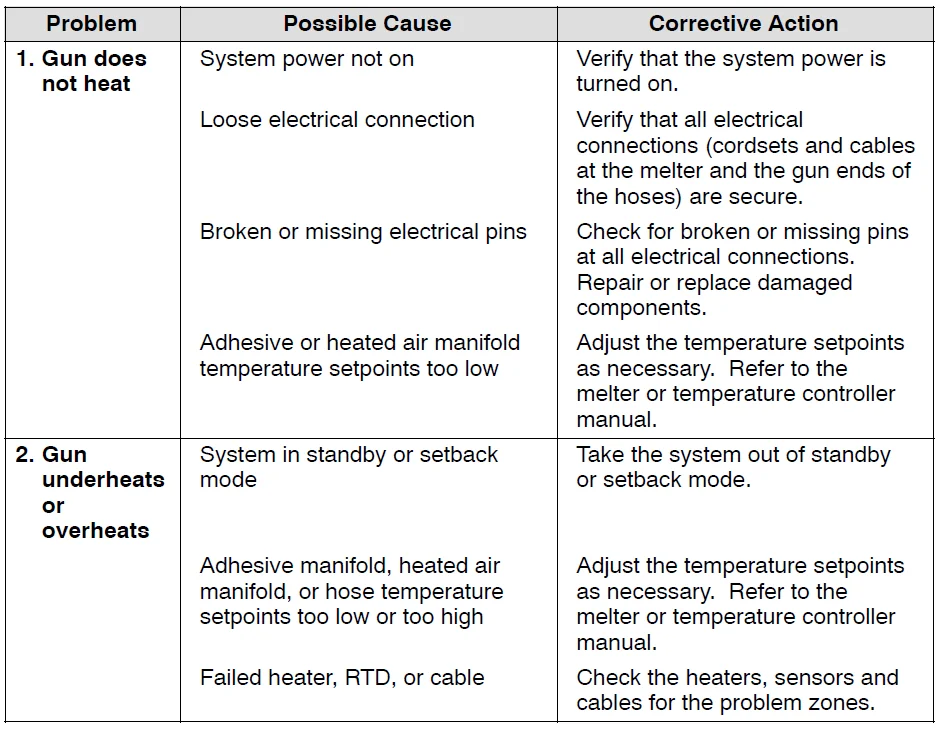
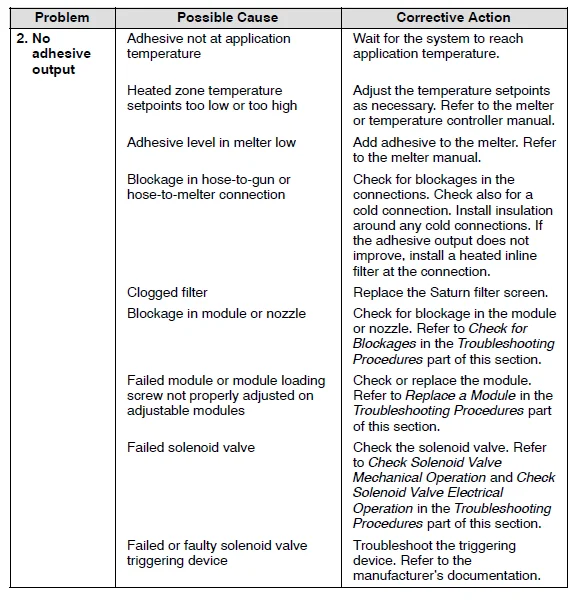
Adhesive Output Problems
Refer to this troubleshooting table if the adhesive output is too low or too high or if there is no adhesive output.
NOTE: Each heated component in a hot melt system (typically the grid, the reservoir, each hose, and each gun) is referred to as a heated zone. The heated zones are the gun adhesive manifold and the heated air manifold.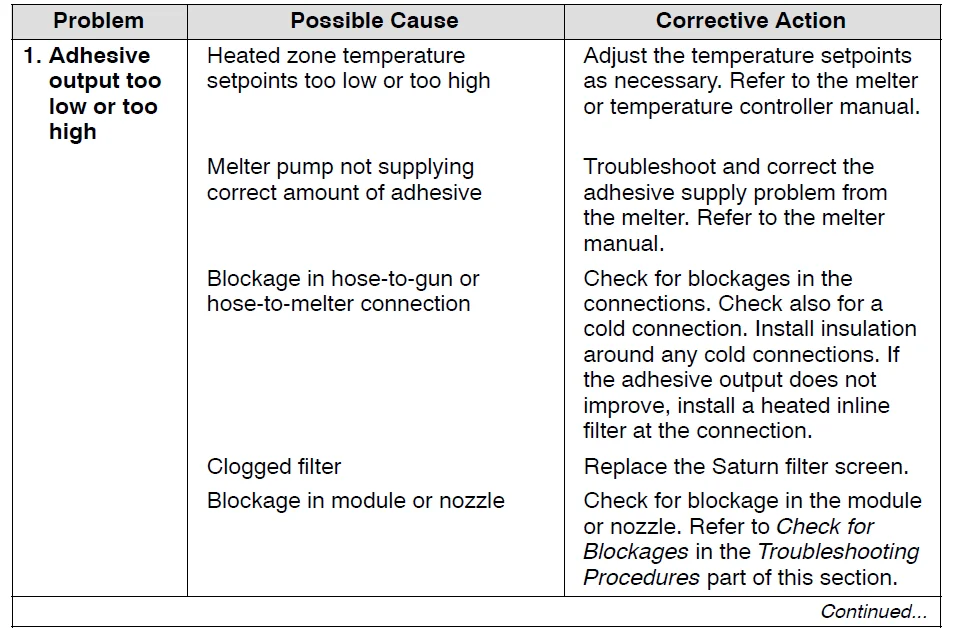
Troubleshooting Procedures
Use these troubleshooting procedures as directed in the Troubleshooting Tables part of this section.
Check for Blockages
- Relieve system pressure. Refer to Safety.
- Place a drain pan under the gun.
- Decrease the pattern air pressure. Leave just enough air pressure to prevent adhesive from entering the pattern air outlet.
- Remove a module from the adhesive manifold.
- Observe the adhesive opening (the lower opening) on the adhesive manifold:
- If there is no adhesive flow from the adhesive opening, there may be a blockage in the adhesive manifold. Clean the system or replace the gun. Refer to the system cleaning procedure in the melter manual.
- If adhesive is flowing from the adhesive opening, there is no blockage in the adhesive package.
Check Solenoid Valve Mechanical Operation
Solenoid valves are used to control the module-actuating air. Follow this procedure to check the mechanical operation of a solenoid valve. To check the electrical operation of a solenoid valve, refer to the next procedure, Check Solenoid Valve Electrical Operation.
- Turn on the air supply to the solenoid valve.
- Trigger the gun at the solenoid valve and check for adhesive flow:
- If adhesive flows from the module, the solenoid valve is operating normally. Return to the appropriate troubleshooting table.
- If no adhesive flows from the module, continue to the next step.
- Manually trigger the solenoid valve and listen to its response:
- If you hear a clicking noise, the valve is operating normally. Return to the appropriate troubleshooting table.
- If you do not hear a clicking noise, the solenoid valve is not engaging. This could be caused by an electrical problem or by low air pressure to the solenoid valve. To check the solenoid valve electrically, go to the next procedure, Check Solenoid Valve Electrical Operation. To check the air pressure regulator, go to Check an Air Pressure Regulator later in this section.
Module Service
This section provides module-related service procedures.
Replace a Module
You will need the following items:
- appropriate tools, including a torque wrench
- drain pans and disposable rags
- replacement module
- replacement O-rings (if needed)
- O-ring lubricant (if needed)
- anti-seize lubricant
NOTE: Refer to Parts for the part numbers of parts, tools, and supplies.
Remove the Module
- Heat the system to application temperature.
- Relieve system pressure. Refer to Safety.
- Trigger the gun solenoid valves to relieve any remaining pressure.
- Shut off the module-actuating air and disconnect the module-actuating air supply from the module to be removed.
- Decrease the pattern air pressure. Leave just enough air pressure (2−5 psi) to prevent adhesive from entering the pattern air outlet.
- Disconnect the solenoid valve electrical connections from the module to be removed. See Figure 10.
- Remove the control module mounting screws (1) and then remove the module (2) from the adhesive manifold.

- Module mounting screws
- Module (with solenoid valve)
- Adhesive manifold
Install a Module
- Wipe off any adhesive on the adhesive manifold.
- Secure the module to the adhesive manifold using the screws removed previously.
- Reconnect the module-actuating air supply and solenoid valve electrical connections.
- Restore the system to normal operation. Tighten the mounting screws again after the gun reaches application temperature.
Remove a Nozzle
Several types of nozzles may be installed on a PatternJet module. Follow this procedure to remove or install nozzles as needed. You will need the following items:
- appropriate tools, including a torque wrench
- drain pans and disposable rags
- replacement nozzle
NOTE: Refer to Parts for the part numbers of parts, tools, and supplies.
- Heat the system to application temperature.
- Relieve system pressure. Refer to Safety.
- Trigger the gun solenoid valves to relieve any remaining pressure.
- Shut off the module-actuating air.
- Decrease the pattern air pressure. Leave just enough air pressure to prevent adhesive from entering the pattern air outlet on the module. See Figure 11.
- Back the nozzle-retaining clamp screw (1) to loosen the clamp.
- Push the nozzle retaining clamp (2) toward the module to eject the nozzle.
- Nozzle-retaining clamp screw
- Nozzle-retaining clamp
- Universal CF module
- Summit nozzle
- MiniBead nozzle
- Slot nozzle
Install a Nozzle
- Clean the mating surface where the nozzle will be seated.
- See Figure 11. Inspect the nozzle O-ring, replace if necessary, and ensure that the O-ring is lubricated and properly positioned in the O-ring bore.
- Carefully insert the nozzle onto the seat.
CAUTION: Overtightening a nozzle-retaining clamp screw can damage the module. - Tighten the nozzle-retaining clamp screw to 1.7 N•m (15 in.-lb).
Clean Nozzles
Nozzles should be cleaned weekly or as needed to prevent clogging. You will need the following items:
- appropriate tools, including a torque wrench
- drain pans and disposable rags
- cleaning supplies (refer to Table 5)
- nozzle cleaning kits
- O-ring lubricant
- Remove the nozzles. Refer to Remove a Nozzle earlier in this section.
- Clean the nozzles using one of the Nordson-recommended methods shown in Table 5.
Use only cleaning agents recommended by the adhesive supplier.
WARNING: Risk of explosion or fire. Follow the safety guidance and heating recommendations on the Material Safety Data Sheets (MSDSs) for your adhesives and nozzle-cleaning solutions.
WARNING: Risk of explosion or fire. Use a controlled heating device, such as a thermostatically controlled hot plate, to heat cleaning fluid, including Nordson Type-R fluid.
CAUTION: Risk of equipment damage. Do not use a wire brush (or a brush with bristles harder than the nozzle) to clean nozzles. - If there is any remaining char buildup on the nozzles, gently scrape the char from the nozzles.
CAUTION: Risk of equipment damage. Use of an open torch, drill, or broach can damage a nozzle. Use only a pin-type probe to clean nozzle orifices, and do not twist the probe inside the nozzle. - If cleaning of the nozzle orifices is necessary, use a pin-type probe that is one size smaller than the orifice size: insert the probe in the direction opposite the adhesive flow and then remove the probe without twisting it, as shown in Figure 12.
NOTE: Nordson offers two nozzle cleaning kits that contain a holder and several probe sizes. Refer to Recommended Spare Parts and Supplies under Parts. - Reinstall the nozzles. Refer to Install a Nozzle earlier in this section.
- Restore the system to normal operation.
For more manuals by Nordson, visit ManualsLibraryy
Nordson PatternJet Adhesive Dispensing Gun-FAQs
Q1. What are the common methods of adhesive dispensing?
Adhesives can be applied manually, through contact dispensing, or by non-contact jetting. Jetting ensures precise volume control with higher repeatability.
Q2. What is the HS code for an adhesive dispensing gun?
The HS code for adhesive dispensing guns is 82055990, which is used for import and export classification.
Q3. What is the harmonized tariff code for adhesives?
Prepared glues and adhesives are classified under HTS Code 3506.99.00.
Q4. What types of adhesives are commonly used?
The three main types include natural rubber, synthetic rubber, and acrylic adhesives, each suited for different bonding needs.
Q5. How do I control adhesive thickness during application?
Adhesive thickness can be controlled using spacer beads or specialized nozzles that ensure uniform bond line thickness.
Q6. What does “adhesive” mean in simple terms?
An adhesive is a bonding substance that sticks surfaces together, ranging from industrial glues to common household glue.
Q7. How is adhesive strength usually tested?
Strength is measured by tensile testing, where bonded samples are pulled apart until the adhesive layer fails.
Q8. Which adhesive type is considered the strongest?
Epoxy resins are among the strongest adhesives due to their chemical bonding, making them suitable for high-strength applications.

