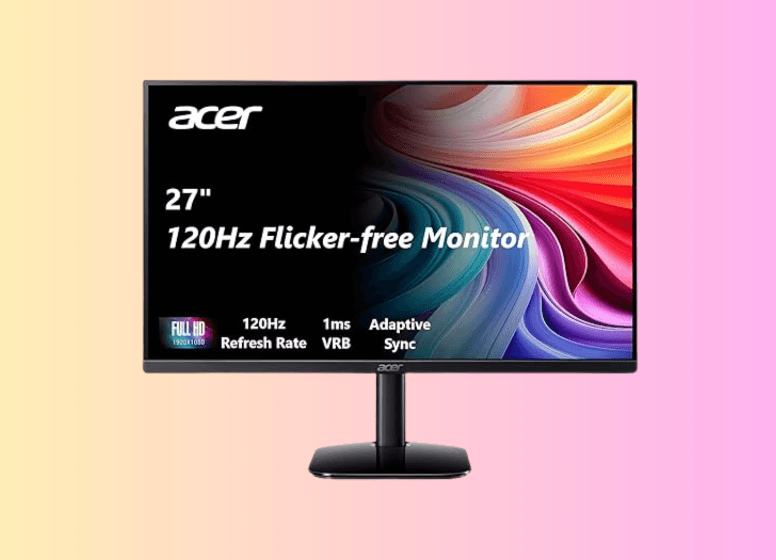
Acer KB272 G0bi 27-inch IPS Full HD Gaming Monitor

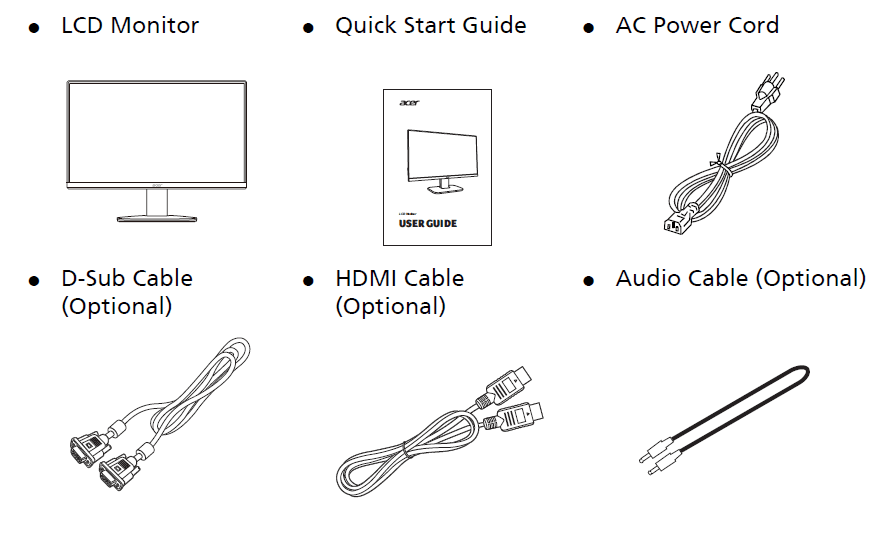
UNPACKING
Please check the following items are present when you unpack the box, and save the packing materials in case you will need to ship or transport the monitor in future.
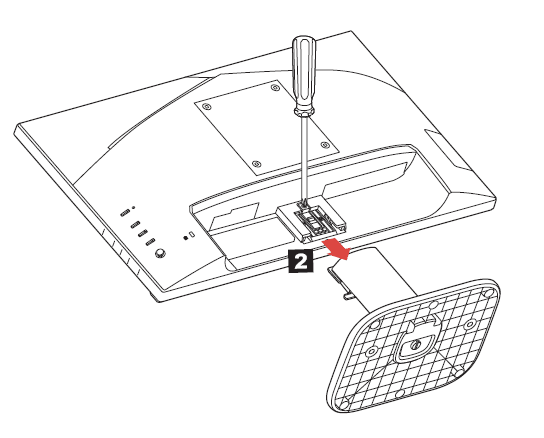
ATTACHING / REMOVING THE BASE
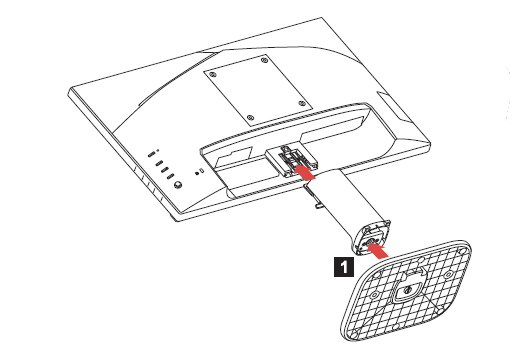
Note: Remove the monitor and monitor base from their packaging. Carefully place the monitor face down on a stable surface — use a cloth to avoid scratching the screen.
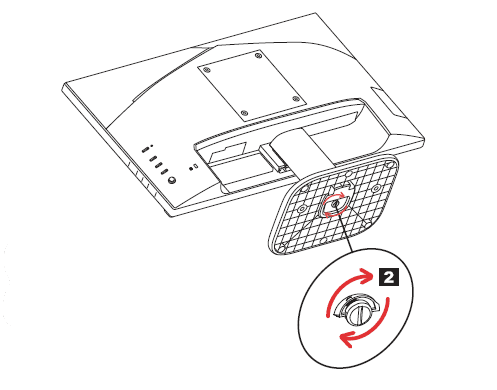
- Attach the stand arm and the base to the monitor, as illustrated.

- Ensure that the base is screwed tight onto the monitor stand arm.

Note: If installing with a wall mounting kit, it is recommended to use VESA mounting kit (100mm x 100mm) with M4 x 10 (L) mm screws to fix your monitor on the wall.
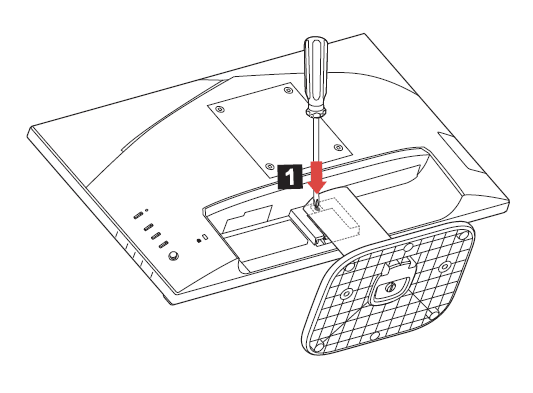
Follow the instructions below to remove the base from the monitor.
Note: Carefully place the monitor face down on a stable surface — use a cloth to avoid scratching the screen.
- Use a screwdriver to press the release button.

- With the release button pressed, remove the stand base from the monitor.

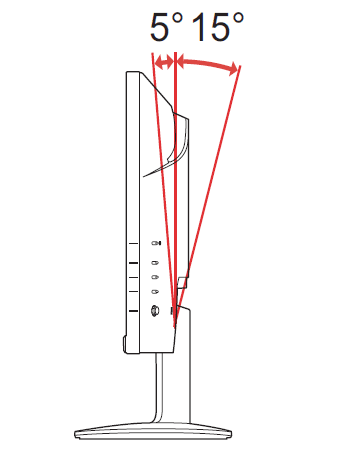
SCREEN POSITION ADJUSTMENT
To optimize the best viewing position, you can adjust the tilt of the monitor.
- Tilt
Please see the illustration below for an example of the tilt range.
CONNECTING THE POWER CORD
- Check first to make sure that the power cord you use is the correct type required for your area.
- This monitor has a universal power supply that allows operation in either 100/120V AC or 220/240 V AC voltage area. No user-adjustment is required.
- Plug one end of the power cord to the AC inlet, and plug the other end into an AC outlet.
- For a unit using 120 V AC:
Use a UL Listed Cord Set, Type SVT wire, and plug rated 10 A/125 V. - For units using 220/240 V AC (outside of the U.S.):
Use a Cord Set consisting of H05VV-F cord and plug rated 10 A, 250 V. The cord set should have the appropriate safety approvals for the country in which the equipment will be installed. - Please confirm that the distribution system in the building installation shall provide the circuit breaker rated 120/240 V, 20 A (maximum).
SAFETY PRECAUTION
- Avoid placing the monitor, or any other heavy object, on the power cord to avoid damage to the cable.
- Do not expose the monitor to rain, excessive moisture, or dust.
- Do not cover the ventilation slots or openings of the monitor. Always put the monitor in a place where there is adequate ventilation.
- Avoid placing the monitor against a bright background or where sunlight or other light sources may reflect on the face of the monitor. Place the monitor just below eye level.
- Handle with care when transporting the monitor.
- Refrain from giving a shock or a scratch to the screen, as the screen is fragile.
- To prevent damage to the monitor, do not lift the monitor by its base.
CLEANING YOUR MONITOR
Please carefully follow the guidelines below when cleaning the monitor.
- Always unplug the monitor before cleaning.
- Use a soft cloth to gently wipe the screen and the cabinet front and sides.
- NEVER SPRAY OR POUR ANY LIQUID DIRECTLY ONTO THE SCREEN OR CASE.
- PLEASE DO NOT USE ANY AMMONIA OR ALCOHOL-BASED CLEANERS ON THE LCD DISPLAY SCREEN OR CASE.
- Acer will not be liable for damage resulting from the use of any ammonia or alcohol-based cleaners.
POWER SAVING
The monitor will be driven into “Power Saving” mode by the control signal from the display controller, as indicated by the amber-color power LED.

The power saving states will be kept until a control signal has been detected or the keyboard or mouse is activated. The recovery time from Active OFF state back to ON state is around 3 seconds.
DDC
To make your installation easier, the monitor is able to Plug and Play with your system if your system also supports DDC protocol. The DDC (Display Data Channel) is a communication protocol through which the monitor automatically informs the host system about its capabilities, for example, supported resolutions and corresponding timing. The monitor supports DDC2B standard.
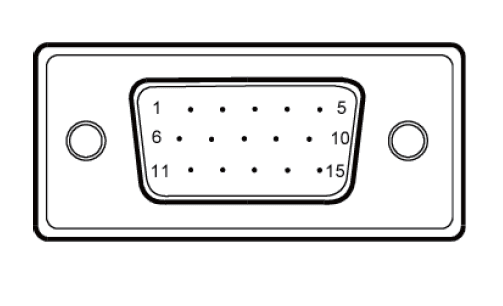
CONNECTOR PIN ASSIGNMENT
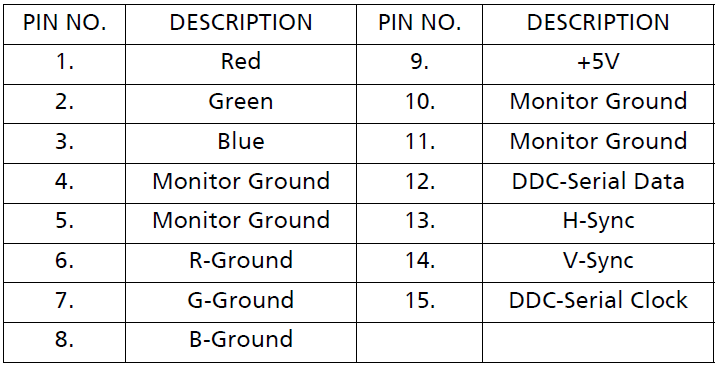
15-Pin Color Display Signal Cable
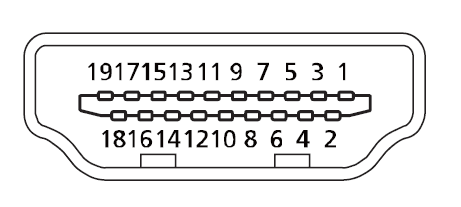
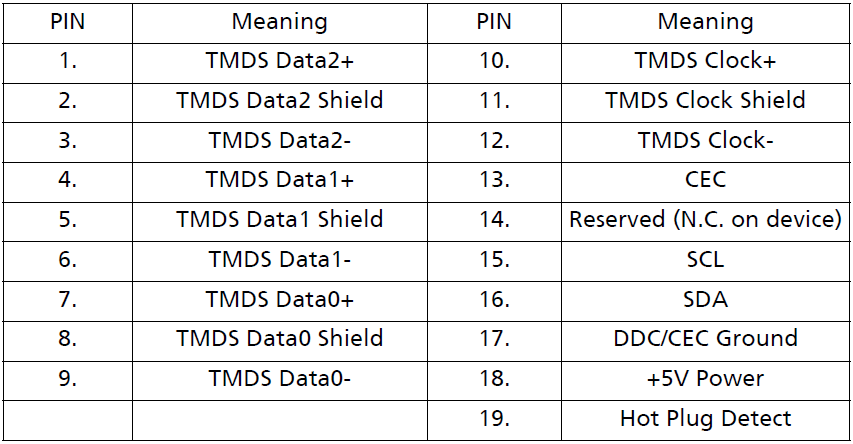
19-Pin Color Display Signal Cable
INSTALLATION
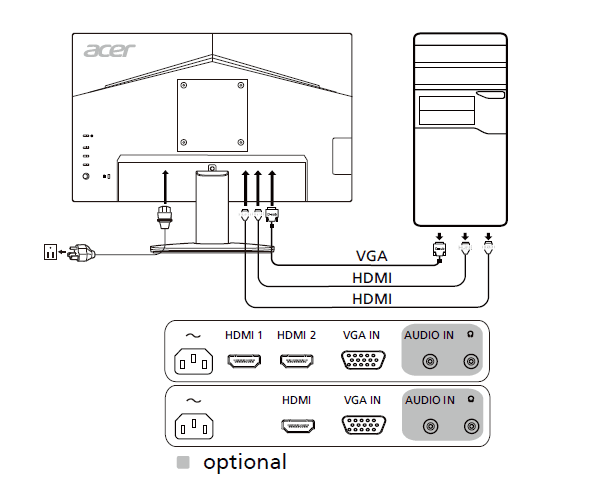
To install the monitor on your host system, please follow the steps as given below:
Steps
- Cable connection
- Connect the Video Cable
- Make sure both the monitor and computer are powered off.
- Connect the VGA cable to the computer.
- Connect HDMI Cable (Only HDMI-input model)
- Make sure both the monitor and computer are powered off.
- Connect the HDMI cable to the computer.
- Connect the Video Cable
- Connect the Audio Cable (Optional)
- Insert the monitor power cable into the power port at the back of the monitor.
- Plug the power cords of your computer and your monitor into a nearby electrical outlet.
USER CONTROLS
Base Controls
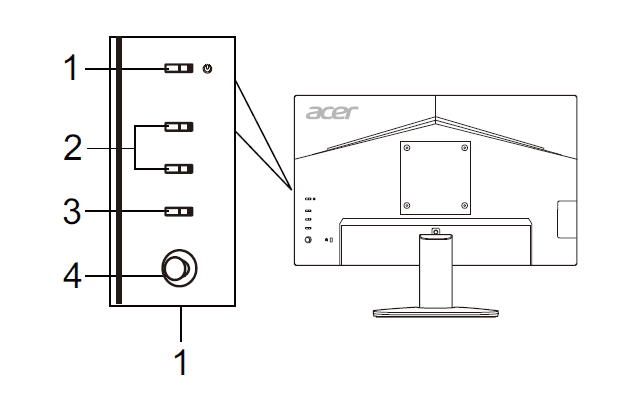
- Power button/indicator
- Turns the monitor on/off. Blue indicates power on.
Amber indicates standby/power saving mode.
- Turns the monitor on/off. Blue indicates power on.
- Hotkey 1, 2 buttons
- Press to activate user user-defined hotkey function.
- Input button
- Press to toggle input sources.
- Navi/OK button
- Press to activate the OSD menu, then use it as a directional key to highlight the desired function. Press it again to enter a selection.
Adjusting the OSD settings
Note: The following content is for general reference only. Actual product specifications may vary.
The OSD (on-screen display) can be used for adjusting the settings of your LCD Monitor. Press the MENU button to open the OSD. You can use the OSD to adjust the picture quality, OSD position, and general settings. For advanced settings, please refer to the following page:
Main Page
The default functions for buttons 1 and 2 are Modes and Brightness. You can use the Hot Key Assignment function to set these buttons to your preferred functions.
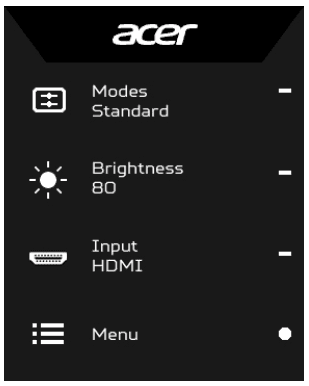
- Modes
- Brightness
- Input
- Menu
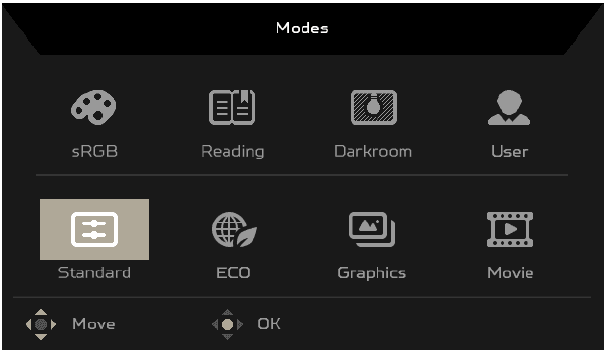
Adjusting the Modes
From any function page, press ![]() to open the Modes control and select which user-defined profile to use (please see the Function page section for more information).
to open the Modes control and select which user-defined profile to use (please see the Function page section for more information).
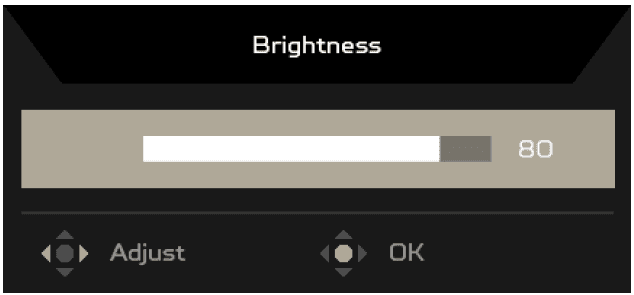
Adjusting the Brightness
Open the Brightness control and select the brightness setting using the Navi/OK button. When you are done, press the Navi/OK button to exit.
Selecting the Input
Open the Input control and select the desired input. You can also toggle Auto Source On or Off. When you are done, use the Navi/OK button to exit.
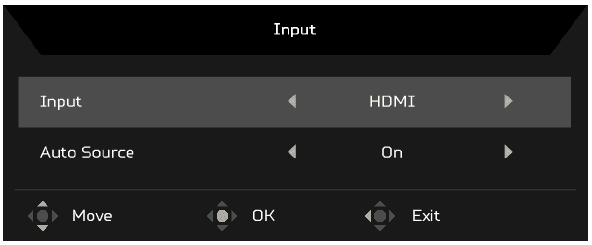
The Function page
Open the Function page to select a menu function, and adjust the settings that you want using the Navi/OK button. When you are done, press ![]() to exit. You can also press
to exit. You can also press ![]() any function page to select your preferred Mode.
any function page to select your preferred Mode.
Adjusting the Picture
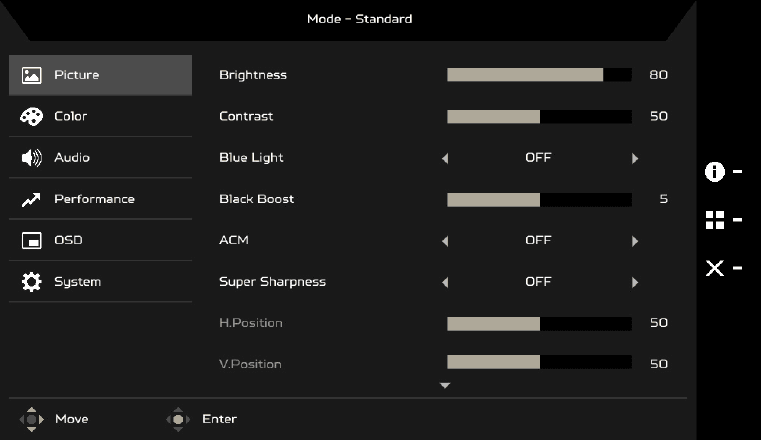
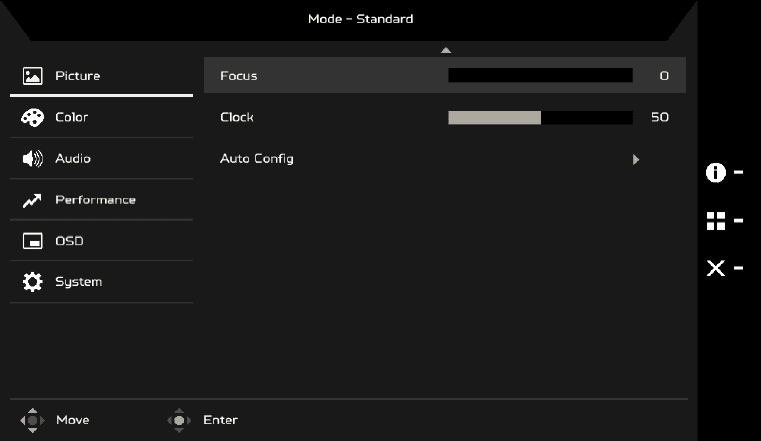
- Press the MENU button to open the OSD.
- Using the Navi/OK button, select Picture from the OSD. Then navigate to the setting you wish to change.
- Use the Navi/OK button to select the setting.
- Brightness: Adjust the brightness from 0 to 100.
Note: Adjusts the balance between light and dark shades. - Contrast: Adjust the contrast from 0 to 100.
Note: Sets the degree of difference between light and dark areas. - Blue Light: Filter out blue light by adjusting different Blue Light showing ratio – 80%, 70%, 60%, 50%.
Note: Higher values allow more blue light through. For the best protection, select a lower value. - Black Boost: This boosts the amplitude of the dark color levels of the display– blacks will be less black. The higher the level, the higher the boost.
- ACM: Turn ACM On or Off. The default is Off.
- Super Sharpness technology can simulate high-resolution images by boosting the pixel density of the original source. It can make images sharper and clear.
- H. Position (only Analog input model): Adjust the horizontal position from 0 to 100.
- V. Position (only Analog input model): Adjust the vertical position from 0 to 100.
- Focus (only Analog input model): Adjust the focus from 0 to 100.
- Clock (only Analog input model): Adjust the clock from 0 to 100.
Adjusting the Color
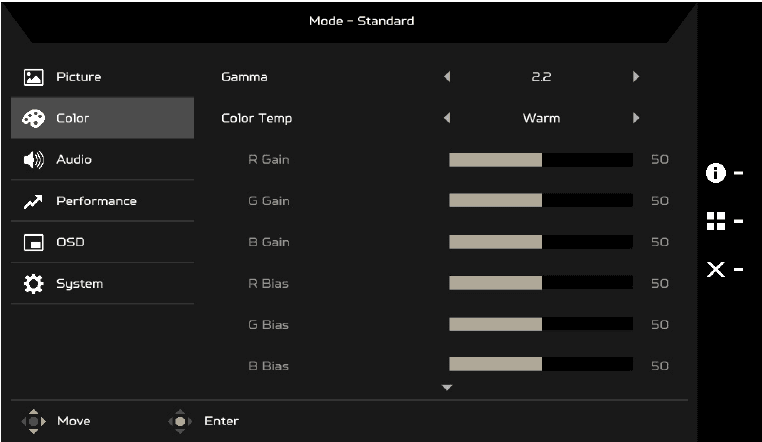
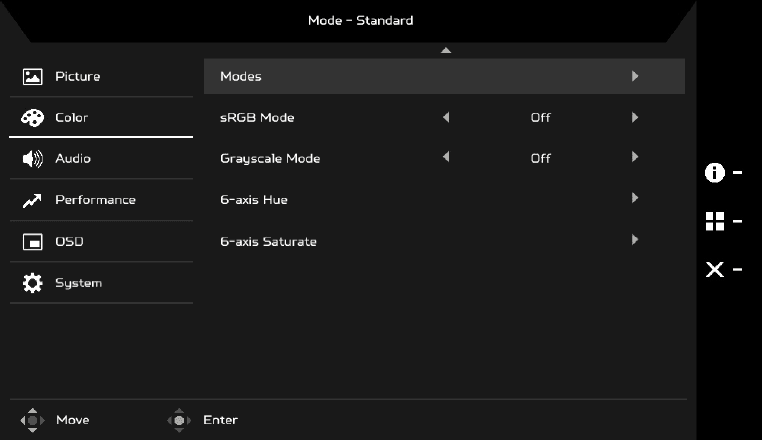
- Press the MENU button to open the OSD.
- Using the Navi/OK button, select Color from the OSD. Then navigate to the setting you wish to change.
- Use the Navi/OK button to select the setting.
- Gamma mode allows you to adjust the luminance tone. The default value is 2.2 (standard value for Windows).
- Color temperature: The Default is warm. You can choose Cool, Warm, Normal, Bluelight or User.
- Modes: Select your preferred mode.
- sRGB mode is for getting better color matching representation with the peripheral device, such as DSCs or printers.
- Grayscale Mode: Turn grayscale mode on or off.
- 6-axis Hue: Adjust the red, green, blue, yellow, magenta, and cyan hue.
- 6-axis Saturate: Adjust the red, green, blue, yellow, magenta, and cyan saturation.
Adjusting the Audio (Selective models)
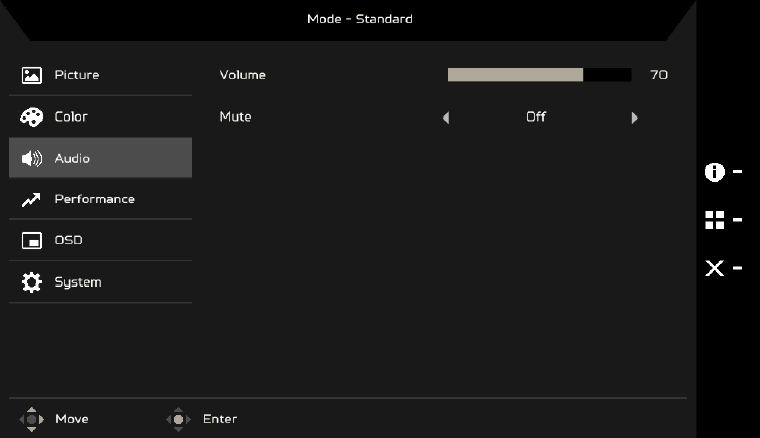
- Press the MENU button to open the OSD.
- Using the Navi/OK button, select Audio from the OSD. Then navigate to the setting you wish to change.
- Use the Navi/OK button to select the setting.
- Volume: Adjust the volume.
- Mute: Select On or Off.
Adjusting the Performance
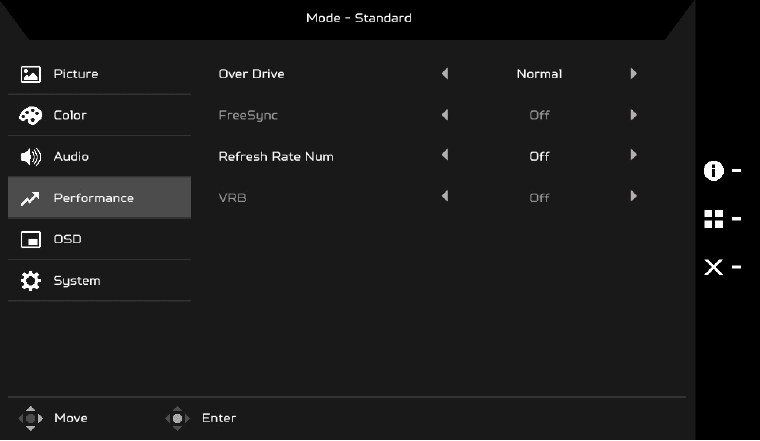
- Press the MENU button to open the OSD.
- Using the Navi/OK button, select Performance from the OSD. Then navigate to the setting you wish to change.
- Use the Navi/OK button to select the setting.
- Over Drive: Select Off, Normal, or Extreme.
Note:- If FreeSync is “ON”, then the Over Drive selection is set to “Normal” automatically
- If FreeSync is “OFF”, then the user can set Over Drive to either one of the three settings, including: (a) Extreme, (b) Normal, or (c) Off.
- FreeSync: Select On or Off. FreeSync is available for AMD-supported graphics cards only.
- Refresh Rate Num: Display the panel’s current refresh rate on the screen.
- VRB: When VRB is Extreme or Normal, VRB provides a sharper and clearer dynamic picture; the default is Off.
Note:- VRB does not support PIP/PBP Mode and HDR Mode. (Selective models)
- When VRB is Extreme or Normal, FreeSync is automatically turned off.
- VRB will affect the brightness of the following: Logo, Aim Point, Message, and Input Icon.
- VRB feature is dependent on the monitor’s maximum refresh rate. For monitors supporting up to 100 Hz, the recommended refresh rate setting of VRB is 75, 85 or 100 Hz.
Adjusting the OSD
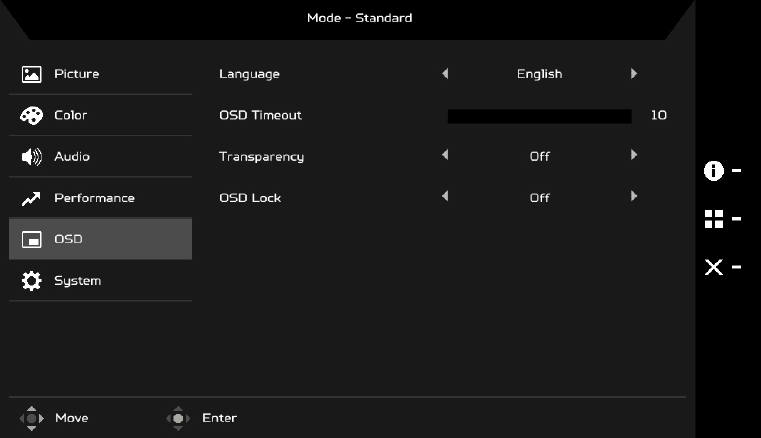
- Press the MENU button to open the OSD.
- Using the Navi/OK button, select OSD from the OSD. Then navigate to the setting you wish to change.
- Use the Navi/OK button to select the setting.
- Language: Set the OSD menu language.
- OSD timeout: Adjust the delay before turning off the OSD menu.
- Transparency: Select the transparency of the OSD menu. The transparency can be 0% (OFF), 20%, 40%, 60%, or 80%.
- OSD Lock: The OSD Lock function is used to prevent the OSD button from being pressed accidentally. To remove the OSD Lock message, press and hold the Navi/OK button continuously for 3 seconds until the message disappears. If the OSD Lock message remains, please check whether the Navi/OK button is stuck.
Adjusting the System
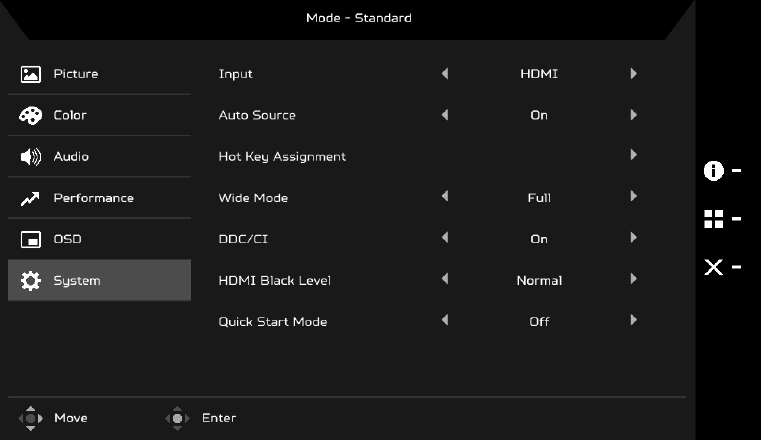
- Press the MENU button to open the OSD.
- Using the Navi/OK button, select System from the OSD. Then navigate to the setting you wish to adjust.
- Use the Navi/OK button to select the setting.
- Input: Select the source from an available input source.
- Auto Source: Automatically searches for available input sources.
- Hot Key Assignment: Select the function of Hot Key 1 or Hot Key 2.
- Wide Mode: You can select which screen aspect you are using. The options are Full and Aspect.
- DDC/CI: Allows the monitor settings to be set through the software on the PC.
- HDMI Black Level: You can select the level of blackness under HDMI source. The options are Normal and Low.
- Quick Start Mode: Enable the monitor rapidly.
Product information
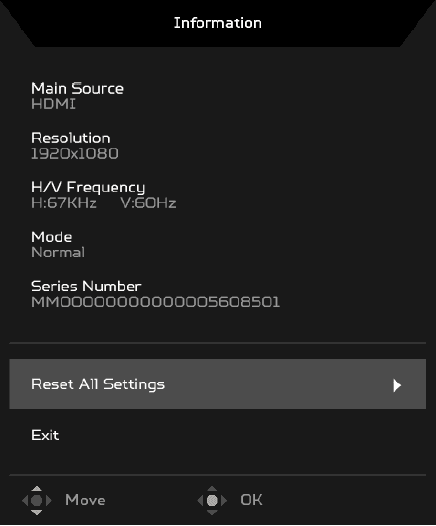
- From any function page, press
 to open the Information page.
 - Reset All Settings: Reset all settings to the factory defaults.
TROUBLESHOOTING
Before sending your LCD monitor for servicing, please check the troubleshooting list below to see if you can self-diagnose the problem.
(VGA Mode)
No Picture
Current Status:
- LED ON
- Using OSD, adjust brightness and contrast to maximum or reset to their default settings.
- LED OFF
- Check the power switch.
- Check if the AC power cord is properly connected to the monitor.
- LED displays amber color
- Check if the video signal cable is properly connected at the back of the monitor.
- Check if the power of the computer system is ON.
Abnormal Picture
Current Status:
- Unstable Picture
- Check if the specification of graphics adapter and monitor is in compliance which may be causing the input signal frequency mismatch.
- Display is missing, center shift, or too small or too large in display size
- Using OSD, adjust RESOLUTION, CLOCK, CLOCK-PHASE, H-POSITION, and V-POSITION with non-standard signals.
- Using OSD, in case of a missing fullscreen image, please select other resolution or other vertical refresh timing.
- Wait for a few seconds after adjusting the size of the image before changing or disconnecting the signal cable or powering OFF the monitor.
Abnormal Sound (Only Audio- Input model) (Optional)
Current Status:
- No sound, or the sound level is too low
- Check the audio cable with the host PC.
- Check if the volume setup of the host PC is in the minimum position and try to raise the volume level.
(HDMI Mode)
No Picture
Current Status:
- LED ON
- Using OSD, adjust brightness and contrast to maximum or reset to their default settings.
- LED OFF
- Check the power switch.
- Check if the AC power cord is properly connected to the monitor.
- LED displays amber color
- Check if the video signal cable is properly connected at the back of the monitor.
- Check if the power of the computer system is ON.
Abnormal Sound (Only Audio- Input model) (Optional)
Current Status:
- No sound, or the sound level is too low
- Check the audio cable with the host PC.
- Check if the volume setup of the host PC is in the minimum position and try to raise the volume level.
EU Declaration of Conformity
We,
Acer Incorporated
SF, 88, Sec. 1, Xintai 5th Rd., Xizhi, New Taipei City 221
And,
Acer Italy s.r.
Viale delle Industrie 1/A, 20044 Arese (MI), Italy
Tel: +39-02-939-921, Fax: +39-02 9399-2913
www.acer.it
Product: LCD Monitor
Trade Name: ACER
Model Number: KB272
SKUNumber: KB272
Federal Communications Commission Declaration of Conformity
This device complies with Part 15 of the FCC Rules. Operation is subject to the following two conditions:
(1) This device may not cause harmful interference, and (2) this device must accept any interference received, including interference that may cause undesired operation.
The following local Manufacturer /Importer is responsible for this declaration:
- Product: LCD Monitor
- Model Number: KB272
- SKU Number: KB272 xxxxxx
(“x” = 0~9, a ~ z, A ~ Z, or blank) - Name of Responsible Party: Acer America Corporation
- Address of the Responsible Party:
333 West San Carlos St.
Suite 1500
San Jose, CA 95110
U.S.A. - Contact Person: Acer Representative
- Phone No..: 254-298-4000
- Fax No.: 254-298-4147
For more manuals by Acer, visit ManualsLibrary
Acer KB272 G0bi 27-inch IPS Full HD Gaming Monitor- FAQs
Does the Acer KB272 have built-in speakers?
No, this monitor does not include built-in speakers. You can connect external speakers or headphones via the audio jack.
Is the Acer KB272 a good monitor for gaming?
Yes, it’s ideal for gaming with a fast 180Hz refresh rate and 1ms response time, delivering smooth and responsive gameplay.
How do I set up my Acer KB272 monitor?
First, turn off and unplug your computer. Then, connect the monitor to your PC using a VGA or HDMI cable, and tighten the connector screws securely.
What is the screen resolution of the Acer KB272?
It has a Full HD resolution of 1920 x 1080 pixels.
Can this monitor play sound?
While the KB272 doesn’t have built-in speakers, you can use the headphone jack to connect headphones or external speakers. You can also output audio directly from your PC to your sound system.
How long do gaming monitors usually last?
Under normal usage, gaming monitors like the KB272 can last around 7 to 10 years.
Does the Acer KB272 have a Game Mode?
Yes, you can enable Game Mode by pressing the monitor’s menu button, navigating to the “Mode” section, and selecting “Game Mode.”
How do I charge devices through the Acer KB272 monitor?
If your model includes USB ports, you can connect devices using the fast-charging USB 3.0 port or regular USB 3.0 ports. Use a USB-B to USB 3.0 cable to enable the USB hub function.

