Adexa EMP500SDF and EVO5000DDPS Drain Pumps
GENERAL NOTES
Upon receipt of the machine, check that the packaging is intact, that there are no missing parts or any damage. Check that the machine corresponds to the order (see delivery note).
All our equipment is always inspected, tested, and packed at the factory, and it is expected that the machine arrives with you in good condition. In case of any damage during transportation, keep the packaging and immediately contact the carrier.
The supply includes:
- Complete machine;
- Inlet and outlet tubes;
- Adjustable feet;
- Water flow reducer;
- User Manual;
- Certificate of Compliance;
- Baskets.
All dimensions indicated in the catalogue are not binding and refer to the standard machine. The drawings and any other documents delivered with the machine are the property of the manufacturer, which reserves all rights. These documents cannot be made available to third parties. It is therefore forbidden to reproduce any part of this text or pictures.
Do not use the dishwasher as a ladder or to support people, objects, or animals. Leaning or sitting on the open door could cause it to tip over and endanger people. Close the door to prevent people from tripping over it.
Before installing this appliance, check that there is no damage visible. For your safety, never operate on a damaged machine. Please ensure that the earth connection has been done correctly. In case of doubts, have the system checked by a qualified technician.
The manufacturer is not liable for any damage due to the interruption or absence of the earth connection.
To carry out maintenance, disconnect the machine from the electrical supply. The machine is considered connected to the mains unless the general isolator switch is off.
Be careful when handling chemical products! These products, such as detergent and rinse aid, can be corrosive or irritant. Follow the safety regulations on the packaging! Wear goggles and gloves! Carefully follow the safety instructions provided by manufacturers.
Do not inhale powder detergent. Ingesting detergent can cause burns to the mouth and throat and lead to suffocation.
After any work done to the water supply, purge the water pipes to the dishwasher to avoid damaging or clogging the water inlet valve.
Do not open the door when the machine is operating. There is a DANGER of splashing with hot water. If you open the door at the end of the cycle, take care not to touch the heating elements located in the wash tank (danger of burns).
Do not remove panels from the machine. Unintentionally touching electrical components is extremely dangerous for the user and may damage the machine.
For correct disposal of the machine, start by eliminating all traces of detergent in accordance with current safety standards (wear gloves and goggles). After that, the dishwasher must be disposed of according to applicable regulations at the time.
The manufacturer disclaims any liability for damages resulting from failure to observe warnings and safety instructions.
CONTROL PANEL
MACHINE DESCRIPTION
The main features of an INDUSTRIAL DISHWASHER, unlike those of a DOMESTIC DISHWASHER, are different in their ability to wash large volumes of ware in a very short period of time. This requirement means that the design of an industrial machine is considerably different. Certain key parameters of an industrial machine differ by:
- The capacity of the basket;
- Features of the type of dishwasher;
- An industrial dishwasher is best served with demineralized water with no impurities. Failing that, a soft or softened water supply should be used (no calcium, magnesium in the water);
- AISI304 heavy-duty stainless steel boiler and machine construction;
- Automatic washing and rinsing system;
- Automatic water filling controlled by a pressure switch;
- Thermostatically controlled wash and rinse temperature;
- Possibility to rinse glassware with cold water;
- The possibility of stopping the cycle by opening the door.
- Automatically rinse aid pump;
- Incoloy tank and boiler elements.
ELECTRICAL SAFETY REQUIREMENTS
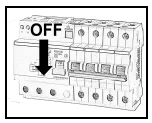
- Before any cleaning or maintenance, when required, press the switch 0/1 the position 0 and switch off electrical power at the main switch, turning it OFF (see picture).

- Do not change the electrical power cable from the one provided. In case the power cable requires replacement, consult a qualified electrician to replace it with a Type Y.
- Verify that the electrical values supplied to the machine meet the demands as specified on the rating plate of the machine. If not, do not start the machine and call for service.
- Check that your electrical system complies with regulations and that the machine has been correctly earthed.
- Do not open the door of the dishwasher while it is running. There is a danger of being sprayed by hot water.
- Do not use the machine if the inlet water temperature around it is less than 5°C.
- Do not use water to wash the outside of the machine.
- Check that the incoming water pressure to the machine is between 2 and 4 bar (200 – 400 KPa).
- Do not remove panels from the machine. Only qualified technical service personnel should remove panels.
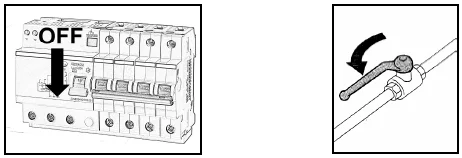
- In case of water leaks from the machine, switch off the electrical power and close the water supply.

ATTENTION
For the best results from your machine, change the water in the tank.
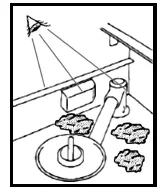
- When changing wash tank water or at the end of the day, visually check the bottom of the tank for soil and debris.
- If soils or debris are in the tank, remove them before starting a new cycle. This is suggested in order to guarantee a correct running of the machine.
- Always wear rubber gloves when cleaning the machine.
- Use caution when closing the door to avoid your hands from becoming trapped!
- Do not use the dishwasher as a shelf.
- Do not stand on or put weight on the open door. Danger of tipping over!
ATTENTION
Do not let children or unauthorized, untrained persons use the machine.
USER CHECKS
The following tests must be performed only by qualified personnel.
- Installation and commissioning;
- Water connection and electrical connection;
- Adjustment of the rinse aid dispenser and (if fitted) the detergent dispenser.
The user must perform the following daily checks:
- Check the correct connection of the inlet and drain tube and that the water supply is open.
- Check that the main electrical switch is ON.
- Check the level in the rinse aid bottle (and detergent, if the machine is fitted with a detergent dispenser). Do not allow the chemical containers to become empty. If required, replace the bottle and check the correct sucking of the dispenser.
ATTENTION
Respect all safety rules when using corrosive chemical products. We recommend the use of gloves and goggles.
Every time you change the product (detergent or rinse aid), it is ABSOLUTELY NECESSARY to clean the peristaltic pump tube by immersing it in water for some cycles.
ONLY USE PRODUCTS DESIGNED FOR INDUSTRIAL DISHWASHING.
We recommend replacing the peristaltic pump tubes during a service call or at least every 12 months.
Failure to comply with these instructions will void the warranty on the machine.
OBSERVATIONS BEFORE WASHING
This machine was developed and designed especially to achieve energy savings. To further optimize the energy savings, you can observe the following:
- Connect the machine to a hot water supply (max 50°C);
- Use the full capacity of the baskets, without overloading them.
- Follow the instructions of the chemical supplier.
Before loading the dishwasher, observe the following:
- Remove as much solid waste as possible, by hand, in order not to block filters, drains, or jets of wash arms;
- Pre-flush with water;
- When washing items with soil of starch, protein, blood, or cheese, if very dry, allow to pre-soak in COLD water before washing;
- When racking, be sure that all soiled surfaces can become exposed to the wash spray. Do not allow items to be “shielded” by other items.
- Insert the glasses and cups with the inside facing downward, avoiding overlapping.
- Check that the upper wash arms are not obstructed and are free to rotate.
- For best results, we suggest washing glassware, cutlery, and cups separately from plates with a different water used for washing dishes.
- Do not wash dishes or cutlery in wood or with some wooden parts; in fact, wood can warp and be damaged. In addition to this, the glues used are not suitable for dishwashers. The consequence could be the detachment of handles or small parts.
- Pots in copper, pewter, or aluminum, or thin glasses, decorated or made of crystal, can be damaged if washed by a glass/dishwasher.
ATTENTION
Do not wash plastic kitchenware.
- If the machine is not supplied with a detergent dispenser, hand dose the wash tank, referring to the chemical manufacturer’s instructions.
- Use only Industrial Dishwashing detergents.
ATTENTION
Observe all safety rules when using corrosive products. We recommend the use of gloves and goggles.
- We recommend using a liquid type of detergent.
- For heavily soiled items, we suggest rinsing them with hot water.
OPERATION
ATTENTION
The first operation of the dishwasher MUST be performed by authorized and qualified personnel who will also give instructions concerning the machine.
Open the dishwasher door and check whether the wash arms are installed. If not, install the wash arms (see Installation Manual). Verify that the suction filter pump is properly assembled. Insert the “overflow” pipe in the case of gravity discharge, or check the correct positioning of the drain pump filter. Then close the door.
FILLING AND HEATING:
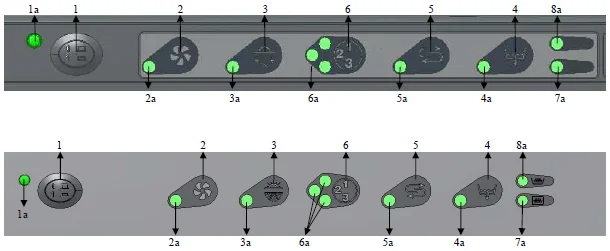
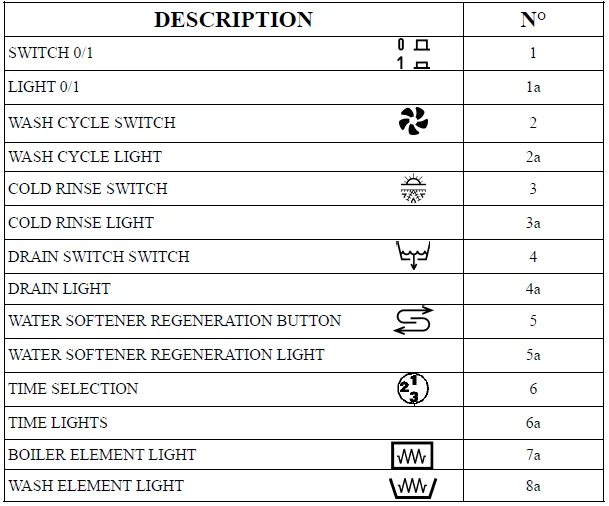
- Pressing the switch 0/1 (1) to 1, the indicator light will turn on (1a) and the machine will make a check on the light. After that, the machine will set into a stand-by mode (the wash cycle light (2a) and regeneration light (5a, if forgotten, blink).
- Pressing the cycle button (2), the machine will start to fill with water. During the filling cycle light will blink.
- In this state, the machine has full control over the tank and boiler temperatures, so if the temperature of the boiler is lower than the pre-set temperature, the machine will activate the boiler heating element until the correct temperature is reached. The boiler heater light (7a) will be on.
- Once the boiler has reached the set temperature, the heating element will turn off, and accordingly, the corresponding light (7a) will turn off. Then the machine will check the wash tank preset temperature, and if it’s lower, the heating element will activate until the correct wash temperature is reached. The wash tank heating elements are indicated by the corresponding light on the control panel (8a). When both the temperature, boiler, and tank are reached, both lights (7a and 8a) will be off.
ATTENTION
To achieve a good washing result, it is essential to wait until the machine has reached the correct temperatures (so when lights 7a and 8a are off).
WASHING:
- Select the cycle by switching (6) slow/medium/fast.
- Press the cycle button (2); the corresponding indicator light (2a) will turn on.
- Wait until the machine has finished the cycle.
- At the end of the cycle (light 2a off), open the door and remove the rack.
COLD RINSE BUTTON
- Press and hold the cold rinse button (3). Then, the indicator light will turn on (3a). The machine will now rinse with cold water.
- Switch off the cold rinse button (3). The corresponding indicator light will turn off.
REGENERATION OF WATER SOFTENER (optional equipment)
ATTENTION
It is necessary to perform the regeneration of the resins depending on the degree of water hardness and the number of wash cycles performed.
The regeneration time is about 20 minutes. So, we suggest running the regeneration when time allows.
If at the end of a wash cycle, the regeneration light blinks, it is because the machine needs to run a regeneration cycle.
Run the regeneration cycle as soon as possible.
- Turn the machine off by switching the switch 0/1 to 0.
- Open the door and check that there is no water inside the tank. If some water is present, completely empty the tank.
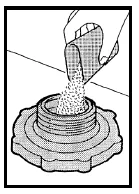
- Unscrew the cap of the salt reservoir and fill the container with salt for water softeners. Then replace the cup. Do not use cooking salt: it contains anti-caking agents which could damage the resin in the softener! If during the filling operation some salt is spilled on the bottom of the tank, remove it immediately and rinse with water.

- Remove the overflow from the machine (if the machine is equipped with it).
- Close the door and press the switch 0/1 to 1. The indicator light will turn on (1a) and the machine will control of lights. After that, the machine is placed in the stand-by mode (cycle light (2a) and regeneration light (5a) will blink.
- Hold down the regeneration button (5) for 8 seconds; the indicator light will turn on (5a), and the regeneration cycle will start.
- The cycle time to regenerate the water softener takes about 20 minutes. The cycle is finished when the water softener regeneration light turns off (5a) and the cycle light blinks (2a).
- Press the cycle button and allow some water to enter the tank for about 1 minute. This is to rinse the tank of salt.
- Turn off the machine, selecting the switch 0/1 to 0, open the door, and insert the “overflow” (if the machine is equipped with it).
- At this point, the resin regeneration cycle has been completed.
AUTOMATIC DRAIN PUMP (optional equipment):
These models are not equipped with the “overflow” system, and they should be used only when the discharge of water is placed above the water level in the tank.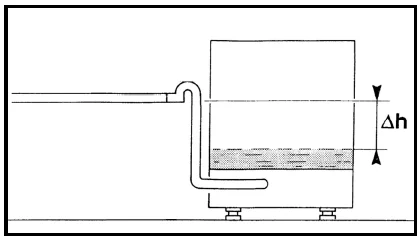
The drain pump automatically operates during the washing cycle while maintaining a constant water level in the tank. When you need to drain the water in the tank, proceed as follows:
- With the machine switched on, switch 0/1 to 1 and hold the drain button (4) for 3 seconds.
- The drain indicator light (4a) will turn on, and the drain cycle will automatically start.
- Wait until the light (4a) has turned off, open the door, and check that the tank is completely empty. If there is still some water, repeat the drain cycle.
CLEANING
SQUARE BASKET MODELS:
- Empty the dishwasher.
- Turn the machine off by pressing the switch 0/1 to 0 and switch the main isolator off.
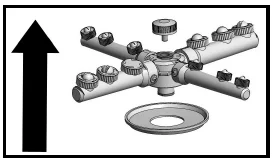
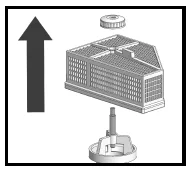
- Remove the wash arm by unscrewing the center spindle, and remove the mounting plate.

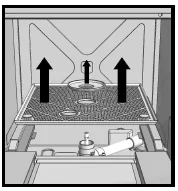
- If the machine is fitted with the (optional) surface filter, remove it and wash it under running water.

- Check that no soil or debris is on the bottom of the tank. Remove them if necessary.

- Remove the filter basket from the wash pump and wash it under running water.

- Reverse the assembly.
- We suggest running 2 filling/draining cycles in order to rinse the tank and the hydraulic system.
WASH / RINSE ARMS – ROTATING TYPE
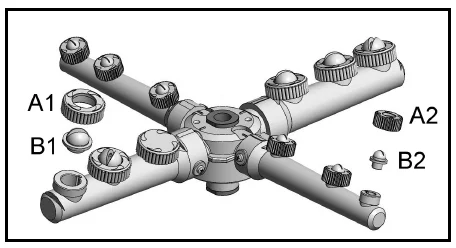
- Unscrew the centre spindle and lift out the wash arm.
- Unscrew the nuts (A1-A2) and remove the jets (B1-B2).

- Immerse the jets in a solution containing some liquid descaling product (example: Vinegar)
- Rinse with water. If necessary, clean the jets with a pin.
- Check that there are no scale deposits on the arm or spindle.
- Reverse the assembly.
- It is suggested to wash and clean jets (B1) individually to avoid incorrect assembly.
RINSE ASSEMBLY
- Carefully unscrew the jets and take out the rinse jet spinners.
- Immerse the jets in a solution containing some liquid descaling product (for ex., Vinegar).
- Rinse with water. If necessary, clean the jets with a pin.
- Before replacing the jets and the spinners, run a filling/draining cycle in order to clean the rinse assembly of soil or debris.
- Replace the jets and the diffuser back onto the rinse assembly.
For more Manuals by Adexa, visit ManualsLibraryy
Adexa EMP500SDF and EVO5000DDPS Drain Pumps-FAQs
How do I manually drain an Adexa dishwasher?
For models like DW500P, turn the machine OFF, open the door, remove the drain pipe, and keep the door open until the tank empties.
Why is my Adexa dishwasher not filling with water?
Make sure the water tap is open, the ON/OFF switch is set to ON, the 0–1 switch is on 1, and the overflow pipe is installed correctly.
How do I drain the dishwasher on an Omniwash EVO5000DDPS?
Press and hold the Drain button on the display for 5 seconds. The pump will activate and empty the wash tank automatically.
How can I run a drain cycle on a dishwasher?
Hold the Cancel/Reset button for about 3 seconds. The machine should stop and begin draining.
Can I throw a dishwasher pod inside the tub instead of the dispenser?
It’s not recommended. Pods dissolve properly only when placed in the detergent dispenser, as designed.
What are common dishwasher faults I should know about?
Frequent issues include poor drainage, slow filling, clogged filters, leaking, and error codes indicating water flow or pump problems.
How do I unclog a dishwasher drain line?
Clean the filter, check the pump for blockages, inspect the drain hose, and make sure the garbage disposal (if connected) isn’t blocked.
How do I know if my dishwasher inlet valve is clogged?
If water flow is weak or slow, or the machine isn’t filling, the valve screen may need cleaning—or the valve itself may need replacement.
How do I force a dishwasher to drain?
Use the Cancel/Reset function, check for blockages, inspect the drain valve, and ensure the hose is not kinked.
Is it safe to pour boiling water down a dishwasher drain?
Avoid pouring boiling water into dishwasher plumbing—it can damage PVC hoses and seals, especially if there is a clog.

