
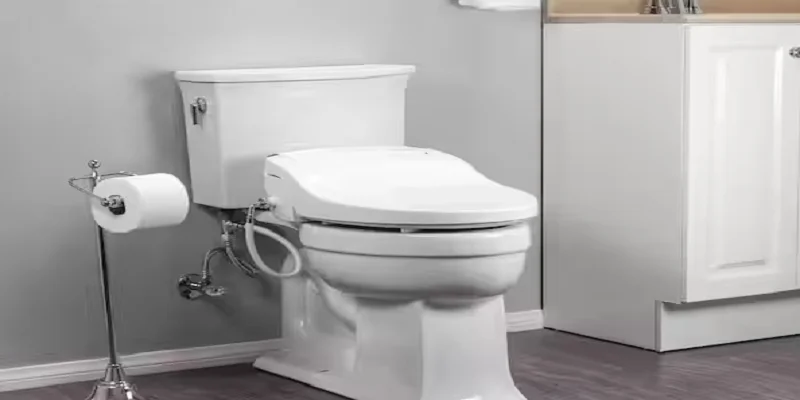
Alpha Bidet JX Elongated Toilet Seat
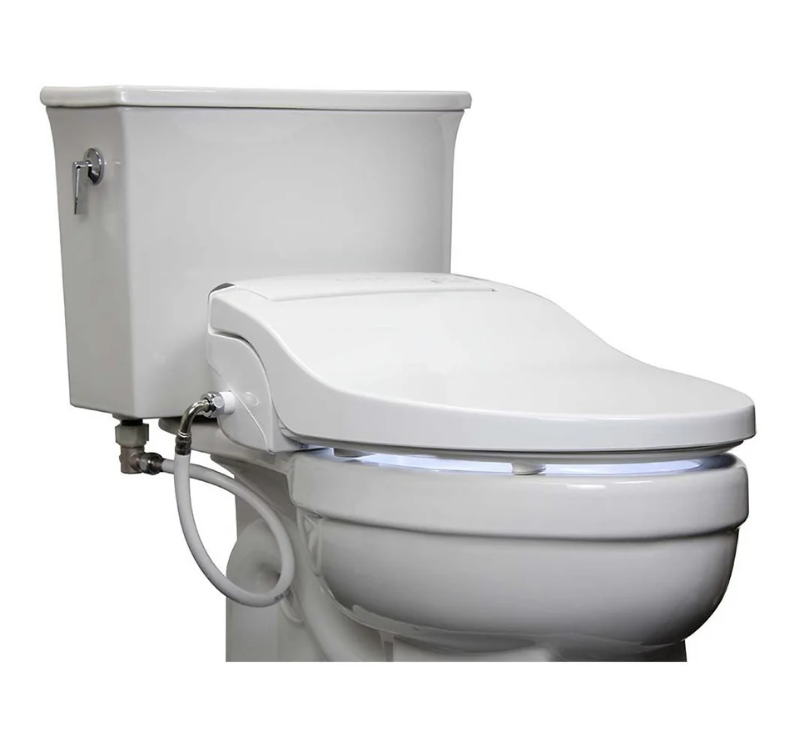
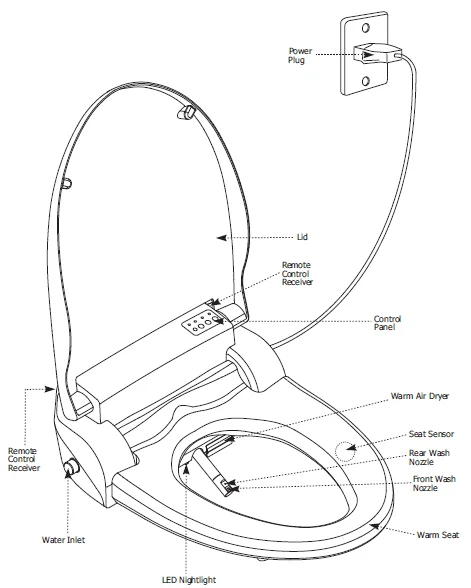
Parts Identification
Main Unit
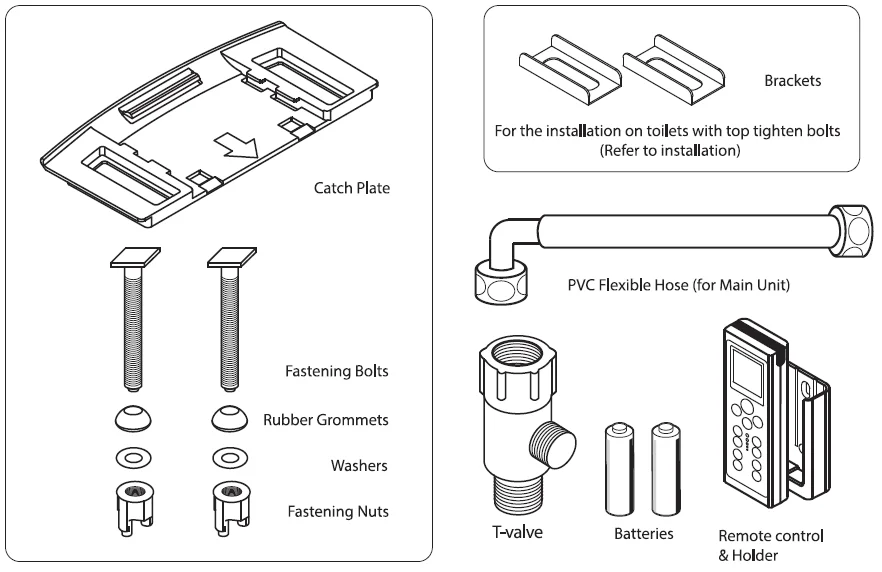
Accessory Parts
Control Panel

How to enable Quiet Mode (no beeps)
- Unplug the bidet’s power cord from the electrical outlet.
- Press firmly and hold the POWER SAVING button at the top of the bidet.
- Plug in the power cord while holding the POWER SAVING button and continue to hold it for 5 seconds.
※ Repeat the steps above to disable Quiet Mode (beeps on).
Remote Control
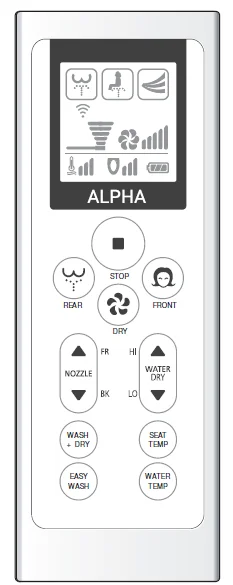
LCD Screen Icon Descriptions
 Appears when REAR or EASY WASH is pressed
 Appears when FRONT is pressed
 Appears when DRY is pressed
 Appears during any wash function
The number of lines displays the spray pressure level Appears during the dry function
Number of lines displays dryer temp Displays the current water temperature level
 Displays the current seat temperature level
 Both appear when the WASH+DRY is pressed
Special Function Button Descriptions
 Activates a 1-minute rear wash cycle, and then a 1-minute dry cycle, and then stops
 Activates a high-pressure rear wash with nozzle oscillation
Basic Instructions
- Sit on the seat
- When you sit on the seat, a beep will sound, and you may hear water dripping into the bowl if the nozzle needs to purge residual water.

- When you sit on the seat, a beep will sound, and you may hear water dripping into the bowl if the nozzle needs to purge residual water.
- Press the REAR or FRONT button
- Each wash function will automatically stop after 1 minute.
- The nozzle will oscillate back and forth if you press the same wash button again. Duringg the wash unit will beep once the wash cycle completes.

- Press the DRY button.
- The warm air dryer function will automatically stop after 3 minutes.
- The dryer is much more effective if you dab away excess moisture with toilet paper first.
- The unit will beep once the dry cycle completes.

- Press the STOP button
- Stops all functions currently in operation.

- Stops all functions currently in operation.
- When using the unit, please center your weight on the bidet seat.
- The seat sensor is installed inside the seat. (Please refer to page 5.) The unit starts operating only when the user’s skin touches the seat sensor. Seat covers or other materials on the seat may prevent the sensor from operating properly.
Functions & Operation
Nozzle Oscillation
- Nozzle will begin oscillating back and forth by pressing REAR or FRONT during the ash cycle.
- The nozzle will stop oscillating by pressing REAR or FRONT again.
Water Pressure Adjustment
- Water spray pressure can be adjusted by pressing the HI or LO buttons.
- The unit remembers the most recent water pressure setting.
Nozzle Position Adjustment
- During a wash cycle, press FR to move the nozzle forward or BK to move the nozzle backward.
- The nozzle position will reset to the middle position between users.
Water Temperature Adjustment
- Press WATER TEMP to adjust the water temperature level.
Water temperature will cycle through 4 levels: Off – Low – Med – High
Seat Temperature Adjustment
- Press SEAT TEMP to adjust the seat temperature level.
Seat temperature will cycle through 4 levels: Off – Low – Med – High.
* The unit remembers the water and seat temperature settings even if the power is shut off. No need to readjust the temperature settings after a power failure.
Functions & Operation
Air Dryer Temperature Adjustment
- Press HI or LO buttons during warm air drying cycle to adjust the temperature of the warm air (Levels 1-5). The unit will remember the most recent dryer temperature setting.
LED Nightlight
- Press the LIGHT button on the unit’s control panel (not the remote control) to activate the LED nightlight feature. The LIGHT indicator light on the control panel will turn on when the feature is activated.
- The LED nightlight will only glow when the bathroom lighting conditions are dark. You can test by covering the LIGHT SENSOR on the control panel with your finger.
- LED lights use very little energy to operate. The LED nightlight can be turned off by pressing LIGHT again.
Auto Power Saving
- Press the POWER SAVING button on the control panel until the AUTO indicator light is lit.
- When set to AUTO power saving mode, the bidet will reduce the water and seat temperature to 86°F during periods of non-use.
- When someone sits down, water and seat temperature will return to the user’s settings on the remote control.
- To turn off AUTO power saving mode, press the POWER SAVING button until the AUTO indicator light turns off.
Super Power Saving
- Press the POWER SAVING button on the control panel until the SUPER indicator light is lit.
- Use SUPER power saving mode for the most energy efficiency. In this mode, the seat will reduce water and seat temperatures to room temperature when lighting conditions are dark.
- Once the bathroom lights are turned on, water and seat temperature settings will return to the user’s settings on the remote control.
- To turn off SUPER power saving mode, press the POWER SAVING button until the SUPER indicator light turns off.
Easy Wash
- Press the EASY WASH button to do a rear wash with nozzle oscillation at full pressure.
- 1 button operation for a quick and easy rear wash.
Wash & Dry
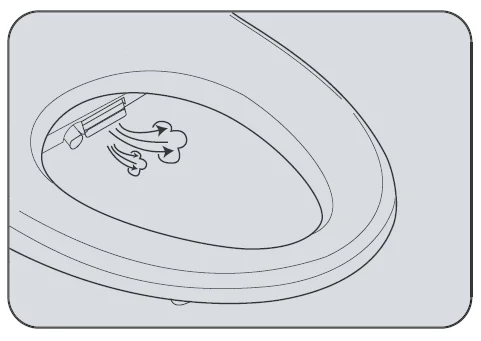
- Press WASH & DRY to activate the special auto clean and dry function. WASH & DRY will run a full rear wash cycle with oscillation, and then a full warm air drying cycle, and then stop.
- Default settings are “Level 3” for water pressure, “Level 2” for warm air drying temperature, and “Level 3” for the nozzle position. These settings can be adjusted during operation.
- A beep will sound when the WASH & DRY function is finished.
- Water pressure, air drying temperature, and nozzle position will return to user settings after the WASH + DRY function is finished.
- The WASH & DRY function is perfect for individuals with limited mobility, children, or the elderly who may find it difficult to select custom settings on the remote control.
Power On/Off
- To turn the unit off, press the REAR/STOP button on the control panel for at least 5 seconds.
- To turn the unit on, press any button on the control panel or any wash function on the remote control.
The power indicator light will turn on. - When the unit is powered off, the remote control will remember all of the user settings.
Cleaning the Nozzle
- Press the REAR/STOP and POWER SAVING buttons on the control panel simultaneously and hold for at least 5 seconds. Be sure to press both buttons down firmly and hold.
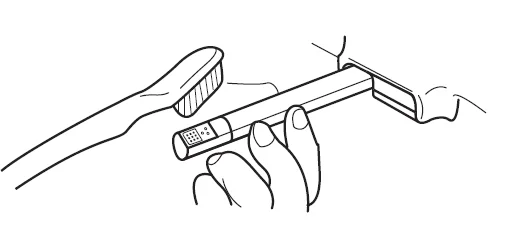
- Clean the nozzle tip with a soft brush (i.e., toothbrush) and water. The tip can also be removed from the nozzle assembly by holding the nozzle base with one hand, while pulling off the tip with the other hand.
- Press the REAR/STOP button to retract the nozzle. The nozzle will then run through a self-cleaning function.
Burn Protection System
- When the seat temperature is set to “HI;’ it will be reduced automatically when the unit is in use for more than 30 minutes. This protects the user from burns, which can occur when sitting on the unit for a long time.
- Seat temperature can be returned to”HI” by manually resetting the temperature or moving away from the seat.
Self-Cleaning Nozzle
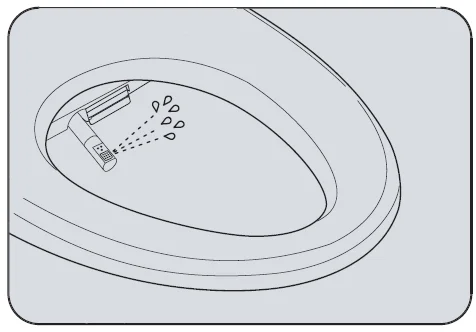
- Before and after each operation, the self-cleaning nozzle function will sanitize the nozzle head.
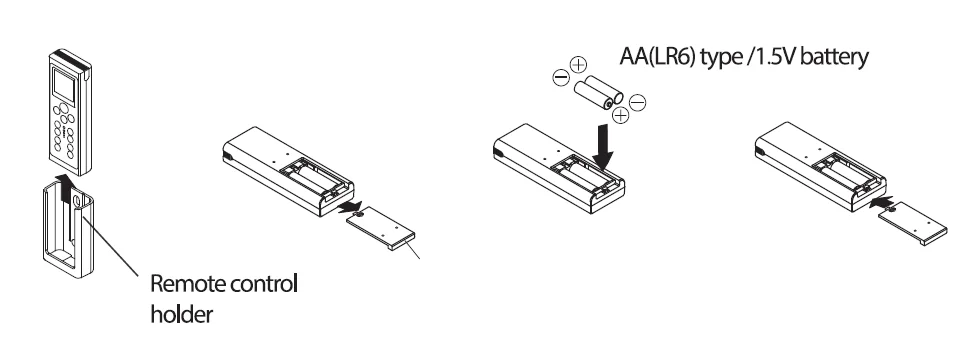
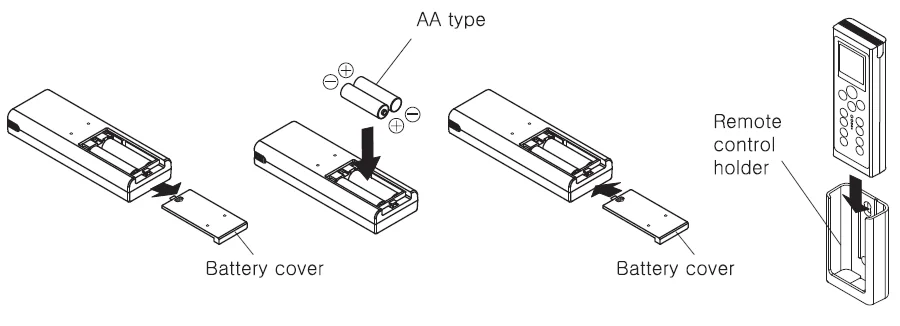
Changing Batteries of Remote Control (AA)
- When the “BATTERY SIGN” indicator blinks on and off, remote buttons will not work properly, and it is time to replace the batteries. However, the batteries may discharge quickly under certain operating conditions, such that the remote control unit may be disabled before the user notices the “BATTERY SIGN” indicator is blinking.
- Remove the remote control from the remote control holder.
- Open the battery cover and replace the batteries with new ones. (Battery life is about 1 year.)
- Close the battery cover and insert the remote control back into the remote control holder.

 Caution
- Use only AA(LR6) /1.SV batteries. There is a risk of explosion if the battery is replaced with the wrong type. Dispose of used batteries properly according to the battery manufacturer’s instructions.
- Insert the batteries according to the(+),(-) indications marked on the remote control.
- Do not use a used battery and a new one together.
Installing Unit
![]()
Caution before installation!
- Make sure the size and shape of the bidet seat are compatible with the toilet.
- Check that all parts are included and ready for installation.
- Do not connect the power until installation is complete.
- The bidet should be connected to the ground by an authorized service representative only.
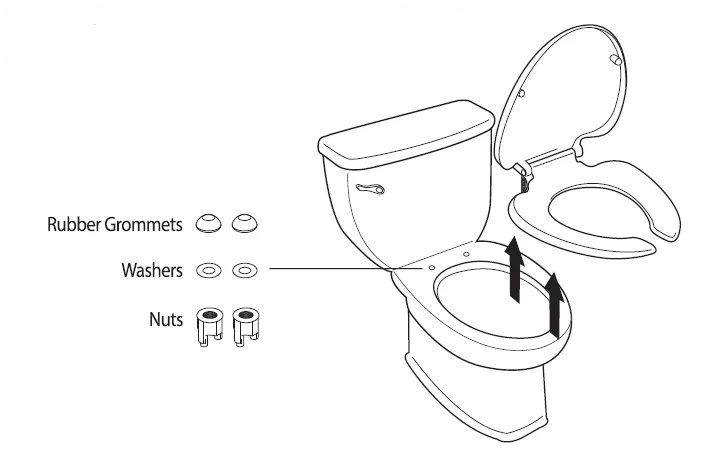
- Remove the existing toilet seat.

- Remove the existing toilet seat and lid by removing the fastening nuts from below. Some toilet seats may be held in by screws from the top.
- Keep the detached seat, lid, and nuts for later use.
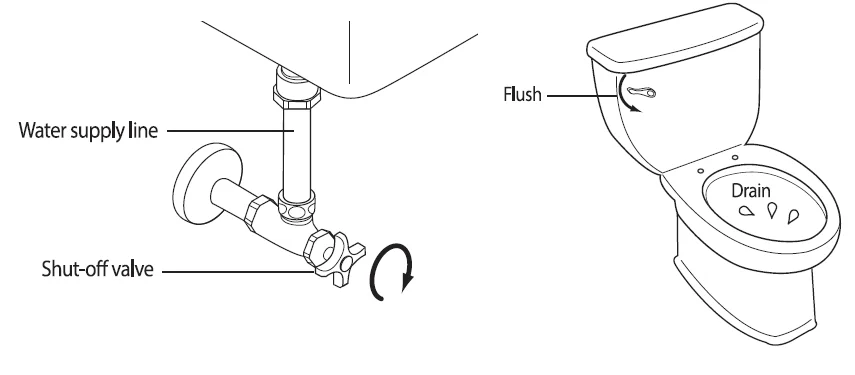
- Shut off the water supply by turning off the shut-off valve at the wall.
Then, drain the toilet tank by flushing the toilet tank completely.
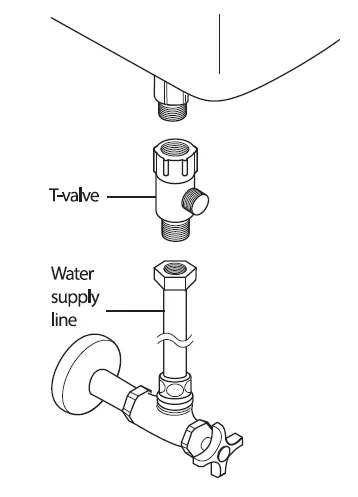
- Disconnect the water supply line from the toilet water tank and install a T-valve.

- Line up the bolt slots in the catch plate with the bolt holes in the toilet bowl.
- 5.5″ (140mm) hole spacing is required for a typical installation.
- If your bolt hole spacing is different, a custom solution is needed to affix the catch plate bracket to the toilet. Contact us for additional details.
- Inserted fastening bolts through the bolt slots and into the bolt holes in the toilet.
- Securely fasten the catch plate by installing the rubber grommets and washers as shown below, and tightening the fastening bolts and nuts.

Toilets with Bolts Tightened from Above
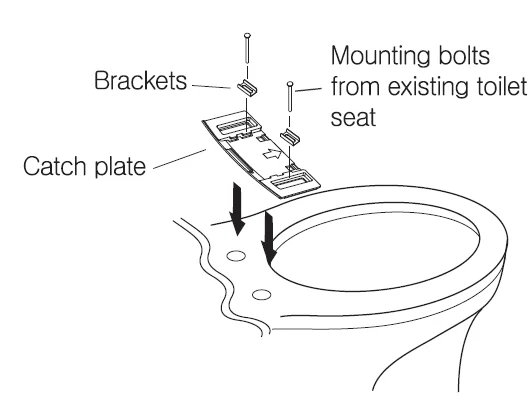
Reuse the mounting bolts from the existing toilet seat with the brackets included with the bidet.

- Place the catch plate so that the slots align with the bolt holes in the toilet.
- Place the brackets on the catch plate.
- Fasten the catch plate using the bolts removed from the existing toilet seat.
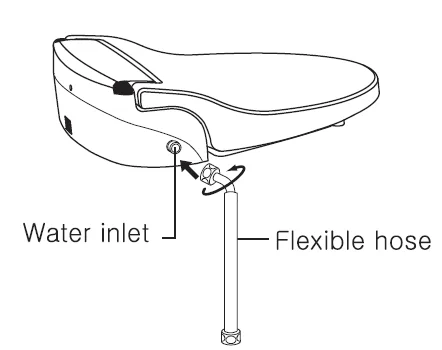
- Connect the flexible hose to the bidet.

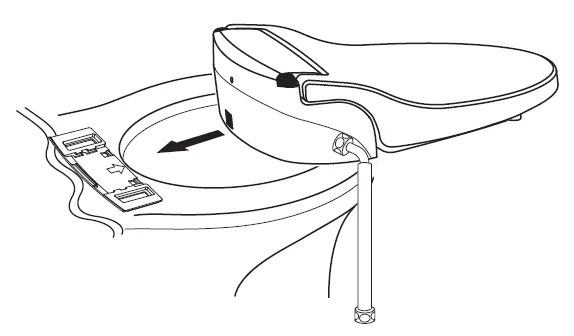
- Slide the bidet unit onto the catch plate by aligning the grooves under the bidet unit.
The bidet seat should slide all the way back and lock into the mounting bracket. It should not be able to slide forward once locked.
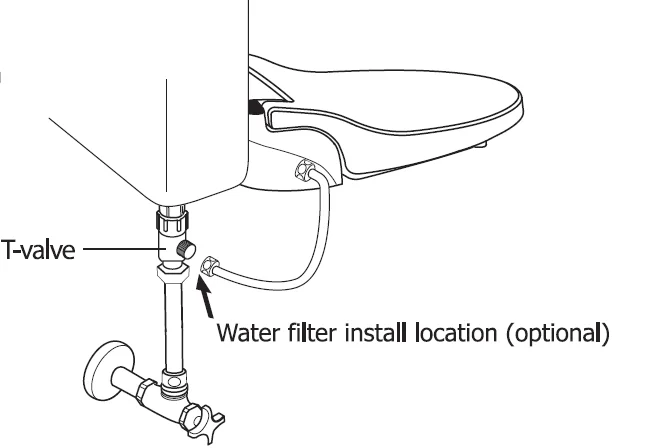
- Connect the flexible hose to the T-valve.
If you choose to install a water filter, install it between the t-valve and the supply hose.
Remote Control Wall Mount
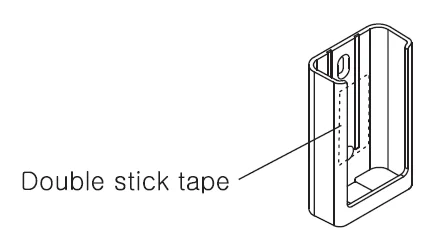
- Attach the remote control mounting plate to the wall with double-sided adhesive tape.

- Insert batteries into the remote control unit, as shown below, and mount the unit to the mounting plate.

Trial Operation
- Open the shut-off valve by turning counterclockwise.

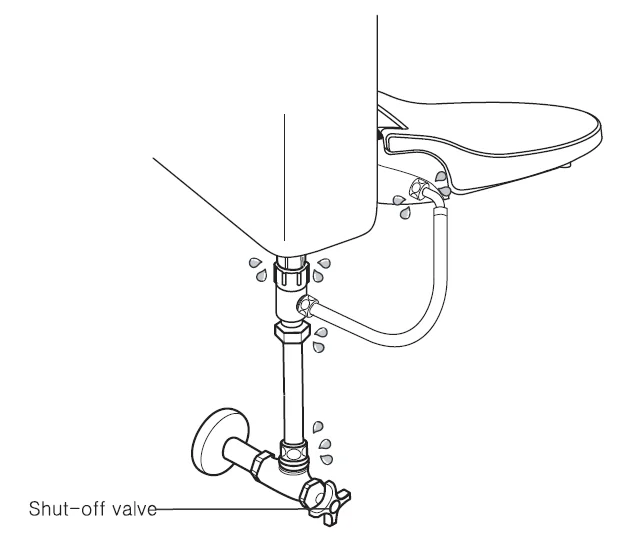
- Check for any water leakage from hose connections.
- Plug in the power cord.
* If the power indicator light does not turn on after plugging in the power cord, press any button to turn it on manually.
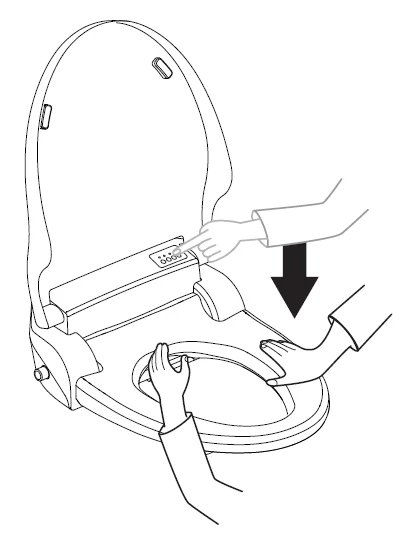
WARNING: Do not invert or otherwise move the bidet while it is connected to power and water. Doing so may cause damage to the unit. - To test the water spray operation, press either the REAR or FRONT button while placing your hand on the seat sensor.

* Get ready to cover the nozzle with your other hand to prevent water from pouring out of the bowl.
Uninstalling Unit
To detach or move the unit, follow the instructions shown below.
- Unplug the power cord.
- Shut off the water supply by turning the shut-off valve clockwise. Then completely drain the toilet water tank.
- Disconnect the flexible hose from the T-valve, detach the bidet unit from the catch plate, and unfasten the catch plate from the toilet.
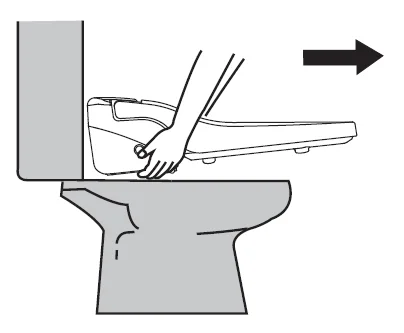
 To detach the unit, pull it forward while lifting the front end, as shown.
 - Disconnect the T-valve.
- Reconnect the water supply hose to the toilet water tank.
- Open the shut-off valve by turning it clockwise, and then check for any leakage from connections.
- Reinstall the original seat and lid onto the toilet.
For service request
Please contact the dealer where you purchased this unit or the manufacturer on the back of this manual.
Maintenance
Cleaning the Water Strainer
- Shut off the water supply by turning the shut-off valve clockwise. Then drain the toilet tank by flushing completely.
- Disconnect the flexible hose from the water inlet adapter on the side of the bidet.
- Locate and remove the strainer from the water inlet adapter. If you can’t reach it with your fingers, use thin pliers.
Clean the strainer with a toothbrush or by running it under a faucet. Then, reinstall it into the water inlet adapter. - Re-attach the flexible hose to the water inlet adapter and open the water supply valve. Check for leaks.

Cleaning the Nozzle
- Press the REAR/STOP and POWER SAVING buttons simultaneously to extend the nozzle for manual cleaning.
- Clean the nozzle manually with a soft brush. To return the nozzle to its retracted position, press REAR/STOP, which automatically activates the self-cleaning function.
External Cleaning
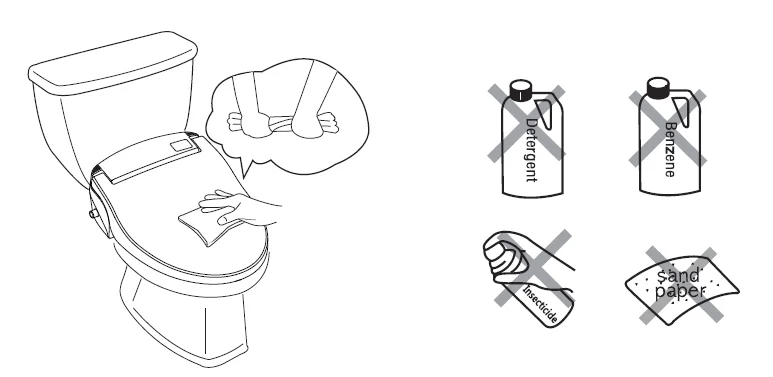
- The bidet body is made from a durable, glossy plastic known as polypropylene. As with all glossy plastics, avoid cleaning with harsh chemicals to protect the finish.
- Avoid bleach, heavy detergents, and any alcohol or benzene-based cleaners.
- Do not spray or dump excess water onto the unit. This could cause damage to sensitive internal parts.
- Ideally, clean the unit with a soft towel and a solution of warm water with mild soap or vinegar.
- If the unit is cleaned with Lysol or another abrasive chemical, be sure to wipe it down again with warm water to remove any remaining chemicals.
- Unplug the unit from power before cleaning, and be careful not to splash water on the plug or socket.
Troubleshooting
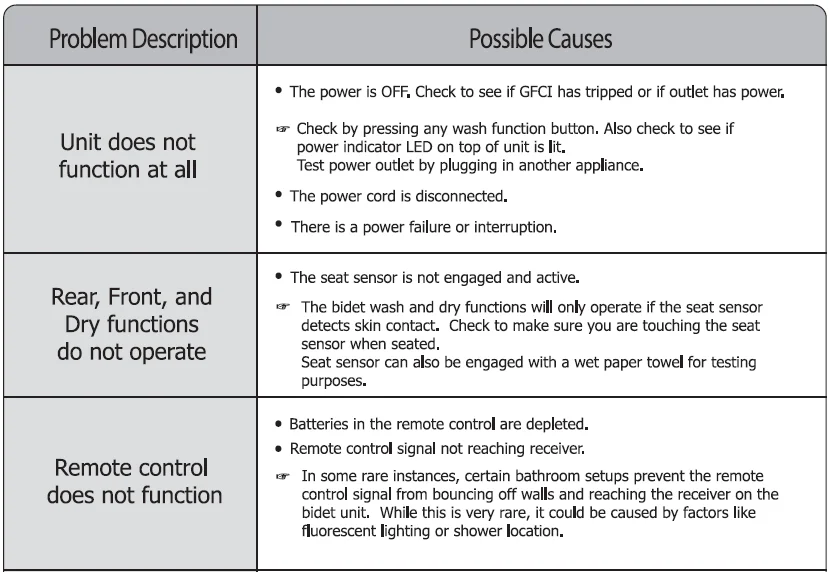
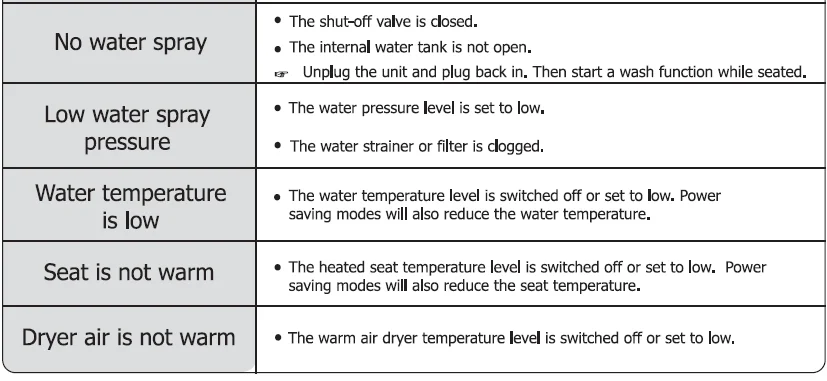
Check the following items before calling for service.
Product Specifications
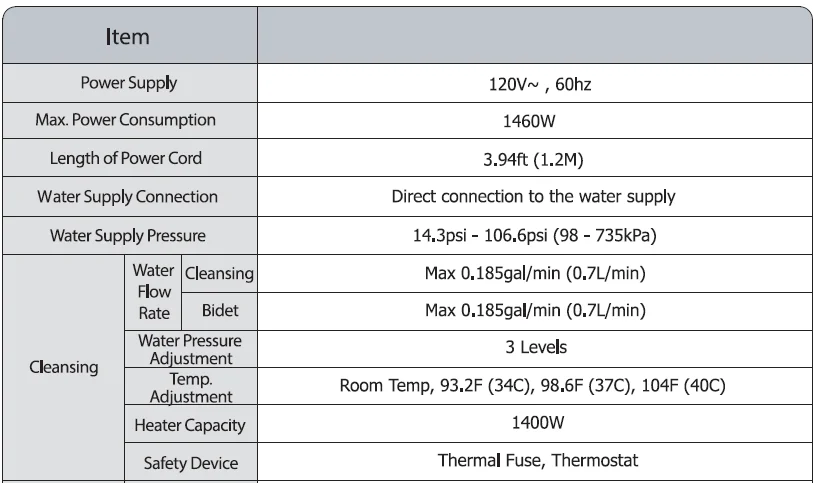
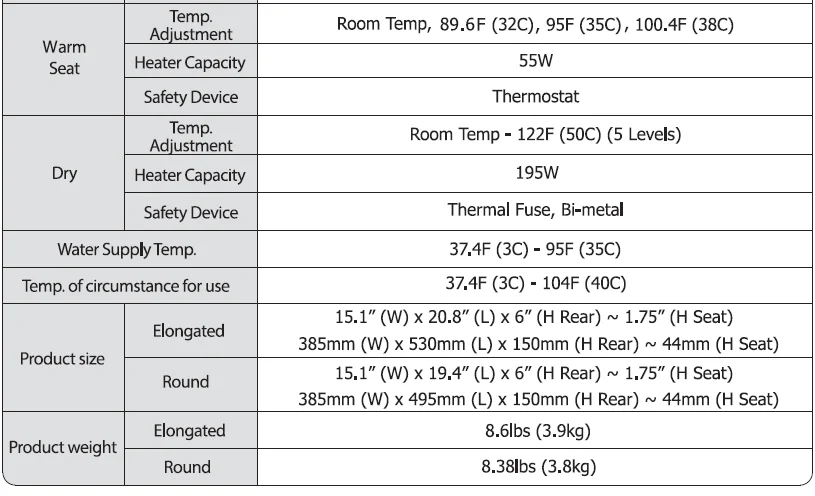
For more manuals by Alpha Bidet, visit ManualsLibraryy
Alpha Bidet JX Elongated Toilet Seat- FAQs
How do I remove the Alpha Bidet toilet seat?
Locate the seat release button on the rear right side of the bidet. Press the button firmly, then slide the entire seat forward to detach it from the mounting bracket. This allows you to clean or repair the unit easily.
How do I install the Alpha Bidet seat?
Remove your existing toilet seat, connect the supplied T-valve to your toilet tank, and mount the new bidet using the included bracket and bolts. Slide the Alpha Bidet seat into the bracket until it locks securely in place.
How do I clean the Alpha Bidet JX seat and nozzle?
Press the REAR/STOP and POWER SAVING buttons at the same time to extend the nozzle. Clean it gently using a soft cloth or brush, then press REAR/STOP again to retract it. The nozzle also performs automatic self-cleaning after each use.
What is the power cord length of the Alpha Bidet JX?
The Alpha Bidet JX features a 4-foot long power cord with a 3-prong grounded plug for standard 120V outlets.
What is a smart bidet toilet seat?
A smart bidet toilet seat offers adjustable water temperature, pressure, heated air drying, and seat warming features. The Alpha JX provides a fully customizable and hygienic toilet experience controlled via remote.
Is the Alpha Bidet automatic?
Yes, many Alpha Bidet models, including the JX, have automatic functions such as self-cleaning nozzles and auto power-saving modes for a more hands-free and hygienic experience.
Where are Alpha Bidet products made?
Alpha Bidet toilet seats are designed in the USA and manufactured in China under strict quality standards.
What is the difference between the Alpha JX and JX2 models?
The Alpha JX2 is the updated version featuring a stainless steel nozzle and a Bowl Mist function that pre-sprays the toilet bowl to prevent stains.
Is Alpha Bidet a reliable brand?
Yes, Alpha Bidet is highly rated for its durable build, modern design, and advanced features like tankless water heating and quiet operation, making it a top choice among users.

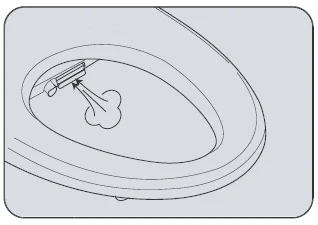

 To detach the unit, pull it forward while lifting the front end, as shown.