![]()
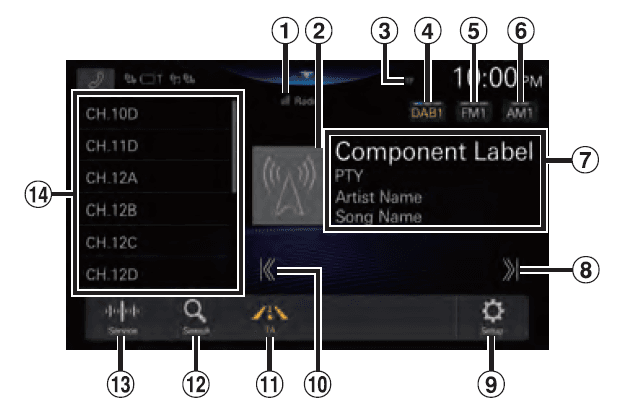
Alpine iLX-F905D Halo9 9-Inch Digital Media Receiver
Operating Instructions
Points to Observe for Safe Usage
- Read this manual carefully before using these system components. They contain instructions on how to use this product in a safe and effective manner. Alpine cannot be responsible for problems resulting from failure to observe the instructions in this manual.
- This manual uses various pictorial displays to show you how to use this product safely and to alert you to potential dangers resulting from improper connections and operation. Following are the meanings of these pictorial displays. It is important to fully understand the meanings of these pictorial displays in order to use this manual and the system properly.
- This product may be used with software applications. Please follow all usage instructions and warnings when using this product at all times. Do not use this product or any software application in a manner which will hinder safe operation of your vehicle.
INSTALL THE PRODUCT CORRECTLY SO THAT THE DRIVER CANNOT WATCH TV/VIDEO UNLESS THE VEHICLE IS STOPPED AND THE PARKING BRAKE IS APPLIED.
Itis dangerous for the driver to watch TV/Video while driving a vehicle. Installing this product incorrectly enables the driver to watch TV/Video while driving. This may cause a distraction, preventing the driver from looking ahead, thus causing an accident. The driver or other people could be severely injured.
Protecting the USB connector
- Only an iPhone or USB flash drive can be connected to the USB connector on this unit. Correct performance using other USB products cannot be guaranteed.
- If the USB connector is used, be sure to use only the supplied connector cable with the unit. A USB hub is not supported.
- Depending on the connected USB flash drive, the unit may not function or some functions may not be performed.
- The audio file formats that can be played on the unit is MP3/WMA/AAC/FLAC/WAV/APE.
- Artist/song name, etc,, can be displayed. Certain, special characters may not be correctly displayed.
Getting Started
Location of Control
- HW iLX-705D
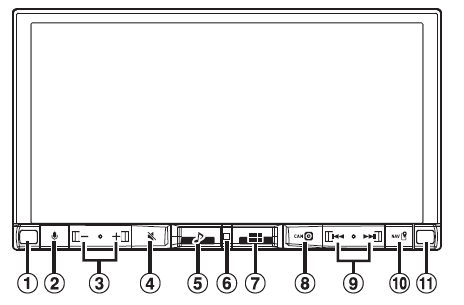
- WH iLX-F905D/iLX-F115D

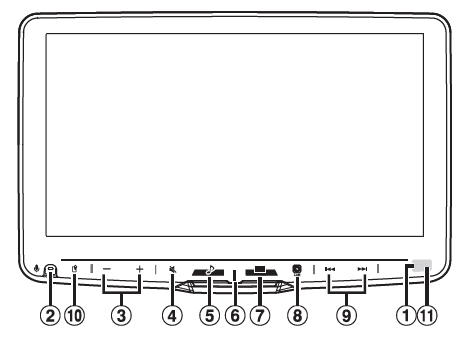
- Dimmer Sensor: Senses the brightness of the car interior.
- Button: Activate Siri function or voice recognition mode while Apple CarPlay or Android Auto is connected.
- —/+ (DOWN/UP) button: Adjusts the volume.
- (MUTE) button: Activates/deactivates MUTE mode. Press and hold this button for at least 2 seconds to turn off the screen/button illumination.
- (Audio) button: Displays the Audio playback screen. Audio sources can be switched while the Audio playback screen is displayed.
- When displaying a screen different from the audio source (such as the map screen for Apple CarPlay or Android Auto), the audio source is switched without changing the screen display.
- Power indicator
 HOME button: Displays the HOME screen. The Sound Setup screen is displayed while the HOME screen is displayed. Hold this button for at least 2 seconds to turn the power off.
 (CAM) button: Displays the image of Camera2 (Front/Side/Other) or Camera (Rear). Press for 1 second or more to return to the previous screen.
 button: Press to seek up/down a station in radio mode or up/ down a track, etc, in other audio/visual sources.
 (MAP) button: Displays the Apple CarPlay / Android Auto map screen when Apple CarPlay or Android Auto is connected.
- Remote Sensor: Point the remote control transmitter towards the remote sensor within a range of 2 meters.
Touch Screen Operation
You can operate the unit by using the touch panel display.
- Be sure to touch the onscreen button lightly with the pad of your finger to avoid scratching the display.
Touch operation
Touch a button or list item on the screen lightly.
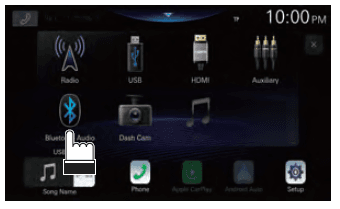
- If you touch a button and there is no reaction, lift your finger.
- Onscreen buttons that cannot be operated are dimmed.
Swipe operation (Enhanced Text mode only)
Move your finger lightly with a swipe. 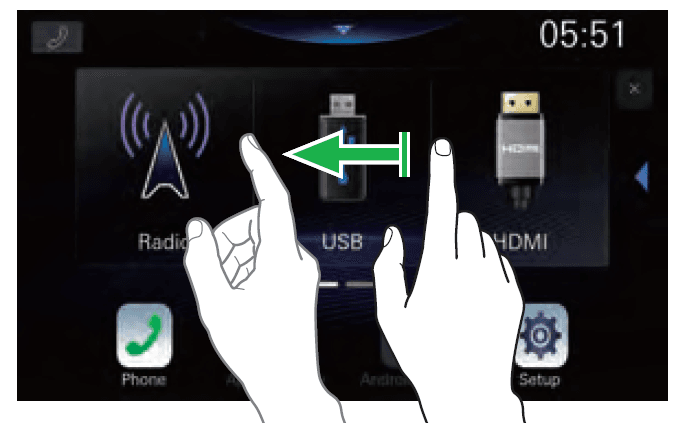
Setup Operation
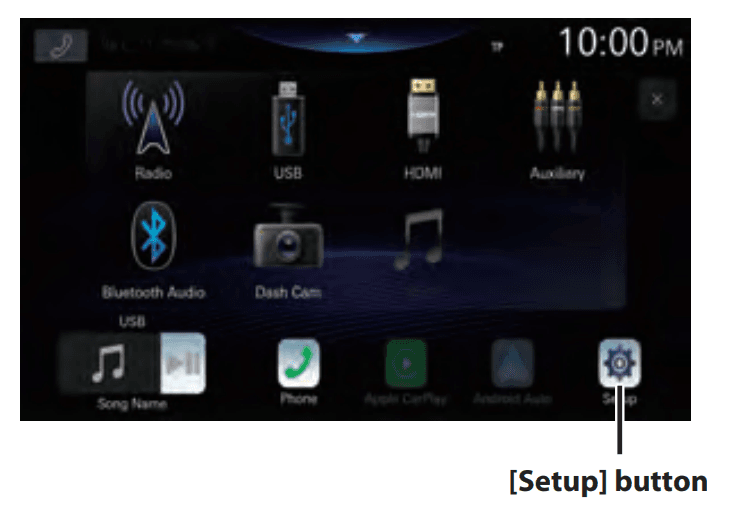
- Press the
 (HOME) button.
The HOME screen is displayed.
- Touch [Setup].
The Settings menu screen is displayed.
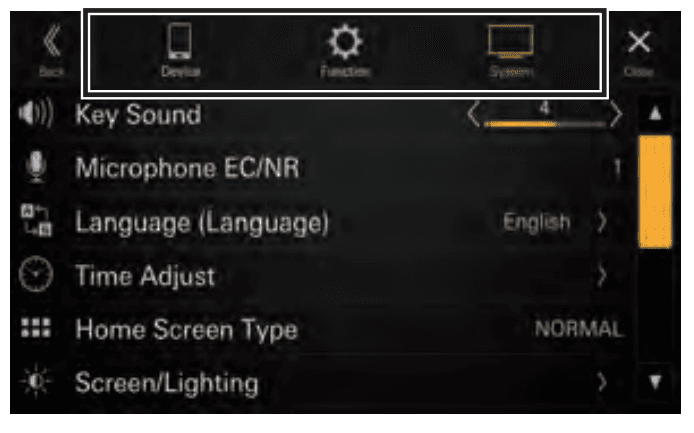
- Touch the required setting category on the upper part of the Settings menu screen, and
then touch the setting item.
Setting categories:
- Device: See “Device Setup” (page 14)
- Function: See “Function Setup” (page 16)
- System: See “System Setup” (page 25)
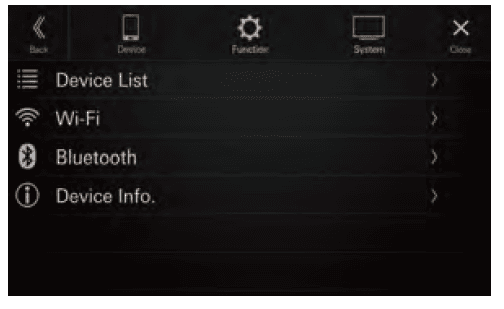
Device Setup
[Device] is selected on the Settings menu screen.
- HB Device Setup Menu screen

Setting items:
- Device List (page 14)
- Wi-Fi (page 15)
- Bluetooth (page 15)
- Device Info. (page 16)
Displaying Device List
[Device List] is selected on the Device Setup menu screen.
The list of devices registered or connected to this unit is displayed. 10 devices compatible with Bluetooth and Wi-Fi, and 1 device compatible with Apple CarPlay or Android Auto connected via USB, can be displayed.
- Device List screen example
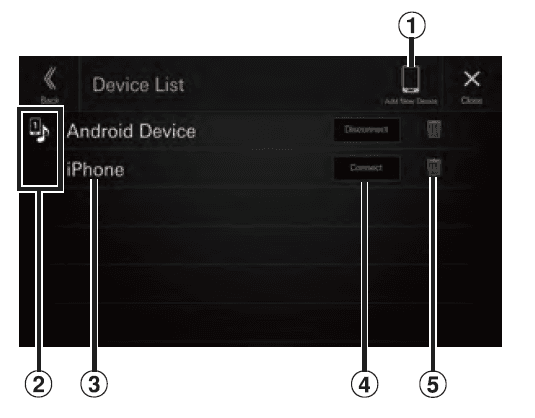
- Add New Device: Search for Bluetooth-compatible devices. For details, see “Pairing the Bluetooth Device” (page 14).
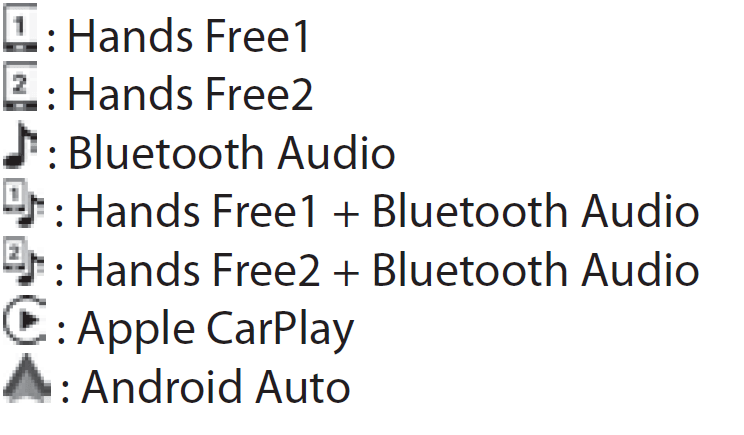
- Function icon

- Device Name or Device Address
- Connect or disconnect the selected device. For details, see “Connecting the Device Registered in the Device List’, “Disconnecting the Connected Device” (page 15).
- Delete the selected device information. For details, see “Deleting a Bluetooth Device from the
list” (page 15).
Pairing the Bluetooth® Device
Search for Bluetooth-compatible devices.
Setting item:
Add New Device
- Touch [Add New Device]: A search for devices to connect wirelessly to the unit starts. The Search List is displayed, and the list of searched devices is displayed.
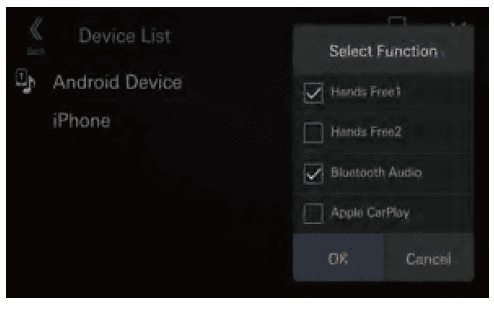
- Touch a device to connect to the list. The Select Function screen is displayed.
- Select the function of the connecting device on the Select Function screen, and touch [OK]. A check mark is displayed for the selected function.

- Hands Freel: The device is used as the first hands-free phone.
- Hands Free2: The device is used as the second hands-free phone.
- Bluetooth Audio: The device is used as a Bluetooth Audio device.
- Apple CarPlay*: The device is used as Apple CarPlay.
- * If you want to use Apple CarPlay mode without displaying [Apple CarPlay] on the Select Function screen, select [Hands Free1] or [Hands Free2] to connect your device.
- For example, when the device is used as a hands-free phone and Bluetooth Audio, select [Hands Free1] and [Bluetooth Audio].
- If you want to use Apple CarPlay with a wireless connection, set the Wi-Fi function of your iPhone to ‘on’.
- When a code is displayed on the device, check that the code is the same as the one on the screen of the unit, and touch [Yes].
When the device connection is complete, a message appears and the device returns to normal mode.
Connecting the Device Registered in the Device List
Select one of 10 paired Bluetooth or Wi-Fi compatible devices that you previously registered.
- Touch [Connect] of the device you want to connect from the Paired Device list. The Function Select screen is displayed.
- Select the function of the connecting device on the Function Select screen, and touch [OK]. ‘A check mark is displayed for the selected function. When the device connection is complete, a message appears and the device returns to normal mode.
Function Setup
[Function] is selected on the Settings menu screen.
- Function Setup Menu screen
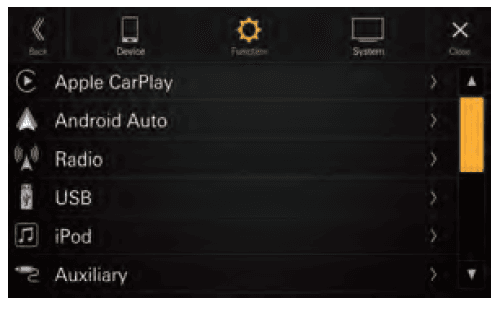
Setting items:
- Apple CarPlay (page 16)
- Android Auto (page 17)
- Radio (page 18)
- USB (page 19)
- iPod (page 20)
- Auxiliary (page 20)
- HDMI (page 21)
- Phone (page 21)
- Bluetooth Audio (page 22)
- CAN I/F BOX (page 22)
- Dash Cam (page 23)
- Camera (page 23)
Apple CarPlay Setup
[Apple CarPlay] is selected on the Function Setup Menu screen.
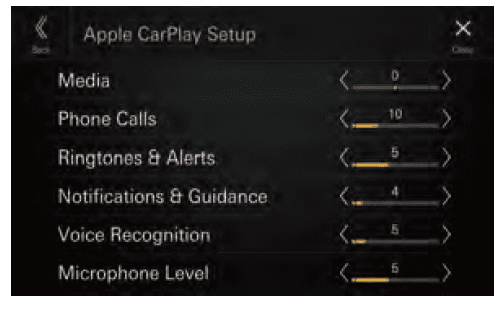
Adjusting the Media Level
Setting item:
Media
Setting level:
-14 to +14 (Initial setting: 0)
Touch [<]or[>] of “Media” to set the media volume level for CarPlay playback.
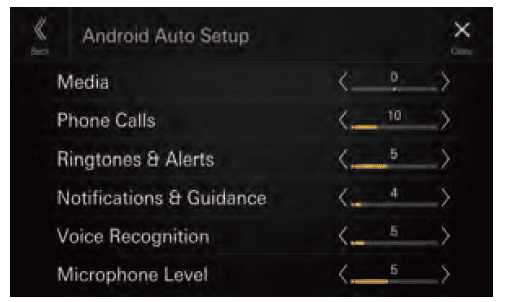
Android Auto Setup
[Android Auto] is selected on the Function Setup Menu screen,

Adjusting the Media Level
Setting item:
Media
Setting level:
-14t0 +14 (Initial setting: 0)
Touch [<]or[ >] of “Media” to set the media volume level for Android Auto playback.
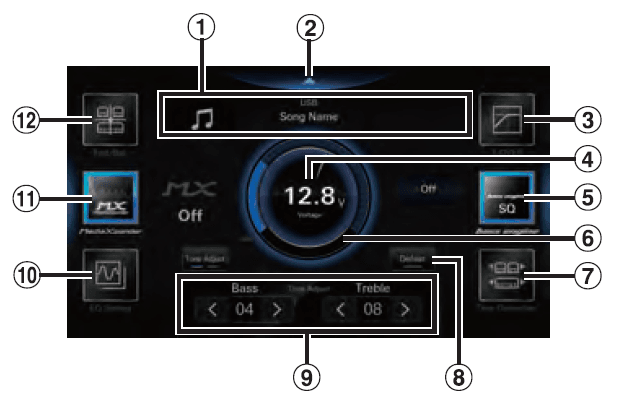
Sound Setup
You can set up items related to the sound quality. Touch the upper central area![]() of the Home
of the Home
screen. The Sound Setup screen is displayed.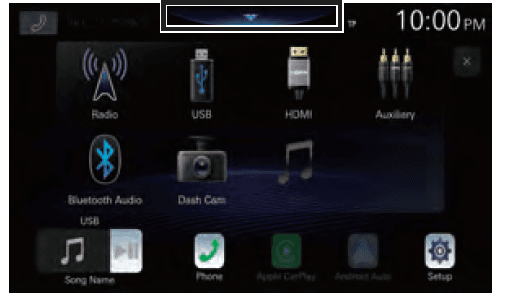
- The Sound Setup screen can also be displayed by touching (HOME) while displaying the Home screen.
- Sound Setup Menu screen

- Current source information display.
- Touch this to change to the Home screen.
- X-OVER (page 32)
- Voltage display.
- bass engine (page 33)
- Volume level indicator
- Time Correction (page 32)
- Defeat (page 34)
- Tone Adjust (Bass/Treble) (page 33), Sub
Woofer Level (page 33) - EQ Setting (page 30)
- Media Xpander (page 30)
- Fader/Balance/Rear Speaker/Subwoofer (page 31)
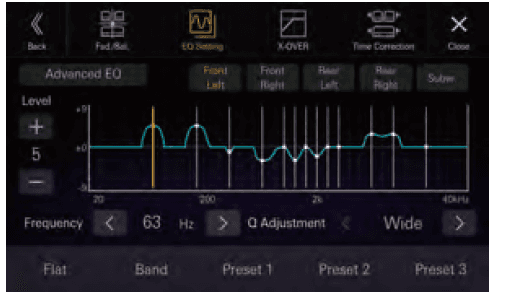
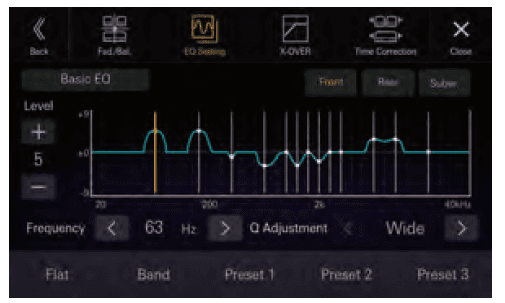
Adjusting the Parametric Equalizer Curve (Advanced EQ/Basic EQ)
You can modify the Equalizer settings to create a response curve more appealing to your personal taste.
This unit has “Advanced EQ” which can set 4 types of speakers, and “Basic EQ” which can set 2 types of speakers.
- Advanced EQ

- Basic EQ

- Touch [EQ Setting].
- Touch [Advanced EQ] or [Basic EQ] to select Equalizer mode.
- Select a speaker to adjust.
- ‘Advanced EQ: Front Left / Front Right / Rear Left Rear Right / Subw.
- Basic EQ: Front / Rear / Subw.
- Touch (Band to select the band to be adjusted.
Band1 →Band2→….→Band12→Band13→Band 1- You can select a band directly by touching the screen.
- Touch [<]or[ >] of “Frequency” to adjust the frequency of the selected band.
Adjustable frequency bands:
20 Hz10 40 kHz (in 1/3 octave steps)
- Band: 20 Hz~100 Hz (63 Hz)
- Band2: 63 Hz~315 Hz (125 Hz)
- Band3: 100 Hz~500 Hz (200 Hz)
- Band: 160 Hz~800 Hz (315 Hz)
- Bands: 250 Hz~1.25 kHz (500 Hz)
- Bandé: 315 Hz~1.6 kHz (630 Hz)
- Band7: 500 Hz~2.5 kHz (1 kHz)
- 1Bands: 1 kHz~5 kHz (2 kHz)
- Band9: 1.6 kHz~8 kHz (3.15 kHz)
- Band10: 2.5 kHz~12.5 kHz (5 kHz)
- Band11: 4 kHz~20 kHz (8 kHz)
- Band12: 6.3 kHz~31.5 kHz (12.5 kHz)
- Band13: 10 kHz~40 kHz (20 kHz)
- Touch [—]or [+] of “Level” to adjust the level of the selected band.
Setting contents:
-9 to +9 (Initial setting: 0)
- 7 Touch [<]or[>] of “Q Adjustment” to select the bandwidth.
Setting contents: Wide (Initial setting) / Medium / Narrow
- To adjust another band, repeat steps 2 to 6, and adjust all bands.
- To store the adjusted setting value, touch and hold [Preset 1, [Preset 2], or [Preset 3] for at least 2 seconds.
- Band2 and Band11 are the same as the Bass and Treble controls. For details on setting Bass and Treble, see “Adjusting Bass Level/Treble Level” (page 33).
- Settings exceeding the frequency of adjacent bands are not available.
- While adjusting the Parametric EQ, you should consider the frequency response of the connected speakers.
- When the Parametric EQ is adjusted, the Preset EQ is overridden.
- When Preset EQ is set, the linked Parametric EQ settings are also changed. We recommend storing Parametric EQ settings in a Preset in advance.
- Touch [Flat] to initialize all values.
Calling the Parametric EQ adjusted value
Calling the pre-set Parametric EQ adjusted value.
Touch [Preset 1, [Preset 2], or [Preset 3] on the Parametric EQ screen.
The setting stored in the Preset will be recalled.
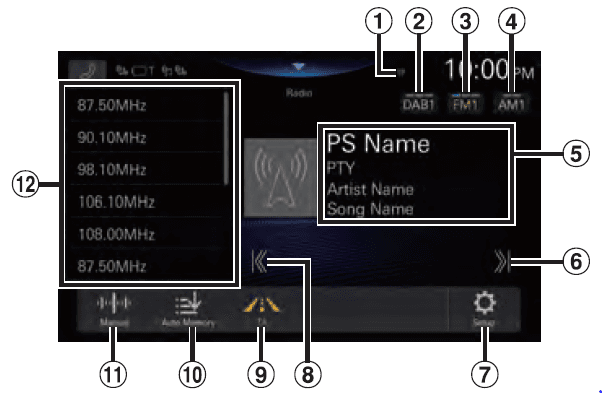
Radio/RDS
- RDS (FM1/FM2/FM3) main screen example

- TP/EON indicator
- switches the DAB band.
- Switch the FM band.
- Switch the AM band.
- Information display
- For details on switching the display of the Radio text, see “Displaying Radio Text” (page 40).
- Increases frequency: Touch and hold to change the frequency continuously.
- Displays the Radio Setup Menu screen (page 18). Decreases frequency
- Touch and hold to change the frequency continuously.
- Traffic Information mode On/Off
- Memorizes stations automatically
- Switches a Seek mode.
- preset List: Displays the preset stations with a short touch. Touch for at least 2 seconds to memorize the current station as a preset station.
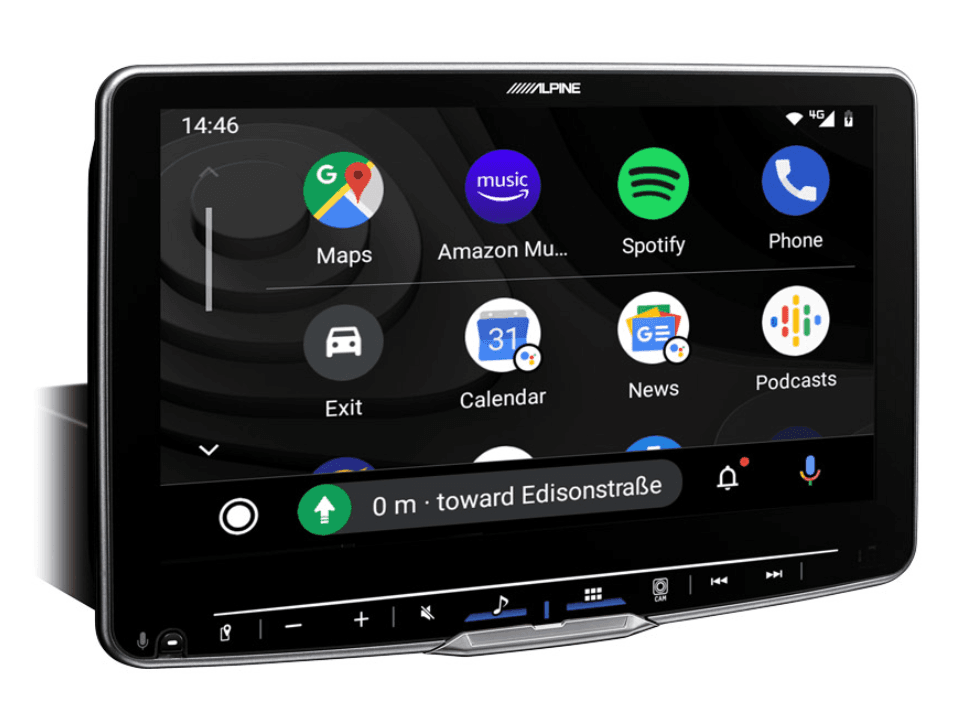
DAB/DAB+
- signal Strength indicator
- slide Show: Displays the program information, artist photos, and ‘advertisements that are synchronized with the Service ‘component currently being received. They may not be displayed, depending on the Service component currently being received.
- TP indicator
- Switch the DAB band.
- switch the FM band.
- Switch the AM band.
- Information display
- For details on switching the display, see “Displaying DAB Text” (page 42).
- Increases frequency: Touch and hold to change the frequency continuously.
- Displays the Radio Setup Menu screen (page 18).
- Decreases frequency: Touch and hold to change the frequency continuously.
- Traffic Information mode On/Off
- Displays the search screen
- Switches a Seek mode.
- preset List: Displays the preset stations with a short touch. ‘Touch for at least 2 seconds to memorize the current station as a preset station.
USB Audio
USB Audio mode screen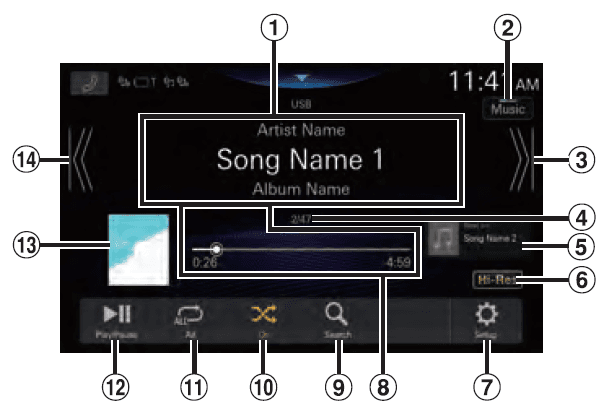
- Information display
- Switches to USB Video mode
- Find the beginning of the next chapter/Fast-forward when touched for at least 1 second
- Current track number/Total track number
- Next, the song information display
- Hi-Res icon display
- Not displayed if the following conditions are not satisfied
- Extension: flac/ wav
- Sampling frequency: 96 kHz or more
- ‘Quantization bit rate: 24 bit or more
- Displays the USB Setup Menu screen (page 19)
- Time Bar (Elapsed time/Total time for playing)
- Displays the search screen
- Shuffle mode
- Repeat mode
- Pause and Play
- Artwork display
- Finds the beginning of the current file/Finds a previous file within 3 seconds after playback
starts/Fast-reverses when touched for at least 1 second
USB Video
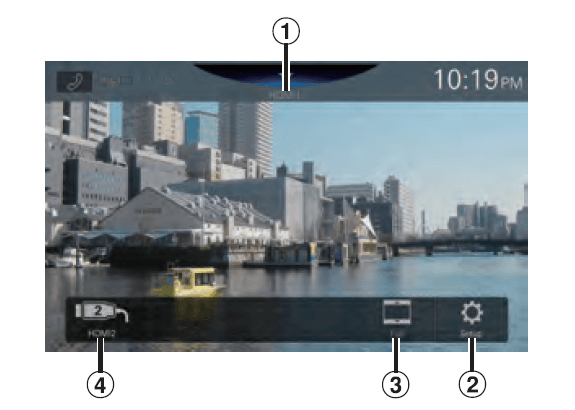
The video formats (US8 Flash div) supported by the ut areas follows.
- Supported Container: MP/MOV/FLYMKY
- Supported Video Coding: MPEG-4/H 263/H264 (MPEG 4 INCYMPEG-/MPEG2
- Supported Audio Coding: MPWMA/AACWAVIFLAC/ are
USB Video mode screen
- Folder NameFile Name
- Current ile number Total file number Changes the Audio Tracks (Only during MKV file playback)
- Switches to Us8 Audio mode
- Finds the beginning of next file/Fast forwards ‘when touched for atleast 1 second
- Displays the USB Setup Menu screen (page 19)
- Switching Display Modes
- Displays the search screen
- Time Bar (Elapsed time/Total time for paying)
- Shuffle mode:
- Repeat mode
- Pause and Play.
- Finds the beginning of the current fil/Finds a previous fle within one second ater playback starts/Fast reverses when touched for atleast 1 second
Information
Product Software Update :
This product uses software that can be updated through a USB flash drive. Download the software from the Alpine website and update the product using the USB flash drive.
Updating this product
Check the Alpine website for details on updating. https://www.alpine-europe.com/alpine-europe html
Important information on the software
About the software license of the product. The software installed in the product contains open-source software. For details, refer to the “Open source licenses” screen on this unit. See “Displaying Software License” (page 29).
What is MP3?
MP3, whose official name is “MPEG Audio Layer 3!is a compression standard prescribed by the ISO, the
International Standardization Organization and MPEG which is a joint activity institution of the IEC.
MP3 files contain compressed audio data. MP3 encoding is capable of compressing audio data at extremely high ratios, reducing the size of music files to as much as one-tenth their original size. This is achieved while still maintaining near CD quality. The MP3 format realizes such high compression ratios by eliminating the sounds that are either inaudible to the human ear or masked by other sounds.
What is WMA?
WMA, or“Windows Media™ Audio is compressed audio data. WMA is similar to MP3 audio data.
What is AAC?
AAC is the abbreviation for “Advanced Audio Coding.” and is a basic format of audio compression used by MPEG2 or MPEG4.
What is FLAC?
FLAC (Free Lossless Audio Codec) is an audio file codec for lossless compression, developed and offered as open source software. Codecs with lossy compression forms, such as MP3 and AAC, reduce part of the data to improve compression efficiency. However, FLAC can reconstruct compressed data to be an identical copy of the original data by performing lossless compression. The compression ratio of FLAC is
about 50%.
What is WAV?
WAV is a standard audio format for Windows. Its the original format before compression. You can enjoy music with almost the same sound quality as a CD. WAV is also known as WAVE.
What is APE?
APE is a format called lossless compression. It can be restored to its original quality by decoding. Mainly, it is used in “Monkey’s Audio”
For more manuals about Alpine, visit ManualsLibraryy
Alpine iLX-F905D Halo9 9-Inch Digital Media Receiver-FAQs
How do I connect my Alpine receiver?
Search for available Bluetooth devices on your device and select “Alpine CD Receiver,” “Alpine Digital Media Receiver,” or “Alpine NAVI” for pairing. Use the Rotary Encoder on the receiver to confirm pairing by selecting “PAIR YES” and pressing ENTER.
How do I connect a digital receiver to my TV?
Plug one end of an HDMI cable into the HDMI port on the digital receiver and the other end into the HDMI port on your TV. Then connect the power cord of the receiver to an electrical outlet.
How do I pair my phone with the Alpine iLX-F905D?
Ensure your phone is in discoverable mode, then press the interface dial on the receiver. Once your phone appears on the list, select it to complete pairing.
What does HDMI ARC mean?
HDMI ARC (Audio Return Channel) allows audio to flow in both directions through a single HDMI cable, making it possible to connect Blu-ray players, set-top boxes, or gaming consoles to a TV and channel audio to a connected soundbar or home theater system.
How do digital receivers work?
Digital receivers demodulate the signal and convert it back into an analog audio signal to feed into speakers. They use digital processing for signal enhancement and error checking.
Can I connect a receiver to my TV?
Yes, connecting your receiver to the TV using HDMI ensures the best audio quality. Select the sound receiver as the audio output option through the TV’s Quick Settings menu.
Why won’t my phone connect to my Alpine radio?
If you’re encountering pairing issues, the “Paired Device List” may be full. Clear old or unused devices from the list and try connecting again.
How do I connect my phone to a stereo system?
Use an auxiliary (AUX) cable to connect your phone’s headphone jack to the AUX port on your stereo. Then select “AUX” as the input source on your stereo system.

