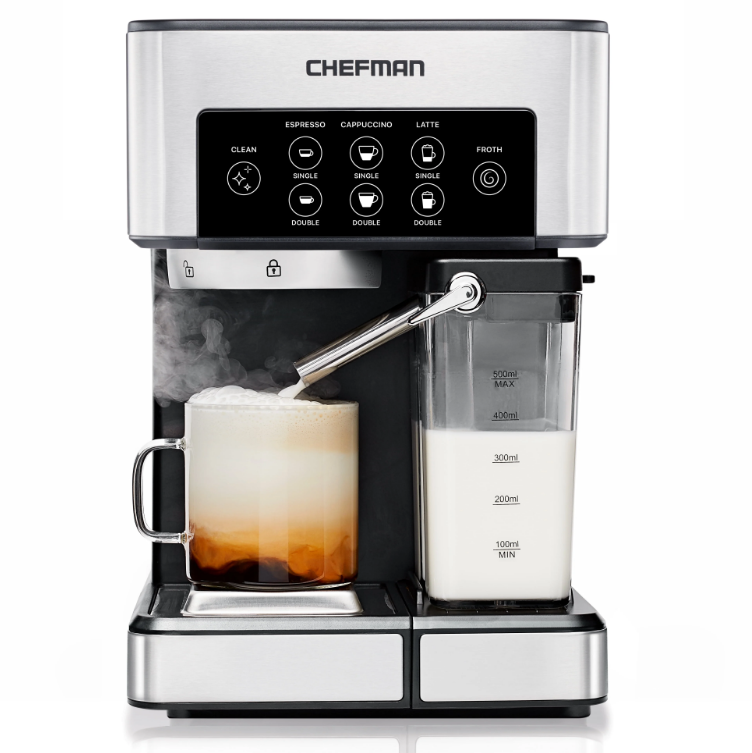
Chefman RJ54-SS-15 6-in-1 Espresso Machine
SAFETY INSTRUCTIONS
- READ ALL INSTRUCTIONS.
- Do not touch hot surfaces. Use handles or knobs.
- To protect against fire, electric shock, and injuries to persons, do not immerse the cord, plug, charging base, or unit in water or any other liquid.
- Close supervision is necessary when any appliance is used by or near children.
- Unplug the appliance from the outlet when not in use and before cleaning. Allow the appliance to cool before putting on or taking off parts, and before cleaning it.
- Do not operate any appliance with a damaged cord or plug, or after the appliance malfunctions or has been damaged in any manner. If this should occur, contact Chefman® Customer Support.
- The use of accessory attachments not recommended by Chefman® may result in fire, electric shock, or injury to persons.
- Do not use outdoors.
- Do not let the cord hang over the edge of a table or counter, or touch hot surfaces.
- Do not place the appliance on or near a hot gas or electric burner, or in a heated oven.
- To disconnect, turn any control to OFF, then remove the plug from the wall outlet.
- Do not use the appliance for anything other than its intended use.
FEATURES
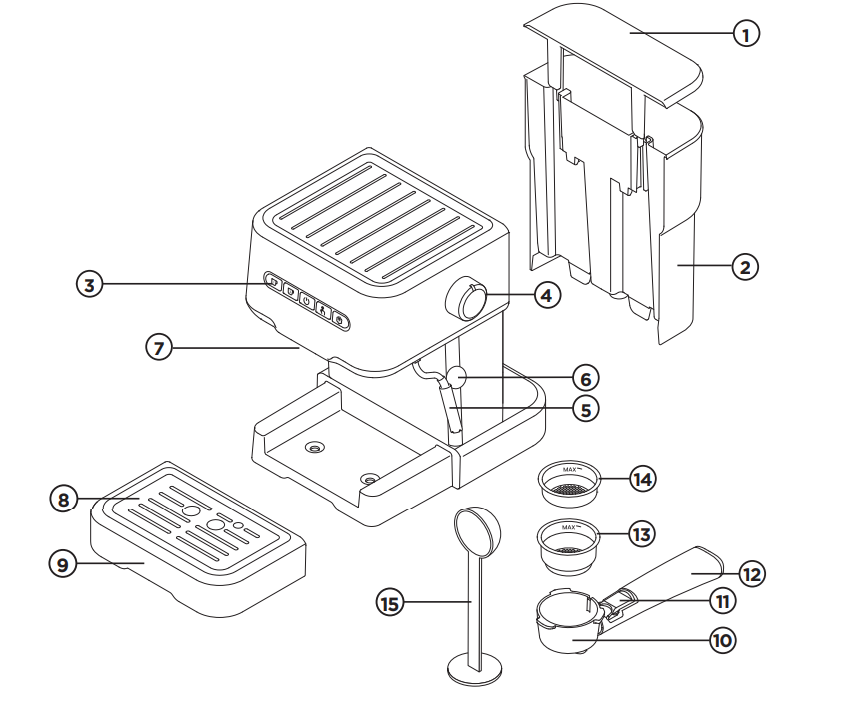
- Water Reservoir Cover
- 1.5L Removable Water Reservoir
- Control Panel
- Steam Control Knob
- Steam Wand
- Steam Wand Handle
- Brew Head
- Removable Drip Tray Coaster
- Removable Drip Tray
- Portafilter
- Portafilter Basket Retention Clip
- Portafilter Handle
- Portafilter Double-Shot Basket
- Portafilter Single-Shot Basket
- Coffee Measuring Scoop and Tamper

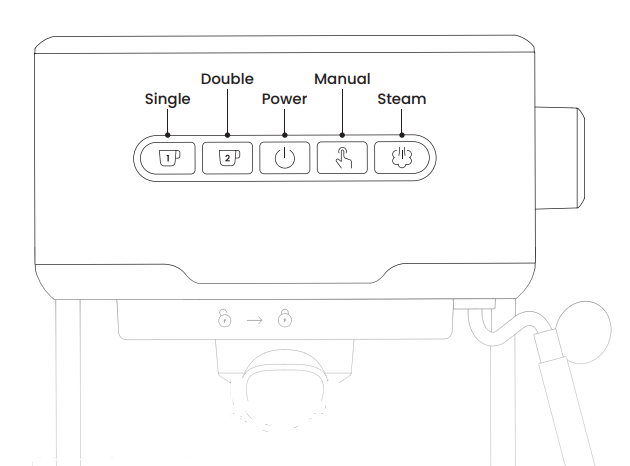
- SINGLE-SHOT Button – Use for a single shot of espresso
- DOUBLE-SHOT Button – Use for a double shot of espresso
- POWER Button – Turns the unit on/off
- MANUAL Coffee Button – Allows you to customize the volume of your espresso by adjusting the amount of water dispensed
- STEAM Button – Press to activate the steam wand when frothing milk

OPERATING INSTRUCTIONS
BEFORE FIRST USE
- Remove all packaging materials and check to ensure that all parts and accessories are accounted for. Read all stickers and remove the ones that are not permanent.
- Remove the water reservoir from the unit (see p. 13) and remove the orange plastic tab from the bottom of the reservoir. Hand-wash the reservoir, portafilter, portafilter baskets, and measuring scoop with a mild detergent and water. Rinse and dry well. Only the single- and double-shot baskets are top-rack dishwasher-safe.
- Gently wipe down the exterior with a damp cloth or paper towel. CAUTION: Never immerse the espresso machine, its base, cord, or plug in water or any other liquid. Do not use scouring pads or abrasive cleaners, as these can damage the finish.
- Place the unit on a hard, flat surface away from sources of heat. Press down firmly so the suction cups on the base attach to the surface.
- Before brewing for the first time, follow the instructions to prime and preheat the unit to clean out any packaging debris or dust that may have accumulated during shipping.
PRIMING THE EASY-BREW ESPRESSO MACHINE
The unit must be primed before first use and after extended periods of disuse when the unit goes completely dry. This will push water into the unit’s internal parts and release air from inside the pump. To prime, follow these steps:
- Fill the water reservoir up to and not exceeding the MAX fill line.
- Place a heatproof cup or mug on the coaster set over the drip tray. Make sure the steam control knob is set to OFF.
- Plug in the unit and press the POWER button. The button will illuminate, and the SINGLE-SHOT, DOUBLE-SHOT, and MANUAL coffee buttons will slowly pulse as the unit heats. When heating is complete, the buttons will illuminate solid, indicating they are ready for use.
- Press the SINGLE-SHOT button. The unit will start pumping water through its internal parts, and a small amount of water should dispense into the cup. NOTE: The unit may produce a loud noise when pumping water for the first time as the air is released inside. This is normal and should stop after a few seconds.
- Remove the cup from the drip tray and discard the water. The unit is now primed.
PREHEATING
After priming and after brief periods of disuse (a week or so), it is recommended to preheat the unit. This will ensure the water is fully drawn into the machine, so the proper amount of coffee dispenses when making your espresso. To preheat the unit, repeat the steps under PRIMING THE EASY-BREW ESPRESSO MACHINE. A larger amount of water will dispense into the cup, indicating the water is able to completely pump through the unit and the unit is ready for use. After the first use, preheating is NOT necessary if you use the unit daily.
CHOOSE THE RIGHT SIZE CUP
While the espresso machine dispenses standard single and double cups of espresso, it also allows you to brew coffee manually so you can choose how much water is dispensed (see p. 17). A standard single cup of espresso yields approximately 1–1.5 fl oz, and a double yields approximately 2–2.5 fl oz. Be aware that these amounts vary depending on variables such as coffee grind and how firmly you pack the filter.
CHOOSE THE RIGHT COFFEE AND GRIND
For best results, use freshly ground espresso-roasted beans, as pre-ground beans lose their flavor fast. The grind should be fine, like table salt. However, if the grind is too fine (it will feel powdery when rubbed between fingers), the water will not flow through evenly under pressure. If the grind is too coarse, the water will flow through too quickly, resulting in a weak flavor. Finding your preferred grind may take some practice.
HOW TO FILL THE WATER RESERVOIR
To fill the reservoir with water, you may either use a pitcher to fill it while on the unit or remove it from the unit to fill at the sink. To remove, gently lift the reservoir straight up from the unit. Lift the lid until the hinges are completely extended, then tilt the lid forward until it rests over the front of the reservoir. Fill with cold water (preferably filtered or bottled) between the MIN and MAX lines on the tank. Never use warm or hot water to fill the reservoir. To replace, close the lid and hold the reservoir above the platform. Set down until the bottom locks in and the reservoir is flat against the unit.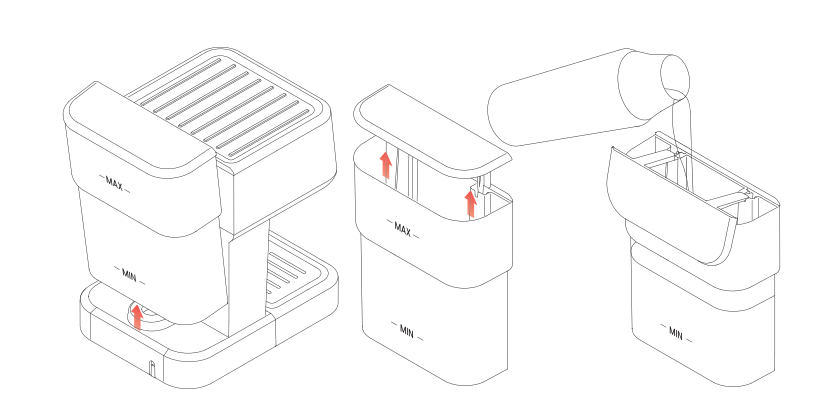
HOW TO CHOOSE AND INSERT THE PORTAFILTER BASKET
To insert the basket into the portafilter, align the tab on the basket with the corresponding groove in the portafilter. Drop the basket in and twist it slightly to ensure it is locked into place. Use the smaller basket for a single shot of espresso and the larger basket for a double shot.
HOW TO PACK THE PORTAFILTER WITH COFFEE
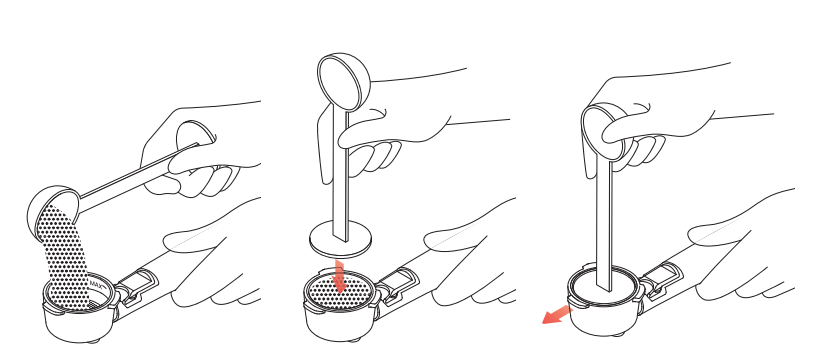
- Use the coffee measuring spoon to fill the basket with finely ground coffee up to and not exceeding the MAX line inside the basket (do not overfill).
- Using the tamper end of the measuring spoon, press on the grounds firmly and evenly. Be sure the surface is smooth and flat.
- Clean any excess grounds from the rim of the portafilter to ensure proper fit in the brew head.

HOW TO PLACE THE PORTAFILTER ON THE BREW HEAD
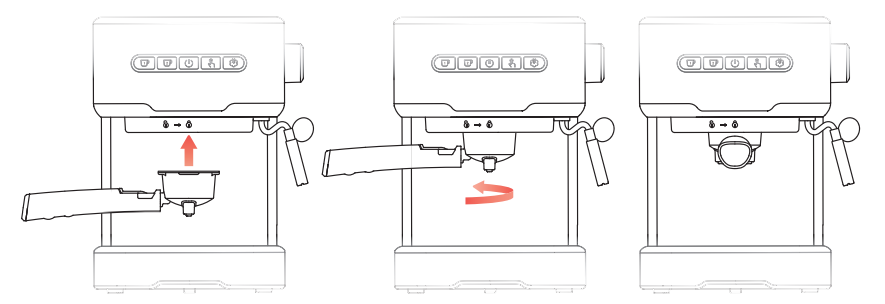
- Position the portafilter underneath the brew head with its handle facing to the left.
- With one hand on top of the unit to steady it, insert the portafilter up into the brew head, lining up the handle with the open lock icon on the unit.
- Slowly turn the handle to the right. You will feel some resistance as you align the handle with the locked icon on the unit (the handle will be at a 90° angle to the unit).

CHOOSE THE CORRECT BREWING SEQUENCE
The Easy-Brew Espresso Machine brews espresso and steams milk for coffee-bar favorites like cappuccinos and lattes. When making a coffee-and-milk drink, you should brew your espresso first and then froth your milk. Steaming the milk first can cause the unit to temporarily overheat when switching back to coffee mode if residual steam gets trapped inside. The SINGLE-SHOT, DOUBLE-SHOT, and MANUAL buttons will blink rapidly and will not turn solid for use until the unit has cooled, which can take several minutes. Do NOT make coffee before the unit has cooled and returned to standby mode, as this can damage the unit.
HOW TO MAKE A STANDARD ESPRESSO
Espresso is a unique method of coffee brewing in which hot water is forced through finely ground coffee beans for a richer and more full-bodied brew than regular drip. Because of its strength, espresso is usually served in small portions (about 1.5 to 2.5 fl oz) in demitasse cups.
- Fill the water reservoir as directed on p. 13.
- Make sure the steam control knob is set to OFF, then plug the unit in.
- Press the POWER button. The button will illuminate, and the SINGLE-SHOT, DOUBLE-SHOT, and MANUAL coffee buttons will slowly pulse as the unit begins heating. Once heating is complete, these three buttons will solidly illuminate, indicating the unit is ready to brew.
- Fill the portafilter with finely ground coffee and attach it to the brew head as directed on pp. 14–15.
- Place a heatproof cup or demitasse on the drip tray. If using a larger cup, remove the drip tray coaster for easier entry.
- Choose to brew a single or double espresso by pressing the appropriate button corresponding to your chosen portafilter basket. The chosen button will remain lit during brewing. Brewing will last approximately 15 seconds for a single and 25 seconds for a double.
- When brewing is complete, the unit will automatically return to standby mode (all buttons except steam lit). Remove the cup from the drip tray and serve. NOTE: If no button is pressed within 25 minutes, the unit will automatically power off.
- To discard spent grounds, remove the portafilter by turning the handle to the left. Let the portafilter cool. Hold the portafilter basket in place by flipping up the retention clip to partially cover the lip of the basket and portafilter. Press on the clip with your thumb to hold the basket in place as you empty the grounds.
HOW TO BREW IN MANUAL COFFEE MODE
The Easy-Brew Espresso Machine allows you to customize the size of your espresso by dispensing the exact amount of water desired, making it perfect for larger espresso drinks, such as an Americano. The MANUAL coffee button can run for up to 60 seconds, producing a maximum of approximately 5.25 fl oz.
- Set up the espresso machine to brew espresso as directed in steps 1–5 in HOW TO MAKE A STANDARD ESPRESSO on p.16.
- Press the MANUAL coffee button. The button will remain lit during brewing.
- Once your desired amount is reached, press the MANUAL button again to stop brewing (it will stop automatically after 60 seconds). When brewing is complete, the unit will return to standby mode (all buttons except STEAM lit).
- Remove the cup from the drip tray and serve. NOTE: If no button is pressed within 25 minutes, the unit will automatically power off.
- To discard spent grounds, remove the portafilter by turning the handle to the left. Let it cool. Hold the portafilter basket in place by flipping up the portafilter basket retention clip to partially cover the lip of the basket and portafilter. Press on the clip with your thumb to hold the basket in place as you empty the grounds.
HOW TO FROTH MILK
The steam wand allows you to heat and froth milk. Frothed milk can be added to your espresso to make a macchiato, cappuccino, or latte, or to other hot drinks—such as hot chocolate—to give them a light, foamy topping. For a macchiato, add just a splash of steamed milk; for a cappuccino, add equal parts espresso, steamed milk, and froth; for a latte, add mostly steamed milk and a shot of espresso. REMEMBER: When making a coffee-and-milk drink, you should brew your espresso first and then froth your milk. Steaming the milk first can cause the unit to temporarily overheat when switching back to coffee mode if residual steam gets trapped inside.
- Fill the water reservoir as directed on p. 13.
- Make sure the steam control knob is set to OFF, then plug the unit in.
- Press the POWER button, and it will illuminate; then press the STEAM button to enter steam mode. The button will slowly pulse as the unit begins heating, then turn solid when ready for use. If entering the steam function from standby mode, simply press the STEAM button, and the SINGLE-SHOT, DOUBLE-SHOT, and MANUAL coffee buttons will turn off.
- Fill a large cup with the desired amount of cold milk and position it under the steam wand, making sure the nozzle is below the surface of the milk. NOTE: Only use cold milk, preferably whole, as warm or skim milk will result in a poor froth.
- Slowly turn the steam control knob counterclockwise, and the unit will begin producing steam. As the unit steams, slowly rotate and move the milk up and down for an even froth, always keeping the nozzle below the milk’s surface.
- When the desired froth is reached, press the STEAM button to exit steam mode. The unit will return to standby mode with the other four buttons lit, but residual steam will continue dissipating from the steam wand.
- Continue frothing the milk for a few seconds more until there is no steam left. Then, turn the steam control knob to its OFF position. CAUTION: Turning the steam control knob OFF before exiting steam mode can trap steam in the unit and cause it to temporarily overheat. If this happens, the SINGLE-SHOT, DOUBLE-SHOT, and MANUAL coffee buttons will blink rapidly. Allow the unit to cool until these buttons are all solidly lit before using the unit again.
- Immediately wipe the steam wand of milk residue.
- Serve by pouring the frothed milk into your drink of choice.
HOW TO USE THE STEAM WAND FOR HOT WATER
The steam wand also dispenses hot water, perfect for warming your cup before pulling your espresso shot.
- With the unit heated and in standby mode (see steps 1 and 2 of HOW TO FROTH MILK on p. 18), place a large heatproof cup underneath the steam wand, making sure the nozzle is below the rim to prevent splashing.
- Slowly turn the steam control knob counterclockwise as if to produce steam. This will open the nozzle so water can flow out.
- Press the SINGLE-SHOT, DOUBLE-SHOT, or MANUAL coffee button. The chosen button will remain lit, and hot water will dispense from the steam wand in the amount of the chosen button (about 1–1.5 fl oz for single, 2–2.5 fl oz for double, and up to 5.25 fl oz for manual).
- When the water has finished dispensing, the unit will automatically return to standby mode. Turn the steam control knob to its OFF position.
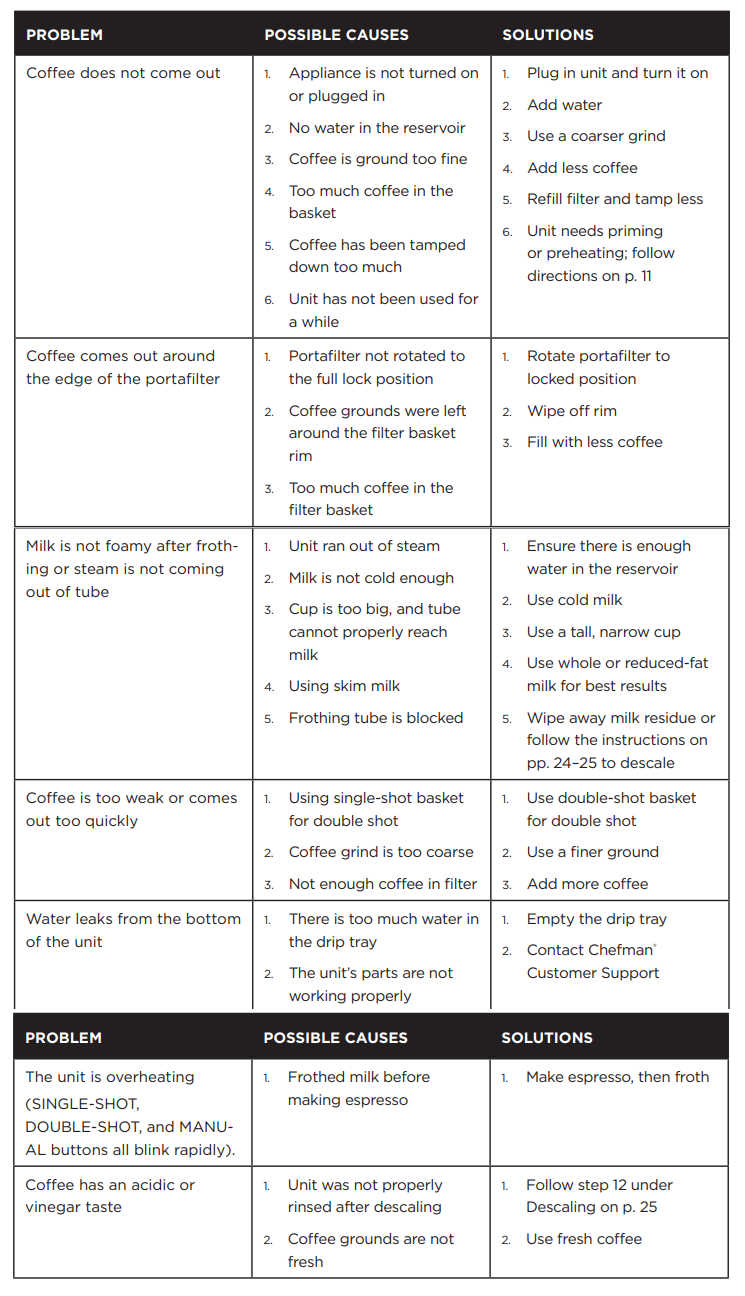
TROUBLESHOOTING
CLEANING AND MAINTENANCE
To keep your coffee and hot water tasting fresh, we recommend rinsing the water reservoir frequently and cleaning your espresso machine often using the following instructions.
HOW TO CLEAN THE PORTAFILTER AND BREW HEAD
- Before cleaning, turn off the unit and unplug it. Some of the metal parts might still be hot. Do not touch them with your hands until they have cooled.
- If not already out, remove the portafilter and discard the used coffee grounds. To hold the basket in place while emptying grinds, flip up the portafilter basket retention clip and hold it down with your thumb as you tip the portafilter upside down and tap to empty the basket.
- Wash the baskets and portafilter with warm, soapy water and rinse well. The single- and double-shot baskets are dishwasher-safe (top rack only), but the portafilter is not.
- Wipe the underside of the brew head with a damp cloth or paper towel to remove any coffee grounds that might have been left behind.
TERMS AND CONDITIONS Limited Warranty
RJ Brands, LLC d/b/a Chefman® offers a limited 1-year Warranty (the “Warranty”) available on sales through authorized distributors and retailers only. Please note that this Warranty becomes valid from the date of initial retail purchase and that the Warranty is non-transferable and applies only to the original purchaser. This Warranty is void without proof of purchase within the United States and Canada. Please be aware that this Warranty supersedes all other warranties and constitutes the entire agreement between the consumer and Chefman®. Any changes to the Terms and Conditions of this Warranty must be in writing, signed by a representative of Chefman®. No other party has the right or ability to alter or change the Terms and Conditions of this Warranty.
We may ask you to please submit, via email, photos and/or video of the issue you are experiencing. This is to help us better assess the matter and possibly offer a quick fix. Photos and/or video may also be required to determine Warranty eligibility. We encourage you to register your product. Registering can make the Warranty process easier and can keep you informed of any updates or recalls on your product. To register, follow the directions on the Chefman® Warranty Registration page in the Chefman® User Guide. Please retain your proof of purchase even after registering. In the event that you do not have proof of your purchase date, we may declare your Warranty void, or we may, at our sole discretion, apply the date of manufacture as the purchase date for purposes of this Warranty.
CHEFMAN® WARRANTY REGISTRATION
For product information, please visit us at Chefman.com.
EXCEPT WHERE SUCH LIABILITY IS REQUIRED BY LAW, THIS WARRANTY DOES NOT COVER, AND CHEFMAN® SHALL NOT BE LIABLE FOR, INCIDENTAL, INDIRECT, SPECIAL, OR CONSEQUENTIAL DAMAGES, INCLUDING WITHOUT LIMITATION, DAMAGE TO, OR LOSS OF USE OF THE PRODUCT, OR LOST SALES OR PROFITS, OR DELAY OR FAILURE TO PERFORM THIS WARRANTY OBLIGATION. THE REMEDIES PROVIDED HEREIN ARE THE EXCLUSIVE REMEDIES UNDER THIS WARRANTY, WHETHER BASED ON CONTRACT, TORT, OR OTHERWISE.
For More Manuals By Chefman, Visit ManualsLibraryy.
Chefman RJ54-SS-15 6-in-1 Espresso Machine-FAQs
Q1. How do I use the Chefman espresso machine for the first time?
Before brewing, fill the water tank and run hot water through the group head and steam wand. This preheats the system, cleans internal parts, and prepares the machine for your first shot.
Q2. What are the basic steps to make espresso with the Chefman 6-in-1?
Preheat the machine (about 5–6 minutes).
Grind fresh coffee beans finely.
Place grounds into the portafilter basket and tamp evenly.
Lock the portafilter into the group head.
Press the button for a single or double shot.
Steam or froth milk if making cappuccinos or lattes.
Q3. Can I use pods in the Chefman espresso machine?
Yes. The machine works with both ground coffee and certain pods, making it flexible for quick brewing or more customized espresso shots.
Q4. How much pressure does the Chefman espresso machine use?
It operates with a 15-bar pump, which is strong enough to brew café-quality espresso with rich flavor and crema.
Q5. What is the ideal pressure for espresso extraction?
The gold standard is around 9 bars of pressure during brewing. Chefman machines apply 15 bars of pump force but regulate pressure during extraction for balanced results.
Q6. What is the correct brewing temperature for espresso?
Espresso should be brewed between 197°F and 205°F (92–96°C) to extract full flavor without bitterness.
Q7. How long should a shot of espresso take?
A proper shot usually takes 25–30 seconds. If it runs too fast, adjust to a finer grind; if too slow, try a coarser grind.
Q8. How do I get good crema on my espresso?
Use freshly roasted beans, grind finely and evenly, and ensure proper tamping pressure. Medium-to-dark roasts typically produce thicker crema.
Q9. How do I steam milk with the Chefman 6-in-1?
Fill a jug with cold milk, insert the steam wand just below the surface, and turn on steam mode. Angle the jug slightly to create a whirlpool effect for creamy microfoam.

