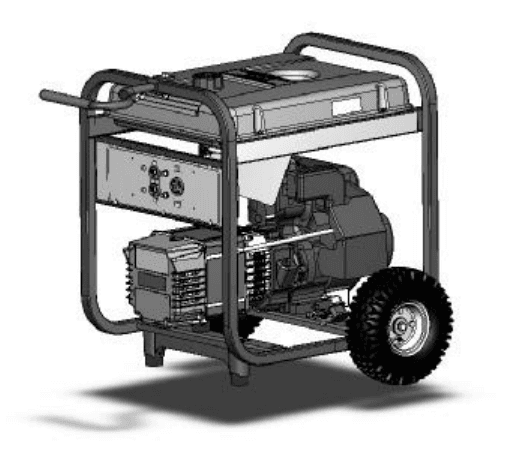
Coleman Powermate PM0525303 5000-watt Portable Generator

- IMPORTANT – Please make certain that persons who are to use this equipment thoroughly read and understand these instructions and any additional instructions provided before operation.
MAJOR GENERATOR FEATURES
- 10 HP Tecumseh engine
- Cast-iron cylinder sleeve
- Low oil sensor
- Receptacles on the control panel
- 5-gallon plastic fuel tank
- Portability kit
CONTROL PANEL
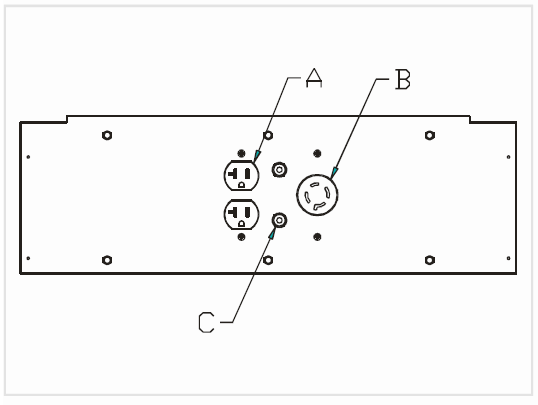
- 120 V, 20 Ampere Duplex Receptacle
- This duplex is split so that 20 amps of current may be drawn from each half of the receptacle. However, the total power drawn must be kept within nameplate ratings. These receptacles may be used along with the twist lock receptacle provided the generator is not overloaded.
- 120/240 V, 20 Ampere Twist lock Receptacle
- A maximum of 20 amps may be drawn from the 120/240-volt receptacle, provided it is the only receptacle used. However, the current must be limited to the nameplate rating. If the 120/240-volt receptacle is used along with the 120-volt receptacle, the total load drawn must not exceed the nameplate ratings.
- Circuit Breakers
- The receptacles are protected by an AC circuit breaker. If the generator is overloaded or an external short circuit occurs, the circuit breaker will trip. If this occurs, disconnect all electrical loads and try to determine the cause of the problem before attempting to use the generator again. If overloading causes the circuit breaker to trip, reduce the load.

- NOTE: Continuous tripping of the circuit breaker may cause damage to the generator or equipment. The circuit breaker may be reset by pushing the button of the breaker
LIMITED WARRANTY
- Warranty Coverage: Power Mate Corporation (the Company) warrants to the original retail customer in North America that it will repair or replace, free of charge, any parts found by the Company or its authorized service representative to be defective in material or workmanship. This warranty covers the cost of replacement parts and labor for defects in material or workmanship.
- Not Covered:
- Transportation charges for sending the product to the Company or its authorized service representative for warranty service, or for shipping repaired or replacement products back to the customer; these charges must be borne by the customer. The engine is covered exclusively by a separate warranty from the engine manufacturer, included with the engine Manual. Damages caused by abuse or accident, and the effects of corrosion, erosion, and normal wear and tear.
EXCLUSIONS AND LIMITATIONS:
- THE COMPANY MAKES NO OTHER WARRANTY OF ANY KIND, EXPRESS OR IMPLIED WARRANTIES, INCLUDING WARRANTIES OF MERCHANTABILITY AND OF FITNESS FOR A PARTICULAR PURPOSE, WHICH ARE HEREBY DISCLAIMED. THE WARRANTY SERVICE DESCRIBED ABOVE IS THE EXCLUSIVE REMEDY UNDER THIS WARRANTY; LIABILITY FOR INCIDENTAL AND CONSEQUENTIAL DAMAGES IS EXCLUDED TO THE EXTENT PERMITTED BY LAW.
PORTABILITY KIT INSTALLATION
WHEEL INSTALLATION
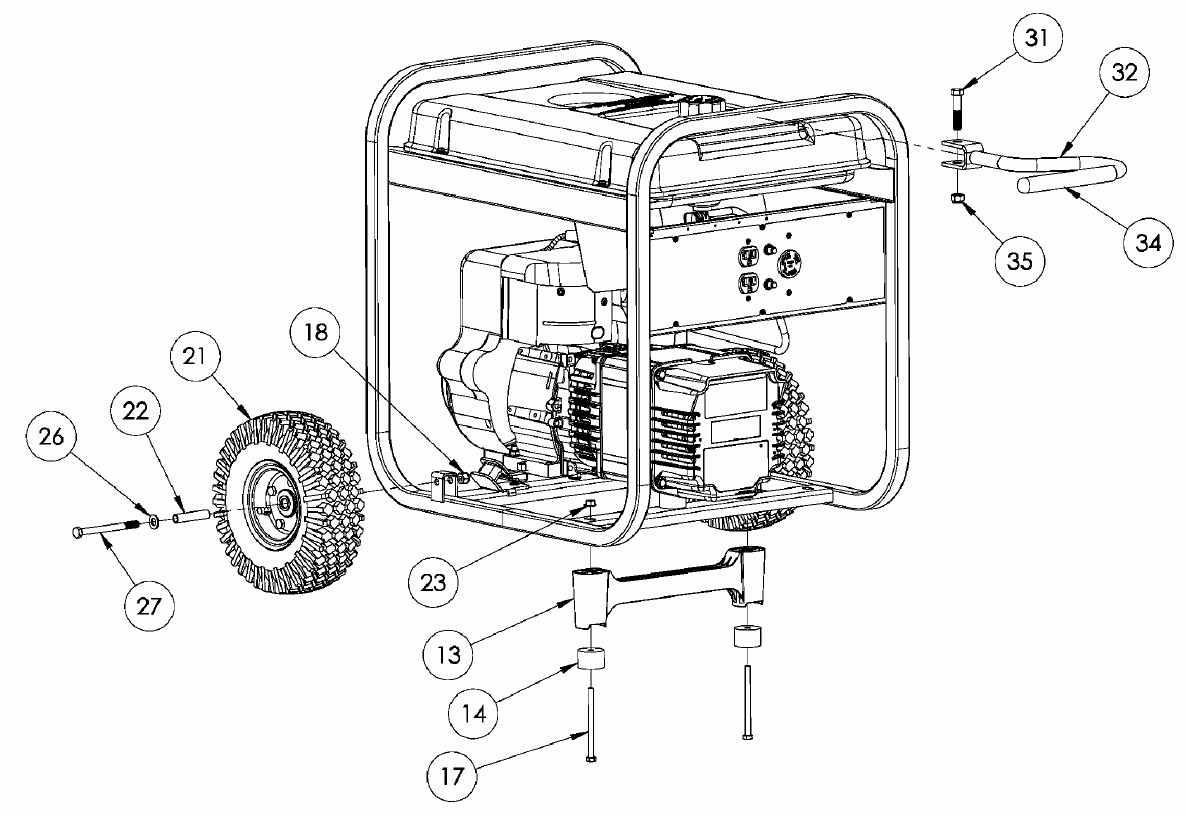
- Block up the end of the generator opposite the fuel tank cap to install the wheel kit.
- Insert the wheel spacer (item 22) into the center of the wheel (item 21).
- Slide 3/8 x 4.25” bolt (item 27) and 3/8 washer (item 26) through the wheel (item 21), then through the wheel bracket on the carrier, with the offset side of the wheel hub against the wheel bracket.
- Thread 3/8 nyloc nut (item 18) onto the bolt and tighten to securely clamp the wheel assembly to the carrier.
- Repeat the above instructions for the remaining wheel.
FOOT INSTALLATION
- Blocking up the alternator side of the generator, place the foot bracket (item 13) under the carrier channel. Thread a 5/16-18 x 4” bolt (item 17) with a rubber foot (item 14) through the mounting holes and thread a 5/16 flange nut (item 23) to the bolt to secure the foot bracket to the carrier.
- Caution: Do not over-tighten so that the rubber foot material collapses.
HANDLE INSTALLATION
- Place the handle (item 32) over carrier tubing on the same end as the feet, centering the handle on the carrier.
- Slide 7/16 x 2” bolt (item 31) through the handle as shown in the diagram and secure with a 7/16” nyloc nut (item 35). Tighten until the handle is securely clamped to the carrier tubing.
- Apply aerosol hairspray or similar adhesive to the handle (item 32), and then slide the handle grip (item 34) onto the handle. The aerosol hairspray will allow for easier assembly and will adhere the grip to the handle.

For more manuals by Coleman Powermate visit, ManualsLibraryy
Coleman Powermate PM0525303 5000-watt Portable Generator-FAQs
How long can a Coleman 5000-watt generator run?
A fully fueled Coleman 5000-watt generator can run for approximately 6 hours per day, lasting 5-7 days depending on usage and fuel availability.
Why does my Coleman generator keep shutting off?
This is often due to bad fuel in the carburetor, which may need cleaning. This is a common issue for generators that aren’t used regularly.
Can I run my generator continuously for 24 hours?
Gasoline-powered portable generators typically run for 6 to 16 hours at a time. A well-maintained propane generator can run for 150 to 200 hours (about 8 days).
How many amps does a 5000-watt generator produce?
At 120 volts, a 5000-watt generator provides 41.66 amps (5000W ÷ 120V = 41.66A).
Why does my generator start and then shut off after a few minutes?
This could be due to low fuel levels. Ensure the fuel tank is full and consider using a generator powered by natural gas or liquid propane for extended operation.
What type of oil should I use for my generator?
1. 10W-30 oil is recommended for temperatures between 40°F and -10°F.
2. Synthetic 5W-30 oil can be used in all temperatures for better performance.
How do I restore residual magnetism in my generator?
You can restore residual magnetism by “flashing the exciter field.” This involves connecting a 12V battery with a current-limiting device to the exciter field while the generator is off.
What are the steps to start my Coleman generator?
1. Turn the fuel valve to the “On” position.
2. Set the on/off switch to “On.”
3. Pull the choke handle to the “Choke” position.
4. Push and hold the start switch until the generator starts.
Where is the reset button on my generator?
The reset button is usually located on the control panel of the generator. In some models, it may be under a protective cover to prevent accidental resets.


