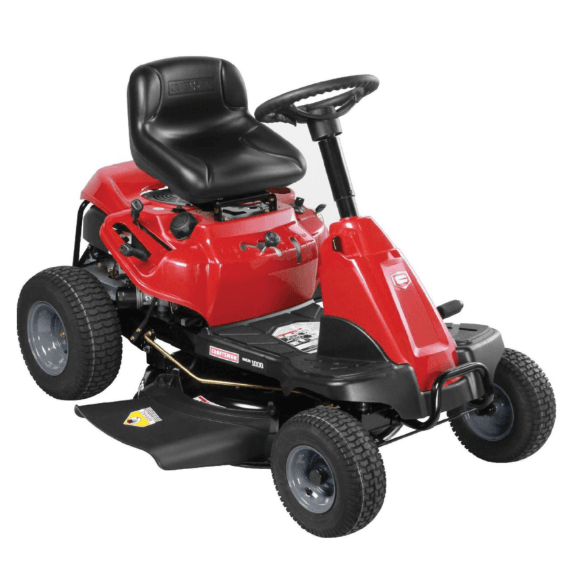
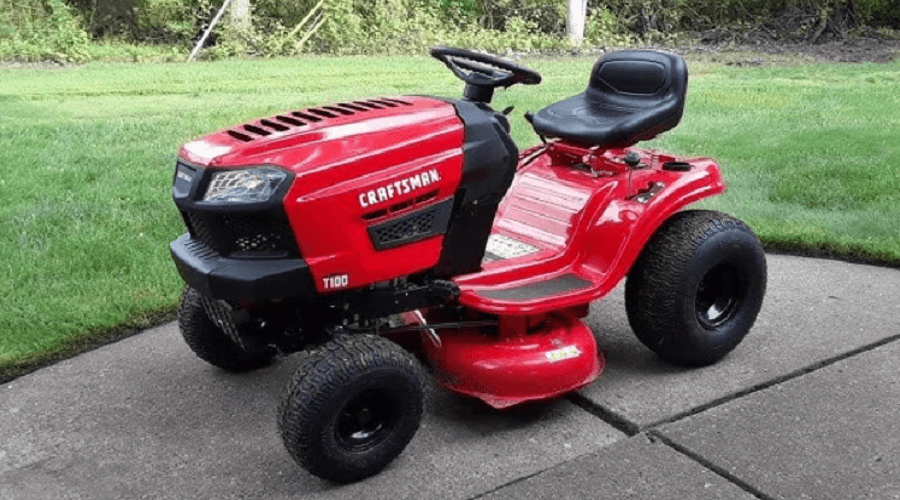
Craftsman 1000 Rear Engine Riding Mower
SAFETY INSTRUCTIONS
GENERAL OPERATION
- Read, understand, and follow all instructions on the machine and in the manual(s) before attempting to assemble and operate. Keep this manual in a safe place for future and regular reference and for ordering replacement parts.
- Be familiar with all controls and their proper operation. Know how to stop the machine and disengage them quickly.
- Never allow children under 14 years old to operate this machine. Children 14 years old and over should read and understand the operation instructions and safety rules in this manual and should be trained and supervised by a parent.
- Never allow adults to operate this machine without proper instruction.
- To help avoid blade contact or a thrown object injury, keep bystanders, helpers, children and pets at least 75 feet from the machine while it is in operation. Stop machine if anyone enters the area.
- Thoroughly inspect the area where the equipment is to be used. Remove
be picked up and thrown by the blade(s). Thrown objects can cause serious personal injury. - Plan your mowing pattern to avoid discharge of material toward roads, sidewalks, bystanders and the like. Also, avoid discharging material against a wall or obstruction which may cause discharged material to ricochet back toward the operator.
- Always wear safety glasses or safety goggles during operation and while performing an adjustment or repair to protect your eyes. Thrown objects which ricochet can cause serious injury to the eyes.
- Wear sturdy, rough-soled work shoes and close-fitting slacks and shirts. Loose fitting clothes and jewelry can be caught in movable parts. Never operate this machine in bare feet or sandals.
- Be aware of the mower and attachment discharge direction and do not point it at anyone. Do not operate the mower without the discharge cover or entire grass catcher in its proper place.
- Do not put hands or feet near rotating parts or under the cutting deck. Contact with the blade(s) can amputate hands and feet.
- A missing or damaged discharge cover can cause blade contact or thrown object injuries.
- Stop the blade(s) when crossing gravel drives, walks, or roads and while not cutting grass.
- Watch for traffic when operating near or crossing roadways. This machine is not intended for use on any public roadway.
- Do not operate the machine while under the influence of alcohol or drugs
- Mow only in daylight or good artificial light.
- Never carry passengers. Disengage blade(s) before shifting into reverse. Back up slowly. Always look down and behind before and while backing to avoid a back-over accident.
- Slow down before turning. Operate the machine smoothly. Avoid erratic operation and excessive speed.
- Disengage blade(s), set parking brake, stop engine and wait until the blade(s) come to a complete stop before removing grass catcher, emptying grass, unclogging chute, removing any grass or debris, or making any
adjustments. - Never leave a running machine unattended. Always turn off blade(s), set parking brake, stop engine and remove key before dismounting.
- Use extra care when loading or unloading the machine into a trailer or truck. This machine should not be driven up or down ramp(s), because the machine could tip over, causing serious personal injury. The machine must be pushed manually on ramp(s) to load or unload properly.
- Muffler and engine become hot and can cause a burn. Do not touch
SAFETY INSTRUCTIONS
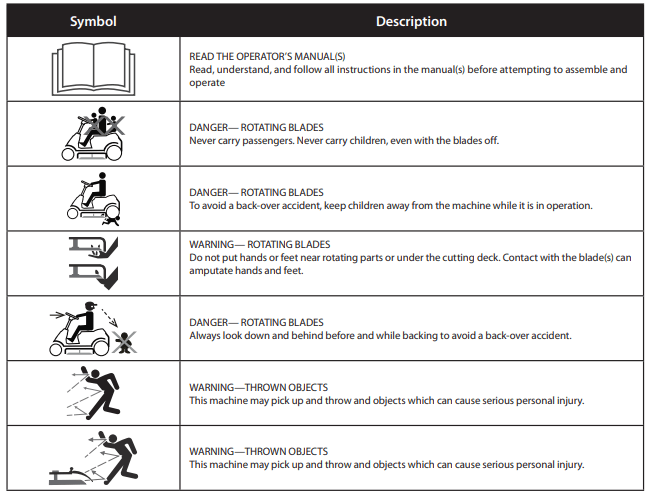
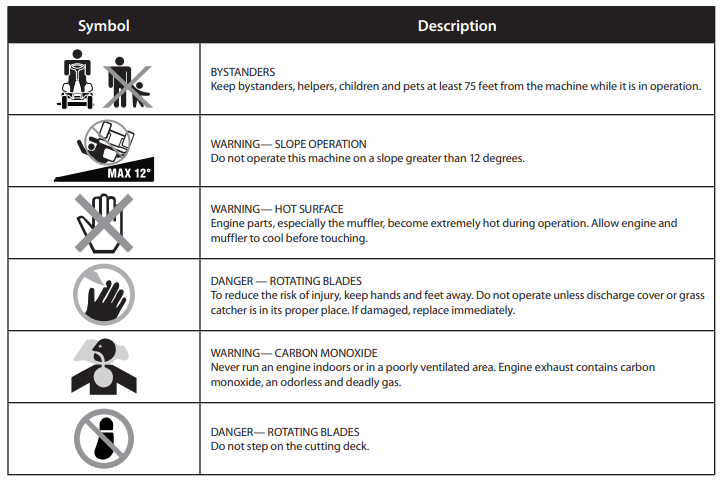
SAFETY SYMBOLS
This page depicts and describes safety symbols that may appear on this product. Read, understand, and follow all instructions on the machine before attempting to assemble and operate.
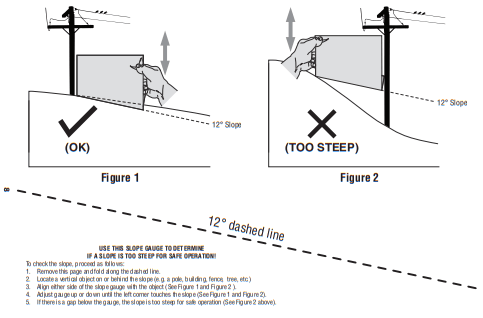
SLOPE GAUGE
 WARNING:
Slopes are a major factor related to tip-over and roll-over accidents which can result in severe injury or death. Do not operate machine on slopes in excess of 12 degrees. All slopes require extra caution. If you cannot back up the slope or if you feel uneasy on it, do not mow it. Always mow up and down the face of slopes, never mow across the face of slopes.
ASSEMBLY
Contents of Crate
- One Riding Mower
- One Seat Assembly
- One Discharge Chute Assembly
- One Steering Wheel/Shaft Assembly
- One Rear Engine Cover
- One Hardware Pack
- One Rear Hitch Plate
- One Oil Drain Sleeve
- One Riding Mower Operator’s Manual
- One Steering Pedestal Cap
Contents of Hardware Pack
Before beginning installation, remove all the contents from the crate and all the hardware from the pack from to make sure everything is present. Hardware is listed below. Part numbers are shown in parentheses.
- Hitch Plate
- Seat Mounting Bracket (with two shoulder bolts & lock nuts installed) Recommended Tools for Assembly
- 3/8” Wrench (or socket)
- 9/16” Socket
- 1/2” Wrench (or socket) • 7/16” wrench
- 5/8” Wrench (or socket) • Phillips Screw Driver
- 1/4” Drive Ratchet
Installing The Steering Wheel Assembly
If the steering wheel assembly for your tractor did not come already installed, follow the steps below:
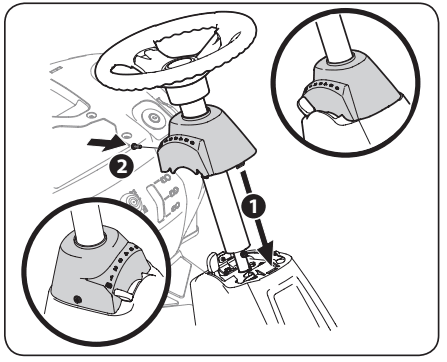
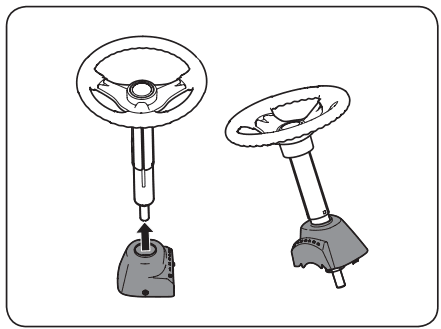
- Slide the pedestal cap onto the steering shaft so that when the steering shaft is installed on the tractor, the pedestal cap will be upright as shown in Figure 1.

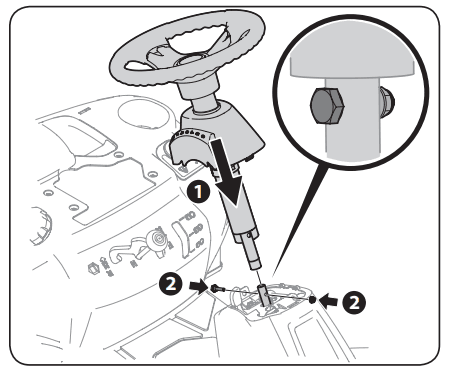
- Remove the shoulder bolt and lock nut from the steering shaft on the tractor and retain for later steps.
- With the steering wheel assembly upright and positioned over the lower steering shaft on the tractor, align the steering wheel so that with the tractor wheels straight, the large opening on the steering wheel is facing forward.
- Lower the steering wheel assembly onto the lower steering shaft (1) and secure with bolt and lock nut (2) previously removed. See Figure 2.
 Tighten the shoulder bolt and lock nut using a 9/16” wrench and 7/16”wrench or socket.
- Remove the pedestal cap mount screw factory installed and located on the tractor’s steering console. Retain the screw for later instructions.
Slide the Pedestal cap down onto the tractor (1) and slightly rotate to the right to clip into place. Secure the pedestal with the screw (2) previously removed. See Figure 3.Attaching The Seat If the seat for your tractor was not attached at the factory, follow the applicable instructions below to attach it.
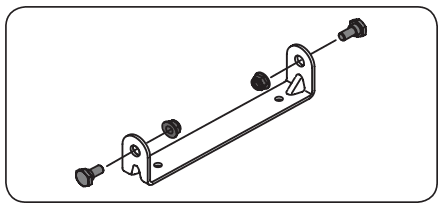
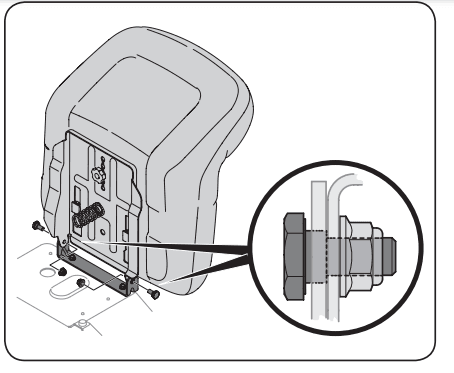
- Remove the shoulder bolts and lock nuts from the seat mounting bracket included in your hardware pack. See Figure 4.

Attaching The Seat
If the seat for your tractor was not attached at the factory, follow the applicable instructions below to attach it.
- Remove the shoulder bolts and lock nuts from the seat mounting bracket included in your hardware pack. See Figure 4.

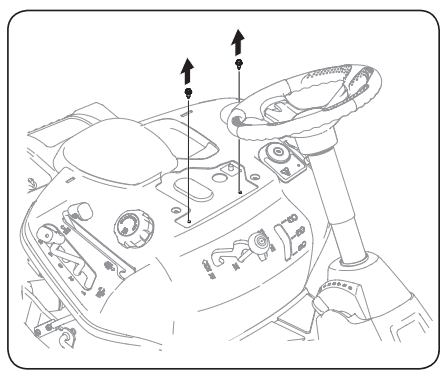
- Remove the two self-tapping screws factory installed on the tractor. See Figure 5.

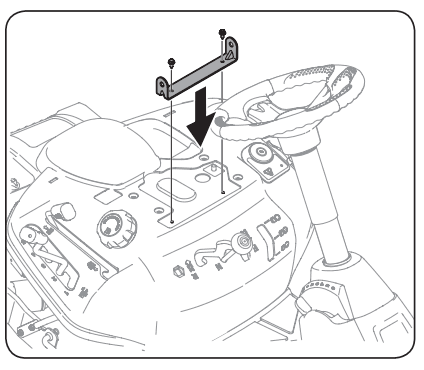
- Align the seat bracket in place over the holes from where the self-tapping screws were removed, as shown in Figure 6.
- Using a 1/4-inch drive ratchet with a 3/8” socket, secure the seat bracket with the self-tapping screws removed in Step 2. See Figure 6

- Position the seat assembly over the seat mounting bracket, aligning the holes provided.
- Install the two shoulder bolts and lock nuts removed from the seat mounting bracket in Step 1. See Figure 7.

Seat Adjustment
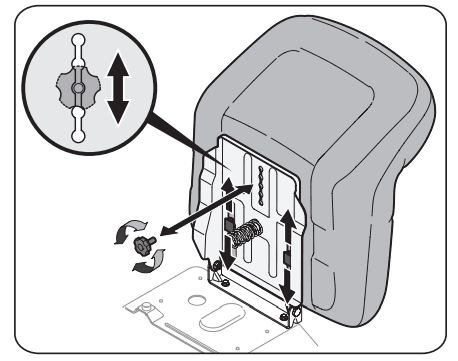
- To adjust the position of the seat, remove the adjustment knob on the bottom of the seat. Slide the seat forward or backward as desired. Reinstall the adjustment knob. Refer to Figure 8.

Steering wheel height adjustment
To adjust the height of the steering wheel, this unit is equipped with a telescoping steering column. To adjust the height of the steering wheel:
- Sit in the operator’s seat and place your hands on the steering wheel.
- Push the button (a) on the steering column and raise or lower the steering wheel (b) to the desired position. See Figure 9.
Note: Once the desired position is achieved, lift up and down on the steering wheel to make sure it locks into place and the button (a) on the steering column releases into a locked position. Do not operate this unit unless the steering column is in a locked position.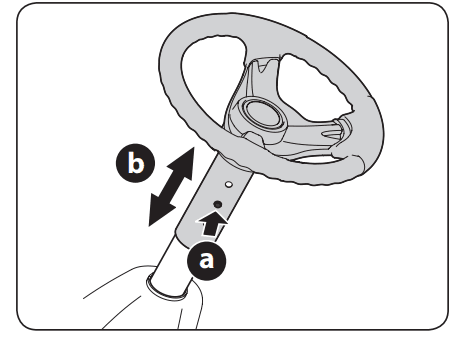
Installing The Deck Chute
WARNING: NEVER operate this tractor without either the mulch plug or deck chute installed.
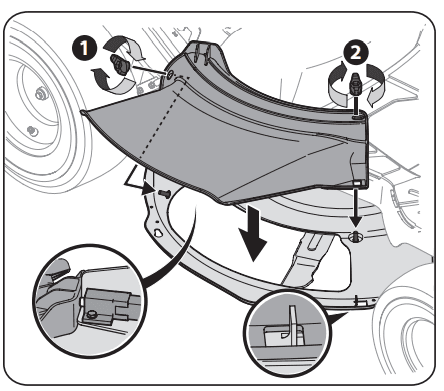
- Remove the wing knobs installed on the mowing deck and retain for later installation.
- Install the deck chute into the deck discharge opening on the deck. The studs on the deck surface will fit through the holes on the upper portion of the deck chute. The small tab on the deck lip area will fit through the square cutout on the lower portion of the deck chute. See inset of Figure 10. Note: Make certain that the upper-rear portion of deck chute is depressing the safety switch located on the deck surface. The engine will not start without the deck chute properly in place.
- Secure the deck chute by tightening the wing knobs removed earlier. See Figure 10.

OPERATION
Throttle / Choke Control
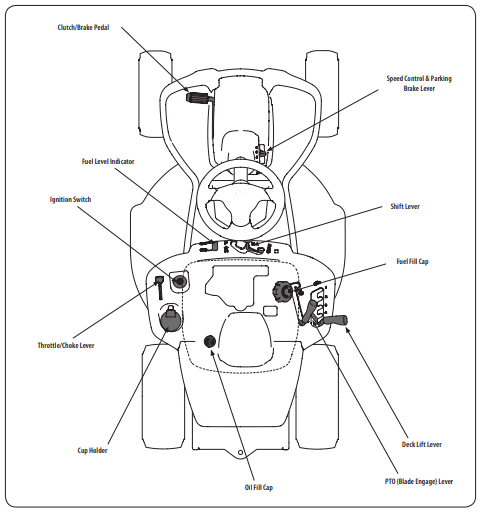
The throttle control lever is located on the left fender of the tractor as seen from the operator’s position, see Figure 17. This lever controls the speed of the engine, as well as the choke when it is pushed all the way forward. When set in a given position, the throttle will maintain a uniform engine speed.
IMPORTANT: When operating the tractor with the cutting deck engaged, be certain that the throttle lever is always in the FAST (rabbit) position. Moving the throttle lever all the way forward activates the engine’s choke control. Activating the choke control closes the choke plate on the carburetor and aids in starting the engine.
Refer to Starting The Engine in the Operation section of this manual for detailed starting instructions.
Ignition Switch
The ignition switch is located on the left fender of the tractor as seen from the operator’s position, adjacent to the Throttle/Choke Control. Activate the Ignition Switch to start the engine by inserting the key into the ignition switch and turn clockwise to the START position. Release the key into the ON position once engine has fired. See Figure 18.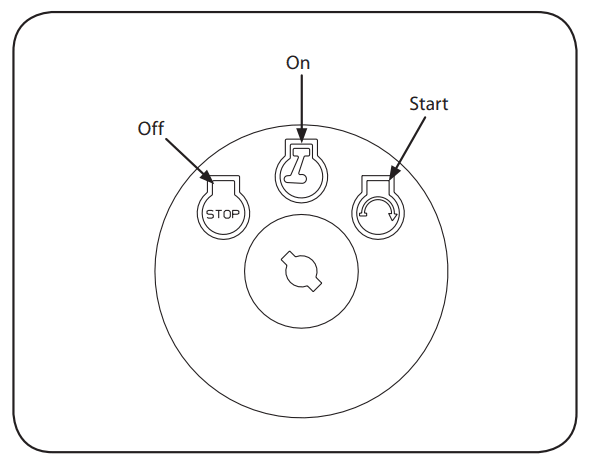
Clutch-Brake Pedal
The clutch-brake pedal is located on the left side of the lawn tractor, along the running board. Depress the clutch-brake pedal part way down when slowing the tractor by changing speeds (Refer to Speed Control Lever). Depress the pedal all the way down to engage the disc brake and bring the tractor to a complete stop.
NOTE: The clutch-brake pedal must be completely depressed to start the engine. Refer to Safety Interlock Switches in the Operation section of this manual.
Shift Lever
The shift lever is located on the control panel just below the seat, in the center of the tractor. It has three positions, FORWARD, NEUTRAL and REVERSE. The brake pedal must be completely depressed and the tractor must not be in motion when moving the shift lever. See Figure 19.
IMPORTANT: Never force the shift lever. Doing so may result in serious damage to the tractor’s transmission.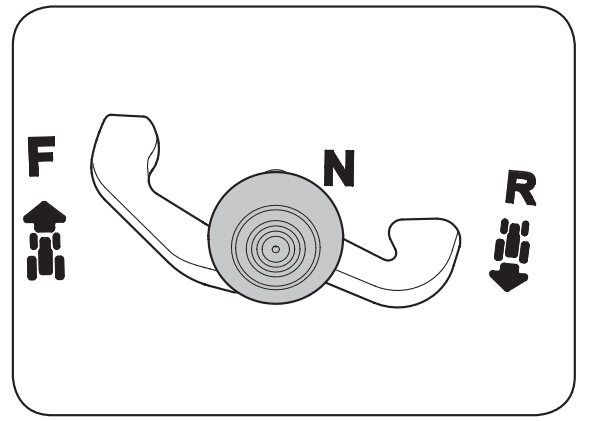
Speed Control Lever
- The speed control lever, located on the right side of the tractor’s steering console, allows you to regulate the ground speed of the lawn tractor. To use, depress the clutch-brake pedal and move the lever out of the parking brake notch and forward to increase the tractor’s ground speed. When a desired speed has been reached, release the lever into an appropriate notch to maintain that speed. To slow the tractor’s ground speed, depress the clutch-brake pedal and move the speed control lever rearward and release it into a notch.
Parking Brake
- To set the parking brake, fully depress the clutch-brake pedal. Move the speed control lever all the way down and into the parking brake position. Release the clutch-brake pedal to allow the parking brake to engage. To release the parking brake, depress the clutch-brake pedal and move the speed control lever out of the parking brake position into the desired position. Release the clutch-brake pedal.
NOTE: The parking brake must be set if the operator leaves the seat with the engine running or the engine will automatically shut off.
Fuel Lever Indicator
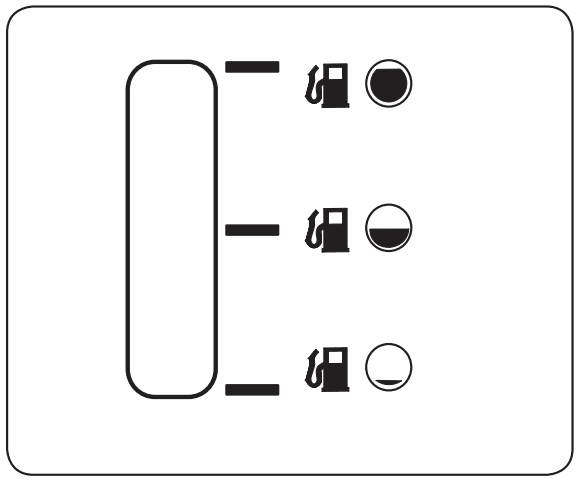
- The Fuel Lever Indicator is located below the seat on the left hand side from the operator’s position in the control panel. Use this window to identify the tractor’s fuel needs. See Figure 20.

Deck Lift Lever
Found on your tractor’s right fender, the deck lift lever is used to change the height of the cutting deck. To use, move the lever to the left, then place in the notch best suited for your application.
PTO (Blade Engage) Lever
Found on the tractor’s right fender, the PTO (blade engage) lever is used to engage power to the cutting deck. To operate, move the lever all the way forward. Moving the lever all the way rearward into the PTO OFF position disengages power to the cutting deck.
NOTE: The PTO (blade engage) lever must be in the disengaged (PTO OFF) position when starting the engine.
Fuel Fill Cap
The Fuel Fill Cap is located below the seat. Refer to the Assembly section in this manual for instructions on fueling this tractor.
Oil Fill Cap
The Oil Fill Cap is located below the seat. Refer to the Assembly section in this manual for instructions on checking and adding oil to this tractor.
Fuel Fill Cap
The gasoline tank is located under the seat. Do not overfill.
Safety Interlock Switches
The safety interlock system is designed for safe operation of the tractor. If this system should ever malfunction, do not operate the tractor. Immediately contact 1-888-331-4569 to have the system serviced.
- The safety interlock system prevents the engine from starting unless the parking brake is engaged and the PTO (Blade Engage) lever is in the disengaged (OFF) position.
- The safety interlock system will automatically shut off the engine if the operator leaves the seat before engaging the parking brake.
- The safety interlock system will automatically shut off the engine if the operator leaves the tractor’s seat with the PTO (Blade Engage) lever engaged, regardless of whether the parking brake is engaged.
- The engine will automatically shut off if the PTO (Blade Engage)lever is moved into the engaged (ON) position with the shift lever in Reverse.
Ignition Switch
The ignition switch is activated to start the engine. Insert key into the ignition switch and turn clockwise to the START position. Release the key into the ON position once engine has fired. See Figure 21. To stop the engine, turn the ignition key counterclockwise to the OFF position. See Figure 21.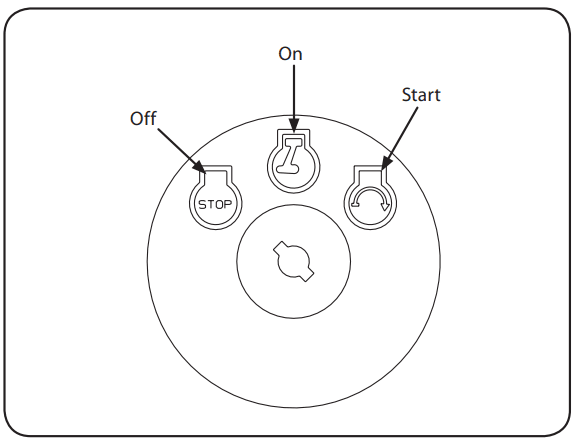
Engaging the Parking Brake
To engage the parking brake:
- Fully depress the brake pedal and hold it down with your foot.
- Move the parking brake lever down into the parking brake position.
- Release the brake pedal to allow the parking brake to engage.
To release the parking brake:
- Depress the brake pedal and move the speed control lever out of the parking brake position.
Setting the Cutting Height
Select the height position of the cutting deck by placing the deck lift lever in any of the different cutting height notches on the right side of the fender.
Starting the Engine
WARNING: Do not operate the tractor if the interlock system is malfunctioning. This system was designed for your safety and protection.
NOTE: Refer to the Assembly section of this manual for gasoline and oil fill-up instructions.
- Insert the tractor key into the ignition switch.
- Place the PTO (Blade Engage) lever in the disengaged (OFF) position.
- Engage the tractor’s parking brake.
- Activate the choke control.
- Turn the ignition key clockwise to the START position. After the engine starts, release the key. It will return to the ON position.
- After the engine starts, deactivate the choke control by placing the throttle control into the FAST position.
NOTE: Do NOT leave the choke control on while operating the tractor. Doing so will result in a “rich” fuel mixture and cause the engine to run poorly. Stopping the Engine
WARNING: If you strike a foreign object, stop the engine, disconnect the spark plug wire(s) and ground against the engine. Thoroughly inspect the machine for any damage. Repair the damage before restarting and operating.
- If the blades are engaged, place the PTO (Blade Engage) lever in the disengaged (OFF) position.
- Turn the ignition key counterclockwise to the STOP position.
- Remove the key from the ignition switch to prevent unintended starting.
Driving The Tractor
- Depress the brake pedal and move the speed control lever out of the parking brake position,then let the pedal release.
- Move the throttle lever into the FAST (rabbit) position.
- Place the shift lever in either the FORWARD or REVERSE position. IMPORTANT: Do NOT use the shift lever to change the direction of travel when the tractor is in motion. Always use the brake pedal to bring the tractor to a complete stop before shifting.
- Release the parking brake by depressing the clutch-brake pedal and positioning the speed control lever in desired position. IMPORTANT: First-time operators should use speed positions 1 or 2. Become completely familiar with the tractor’s operation and controls before operating the tractor in higher speed positions.
- Release clutch-brake pedal slowly to put unit into motion.
- The lawn tractor is brought to a stop by depressing the clutch-brake pedal.
NOTE: When operating the unit initially, there will be little difference between the highest two speeds until after the belts have seated themselves into the pulleys during the break-in period.
IMPORTANT: When stopping the tractor for any reason while on a grass surface, always:
- Place the shift lever in neutral,
- Engage the parking brake,
- Shut engine off and remove the key. Doing so will minimize the possibility of having your lawn ‘‘browned’’ by hot exhaust from your tractor’s running engine.
If unit stalls with speed control in high speed, or if unit will not operate with speed control lever in a low speed position, proceed as follows:
- Place shift lever in NEUTRAL.
- Restart engine.
- Place speed control lever in highest speed position.
- Release clutch-brake pedal fully.
OFF-SEASON STORAGE
PREPARING THE ENGINE
IMPORTANT: Fuel left in the fuel tank during warm weather deteriorates and will cause serious starting problems.
Engines stored between 30 and 90 days need to be treated with a gasoline stabilizer and engines stored over 90 days need to be drained of fuel to prevent deterioration and gum from forming in fuel system or on essential carburetor parts. If the gasoline in your engine deteriorates during storage, you may need to have the carburetor, and other
fuel system components, serviced or replaced.
To prevent gum deposits from forming inside the engine’s carburetor and causing possible malfunction of the engine, the fuel system must be either completely emptied, or the gasoline must be treated with a stabilizer to prevent deterioration.
- If using a fuel stabilizer:
- Read the product manufacturer’s instructions and recommendations.
- Add to clean, fresh gasoline the correct amount of stabilizer for the capacity of the fuel system.
- Fill the fuel tank with treated fuel and run the engine for 2-3 minutes to get stabilized fuel into the carburetor.
- If emptying the fuel system:
- Do not drain fuel when the engine is hot. Allow the engine adequate time to cool. Drain fuel into an approved container outdoors, away from open flame.
- Drain any large volume of fuel from the tank by disconnecting the fuel line from the in-line fuel filter near the engine. See the complete instructions for Draining The Fuel later in this section.
- Reconnect the fuel line and run the engine until it starts to falter, then use the choke to keep the engine running until all fuel in the carburetor has been exhausted.
- Disconnect the fuel line and drain any remaining gasoline from the system.
- Remove the spark plug and pour one (1) ounce of engine oil through the spark plug hole into the cylinder. Crank the engine several times to distribute the oil. Replace the spark plug.
- Clean debris from around engine, under finger guard, and under, around and behind muffler. Touch up any damaged paint, and coat other areas that may rust with a light film of oil.
- Store in a clean, dry and well ventilated area away from any appliance that operates with a flame or pilot light, such as a furnace, water heater, or clothes dryer. Also avoid any area with a spark producing electric motor, or where power tools are operated.
- If possible, also avoid storage areas with high humidity, because that promotes rust and corrosion.
- Keep the engine level in storage. Tilting can cause fuel or oil leakage.
DRAINING THE FUEL
- Locate the fuel filter, which is located on the left side of the engine, and may be attached to the engine with a tie strap.
- Cut the tie strap, if present, then pinch the in-line clamp on the fuel filter with a pair of pliers, slide the clamp up the fuel line.
- Pull the fuel line free from the filter and place the open end of the line into an approved container to drain the fuel.
PREPARING THE LAWN TRACTOR
- Clean and lubricate the unit thoroughly as described in the Lubrication instructions in the Service and Maintenance section.
- Do not use a pressure washer or garden hose to clean your unit.
- Store mower in a dry, clean area. Do not store next to corrosive materials, such as fertilizer.
Removing From Storage
- Check the oil level as described in the Assembly section of this manual.
- If the fuel was drained during storage preparation, fill the tank with fresh gasoline. If you keep a container of gasoline for refueling, make certain it contains only fresh fuel. Gasoline oxidizes and deteriorates over time, causing hard starting.
- If the cylinder was coated with oil during storage preparation, the engine will smoke briefly at startup. This is normal.
TROUBLESHOOTING
| Problem | Cause | Remedy |
| Engine fails to start | 1. PTO/Blade Engage lever engaged. 2. Parking brake not engaged. 3. Spark plug wire(s) disconnected. 4. Throttle/Choke control lever not in correct starting position. 5. Choke not activated
6. Fuel tank empty, or stale fuel. 7. Blocked fuel line. 8. Faulty spark plug(s). 9. Engine flooded. 10. Blown Fuse(s). 11. Safety switch(s) not properly engaged. | 1. Place lever in disengaged (OFF) position. 2. Engage parking brake. 3. Connect wire(s) to spark plug(s). 4. Place Throttle/Choke lever into the FAST position.
5. Move the Throttle/Choke lever into the Choke position. 6. Fill tank with clean, fresh (less than 30 days old) gas. 7. Replace the fuel line and replace fuel filter. 8. Clean, adjust gap or replace plug(s). 9. Crank engine with throttle in FAST position. 10. Replace Fuse(s) 11. Ensure seat is in the proper operating position, and/ or deck chute, tube or mulch plug properly installed. |
| Engine runs erratically | 1. Unit running with CHOKE activated. 2. Spark plug wire(s) loose. 3. Blocked fuel line or stale fuel.
4. Vent in gas cap plugged. 5. Water or dirt in fuel system. 6. Dirty air cleaner. | 1. Deactivate the CHOKE. 2. Connect spark plug wire(s). 3. Replace the fuel line; fill tank with clean, fresh gasoline and replace fuel filter. 4. Clear vent or replace cap if damaged. 5. Drain fuel tank. Refill with clean, fresh gasoline. 6. Replace air cleaner paper element or clean foam pre-cleaner, if equipped. |
| Engine overheats | 1. Engine oil level low. 2. Air flow restricted. | 1. Fill crankcase with proper amount and weight of oil. 2. Clean grass clippings and debris from around the engine’s cooling fins and housing. |
| Engine hesitates at high RPM | 1. Spark plug gap too close. | 1. Remove spark plug and reset the gap. |
| Engine idles rough | 1. Spark plug fouled, faulty or gap too wide. 2. Dirty air cleaner. | 1. Replace spark plug. Set plug gap. 2. Replace air cleaner element and/or clean pre- cleaner. |
| Excessive vibration | 1. Cutting blade loose or unbalanced. 2. Damaged or bent cutting blade. | 1. Tighten blade and spindle. 2. Replace blade. |
| Mower will not mulch grass | 1. Engine speed too low. 2. Wet grass. 3. Excessively high grass.
4. Dull blade. | 1. Place throttle in FAST (rabbit) position. 2. Do not mulch when grass is wet. 3. Mow once at a high cutting height, then mow again at desired height or make a narrower cutting swath. 4. Sharpen or replace blade. |
| Uneven cut | 1. Deck not leveled properly. 2. Dull blade. 3. Uneven tire pressure. | 1. Perform side-to-side deck adjustment. 2. Sharpen or replace blade. 3. Check tire pressure in all four tires. |
GENERAL EMISSIONS WARRANTY COVERAGE:
MTD Consumer Group Inc warrants to the ultimate purchaser and each subsequent purchaser that the outdoor equipment is: (1) designed, built, and equipped so as to conform with all applicable regulations; and (2) free from defects in materials and workmanship that cause the failure of a warranted part for a period of two years.
The warranty period begins on the date the outdoor equipment is delivered to an ultimate purchaser or first placed into service. Subject to certain conditions and exclusions as stated below, the warranty on emission-related parts is as follows:
- Any warranted part that is not scheduled for replacement as required maintenance in the written instructions supplied is warranted for the warranty period stated above. If the part fails during the period of warranty coverage, the part will be repaired or replaced by MTD Consumer Group Inc according to subsection (4) below. Any such part repaired or replaced under warranty will be warranted for the remainder of the period.
- Any warranted part that is scheduled only for regular inspection in the written instructions supplied is warranted for the warranty period stated above. Any such part repaired or replaced under warranty will be warranted for the remaining warranty period.
- Any warranted part that is scheduled for replacement as required maintenance in the written instructions supplied is warranted for the period of time before the first scheduled replacement date for that part. If the part fails before the first scheduled replacement, the part will be repaired or replaced by MTD Consumer Group Inc according to subsection (4) below. Any such part repaired or replaced under warranty will be warranted for the remainder of the period prior to the first scheduled replacement point for the part.
- Repair or replacement of any warranted part under the warranty provisions herein must be performed at a warranty station at no charge to the owner.
- Notwithstanding the provisions herein, warranty services or repairs will be provided at all of our distribution centers that are franchised to service the subject engines or equipment.
- The outdoor equipment owner will not be charged for diagnostic labor that is directly associated with diagnosis of a defective, emissionrelated warranted part, provided that such diagnostic work is performed at a warranty station.
- MTD Consumer Group Inc is liable for damages to other engine or equipment components proximately caused by a failure under warranty of any warranted part.
- Throughout the off-road engine and equipment warranty period stated above, MTD Consumer Group Inc will maintain a supply of warranted parts sufficient to meet the expected demand for such parts.
- Any replacement part may be used in the performance of any warranty maintenance or repairs and must be provided without charge to the owner. Such use will not reduce the warranty obligations of MTD Consumer Group Inc.
- Add-on or modified parts that are not exempted by the Air Resources Board may not be used. The use of any non-exempted add-on or modified parts by the ultimate purchaser will be grounds for disallowing a warranty claim. MTD Consumer Group Inc will not be liable to warrant failures of warranted parts caused by the use of a non-exempted add-on or modified part.
For more manuals about Craftsman, visit ManualsLibraryy
Craftsman 1000 Rear Engine Riding Mower-FAQS
What type of oil should I use for the Craftsman R1000 riding mower?
Use 4-Cycle SAE 10W-30 engine oil for optimal performance.
How do I start a Craftsman R1000 lawn mower?
Stand behind the mower, pull the blade control lever back against the upper handle, and press the electric starter push key to start the engine. Note: The electric starter includes an internal circuit breaker.
How do I use the choke on a Craftsman riding mower?
Move the throttle lever to the top position, marked with a symbol resembling a flapper plate between two lines. This is the choke position for starting a cold engine.
Where can I find the model number on my Craftsman mower?
For Craftsman walk-behind mowers, the model and serial numbers are printed on a sticker located at the back of the deck. For riding mowers, the numbers are typically found on the frame under the seat or the underside of the seat.
What is the correct spark plug gap for a Craftsman R1000 mower?
The spark plug gap should be set between 0.030 and 0.035 inches.
How much oil does a Craftsman riding mower require?
A Craftsman riding mower typically requires between 1 and 2 quarts of oil. Check the owner’s manual for the exact amount needed for your specific model.
How do I turn off my Craftsman push lawn mower?
If your mower does not have an auto-choke or primer, hold the trigger and let the engine rev down until it stops. For models with an auto-choke, manually choke the engine by removing the air filter and covering the carburetor with a rag to restrict airflow.
How do I identify my mower deck on a Craftsman mower?
Look for a sticker on the back of the deck for walk-behind mowers. This sticker will display the model and serial number needed for identification.
How do I determine my Craftsman riding mower model?
Check under the seat or on the frame beneath the seat for a label with the model and serial numbers. These details are essential for locating parts or service information.

 Tighten the shoulder bolt and lock nut using a 9/16” wrench and 7/16”wrench or socket.