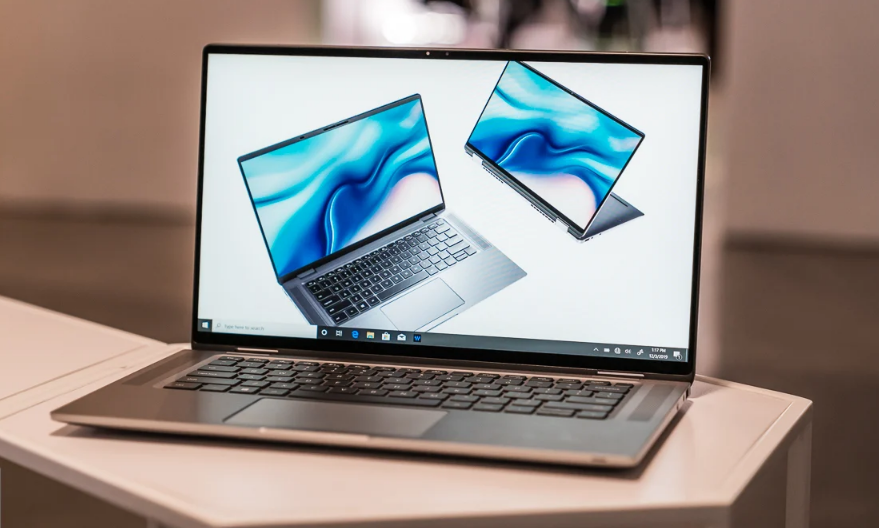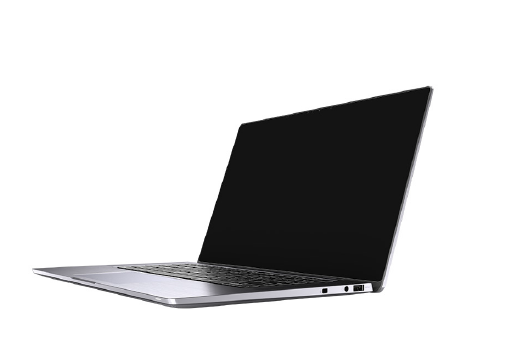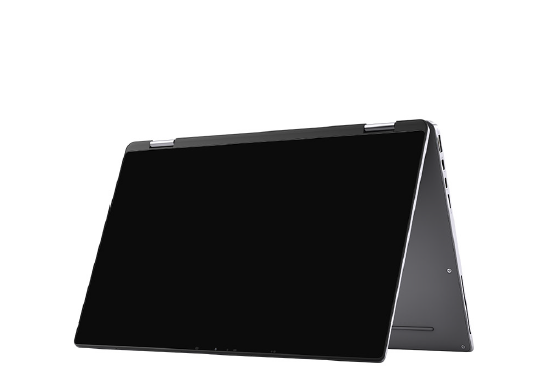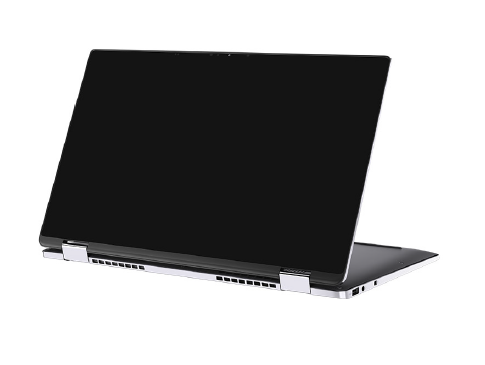
Dell Latitude 9510 Laptop
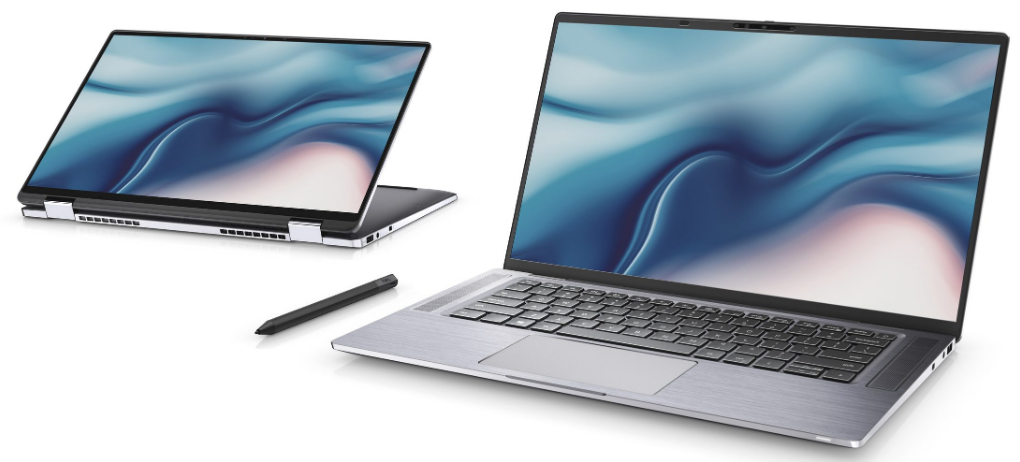
Set up your Latitude 9510
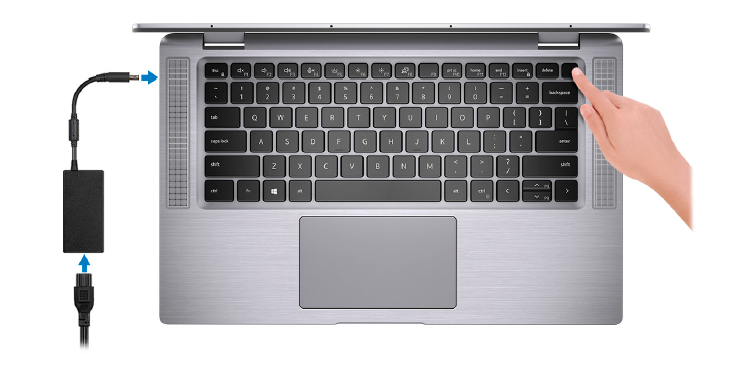
- Connect the power adapter and press the power button.

- Finish the Windows system setup.
- Follow the on-screen instructions to complete the setup. When setting up, Dell recommends that you:
- Connect to a network for Windows updates. NOTE: If connecting to a secured wireless network, enter the password for the wireless network access when prompted.
- Sign in or create an account if the internet is connected, or create an offline account if it’s not.
- On the Support and Protection screen, enter your contact details.
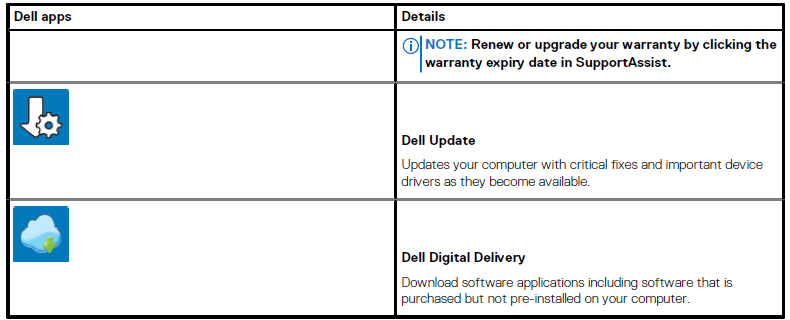
- Locate and use Dell apps from the Windows Start menu—Recommended
Table 1. Locate Dell apps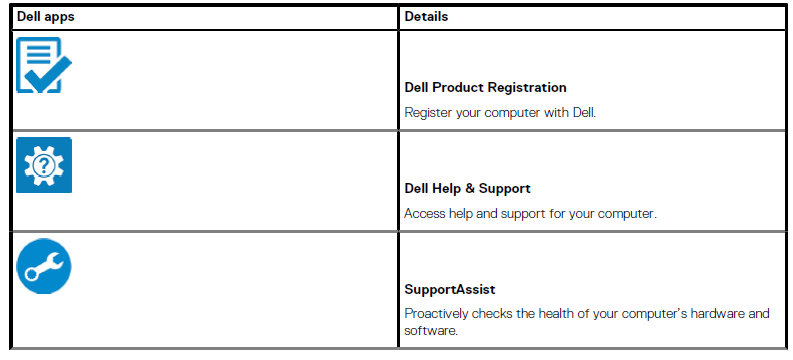
Create recovery drive for Windows.
NOTE: It is recommended to create a recovery drive to troubleshoot and fix problems that may occur with Windows.
Latitude 9510 views
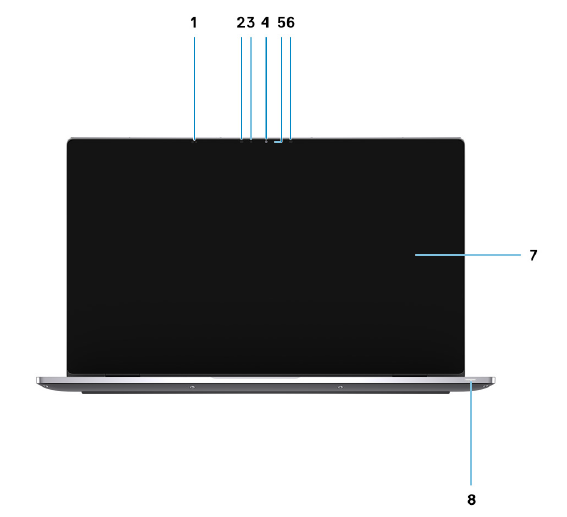
Display view
- Proximity sensor
- IR emitter
- Ambient Light Sensor (ALS)
- Camera (IR/RGB)
- Camera status light
- IR emitter
- Display panel
- Battery status light / Diagnostics status light

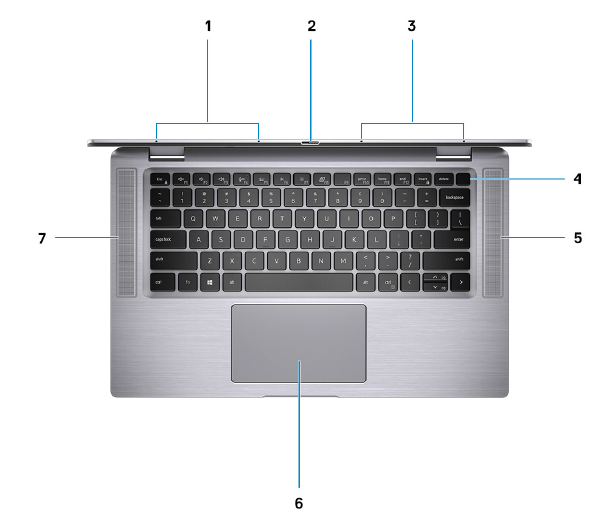
Top view (Convertible)
- Microphones
- Power button
- Right speaker
- Touchpad
- Left speaker

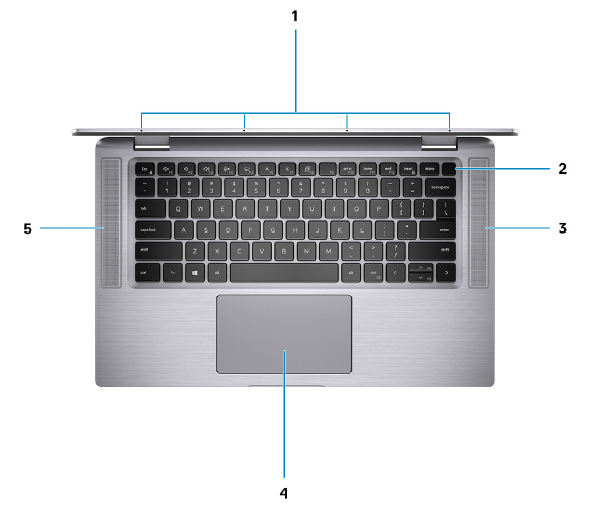
Top view
- Left Microphone
- Camera shutter
- Right Microphone
- Power button with fingerprint reader (optional)
- Right speaker
- Touchpad with NFC (optional)
- Left speaker

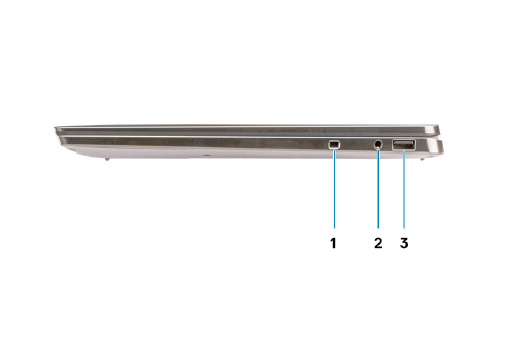
Right view
- Security-cable slot (wedge-shaped)
- 3.5 mm universal audio jack
- USB 3.2 Gen 1 Type-A port with PowerShare

Left view
- HDMI 2.0 Port
- USB 3.2 Gen 2 Type-C port with Thunderbolt 3/Power Delivery/DisplayPort
- USB 3.2 Gen 2 Type-C port with Thunderbolt 3/Power Delivery/DisplayPort
- SIM card slot
- microSD card slot
- Contacted smart card reader (optional)

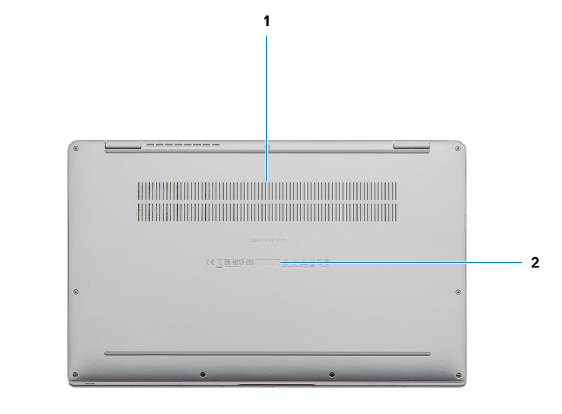
Bottom view
- Thermal vent
- Service Tag label

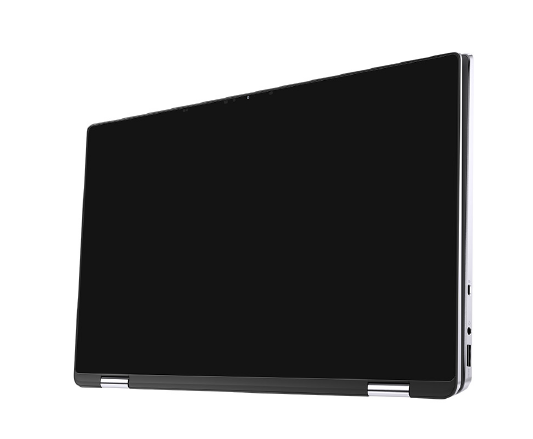
Modes
- Tablet mode

- Laptop mode

- Tent mode

- Stand mode

Specifications of Latitude 9510
Dimensions and weight
Table 2. Dimensions and weight
Processors
NOTE: Processor numbers are not a measure of performance. Processor availability is subject to change and may vary by region/country.
Table 3. Processors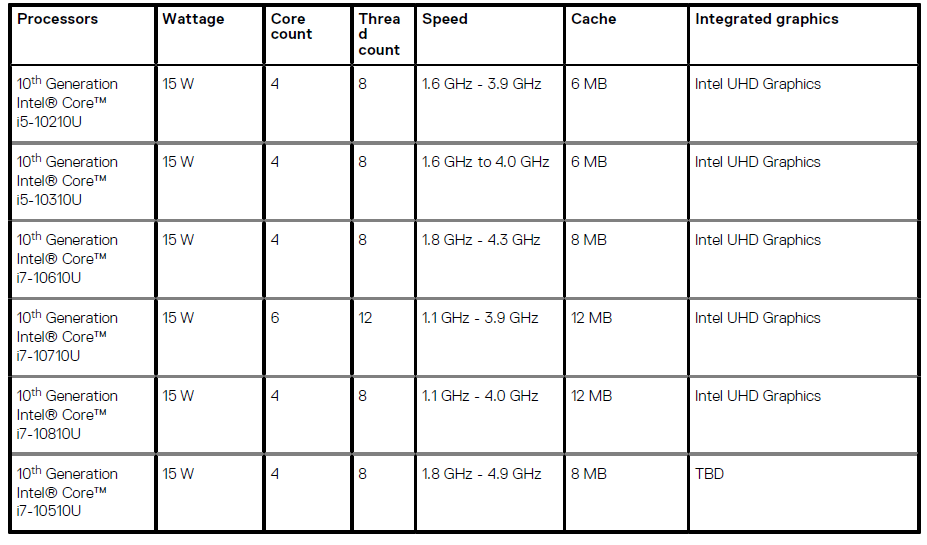
Processors
NOTE: Processor numbers are not a measure of performance. Processor availability is subject to change and may vary by region/country.
Table 4. Processors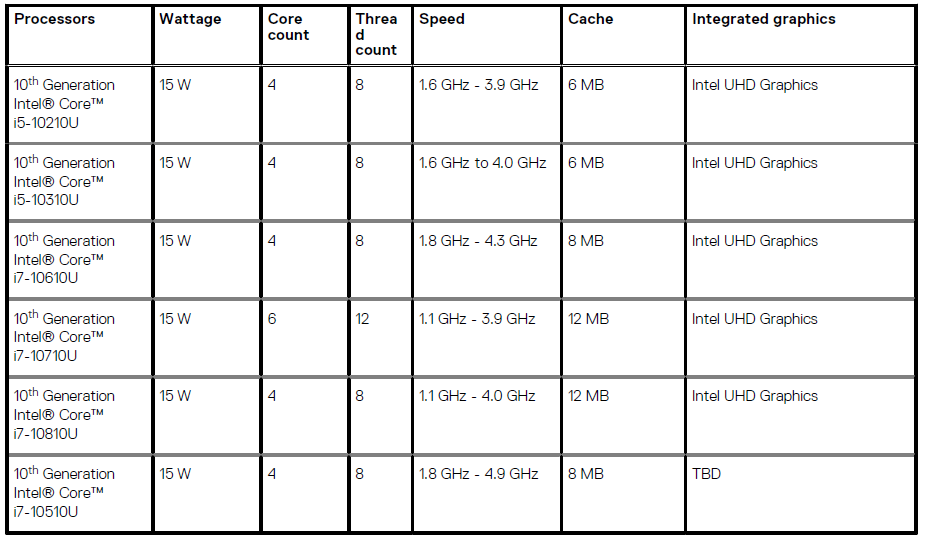
Chipset
Table 5. Chipset
Operating system
- Windows 10 Professional (64-bit)
- Windows 10 Home (64-bit)
Memory
Table 6. Memory specifications
Ports and connectors
- Table 7. Ports and connectors

- Table 8. External ports

- Table 9. Internal ports and connectors

Storage
Your computer supports the following configuration: The primary drive of your computer varies with the storage configuration
Table 10. Storage specifications
Audio
Table 11. Audio specifications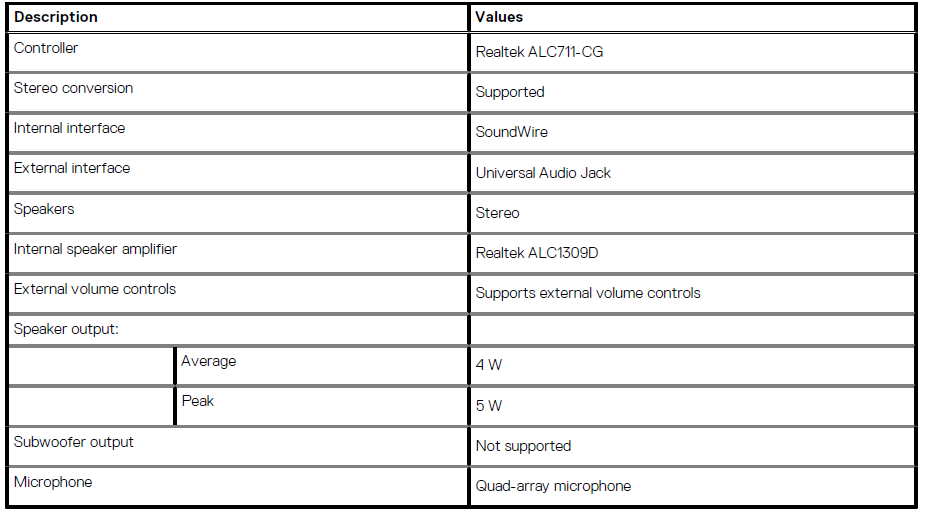
Media-card reader
Table 12. Media-card reader specifications
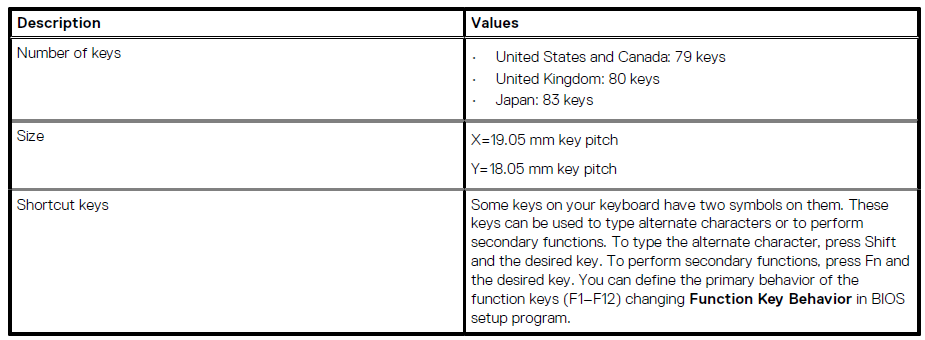
Keyboard
Table 13. Keyboard specifications
Camera
Table 14. Camera specifications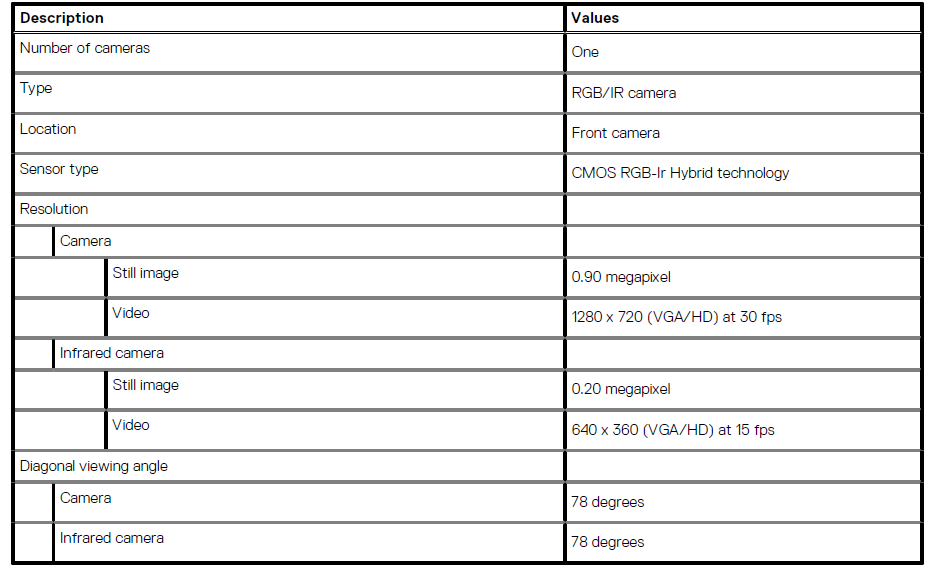
Fingerprint reader (optional)
Table 15. Fingerprint reader specifications

Touchpad
Table 16. Touchpad specifications
Touchpad gestures
For more information about touchpad gestures for Windows 10, see the Microsoft knowledge base article 4027871 at support.microsoft.com.
Power adapter
Table 17. Power adapter specifications
Battery
Table 18. Battery specifications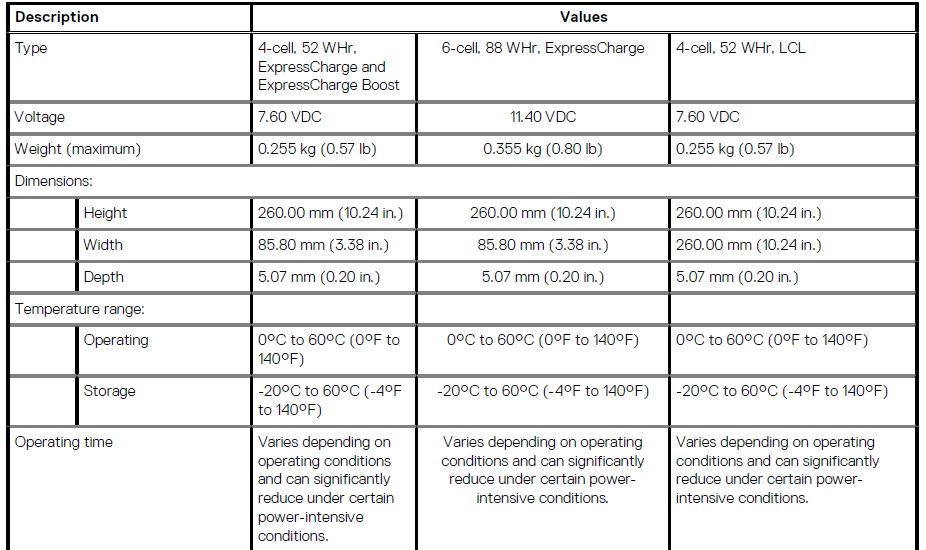
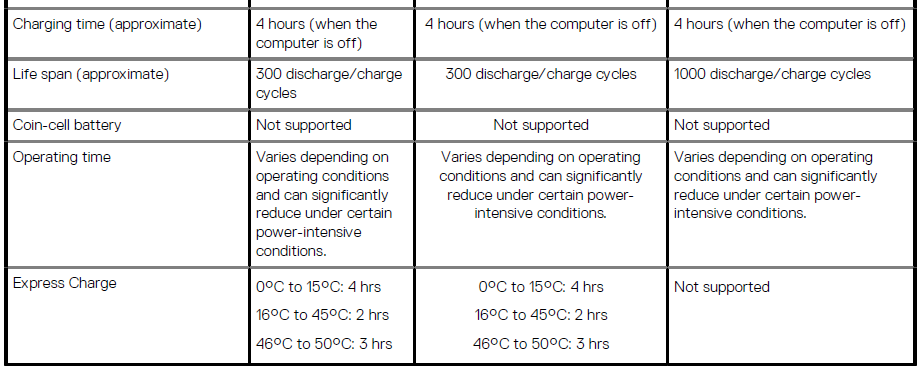
Display
Table 19. Display specifications
Wireless module
Table 20. Wireless module specifications
Computer environment
Table 21. Computer environment
System setup
CAUTION: Unless you are an expert computer user, do not change the settings in the BIOS Setup program. Certain changes can make your computer work incorrectly. Use the BIOS Setup program for the following purposes:
- Get information about the hardware installed in your computer, such as the amount of RAM and the size of the hard drive.
- Change the system configuration information.
- Set or change a user-selectable option, such as the user password, type of hard drive installed, and enabling or disabling base devices.
Topics:
- Boot menu
- Navigation keys
- Boot Sequence
- System setup options
- Updating the BIOS in Windows
- System and setup password
Boot menu
Press <F12> when the Dell logo appears to initiate a one-time boot menu with a list of the valid boot devices for the system. Diagnostics and BIOS Setup options are also included in this menu. The devices listed on the boot menu depend on the bootable devices in the system. This menu is useful when you are attempting to boot to a particular device or to bring up the diagnostics for the system. Using the boot menu does not make any changes to the boot order stored in the BIOS. The options are:
- UEFI Boot:
- Windows Boot Manager
- Other Options:
- BIOS Setup
- BIOS Flash Update
- Diagnostics
- Change Boot Mode Settings
Navigation keys
NOTE: For most of the System Setup options, changes that you make are recorded but do not take effect until you restart the system.
Keys Navigation
- Up arrow – Moves to the previous field.
- Down arrow – Moves to the next field.
- Enter – Selects a value in the selected field (if applicable) or follows the link in the field.
- Spacebar – Expands or collapses a drop-down list, if applicable.
- Tab – Moves to the next focus area.
- Esc – Moves to the previous page until you view the main screen. Pressing Esc in the main screen displays a message that prompts you to save any unsaved changes and restart the system.
Boot Sequence
Boot sequence enables you to bypass the System Setup–defined boot device order and boot directly to a specific device (for example, optical drive or hard drive). During the Power-on Self-Test (POST), when the Dell logo appears, you can:
- Access System Setup by pressing the F2 key
- Bring up the one-time boot menu by pressing the F12 key.
The one-time boot menu displays the devices that you can boot from, including the diagnostic option. The boot menu options are:
- Removable Drive (if available)
- STXXXX Drive
- Optical Drive (if available)
- SATA Hard Drive (if available)
- Diagnostics
NOTE: Choosing Diagnostics displays the SupportAssist screen.
The boot sequence screen also displays the option to access the System Setup screen.
Updating the BIOS in Windows
It is recommended to update your BIOS (System Setup) when you replace the system board or if an update is available. For laptops, ensure that your computer battery is fully charged and connected to a power source before initiating a BIOS update.
- Restart the computer.
- Go to Dell.com/support.
- Enter the Service Tag or Express Service Code and click Submit.
- Click Detect Product and follow the instructions on the screen.
- If you are unable to detect or find the Service Tag, click Choose from all products.
- Choose the Products category from the list. NOTE: Choose the appropriate category to reach the product page.
- Select your computer model, and the Product Support page of your computer appears.
- Click Get drivers, and click Drivers and Downloads. The Drivers and Downloads section opens.
- Click Find it myself.
- Click BIOS to view the BIOS versions.
- Identify the latest BIOS file and click Download.
- Select your preferred download method in the Please select your download method below window, and click Download File. The File Download window appears.
- Click Save to save the file on your computer.
- Click Run to install the updated BIOS settings on your computer. Follow the instructions on the screen.
Updating BIOS on systems with BitLocker enabled
CAUTION: If BitLocker is not suspended before updating the BIOS, the next time you reboot the system, it will not recognize the BitLocker key. You will then be prompted to enter the recovery key to progress, and the system will ask for this on each reboot. If the recovery key is not known, this can result in data loss or an unnecessary operating system reinstall. For more information about this subject, see Knowledge Article: Updating the BIOS on Dell Systems With BitLocker Enabled
Updating your system BIOS using a USB flash drive
If the system cannot load into Windows, but there is still a need to update the BIOS, download the BIOS file using another system and save it to a bootable USB Flash Drive. NOTE: You will need to use a bootable USB flash drive. Please refer to the following article for further details: How to Create a Bootable USB Flash Drive using Dell Diagnostic Deployment Package (DDDP)
- Download the BIOS update .EXE file to another system.
- Copy the file, e.g., O9010A12.EXE, onto the bootable USB flash drive.
- Insert the USB flash drive into the system that requires the BIOS update.
- Restart the system and press F12 when the Dell splash logo appears to display the One Time Boot Menu.
- Using the arrow keys, select the USB Storage Device and click Enter.
- The system will boot to a Diag C:> prompt.
- Run the file by typing the full filename, for example, O9010A12.exe, and pressing Enter.
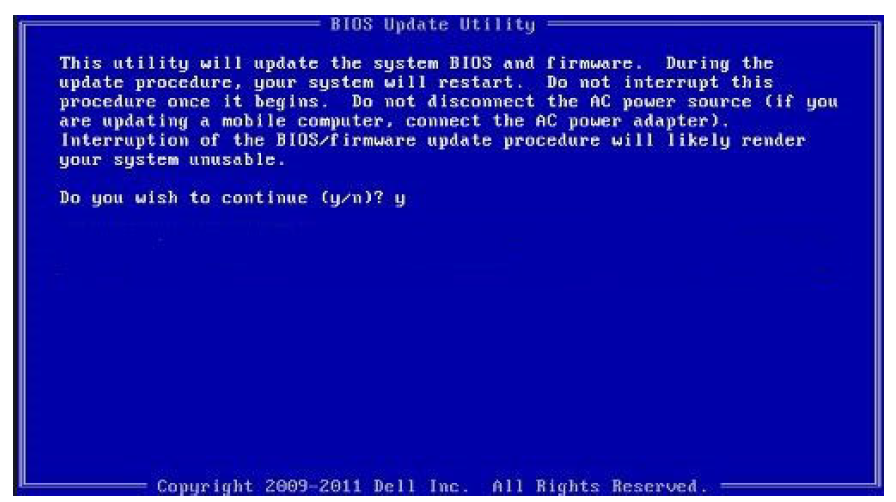
- The BIOS Update Utility will load. Follow the instructions on the screen.

Assigning a system setup password
You can assign a new System or Admin Password only when the status is Not Set. To enter the system setup, press F2 immediately after a power-on or reboot.
- In the System BIOS or System Setup screen, select Security and press Enter. The Security screen is displayed.
- Select System/Admin Password and create a password in the Enter the new password field.
Use the following guidelines to assign the system password:
- A password can have up to 32 characters.
- The password can contain the numbers 0 through 9.
- Only lowercase letters are valid; uppercase letters are not allowed.
- Only the following special characters are allowed: space, (”), (+), (,), (-), (.), (/), (;), (\[), (), (]), (\`).
- Type the system password that you entered earlier in the Confirm new password field and click OK.
- Press Esc ,and a message prompts you to save the changes.
- Press Y to save the changes.
Deleting or changing an existing system setup password
Ensure that the Password Status is Unlocked (in the System Setup) before attempting to delete or change the existing System and Setup password. You cannot delete or change an existing System or Setup password if the Password Status is Locked. To enter the System Setup, press F2 immediately after a power-on or reboot.
- In the System BIOS or System Setup screen, select System Security and press Enter. The System Security screen is displayed.
- In the System Security screen, verify that Password Status is Unlocked.
- Select System Password, alter or delete the existing system password, and press Enter or Tab.
- Select Setup Password, alter or delete the existing setup password, and press Enter or Tab. NOTE: If you change the System and/or Setup password, re-enter the new password when prompted. If you delete the System and Setup passwords, confirm the deletion when prompted.
- Press Esc, and a message prompts you to save the changes.
- Press Y to save the changes and exit from System Setup. The computer restarts.
Troubleshooting
Dell SupportAssist Pre-boot System Performance Check diagnostics. The SupportAssist diagnostics (also known as system diagnostics) performs a complete check of your hardware. The Dell SupportAssist Pre-boot System Performance Check diagnostics are embedded with the BIOS and are launched by the BIOS internally. The embedded system diagnostics provides a set of options for particular devices or device groups, allowing you to:
- Run tests automatically or in an interactive mode
- Repeat tests
- Display or save test results
- Run thorough tests to introduce additional test options to provide extra information about the failed device(s)
- View status messages that inform you if tests are completed successfully
- View error messages that inform you of problems encountered during testing
NOTE: Some tests for specific devices require user interaction. Always ensure that you are present at the computer terminal when the diagnostic tests are performed. For more information, see Resolve Hardware Issues With Built-in and Online Diagnostics (SupportAssist ePSA, ePSA, or PSA Error Codes).
Running the SupportAssist Pre-Boot System Performance Check
- Turn on your computer.
- As the computer boots, press the F12 key as the Dell logo appears.
- On the boot menu screen, select the Diagnostics option.
- Click the arrow at the bottom left corner. The diagnostics front page is displayed.
- Click the arrow in the lower-right corner to go to the page listing. The items detected are listed.
- To run a diagnostic test on a specific device, press Esc and click Yes to stop the diagnostic test.
- Select the device from the left pane and click Run Tests.
- If there are any issues, error codes are displayed. Note the error code and validation number and contact Dell.
Diagnostics
Instead of beep codes, errors are indicated by the bicolor Battery Charge/Status LED. A specific blink pattern is followed by flashing a pattern of flashes in amber, followed by white. The diagnostic pattern consists of a two-digit number being represented by a first group of LED blinks (1 through 9) in amber, followed by a 1.5-second pause with the LED off, and then a second group of LED blinks (1 through 9) in white. This is then followed by a three-second pause, with the LED off, before repeating over again. Each LED blink takes 1.5 seconds. The system will not shut down when displaying the Diagnostic Error Codes. Diagnostic Error Codes will always supersede any other use of the LED. For instance, on Notebooks, battery codes for Low Battery or Battery Failure situations will not be displayed when Diagnostic Error Codes are being displayed.
Table 37. Diagnostic LED states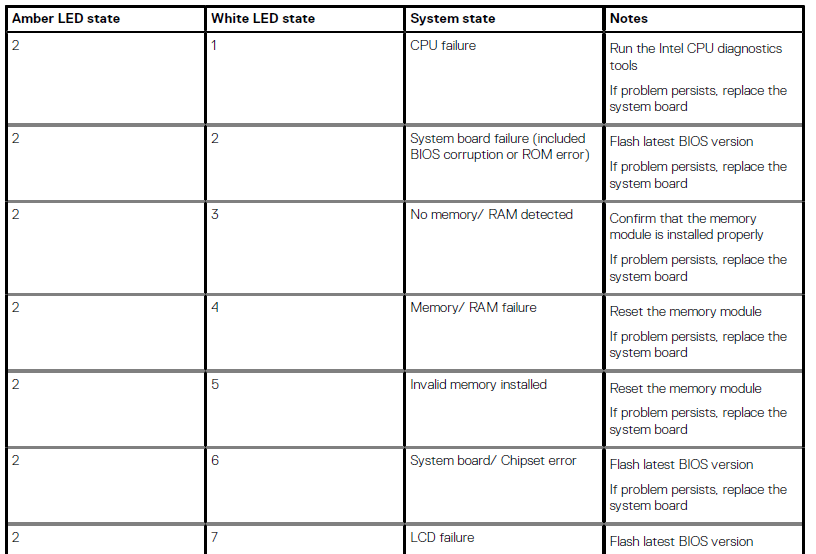
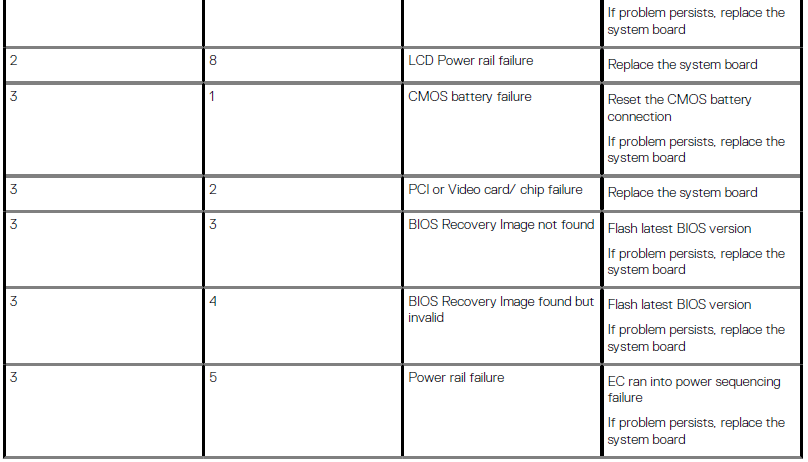

System error messages
Table 39. System error messages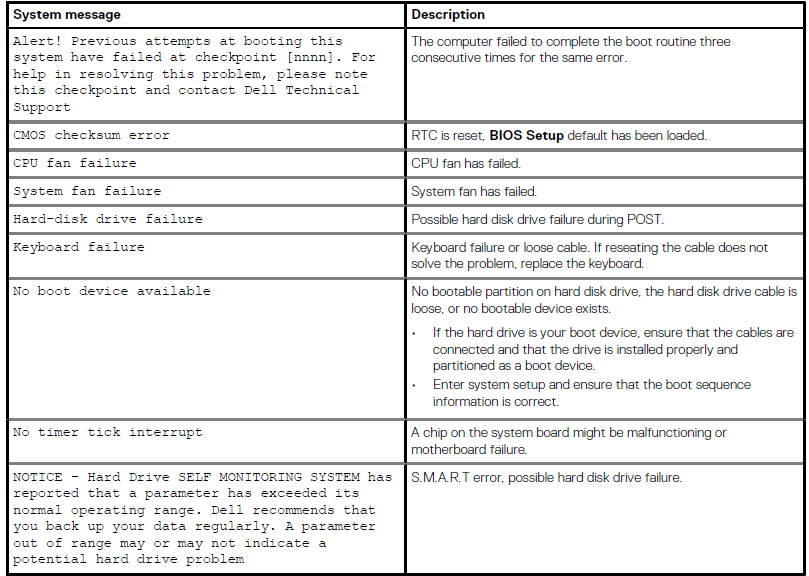
WiFi power cycle
If your computer is unable to access the internet due to WiFi connectivity issues, a WiFi power cycle procedure may be performed. The following procedure provides the instructions on how to conduct a WiFi power cycle: NOTE: Some ISPs (Internet Service Providers) provide a modem/router combo device.
- Turn off your computer.
- Turn off the modem.
- Turn off the wireless router.
- Wait for 30 seconds.
- Turn on the wireless router.
- Turn on the modem.
- Turn on your computer
Getting help
Contacting Dell
NOTE: If you do not have an active Internet connection, you can find contact information on your purchase invoice, packing slip, bill, or Dell product catalog. Dell provides several online and telephone-based support and service options. Availability varies by country and product, and some services may not be available in your area. To contact Dell for sales, technical support, or customer service issues:
- Go to Dell.com/support.
- Select your support category.
- Verify your country or region in the Choose a Country/Region drop-down list at the bottom of the page.
- Select the appropriate service or support link based on your need.
For More Manuals By Dell, Visit ManualsLibraryy.
Dell Latitude 9510 Laptop-FAQs.
How do I check my Dell laptop battery health?
Open Dell Power Manager from the Start menu.
Go to Battery Information to check Battery Health.
Why is my Dell Latitude battery draining fast?
Possible causes:
Too many background apps running.
High screen brightness or resource-heavy software.
Outdated drivers (update via Dell SupportAssist).
How do I check RAM speed and health?
Task Manager Method:
Press Ctrl + Shift + Esc > Performance > Memory.
Windows Memory Diagnostic:
Search for “Windows Memory Diagnostic” and run the test.
Can I replace the Dell Latitude 9510 battery myself?
Most models: User-replaceable.
Newer models: May require a technician (check Dell’s support guide).
How do I download apps on my Dell laptop?
Microsoft Store: Pre-installed for Windows apps.
Chrome Web Store: For browser extensions.
Google Play Store (via Android emulator) for mobile apps.
What processor does the Dell Latitude 9510 have?
10th Gen Intel® Core™ i7-10810U
6 cores, 12 threads, 1.1GHz–4.0GHz
How do I speed up my Dell Latitude laptop?
Disable startup apps (Task Manager > Startup).
Free up disk space (Disk Cleanup).
Upgrade RAM or SSD if needed.
What do blinking lights on my Dell laptop mean?
Orange light: Battery/charging issue.
White light: Normal operation.
Flashing patterns: Refer to Dell’s diagnostic guide.
How do I install WhatsApp on my Dell laptop?
Download WhatsApp Desktop from the Microsoft Store.
Alternatively, use WhatsApp Web (web.whatsapp.com).
How do I check my SSD health?
Task Manager > Performance > Disk
Disk Management (Search “Create and format partitions”)
How do I reset my Dell Latitude battery?
Drain the battery fully, then charge to 100%.
Use Dell Power Manager to calibrate.

