
Emerson IM90T Portable Ice Maker
IMPORTANT SAFETY INSTRUCTIONS
CAUTION
TO REDUCE THE RISK OF ELECTRIC SHOCK, DO NOT REMOVE COVER (OR BACK). NO USER-SERVICEABLE PARTS INSIDE. REFER SERVICING TO QUALIFIED SERVICE PERSONNEL.
DANGEROUS VOLTAGE
The lightning flash with arrowhead symbol within an equilateral triangle is intended to alert the user to the presence of uninsulated dangerous voltage within the product’s enclosure that may be of sufficient magnitude to constitute a risk of electric shock to persons.
ATTENTION
The exclamation point within an equilateral triangle is intended to alert the user to the presence of important operating and maintenance (servicing) instructions in the literature accompanying the appliance.
Please follow the precautions below for your new ice maker:
- This ice maker must be properly installed and located in accordance with the Installation Instructions before it is used.
- Unplug the ice maker before cleaning and/or making repairs.
- We strongly recommend that any servicing be performed by a qualified individual.
- Do not leave ice maker in extreme cold or warm temperatures.
- Do not place ice maker near heat sources or open flames.
- Clean the ice maker with a soft, damp cloth. Remove stains with a mild soap. Do not clean the unit with industrial grade solvents or abrasive chemicals.
- Do not place heavy items on top of the ice maker.
- Never install the ice maker where there is a lot of moisture and water can splash.
- Exercise caution and use reasonable supervision when appliance is used near children.
- Do not tip over.
- Do not operate with side or back panels removed.
- If the ice maker is brought in from outside in wintertime, give it a few hours to warm up to room temperature before plugging it in.
INSTALLATION
Ventilation
Do not block air vents. It is necessary to have adequate ventilation space around the ice maker in order to sustain proper performance, dissipation of heat, maintain efficiency and keep power consumption low. There should be a 5 inch minimum clearance maintained at the rear and sides of the unit and 8 inches on top of the unit.
Cleaning
It is highly recommended to thoroughly clean the ice maker before first use as shown on page 5.
Wait One Hour
When first time plugging in, wait one hour for refrigerant fluid to settle before turn on the unit.
Power supply
- Check your local power source. This ice maker requires a 115V, 60Hz power supply.
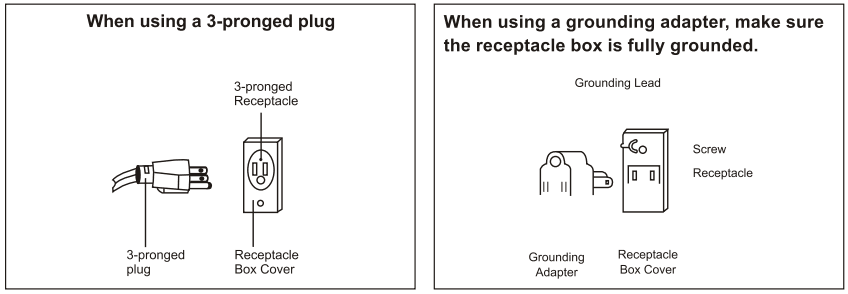
- Use a receptacle that will accept the ground prong. The power cord of this appliance is equipped with a 3-prong (grounding) plug which mates with a standard 3-prong (grounding) wall outlet to minimize the possibility of electric shock hazard from this appliance.
- Longer cord sets or extension cords are available and may be used if care is exercised in their use.
- If along cord or extension cord is used, (1) the marked electrical rating of the cord set or extension cord should be at least as great as the electrical rating of the appliance, (2) the extension cord must be a grounding-type 3-wire cord, and (3) the longer cord should be arranged so that it will not drape over the countertop or tabletop where it can be pulled on by children or tripped over unintentionally.
NOTES:
- The ice maker should always be plugged into its own individual electrical outlet which has a voltage rating that matches the rating plate.
- If you have only a standard 2-prong wall outlet, it is your personal responsibility and obligation to have it replaced with a properly grounded 3-prong wall outlet.
- Never unplug your ice maker by pulling on the power cord. Always grip plug firmly and pull straight out from the outlet.
TROUBLESHOOTING GUIDE
Humming/knocking sound is heard from the back side of the unit when water is being pumped.
- When water is being pumped from the water tank, the water detecting system will create a few small knocking sounds while the water travels through the internal circuit. This sound is normal and does not indicate a problem with the unit.
The ice maker will not operate
- The power supply cord is unplugged.
- A household fuse or circuit breaker has been tripped.
The Add Water indicator is lit
- Press the POWER button to turn off the unit, fill water up to the MAX (Maximum) water level le mark. Wait three minutes to allow the machine to complete the power oll procedur fely, then press the POWER button again to turn on the unit again.
The ICE indicator is lit
- There is too much ice; remove ice from ice basket.
Ice cubes are sticking together
- The ice cycle is too long. Press the POWER button to turn off the unit, wait three minutes to let the machine to complete the power off procedure safely, then press the POWER button again to turn on the unit again. Select the Small size ice cube selection.
- Water temperature in inner tank is too low. Remove water and insert fresh water with a temperature of between 45°F and 90° F.
Ice making cycle is normal but no ice is made
- Ambient temperature or water temperature in inner tank is too high; make sure the room temperature in the room is below 90°F and/or remove water and insert fresh water with a temperature of between 45°F and 90° F.
- Refrigerant liquid leakage; call an authorized technician to repair.
- Pipe in the cooling system is blocked; call an authorized technician to repair.
Water Filter must be cleaned frequently; at least once per week (this improves the performance of unit)
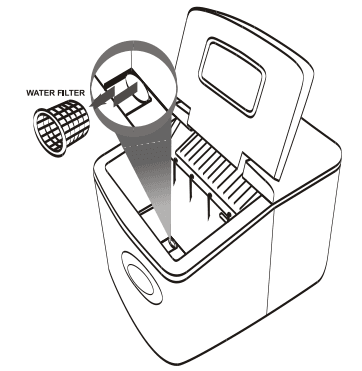
- Take out “WATER FILTER” from draining hole (as shown in the figure above).
- Using only water, clean all residue collected in the “WATER FILTER”
- If “WATER FILTER” becomes very dirty with residue, water cannot be drained from water tank smoothly, the “ADD WATER” indicator will be illuminated.
LOCATION OF CONTROLS
Open
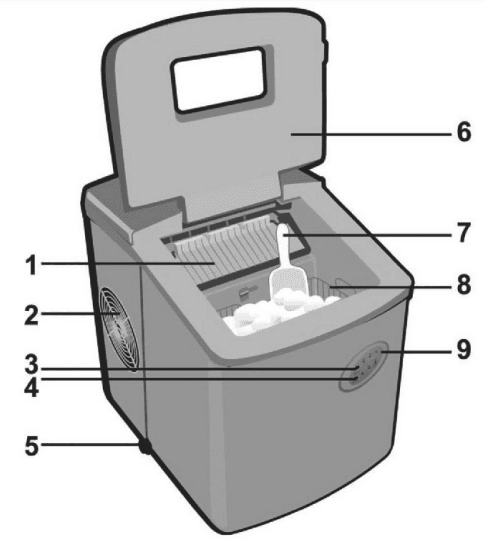
- Ice Scoop
- Air Outlet
- Ice cube SELECT Button
- POWER Button
- Water Drain Cap
- Cover
- Ice Shovel
- Ice Basket
- Control Panel Indicators(Clockwise from Top Left):
- A. Small (S) ICE Indicator
- B. Medium(M) ICE Indicator
- C. Large (L) ICE Indicator
- D. Add Water Indicator E
- E. ICE Indicator
- F. Power (On/Off) Indicator*
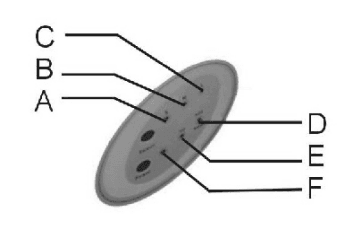
* When this unit is connected to an AC power supply but is turned OFF, the Power indicator will be lit and blinks every 5 seconds. When the unit is turned on (by pressing the POWER button), the Power indicator will always illuminate. Every time the unit is powered off, the machine takes about 3 minutes to complete the power off procedure. Properly turning off the unit protects the machine.
OPERATION

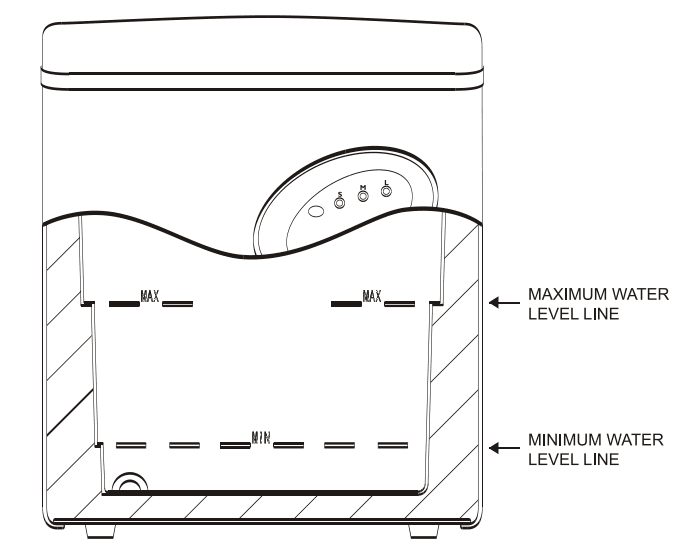
water into Lift open the cove DO NOT EXCEED remove the ice basket and pour tank. THE MAX (MAXIMUM) WATER LEVEL LINE MARK BUT NOT LESS THAN THE MIN (MINIMUM) WATER LEVEL LINE MARK” Close the cover. Press the POWER button on the control panel to begin the ice making process. The ice making process will last 7 to 13 minutes, depending on the size of the ice cube selection and the water’s and room’s temperature .
NOTE: Warmer water and/or room temperature will increase the ice making time. Use cool water to shorten the ice making process.

Select the size of the ice cube by pressing the SELECT button repeatedly until the corresponding LED indicator (Small (S), Medium (M) or Large (L) ICE indicator ) lights up.
If the room temperature is lower than 60°F, it is recommended to select Small or Medium to avoid ice sticking together.
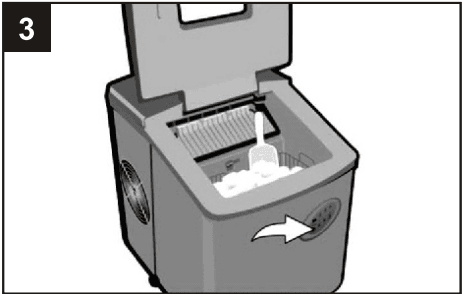
While the ice maker is on, check the Add Water indicator periodically. If the Add Water indicator is on, the ice maker will stop automatically. In this case, press the POWER button to turn the unit off and fill water up to the level mark. Wait three minutes to let the machine complete the power off procedure safely then press the POWER button again to turn the unit ON in order to re-start the ice making process.
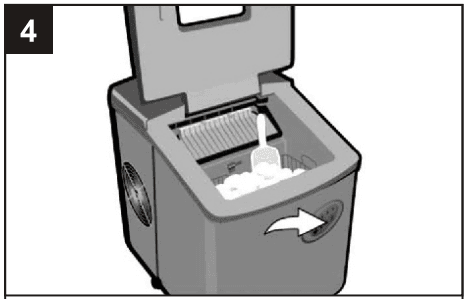
The ice maker automatically stops working when the ice basket is full in which case the ICE indicator will illuminate.
- CHANGING THE WATER: Change the water in the water tank every 24 hours to ensure a reasonable hygiene level. If unit is not in use,drain all water left in the tank. For best results, the use of distilled water is recommended.
- DRAINING THE WATER: To drain the water, simply remove the cap from the drain. Replace after draining the water.
“Water level is low! Please refill water immediately!
- If “ADD WATER” indicator lights up, the minimum water level in the tank has reached the “MIN” (minimum) marking line.
- Power unit OFF, then refill the tank with fresh water not to exceed the “MAX” (maximum) marking line. Please refer to the illustration showing on page 5 about the Maximum and Minimum Water Level Line.
- Power unit ON again to re-start the ice making process.
IMPORTANT: Only fresh, clean water should be used to make ice. Other liquids such as fruit juices, milk and soda will damage the efficiency of the machine.
CLEANING AND MAINTAINING YOUR ICE MAKER
Before using your ice maker, you are strongly recommended to clean it thoroughly.
- Remove the ice basket.
- Clean the interior with diluted detergent, warm water and soft cloth.
- The outside of the ice maker should be cleaned regularly with a mild detergent solution and warm water.
- Dry the interior and exterior with a soft cloth.
- When the machine is not in use, open the water drain cap to completely drain the water reservoir.
IMPORTANT:
Mold formation can occur if moisture gets trapped inside the unit. Drain unit of water after every use and ensure the inside of the unit is completely dry before
For more manuals by Emerson , visit ManualsLibraryy
Emerson IM90T Portable Ice Maker-FAQs
How does a portable ice maker work?
A portable ice maker uses a refrigeration system to freeze metal tubes. Water is pumped into a plastic tray, where it freezes around the tubes before being released as ice cubes.
How do I reset my Emerson ice maker?
Turn off the ice maker and unplug it. Leave it powered off for 5 to 10 minutes to reset internal components, then plug it back in and turn it on.
What do “S” and “L” mean on my portable ice maker?
1. S: Small ice cubes
2. L: Large ice cubes
Additionally, there are indicators for Ice Full and Add Water alerts.
Should I turn off my portable ice maker when not in use?
Yes, turning it off when not needed prevents ice from melting and clumping. You can store extra ice in your freezer and restart the unit when more ice is needed.
How do I manually reset my portable ice maker?
Unplug the machine for 10 seconds, then plug it back in and press the ON button. A blue light should indicate that the reset was successful.
Why is the power button blinking on my ice maker?
A blinking power light may indicate ice cubes stuck in the machine. Check for jammed ice and remove any obstructions to allow normal operation.
What is the “Max Ice” setting?
The Max Ice feature boosts ice production by up to 30% for 24 hours before automatically returning to normal. It cannot be kept on permanently.
How does the ice maker sensor work?
A thermostatic sensor monitors the ice level using temperature-sensitive fluid inside a bulb. When the bin reaches capacity, the sensor signals the machine to stop making ice.
What does “Safe Mode” mean on my ice machine?
Safe Mode activates when there is an issue with the water or ice probe sensor. The machine will continue running based on past cycles but may not operate at full efficiency.
Can I leave my ice maker on all the time?
Yes, most ice makers are designed to run continuously, ensuring a fresh supply of ice. However, turning it off when not in use can help conserve energy.
Why is my portable ice maker not freezing properly?
If your ice maker isn’t getting cold, check for:
1. Dust buildup blocking the heat output
2. Obstructions near the air inlet/outlet (ensure at least 20cm of clearance)
3. Power supply issues affecting the cooling system

