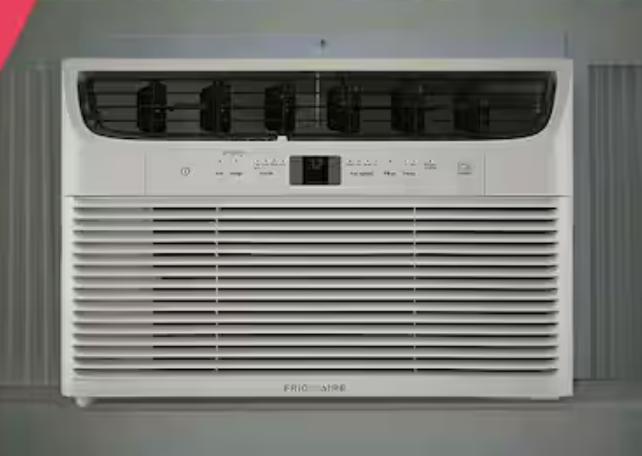
Frigidaire 8,000~12,000 BTU Window AC Installation
INSTALLATION WARNINGS AND CAUTION
- The unit is for window mounting only.
- Carefully read the installation manual before beginning.
- Follow each step as shown.
- Observe all local, state, and national electrical codes and by qualified, licensed, authorized personnel only.
- Pay attention to danger and safety notices.
To avoid risk of personal injury, property damage, or product damage due to the weight of this device and sharp edges that may be exposed:
- Air conditioners covered in this manual pose an excessive weight hazard. Two or more people are needed to move and install the unit. Wear protective gloves whenever lifting or carrying the unit. AVOID the sharp metal fins of front and rear coils. To prevent injury or strain, use proper lifting and carrying techniques when moving the unit.
- Carefully inspect the location where the air conditioner will be installed. Be sure it will support the weight of the unit over an extended period of time.
- Handle the air conditioner with care.
- Make sure the air conditioner does not fall during installation.
![]() NOTE:
NOTE:
- SAVE CARTON and these INSTALLATION INSTRUCTIONS for future reference. The carton is the best way to store units during winter or when not in use.
- DO NOT USE ANY SCREWS OTHER THAN THOSE SPECIFIED HERE.
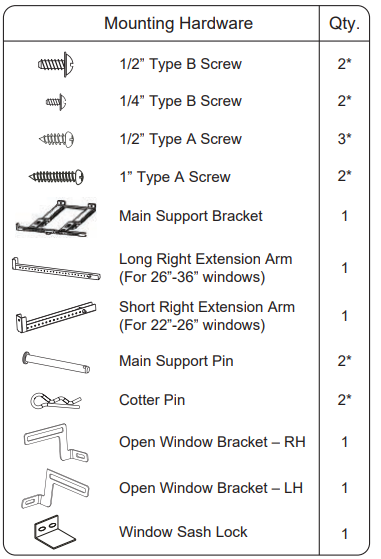
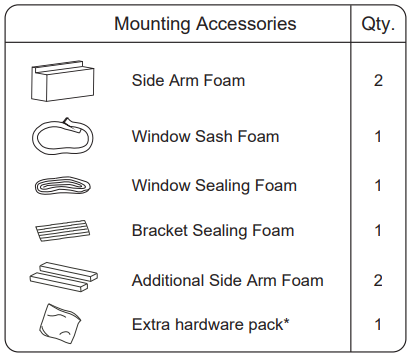
* Extra hardware provided in a separate bag.
TOOLS NEEDED
- Phillips Screwdriver
- Level
- Flat Head Screwdriver
- Pencil
- Ruler or tape measure
- Scissors or a knife
- Drill and 1/8” drill bit ((If pilot holes are needed)
- Proper PPE
Installation Instructions
Check the window opening size
Your air conditioner is designed to be installed in standard double hung windows with opening widths of 23.6 to 36 inches (599mm to 914 mm)
Lower sash must open sufficiently to allow for a clear vertical opening of 13.8 inches (350 mm).

There should be at least 11.8 inches (300mm) of clearance around the unit.

Bracket instruction
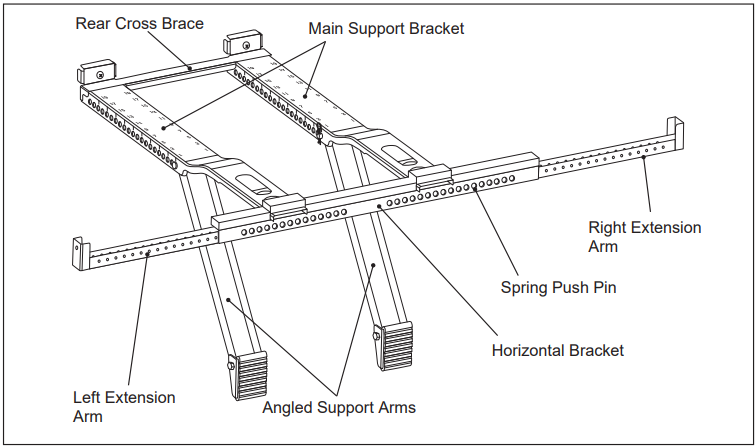
Set up the Bracket
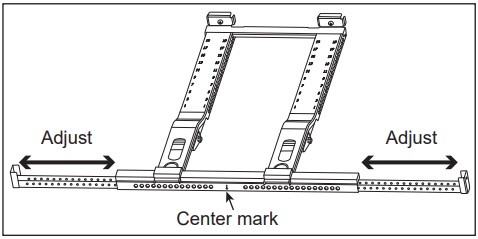
- Measure your window width on the inside of your sill, at the widest part. For window widths between 22″a nd -26″, use the short right extension arm. For window widths between 26″and -36″, use the long right extension arm.
- Install the right extension arm and adjust by pressing the spring push pin to reach the center mark in the middle of the window.
 NOTE: The bracket will be offset to the left when centered.
Install the Bracket
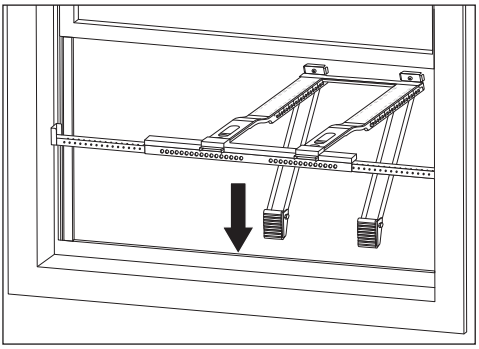
- Place the bracket in the window as shown below.


- Check if the center mark of the bracket is in the middle of the window. Make adjustments if needed.
- Fix the bracket as shown below:
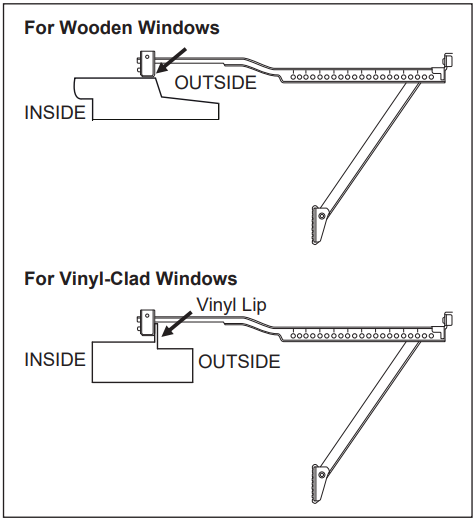
For Wooden Windows
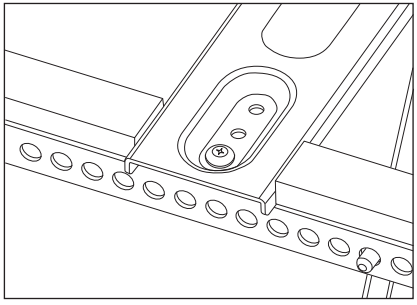
Secure bracket to windowsill by drilling 1/8″ pilot holes and installing 1/2″ and 1″ Type A screws on extension arms as shown below.
 For Vinyl-Clad Windows
Secure bracket to windowsill by drilling 1/8″ pilot holes and installing 1/2″ Type A screws on extension arms as shown below.
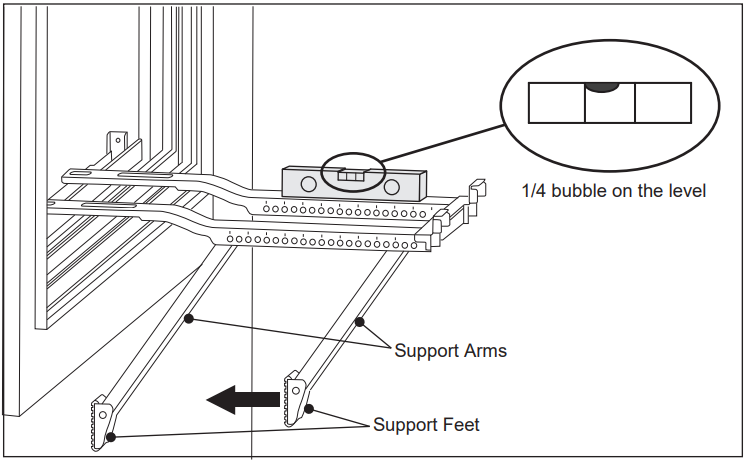
- Move Angled Support Arms toward the exterior wall until Support Feet touch the wall. Place a level on the bracket and adjust the Support Arms so that the bracket is tilted 1/4 bubble downward and towards the outside.

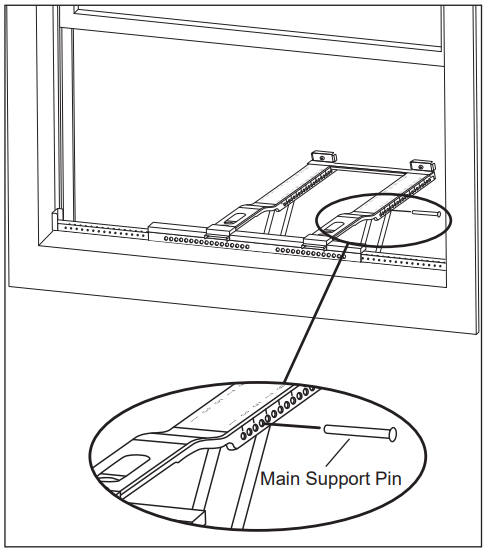
- Insert the Main Support Pin through the holes of the Main Support Bracket and Angled Support Arm.
 Note: If further adjustment is needed, use alternate holes where the Main Support Bracket attaches to the Horizontal Bracket.
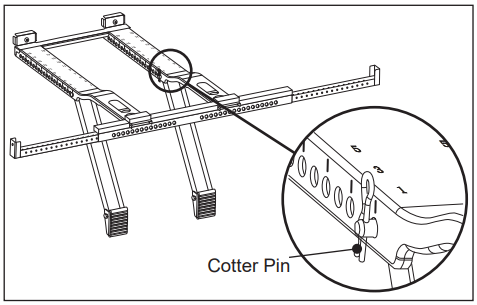
- Check the level again and ensure the bracket feels secure. After making any necessary adjustments, insert the Cotter Pins into the Main Support Pins.

Install Air Conditioner
- Remove the foam insert as shown below.
 Note: Mounting Accessories are attached to the foam insert. Remove from the foam for later use.
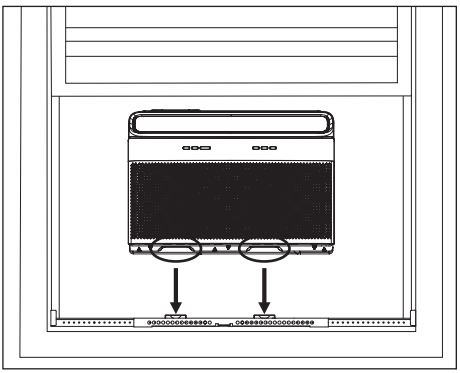
 - Place the unit on top of the support bracket. Ensure the grooves on the bottom of the unit align with the main supports. Using a level, check for proper tilt towards the outside.
Note: Do not leave the unit unattended during installation.
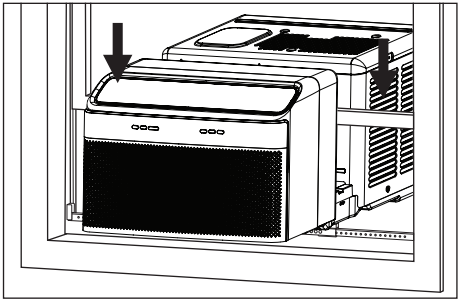
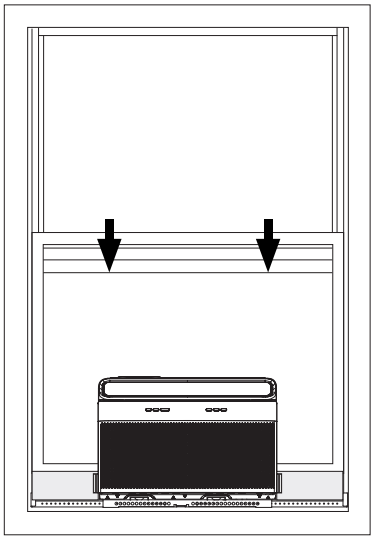
- Pull the window down into the gap for alignment and support. Keep the window partially closed.

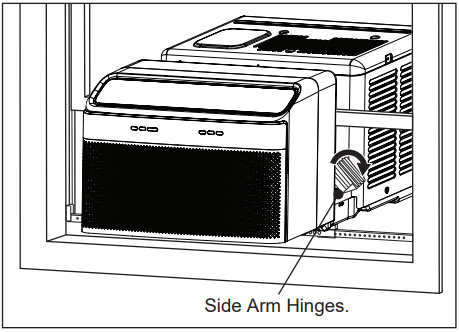
- Fold down both Side Arm Hinges.

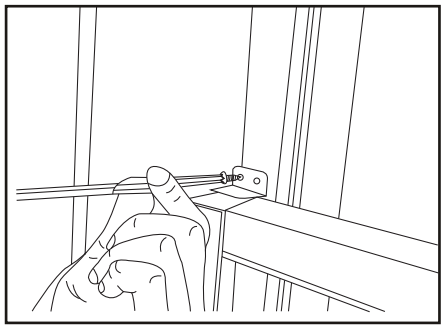
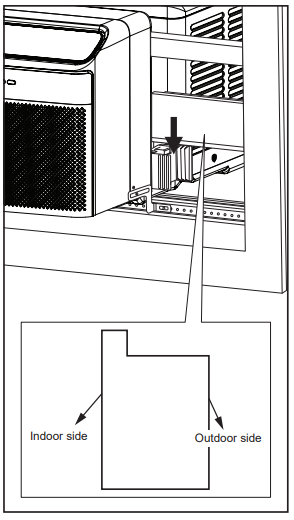
- Install the Open Window Brackets using the provided screws as shown.

 NOTE: Failing to install the Open Window Brackets could cause injury or property damage.
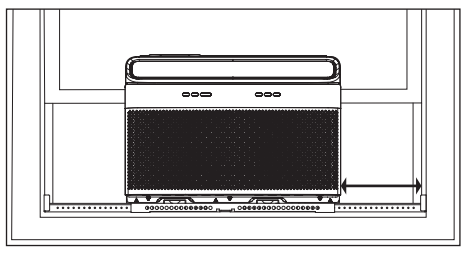
 - Measure the distance between the Side Arm Hinge and the closest part of the window frame in line with the Side Arm. Add 1/4” to this distance and cut the Side Arm Foam to length.

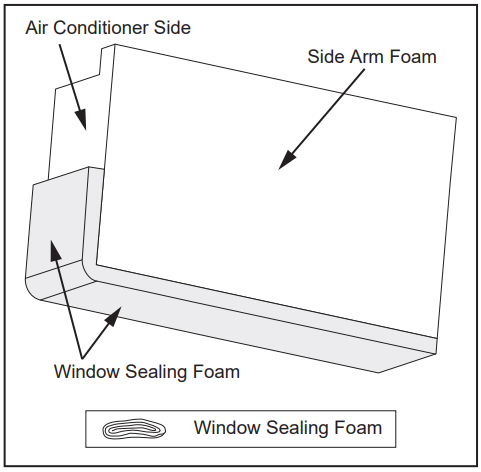
- Cut the Window Sealing Foam to the appropriate size and apply it to the Side Arm Foam as shown.
Note: The Window Sealing Foam attaches to the side next to the air conditioner.
- Insert Side Arm Foam into Side Arm Hinge until the top front of the Side Arm is flush with the top of the hinge.

- Repeat the Side Arm Foam installation steps on the other side of the unit.
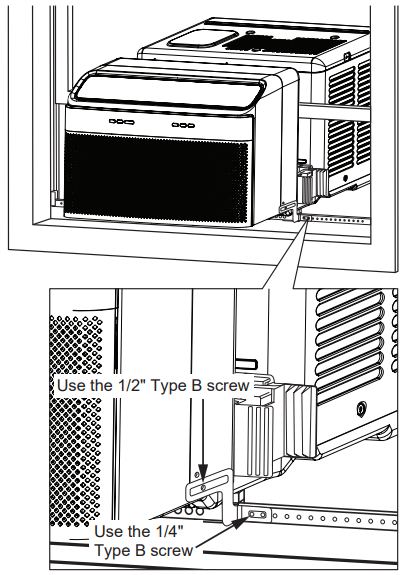
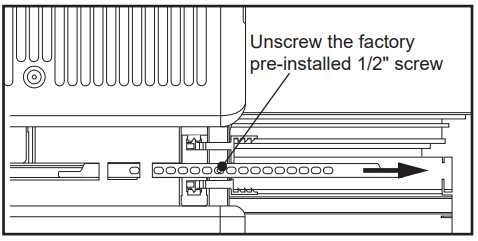
- Unscrew the factory pre-installed 1/2″ screw, then slide out the Anti-Tip Brackets along the window track. Secure the brackets in place by screwing the 1/2″ screw back.
 Note: The Left Anti-Tip Bracket is placed upside down to the Right Anti-Tip Bracket.
 IMPORTANT: The factory-installed 1/2″ screw must be reused to secure the Anti-Tip Bracket. Failing to use this screw could damage the air conditioner.
 - Repeat installation of the Anti-Tip Bracket on the other side.
- Install a strip of Window Sealing Foam on the bottom of your lower sash. This helps to seal any small gaps between the window and the air conditioner. Close the window and check for gaps. Fill any gaps with included foam, as needed.
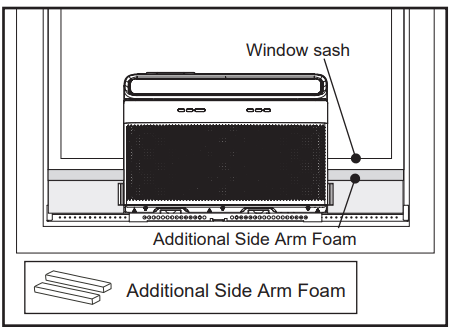
 If necessary, add Additional Side Arm Foam to better seal the space between the window sash and the unit.
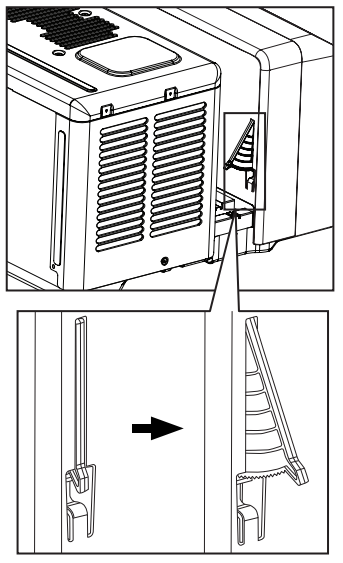
- Extend the integrated Window Locks as shown below.
 Note: For extra security, secure the lower sash into place with the right-angle sash lock and 1/2″ Type A Screws as shown.
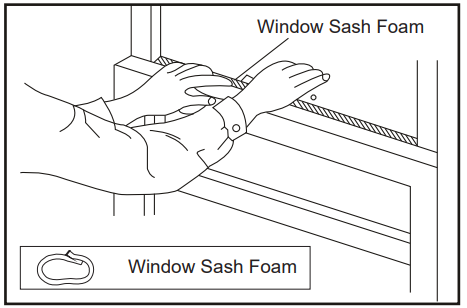
- Cut the window sash foam and insert it into the space between the upper and lower sashes.

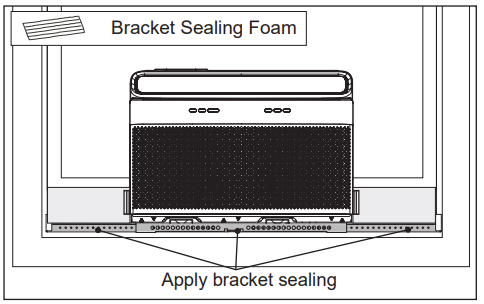
- Apply Bracket Sealing Foam strips to the bottom of the bracket as shown.

- Final Check: Review the installation and check for any gaps or openings. Cover these gaps with the provided foam, ensuring no outdoor air leaks inside.
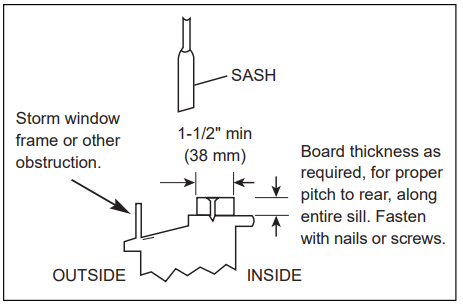
If AC is blocked by a storm window
Add wood as shown, or remove the storm window before the air conditioner is installed. If a storm window frame must remain, be sure the drain holes or slots are not caulked or painted shut. Accumulated rainwater or condensation must be allowed to drain out.
You must secure the support bracket to the added wood piece using the provided 1″ Type A Screws. Refer to the Open Window Bracket installation step.
For more manuals by Frigidaire, visit ManualsLibraryy
Frigidaire 8000-12000 BTU Window AC Installation- FAQs
How do I correctly install a Frigidaire window AC?
Place the unit on the windowsill with a slight outward tilt for drainage. Lower the sash onto the unit, secure it, and seal gaps with foam or weatherstripping. Ensure the unit is level and stable, then plug it in and test.
Can one person install a window AC unit?
It’s possible but not recommended. Window AC units are heavy and awkward to lift—having a second person helps ensure a safer and easier installation.
What room size does an 8,000 BTU AC cool?
An 8,000 BTU unit is ideal for rooms between 350–400 sq. ft. Larger spaces require higher BTU capacity.
What room size does a 12,000 BTU AC cool?
A 12,000 BTU unit can comfortably cool a room of about 450–550 sq. ft.
How much does it cost to run an 8,000 BTU window AC?
Running one for about 8 hours daily costs around $25–$30 per month, depending on your local electricity rates.
How much electricity does a 12,000 BTU AC use per hour?
On average, an efficient 12,000 BTU unit consumes about 300–1,000 watts per hour, depending on efficiency and settings.
What is the recommended temperature setting?
For summer, set your AC to 78°F when home, about 82°F when sleeping, and 85°F when away for energy savings.
Can I control my Frigidaire AC with my phone?
Yes, if your model supports Wi-Fi. Connect it through the Frigidaire 2.0 app and sync with Google Home or Alexa for smart control.
How often should I service my window AC?
Have it professionally serviced twice a year—once before summer and once after—to keep it running efficiently.

 NOTE: The bracket will be offset to the left when centered.
 For Vinyl-Clad Windows
 Note: If further adjustment is needed, use alternate holes where the Main Support Bracket attaches to the Horizontal Bracket.
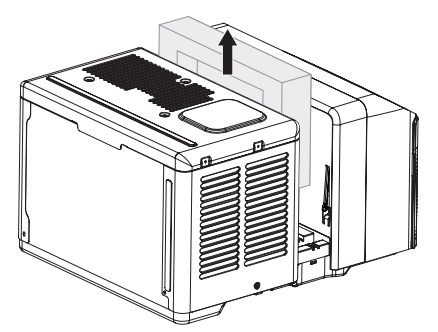 Note: Mounting Accessories are attached to the foam insert. Remove from the foam for later use.
 Note: The Left Anti-Tip Bracket is placed upside down to the Right Anti-Tip Bracket.
 If necessary, add Additional Side Arm Foam to better seal the space between the window sash and the unit.
 Note: For extra security, secure the lower sash into place with the right-angle sash lock and 1/2″ Type A Screws as shown.