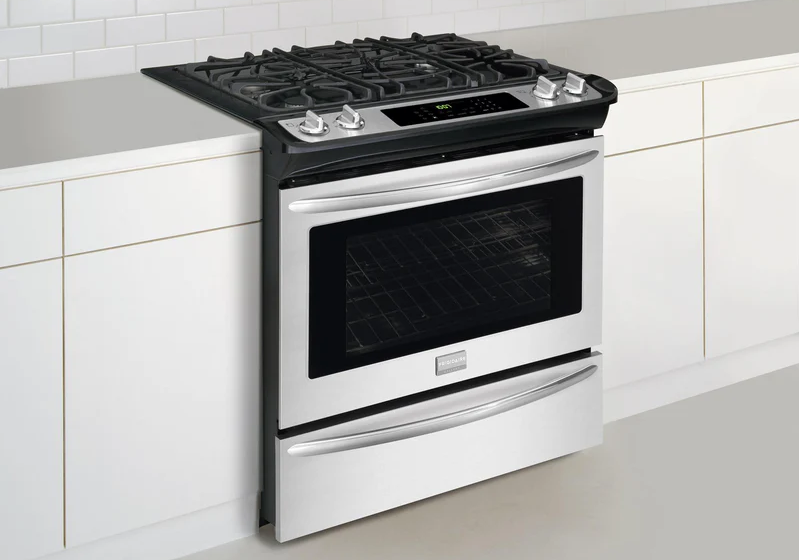
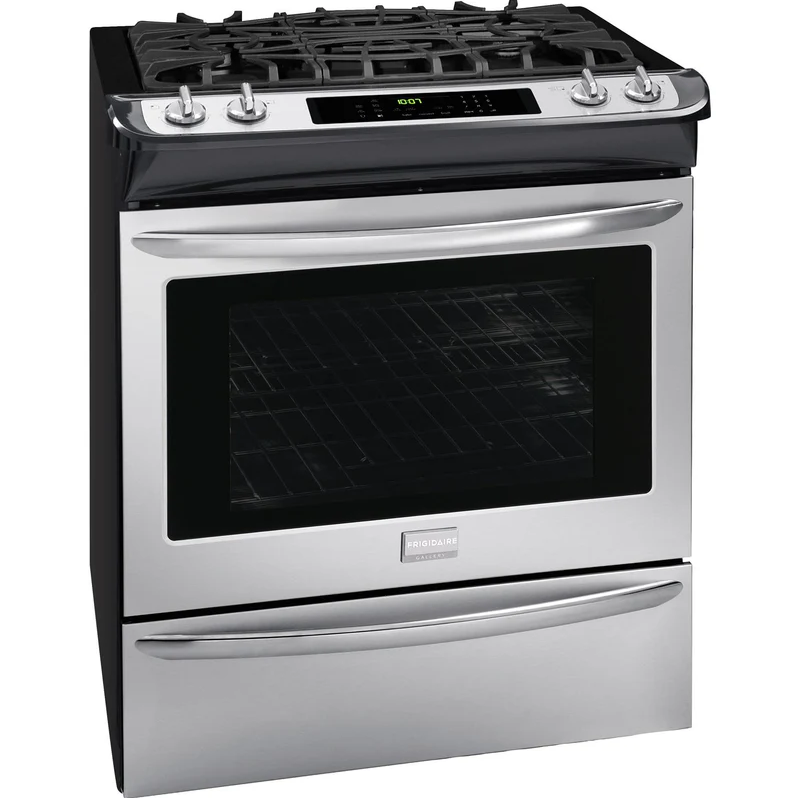
Frigidaire Gallery FGDS3065K Range
Important Safety Instructions
Read all instructions before using this appliance. Save these instructions for future reference.
FOR YOUR SAFETY
- Do not store or use gasoline or other flammable vapors and liquids in the vicinity of this or any other appliance.
- WHAT TO DO IF YOU SMELL GAS:
- Do not try to light any appliance.
- Do not touch any electrical switch; do not use any phone in your building.
- Immediately call your gas supplier from a neighbor’s phone. Follow the gas supplier’s instructions.
- If you cannot reach your gas supplier, call the fire department.
- Installation and service must be performed by a qualified installer, servicer or the gas supplier.
Definitions
This is the safety alert symbol. It is used to alert you to potential personal injury hazards. Obey all safety messages that follow this symbol to avoid possible injury or death.
- Remove all tape and packaging wrap before using the appliance. Destroy the carton and plastic bags after unpacking the appliance. Never allow children to play with packaging material. Do not remove the wiring label and other literature attached to the appliance. Do not remove the model/serial number plate.
- Proper Installation. Be sure your appliance is properly installed and grounded by a qualified technician by the National Fuel Gas Code ANSI Z223.1, latest edition, and National Electrical Code ANSI/NFPA No. 70, latest edition, and local code requirements. Install only according to the installation instructions provided in the literature package for this range. Ask your dealer to recommend a qualified technician and an authorized repair service. Know how to disconnect the electrical power to the appliance at the circuit breaker or fuse box in case of an emergency.
- User Servicing. Do not repair or replace any part of the appliance unless specifically recommended in the manuals. All other servicing should be done only by a qualified technician to reduce the risk of personal injury and damage to the appliance.
- Never modify or alter the construction of an appliance by removing leveling legs, panels, wire covers, anti-tip brackets/screws, or any other part of the product.
WARNING: Stepping, leaning, sitting or pulling down on the door or the drawer of this appliance can result in serious injuries and also cause damage to the appliance. Do not allow children to climb or play around the appliance. The weight of a child on an open door may cause the appliance to tip, resulting in serious burns or other injuries.
- Cleaners/Aerosols—Always follow the manufacturer’s recommended directions for use. Be aware that excess residue from cleaners and aerosols may ignite, causing damage and/or injury.
- Clean in the self-cleaning cycle only the parts of the appliance listed in this Owner’s Guide. Before using the self-cleaning cycle of the appliance, remove all utensils stored in the appliance.
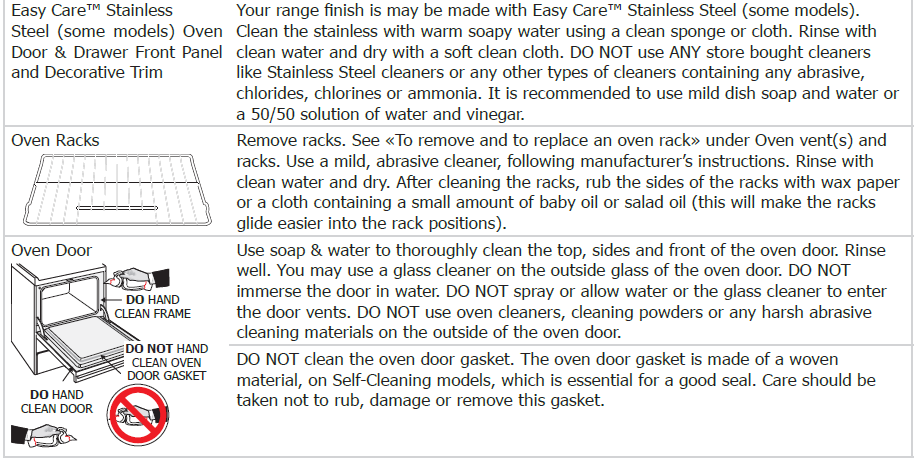
- Do not clean the oven door gasket. The door gasket is essential for a good seal. Care should be taken not to rub, damage, or move the gasket.
- Do not use oven cleaners. No oven cleaner or oven liner protective coating of any kind should be used in or around any part of the appliance.
- Remove oven racks. The oven racks’ color will change if left in the oven during a self-cleaning cycle.
FEATURES AT A GLANCE -MODEL A

Your built-in range Features: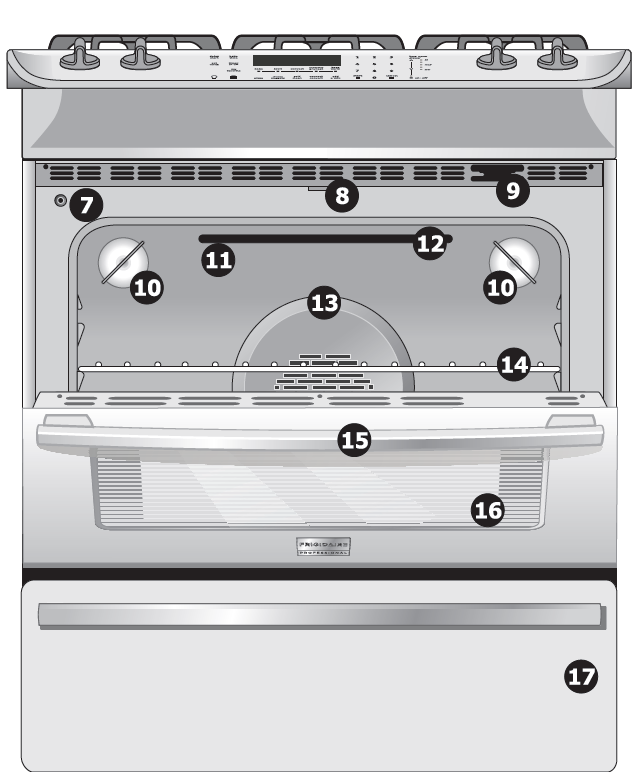
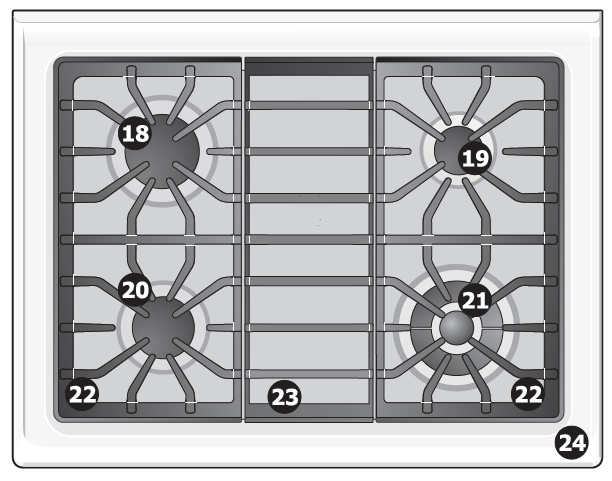
- Electronic oven control with kitchen timer.
- Left rear burner control.
- Left front burner control.
- Right front dual burner control.
- Right rear burner control.
- Warm & serve drawer control.
- Automatic oven door light switch.
- Self-cleaning door latch.
- Oven vent
- 2 Oven interior light with removable cover.
- Self-cleaning oven interior.
- Broil element.
- Convection bake cooking system fan.
- Adjustable interior oven rack(s).
- Large 3-piece oven door handle.
- Stainless steel oven door with window.
- Warm & serve drawer.
- 15000 BTU surface burner.
- 5000 BTU surface burner.
- 9500 BTU surface burner.
- 17000 BTU Dual surface burner.
- Cast iron side grate.
- Cast iron center grate.
- Easy to clean porcelain cooktop.
NOTE: The features shown for your appliance may vary according to model type & color.
Before setting surface controls
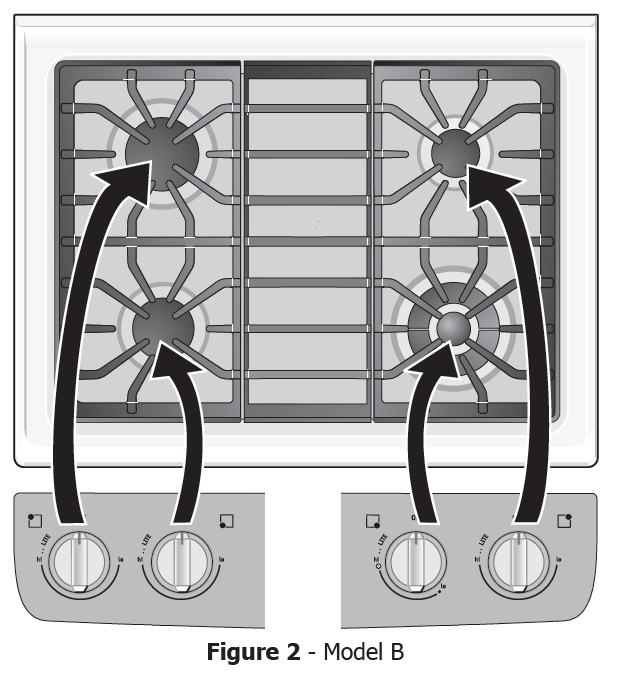
Control the locations of the gas surface burners
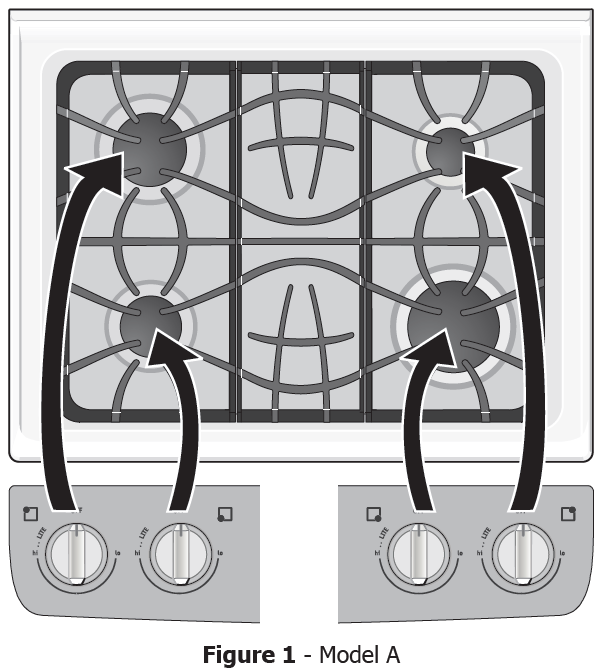
Your built-in range is equipped with gas surface burners with different BTU ratings. The ability to heat food quicker and in larger volumes increases as the burner size increases. The small simmer burner is best used for simmering delicate sauces, etc. This burner is located at the right rear burner position on the cooktop (see Figures 1 & 2). The standard burner can be used for most surface cooking needs. The standard burners are located at the left front position on the cooktop (see Figures 1 & 2). The power burners are best used for bringing large quantities of liquid rapidly up to temperature or when preparing larger quantities of food. The POWER burners are located at the right front and left rear burner positions on the cooktop (see Figures 1 & 2). Regardless of size, always select cookware that is suitable for the amount and type of food being prepared. Select a burner and flame size appropriate to the pan. Never allow flames to extend beyond the outer edge of the pan.
Assembly of the surface burner caps and burner grates
It is very important to make sure that all of the Surface Burner Caps and Surface Burner Grates are installed correctly and at the correct locations.
- Remove all packing material from the cooktop area.
- Discard all packing material (if applicable).
- Unpack Burner Grates and position on the cooktop.
REMEMBER — DO NOT ALLOW SPILLS, FOOD, CLEANING AGENTS, OR ANY OTHER MATERIAL TO ENTER THE GAS ORIFICE HOLDER OPENING.
Always keep the Burner Caps and Burner Heads in place whenever the surface burners are in use.
Setting surface controls
Operating the gas surface controls
- Place the cooking utensil on the surface burner.
- Push the surface control knob down and turn counterclockwise out of the OFF position.
- Release the knob and rotate to the LITE position (see figures 1 & 2).
Note: All four electronic surface ignitors will spark at the same time. However, only the burner you are turning on will ignite. - Visually check that the burner has a flame.
- Turn the control knob counterclockwise to the desired flame size. The control knobs do not have to be set at a particular setting. Use the knob indicator settings to adjust the flame as needed. DO NOT cook with the surface control knob in the LITE position. (The electronic ignitor will continue to spark if the knob is left in the LITE position.)
CAUTION: Do not place plastic items such as salt and pepper shakers, spoon holders, or plastic wrappings on top of the range when it is in use. These items could melt or ignite. Pot holders, towels, or wooden spoons could catch fire if placed too close to a flame.
CAUTION: Do not operate the burner for an extended period without cookware on the grate. The finish on the grate may chip without cookware to absorb the heat.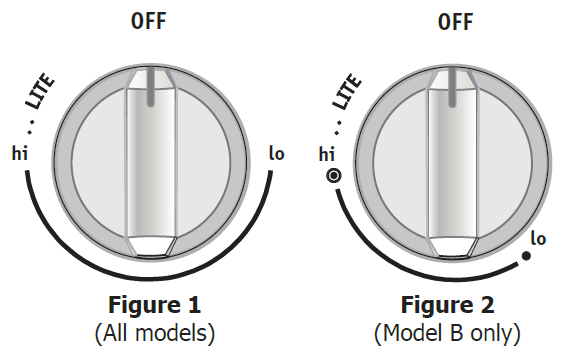
Setting the proper surface burner flame size
For most cooking, start on the highest control setting and then turn to a lower one to complete the process. Use the recommendations below as a guide for determining the proper flame size for various types of cooking. The size and type of utensil used and the amount of food being cooked will influence the setting needed.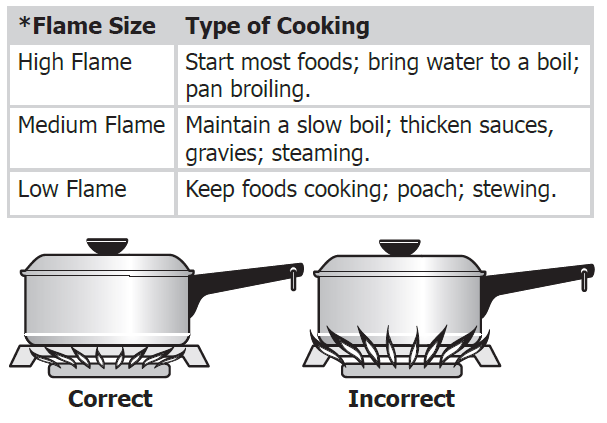
IMPORTANT: Never extend the flame beyond the outer edge of the utensil. A higher flame simply wastes heat and energy, and increases the risk of being burned by the gas flame.
NOTE: *Note: Settings are based on using mediumweight metal or aluminum pans. Settings may vary when using other types of pans. The color of the flame is the key to proper burner adjustment. A good flame is clear, blue, and hardly visible in a well-lighted room. Each cone of flame should be steady and sharp. Clean the burner if the flame is yellow-orange.
BEFORE SETTING OVEN CONTROLS
Oven vent location
The oven is vented at the center rear of the cooktop. When the oven is on, warm air is released through the vent. This venting is necessary for proper air circulation in the oven and good baking results. DO NOT BLOCK OVEN VENT. Never close off the openings with aluminium foil or any other material.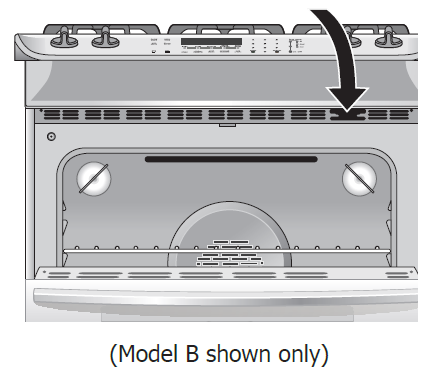
CAUTION: Some models are equipped with a blower that runs in baking and self-cleaning mode to keep all internal components at a cool temperature. The blower may keep running even if the oven has been turned off until the components have cooled down.
Air circulation in the oven
If using 1 rack, place it in the center of the oven. If using multiple racks, stagger cookware as shown. For best air circulation and baking results, allow 2-4″ (5-10 cm) around the cookware for proper air circulation and be sure pans and cookware do not touch each other, the oven door, sides, or back of the oven cavity. The hot air must circulate the pans and cookware in the oven for even heat to reach the food.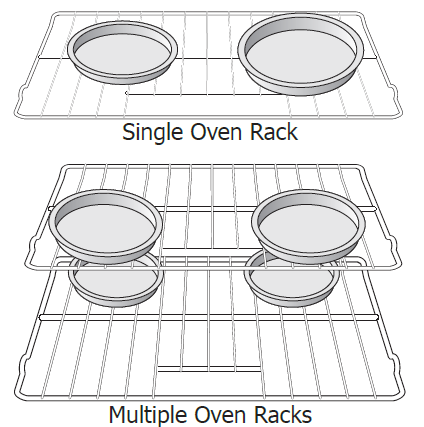
Arranging oven racks
Always arrange oven racks when THE oven is cool (Before operating the oven). Always use oven mittens when using the oven. To remove an oven rack, pull the rack forward until it stops. Lift up the front of the rack and slide out. To replace an oven rack, fit the rack onto the guides on the oven walls. Tilt the front of the rack upward and slide the rack back into place.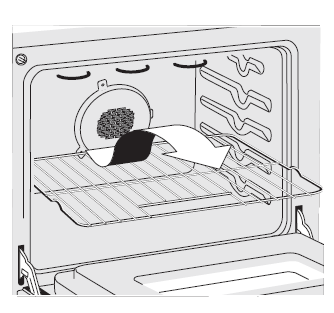
Recommended rack positions
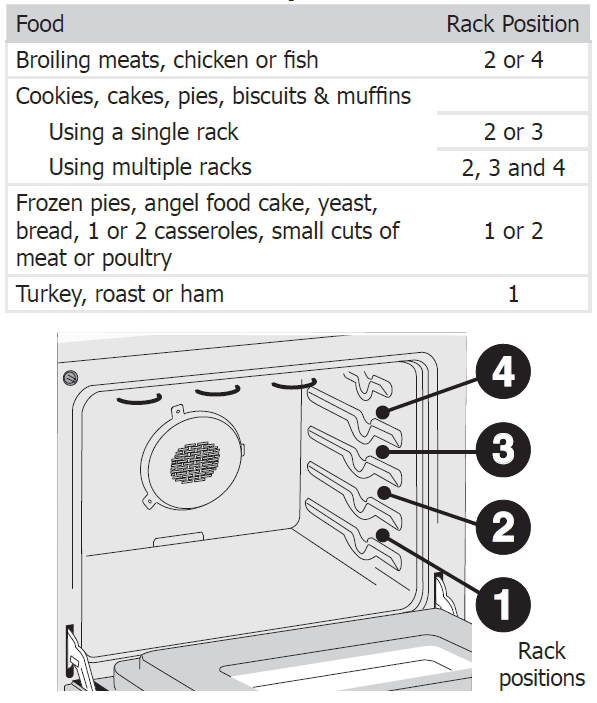
NOTE: Always use caution when removing food from the oven.
Types of oven racks
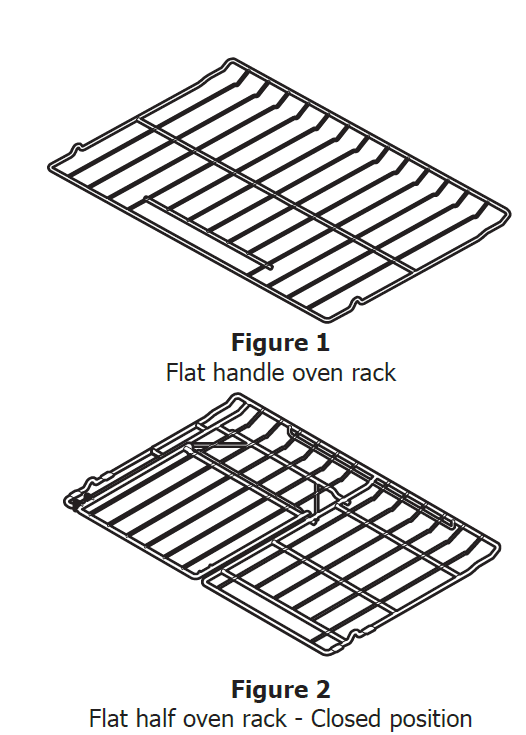
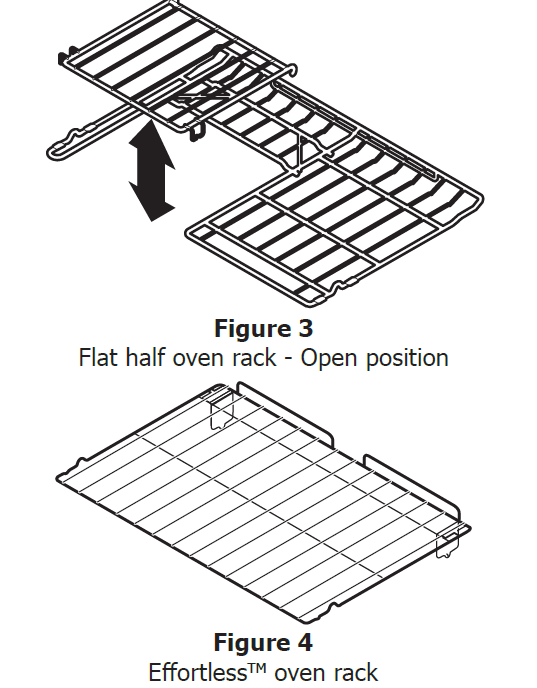
Your built-in range may be equipped with one or more of the oven rack styles shown.
- Flat handle oven rack (Figure 1).
- Flat oven half rack (Figures 2 & 3 – Some models).
- EffortlessTM oven rack (Figure 4 – Some models).


CAUTION: Always use pot holders or oven mittens when adjusting the oven racks. Wait until the oven has completely cooled, if possible. Oven racks may be HOT and may cause burns.
The Flat Oven Handle Rack has a handle to facilitate the sliding of the rack when a large amount of food weight on it. The Flat Oven Half Rack has a removable insert that can provide extra space for larger food items. The right half rack portion may still be used for other food items like a casserole dish (See Figures 2 & 3). To remove the insert, squeeze on the left front insert side (See Figure 5) of the rack and tilt out clockwise. To reinstall, insert rear hooks at the back of the insert (See figure 5) and lay the insert down. Make sure both insert front hooks snap into the rack (See figure 6). Do not use cookware that extends beyond the edge of the Flat Half Rack. For best results, allow 2 inches between the pan placed on the rack and the oven side or rear walls.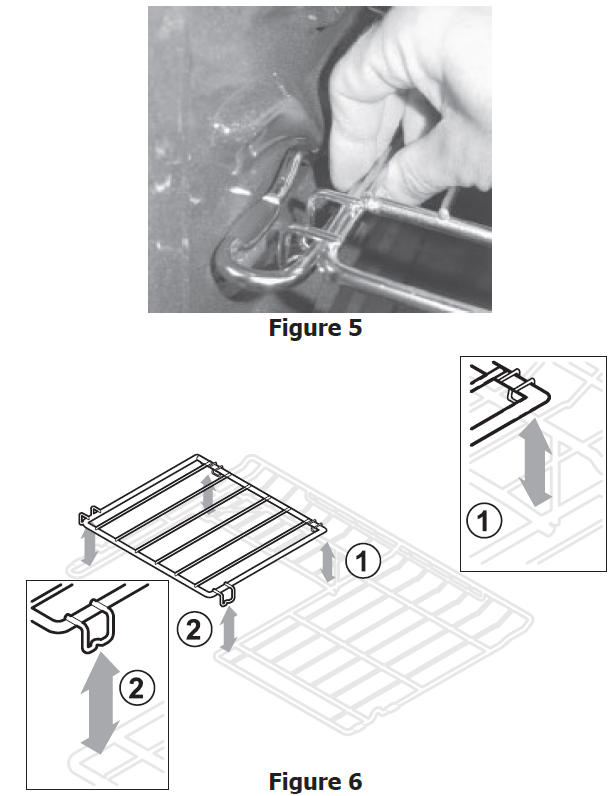
The Effortless™ oven rack system
Some models are equipped with a special oven rack system that automatically partially extends the oven rack from the interior oven glides to assist in easier access to your food items. This feature works whenever the oven door is opened or closed.
To assemble the Effortless™ Oven Rack system:
- Locate all required parts. You will need the supplied oven rack (Effortless™ Oven Rack is a flat rack with a special dark coating on the left and right rack sides) and the 2 supplied chrome connector arms.
- Open the oven door. Be sure the oven is completely cool before proceeding.
- Place the oven rack in positions 1, 2, or 3 only (see previous page to verify positions). Be sure the rack connector brackets are at the rear of the range and pointing towards the oven bottom (See Figure 2).
- Assemble one connector arm at a time. With the oven door open and the oven rack in place, install one end of the connector arm to the hole in the door connector bracket (Figure 1) and the other end in the hole in the rack connector bracket (Figure 2 and as in Figure 3). The oven rack may need to be adjusted in or out of the rack position to match the length of the connector arm.
- While holding the connector arm in place, twist the connector arm so the ends of the connector arm point upwards (See Figures 4 & 5). The connector arm should now be locked into position.
- Repeat steps 4 and 5 for the other connector arm.
- Once both connector arms are properly in place, be sure to test the oven rack operation by gently closing the oven door. The oven rack should move in and out of the oven freely when the door is opened or closed.
CAUTION: REMOVE ALL OVEN RACKS and parts before starting a self-clean cycle. If the oven racks are left in the oven during the self-clean cycle, the glide ability of the Effortless Oven Rack system will be damaged and will cause all oven racks to lose their shiny finish and or turn blue. Remove ALL oven racks and clean according to instructions provided in the Care & Cleaning section of this manual. Make sure the oven and oven racks are COMPLETELY cooled and safe to touch before attempting to assemble or disassemble the Effortless™ Oven Rack system. Never pick up hot oven rack parts.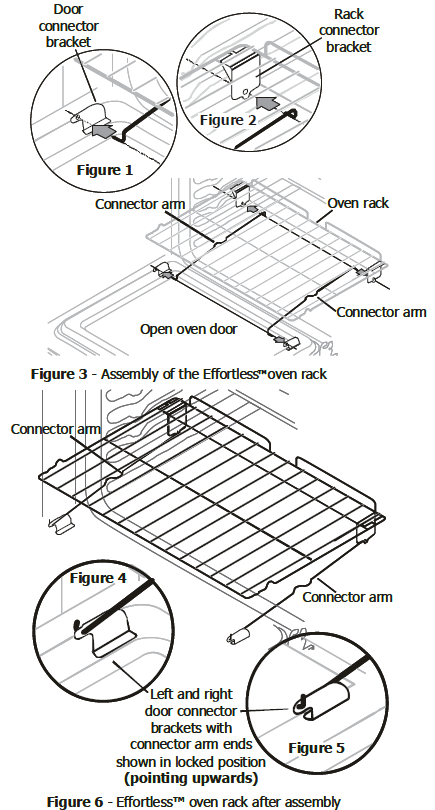
Setting OVEN controls
Control pad features
READ THE INSTRUCTIONS CAREFULLY BEFORE USING THE OVEN. For satisfactory use of your oven, become familiar with the various features and functions of the oven as described below. Detailed instructions for each feature and function follow later in this Use & Care Guide.
- Delay start pad—Use to program a Delayed Timed Bake or Delay Self-Cleaning cycle start time.
- Bake time pad—Use to enter the length of the baking time.
- Set clock pad—Use to set the time of day.
- Timer on-off pad—Use to set or cancel the Timer. The Timer does not start or stop cooking.
- My favorite pad (some models)—Use to record a temperature setting for a cooking feature.
- Oven light pad—Use to turn the oven light ON and OFF.
- Oven lockout pad—Use to lock the oven door and the control panel pads.
- Bake pad—Use to select the bake cooking feature.
- Broil pad—Use to select the broil cooking feature.
- Convection pad—Use to select between the Convection Bake, Convection Roast, and Convection Broil cooking features.
- Quick preheat or power plus preheat pad—Use to quickly raise oven to cooking temperature.
- Keep warm pad—Use to keep the dishes and food warm until served.
- Pizza Pad—Use to select the pizza cooking feature.
- Chicken nuggets pad—Use to select the chicken nuggets cooking feature.
- Self-Clean pad—Use to select the self-cleaning feature.
- Convection convert pad—Use to convert a regular recipe temperature to a convection temperature.
- Add a minute pad—Use to add a minute to the timer feature.
- Numeric pad—Use to enter temperatures and times.
- Start pad—Use to start all oven features (not used with Oven Light).
- Cancel pad—Use to cancel any oven feature previously entered, except the time of day and minute timer.
Care & Cleaning (Cleaning Chart)
Cleaning various parts of your appliance
Before cleaning any part of the appliance, be sure all controls are turned off and the appliance is COOL. Remove spillovers and heavy soiling as soon as possible. Regular cleaning will reduce the number of major cleanings later.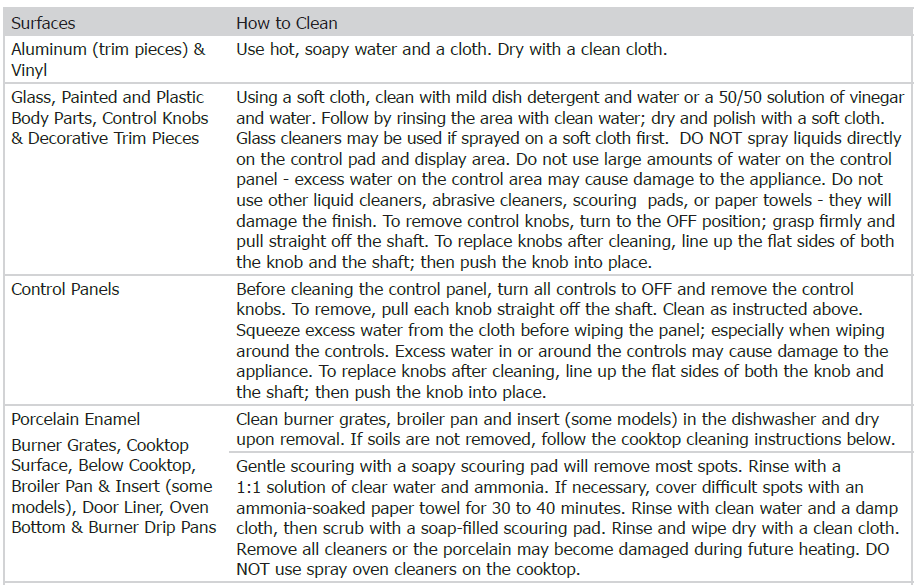
Cleaning the cooktop, burner caps & grates
The cooktop is designed to make cleaning easier. Because the gas Burners are sealed, cleanups are easy when spills are cleaned up immediately. The cooktop, Burner Heads, and Caps should be routinely cleaned. Keeping the Burner Head Ports clean will prevent improper ignition and an uneven flame. Refer to the following instructions:
IMPORTANT: THE COOKTOP IS NOT REMOVABLE. Do not attempt to remove or lift the cooktop.
CAUTION: Pay attention to not damaging the electrodes. Damaged electrodes may cause a delayed ignition or prevent the burner from igniting.
CAUTION: Any additions, changes, or conversions required for this appliance to perform satisfactorily must be made by an authorized Service Center.
Do not remove any parts from the cooktop until they have completely cooled and are safe to handle. Do not operate the surface Burners without the Burner Caps and Burner Heads properly in place.
To clean the surface, Burner Caps and Burner Heads– Use a soap-filled scouring pad or a mild abrasive cleanser to clean the surface Burner Caps. The ports (or slots) around the Burner Heads must be routinely checked. If residue remains in these ports (or slots), use a small-gauge wire or needle to clean the slots or holes. For proper flow of gas and ignition of the burner—DO NOT ALLOW SPILLS, FOOD, CLEANING AGENTS, OR ANY OTHER MATERIAL TO ENTER THE GAS ORIFICE HOLDER OPENING. ALWAYS keep the surface Burner Caps in place whenever the gas Burners are in use or not.
To Clean the Burner Grates- Be sure burners and grates are cool before you place your hand, a pot holder, cleaning cloths, or other material on them. The cast iron burner grates can be washed in hot, soapy water. Rinse thoroughly and dry the grates with a cloth -don’t put them on the cooktop while still wet. Be sure the grates are positioned securely over the burners. To remove burned-on food, place the grates in a covered container or plastic bag. Add 1/4 cup ammonia and soak for 30 minutes. Wash, rinse well, and dry. An abrasive cleaner can be used for stubborn stains.
To clean the Cooktop and contoured areas of the cooktop– If a spill occurs on the porcelain cooktop, blot up the spill with an absorbent cloth. Rinse with a clean, damp cloth and wipe dry. Do not use harsh abrasive cleaners on the cooktop. They can scratch the porcelain. Completely rinse any mild cleaners used from the surface or the porcelain cooktop may become damaged during future heating. DO NOT use spray oven cleaners on the cooktop.
Care and cleaning of stainless steel (Stainless Steel models only)– Some models are equipped with stainless steel exterior parts. Special care and cleaning are required for maintaining the appearance of stainless parts. Please refer to the table provided at the beginning of the General Care & Cleaning section in this Use & Care Guide.
For more manuals by Frigidaire, visit ManualsLibraryy
Frigidaire Gallery FGDS3065K Range-FAQs
How do I set the temperature on my Frigidaire Gallery oven?
Press the Temp (Darkness) button, use the Temp/Timer knob to select your desired temperature, and press Set. Then press the Time (Slices/Size) button, set the cooking time the same way, and press Set again. Press Start/Cancel to begin baking.
What cooking modes are available on the Frigidaire Gallery oven?
This oven offers a wide range of features including Air Fry, No Preheat, Slow Cook, Convection Bake, Steam Bake, Convection Roast, Steam Roast, Air Sous Vide, and more for versatile cooking.
How do I adjust the oven’s temperature manually?
Remove the temperature knob and check the screws on the back. If the oven runs too cold, turn the screws counterclockwise; if it runs too hot, turn them clockwise. Adjust in small increments (about 1/8 of a turn).
How do I calibrate the thermostat on a Frigidaire oven?
Press and hold the Bake button until “Cal” appears on the display. Use the arrow buttons to adjust the temperature in 10-degree increments—increase if your oven runs cold, or decrease if it runs hot.
What temperature does the Keep Warm setting maintain?
The Keep Warm feature maintains a temperature of 170°F (77°C) and keeps food warm for up to 3 hours before automatically turning off.
How do I reset my Frigidaire Gallery oven?
To perform a reset, unplug the oven for a few minutes and then plug it back in. This hard reset can clear minor glitches or touchpad issues.
What is the Frigidaire Gallery series?
The Frigidaire Gallery line is a premium upgrade from basic models. It includes enhanced features, improved design, and offers more advanced functionality across appliances like ovens, refrigerators, and dishwashers.
Which oven mode is best for baking?
Use conventional heating for baking cakes. For cookies or brownies, a convection setting (fan-assisted heat) may give better results. Test different settings for your preferred bakes.

