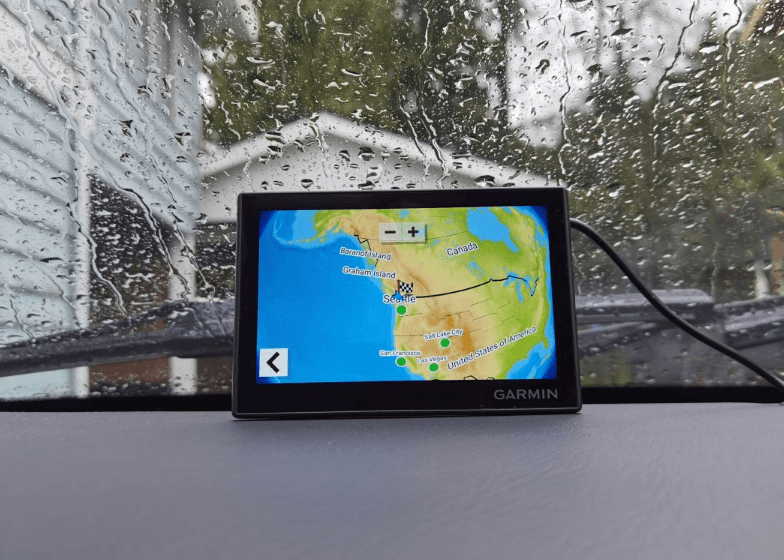
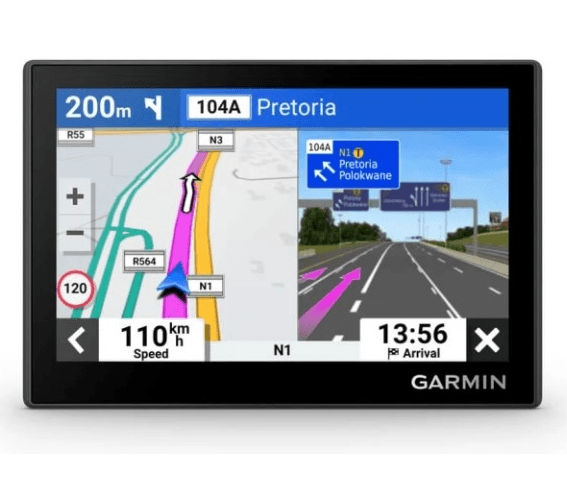
Garmin Drive 53 GPS Navigator
Getting Started
- Update the maps and software on your device.
- Mount the device in your vehicle and connect it to power.
- Acquire GPS signals.
- Adjust the volume.
- Navigate to your destination.
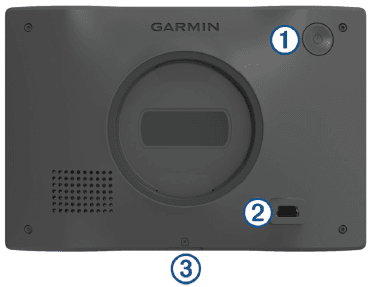
Garmin Drive 53 Device Overview
- Power key
- USB power and data port
- Map and data memory card slot
Mounting Considerations
Do not mount the device in a location that obscures the driver’s view of the road.
WARNING
It is your responsibility to ensure the mounting location complies with all applicable laws and ordinances and does not block your view of the road during the safe operation of your vehicle.
Choose a location that allows you to route the power cable safely.
When installing the device in a vehicle, install the device and power cable securely so they do not interfere with the vehicle’s operating controls. Interference with the vehicle’s operating controls can result in a collision, which could result in injury or death.
Choose a location that is within easy reach.
Thoroughly clean the windshield before installing the mount.
Mounting and Powering the Garmin Drive Device in Your Vehicle
WARNING
This product contains a lithium-ion battery. To prevent the possibility of personal injury or product damage caused by battery exposure to extreme heat, store the device out of direct sunlight.
Before you use your device on battery power, you should charge it.
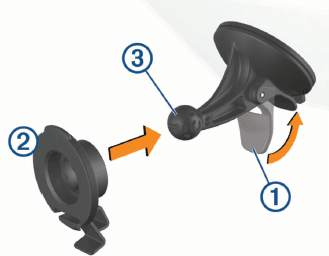
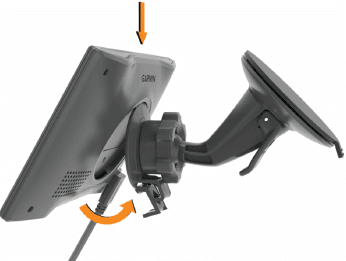
- Press the suction cup to the windshield and flip the lever 1 back toward the windshield.

- Press mount 2 onto the suction cup ball 3 until it snaps into place.
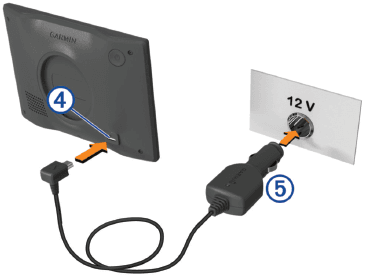
- Plug the vehicle power cable into USB port 4 on the device.

- Plug the other end of the vehicle power cable 5 into a power outlet in your vehicle.
- Fit the tab on the top of the mount into the slot on the back of the device and press the bottom of the mount into the device until it clicks.

Turning the Device On or Off
- To turn the device on, press the power button 1 or connect the device to power.
- To put the device in power saving mode, press the power button while the device is on.
While in power saving mode, the screen is off and the device uses very little power, but it can wake instantly for use.
TIP: You can charge your device faster by putting it in power-saving mode while charging the battery.
- To turn off the device completely, hold the power button until a prompt appears on the screen and select Off.
The prompt appears after five seconds. If you release the power button before the prompt appears, the device enters power saving mode.
Enabling or Disabling Sounds and Audio Sources
You can turn specific audio sources and system sounds on or off without affecting other audio sources.
- Select Volume.
- In the Sounds section, select an option:
- To enable the device to speak navigation prompts and directions, select the Spoken Navigation check box.
- To enable the device to speak traffic alerts and prompts, select the Spoken Traffic Alerts check box.
- To enable the device to play a tone when a driver awareness alert is triggered, select the Alerts and Tones check box.
- To enable the device to play a sound when you touch on-screen buttons, select the Button Presses check box.
Adjusting the Screen Brightness
- Select Settings > Display > Brightness.
- Use the slider bar to adjust the brightness.
Driver Awareness Features and Alerts
CAUTION
The driver alerts and speed limit features are for information only and do not replace your responsibility to abide by all posted speed limit signs and to use safe driving judgment at all times. Garmin® is not responsible for any traffic fines or citations you receive for failing to follow all applicable traffic laws and signs.
Your device provides features that can help encourage safer driving and increase efficiency, even when you are driving in a familiar area. The device plays an audible tone or message and displays information for each alert. You can enable or disable the audible tone for some types of driver alerts. Not all alerts are available in all areas.
Schools: The device plays a tone and displays the speed limit (if available) for an upcoming school or school zone.
Speed limit exceeded: The device displays a red border on the speed limit icon when you exceed the posted speed limit for the current road.
Speed limit reduced: The device plays a tone and displays the upcoming speed limit so you can be prepared to adjust your speed.
Wrong way on a one-way street: The device plays a message and displays a full-screen warning if you travel the wrong way on a one-way street. The edges of the screen appear red and an alert remains at the top of the screen until you leave the one-way street or correct your direction of travel.
Railroad crossing: The device displays the distance to an upcoming railroad crossing.
Animal crossing: The device plays a tone to indicate an upcoming animal crossing area.
Curves: The device plays a tone to indicate a bend in the road.
Slower traffic: The device plays a tone to indicate slower traffic when you approach slower traffic at a higher speed. Your device must be receiving traffic information to use this feature.
Construction zone: The device plays a tone and displays a message when you approach a construction zone.
Lane closure: The device plays a tone and displays a message when you approach a lane closure.
Break planning: The device plays a tone and suggests upcoming rest stops after you have been driving for a long time.
Enabling or Disabling Driver Alerts
You can enable or disable several types of driver alerts.
- Select Settings > Driver Assistance > Driver Alerts.
- Select or clear the check box next to each alert.
Your Route on the Map
As you travel, the device guides you to your destination using voice prompts and information on the map. Instructions for your next turn or exit, or other actions appear across the top of the map.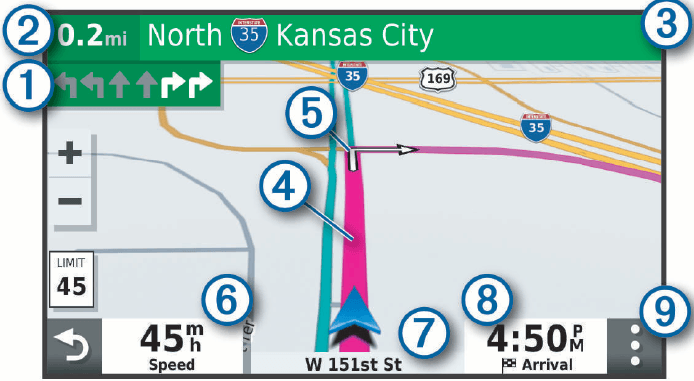
- Next action in the route. Indicates the next turn, exit, or other action and the lane in which you should travel, if available.
- Distance to the next action.
- Name of the street or exit associated with the next action.
- The route is highlighted on the map.
- Next action in the route. Arrows on the map indicate the location of upcoming actions.
- Vehicle speed.
- Name of the road on which you are traveling.
- Estimated arrival time. TIP: You can touch this field to change the information it shows.
- Map tools. Provides tools to show you more information about your route and surroundings.
Traffic
NOTICE
Garmin is not responsible for the accuracy or timeliness of the traffic information.
Your device can provide information about traffic on the road ahead or on your route. You can set your device to avoid traffic when calculating routes and to find a new route to your destination if a large traffic delay occurs on your active route. The traffic map allows you to browse the map for traffic delays in your area.
To provide traffic information, your device must be receiving traffic data.
- All product models can receive traffic data using an over-the-air traffic receiver accessory. Go to your product page at garmin.com to find and purchase a compatible traffic receiver accessory.
Traffic data is not available in all areas. For information about traffic coverage areas, go to garmin.com/traffic.
Receiving Traffic Data Using a Traffic Receiver
NOTICE
Heated (metallized) windshields could degrade the performance of the traffic receiver.
A traffic receiver receives traffic data from an over-the-air broadcast signal, where available. To receive over-the-air traffic data, the device must be connected to vehicle power using a traffic-compatible power cable. A traffic receiver is included with some product models. If your product model does not include a traffic receiver, you can go to your product page at garmin.com to find and purchase a compatible traffic receiver cable accessory.
Traffic data is not available in all areas. For information about traffic coverage areas, go to garmin.com/traffic.
Connect the device to vehicle power using the traffic-compatible power cable.
If your product model includes traffic data, the vehicle power cable included with your device is traffic compatible. If you purchased a traffic receiver cable as an accessory, you should use the accessory cable to connect the device to the vehicle’s power.
When you are within a traffic coverage area, your device can display traffic information and help you avoid traffic delays.
Enabling Traffic
Before you can enable traffic, you must connect your device to a compatible traffic receiver cable.
You can enable or disable traffic data.
- Select Settings > Traffic.
- Select the Traffic check box.
Settings
Map and Vehicle Settings
Select Settings > Map Display.
Map Vehicle Icon: Sets the vehicle icon that represents your position on the map.
Driving Map View: Sets the perspective on the map.
Map Detail: Sets the level of detail on the map. More detail may cause the map to draw more slowly.
Map Theme: Changes the color of the map data.
Map Layers: Sets the data that appears on the map page.
myMaps: Sets which installed maps the device uses.
Enabling Maps
You can enable map products installed on your device.
TIP: To purchase additional map products, go to buy.garmin.com.
- Select Settings > Map Display > myMaps.
- Select a map.
Navigation Settings
Select Settings > Navigation.
Calculation Mode: Sets the route calculation method.
Avoidances: Sets road features to avoid on a route.
Custom Avoidances: Allows you to avoid specific roads or areas.
Restricted Mode: Disables all functions that require significant operator attention.
GPS Simulator: Stops the device from receiving a GPS signal and saves battery power.
Calculation Mode Settings
Select Settings > Navigation > Calculation Mode.
The route calculation is based on road speeds and vehicle acceleration data for a given route.
Faster Time: Calculates routes that are faster to drive but can be longer in distance.
Straight Line: Calculates a direct line from your location to your destination.
Device Information
Viewing E-label Regulatory and Compliance Information
- From the settings menu, swipe to the bottom of the menu.
- Select Device > Regulatory.
Charging the Device
NOTE: This Class III product shall be powered by an LPS power supply.
You can charge the battery in the device using any of these methods.
- Connect the device to vehicle power.
- Connect the device to an optional power adapter accessory, such as a wall power adapter.
You can purchase an approved Garmin AC-DC adapter suitable for home or office use from a Garmin dealer or at www.garmin.com. The device may charge slowly when connected to a third-party adapter.
Device Maintenance
Garmin Support Center
Go to support.garmin.com for help and information, such as product manuals, frequently asked questions, videos, and customer support.
Map and Software Updates
For the best navigation experience, you should keep the maps and software on your device up to date.
Map updates provide the newest available changes to roads and locations in the maps used by your device. Keeping maps up to date helps your device find recently added locations and calculate more accurate routes. Map updates are large and may take several hours to complete.
Software updates provide changes and improvements to the device features and operation.
Updating Maps and Software with Garmin Express™
You can use the Garmin Express application to download and install the latest map and software updates for your device.
- If you do not have the Garmin Express application installed on your computer, go to garmin.com/express and follow the on-screen instructions to install it.
- Open the Garmin Express application.
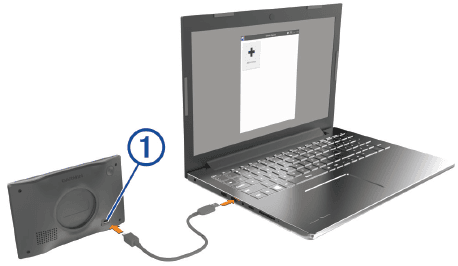
- Connect your device to your computer using a USB cable. The small end of the cable connects to USB port 1 on your Garmin Drive device, and the large end connects to an available USB port on your computer.

- From your Garmin Drive device, select Tap to Connect to Computer.
- When your Garmin Drive device prompts you to enter file transfer mode, select Continue.
- In the Garmin Express application, click Add a Device. The Garmin Express application searches for your device and displays the device name and serial number.
- Click Add Device and follow the on-screen instructions to add your device to the Garmin Express application. When setup is complete, the Garmin Express application displays the updates available for your device.
- Select an option:
- To install all available updates, click Install All.
- To install a specific update, click View Details and click Install next to the update you want.
The Garmin Express application downloads and installs the updates onto your device. Map updates are very large, and this process may take a long time on slower internet connections.
NOTE: If a map update is too large for the internal storage of the device, the software may prompt you to install a microSD® card in your device to add storage space.
- Follow the on-screen instructions during the update process to finish installing updates. For example, during the update process, the Garmin Express application may instruct you to disconnect and reconnect your device.
Installing Garmin Express
The Garmin Express application is available for Windows® and Mac® computers.
- On your computer, go to garmin.com/express.
- Select an option:
- To view the system requirements and verify the Garmin Express application is compatible with your computer, select System Requirements.
- To install on a Windows computer, select Download for Windows.
- To install on a Mac computer, select Download for Mac.
- Open the downloaded file and follow the on-screen instructions to complete the installation.
Cleaning the Outer Casing
NOTICE
Avoid chemical cleaners and solvents that can damage plastic components.
- Clean the outer casing of the device (not the touchscreen) using a cloth dampened with a mild detergent solution.
- Wipe the device dry.
Cleaning the Touchscreen
- Use a soft, clean, lint-free cloth.
- If necessary, lightly dampen the cloth with water.
- If using a dampened cloth, turn off the device and disconnect the device from the power source.
- Gently wipe the screen with the cloth.
Avoiding Theft
- Remove the device and mount it out of sight when not in use.
- Remove the residue left on the windshield by the suction cup.
- Do not keep your unit in the glove compartment.
- Register your device using the Garmin Express software (garmin.com/express).
Restarting the Device
You can restart your device if it stops functioning.
Hold the power button for 12 seconds.
Troubleshooting
I cannot adjust the screen brightness on my device
If your Garmin Drive device is not supplied with enough power, the screen does not display at full brightness.
- Verify that your vehicle is turned on and is supplying power to the power outlet.
- Verify the Garmin Drive device is connected to vehicle power using the included vehicle power cable and the included vehicle power adapter.
The suction cup will not stay on my windshield
- Clean the suction cup and windshield with rubbing alcohol.
- Dry with a clean, dry cloth.
- Mount the suction cup.
My device is not acquiring satellite signals
- Verify that the GPS simulator is turned off.
- Take your device out of parking garages and away from tall buildings and trees.
- Remain stationary for several minutes.
Purchasing Additional Maps
- Go to your device product page at garmin.com.
- Click the Maps tab.
- Follow the on-screen instructions.
Purchasing Accessories
Optional accessories are available at garmin.com or from your Garmin dealer.
For more Manuals by Garmin, visit ManualsLibraryy
Garmin Drive 53 GPS Navigator-FAQs
Does the Garmin Drive 53 come with free map updates?
Yes, the Garmin Drive 53 offers free map updates up to three times a year with no subscription or additional fees. You can check for updates by connecting the device to your computer via Garmin Express.
Is the Garmin Drive 53 waterproof?
No, the Garmin Drive 53 itself is not waterproof. However, accessories like the Koah Weatherproof Hard Case, rated IP67, can protect it from water and dust if needed.
Can I replace the battery in the Garmin Drive 53?
No, the battery is built-in and not user-replaceable. It uses a rechargeable lithium-ion battery designed to work seamlessly with the device.
Does Garmin Drive 53 require Wi-Fi to work?
No, the device can display maps and provide navigation without Wi-Fi or cellular data. However, some online features like wind overlays or data syncing may require a data connection if Wi-Fi is unavailable.
Does the Garmin Drive 53 have Bluetooth?
Yes, it supports Bluetooth and can connect to the Garmin Drive app on a compatible smartphone to access features like Live Traffic.
Are software updates automatic on the Garmin Drive 53?
Yes, software updates are downloaded automatically when the device is connected to the Garmin Connect app on your phone.
Does the Garmin Drive 53 provide traffic updates?
Yes, the device offers real-time traffic alerts and can reroute you to avoid delays. Traffic settings can be customized in the menu.
Does the Garmin Drive 53 support voice commands?
Yes, it features voice-activated controls, allowing for hands-free use while driving.

