


GE Profile Smart Mixer with Auto Sense

IMPORTANT SAFETY INFORMATION
READ ALL INSTRUCTIONS BEFORE USING THE APPLIANCE
WARNING: The appliance is designed for household use and may only be operated in accordance with these instructions for use. Always handle with care and warn other users of potential danger. Failure to follow these instructions can result in death, fire, electric shock, or personal injury. Always follow these safety precautions when using this appliance.
Read all instructions before using
- DO NOT immerse the appliance in water or any other liquids. This will damage the appliance and pose a risk of an electric shock.
- Use only a 120 V, 60 Hz standard electrical supply that is properly grounded in accordance with the National Electric Code and local codes and ordinances.
- Make sure the appliance is set up on a flat and steady surface.
- Turn the appliance OFF, then unplug from the outlet when not in use, before assembling or disassembling parts, and before cleaning. To unplug, grasp the plug and pull from the outlet. Never pull from the power cord.
- Avoid contact with moving parts. Keep hands, hair, clothing, as well as spatulas and other utensils, away from attachments (beaters, whisks, dough hook, etc.) during operation to reduce the risk of injury to persons or damage to the mixer.
- Do not use outdoors.
- Use this product only for its intended purpose as described in this user manual.
- The use of attachments not recommended or sold by the manufacturer may cause fire, electric shock or injury.
- This appliance is not intended for use by persons (including children) with reduced physical, sensory, or mental capabilities, or lack of experience and knowledge, unless they are closely supervised and instructed concerning use of the appliance by a person responsible for their safety. Close supervision is necessary when any appliance is used by or near children. Children should be supervised to ensure that they do not play with the appliance.
- Do not allow children to touch the appliance or the power cord during operation.
- DO NOT let the appliance run unattended.
- Allow to cool before putting on or taking off parts, and before cleaning the appliance.
- To reduce the risk of fire or electric shock, do not attempt to disassemble, repair, modify, or replace any part of your product.
- If the power cord is damaged, it must be replaced by the manufacturer. DO NC replace the power cord on your own.
- Do not operate any appliance with a damaged cord, plug, or after the appliance malfunctions, is dropped, or is damaged in any manner. Contact GE Appliances at the website listed in the Contact Us section for information on examination, repair, or adjustment.
Always follow these safety precautions when using this appliance.
- DO NOT use an extension power cord.
- Do not let the cord hang over the edge of the table or counter.
- Do not let the cord contact a hot surface, including the stove.
- Remove the beater, whisk, and dough hook from the appliance before washing.
- Use caution when mixing hot ingredients to avoid splashing and burns.
- Do not exceed the maximum capacity as indicated on the accessories (bowl). Follow the quantities, processing time, and speed when using the smart mixer tools, as indicated in the user manual.
- Do not lift the appliance from the Bowl Carrier when the Bowl Lift Arms are in the down position.
SAVE THESE INSTRUCTIONS
Getting Started
Before First Use
Read all safety instructions before the first use. Be sure to clean your smart mixer as listed in the Care and Cleaning section of this manual. Thoroughly clean the parts that come into contact with food before you use the appliance for the first time. Refer to the instructions and table for cleaning given in the user manual. For household use only.
Electrical Requirements
Voltage: 120 A.C. only. Frequency 60 Hz. The wattage rating for the smart mixer is printed on the serial plate. Do not use an extension cord. The maximum electrical rating is based on the attachment that uses the highest amperage.
Mixing Bowl Notes
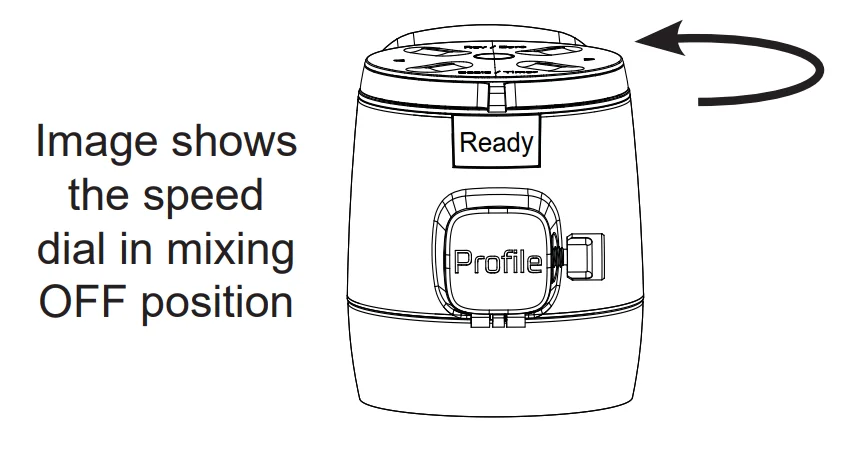
Turn the speed dial to the mixing OFF position before starting. Follow the recommended quantities, processing time, and speed as indicated in this owner’s manual. DO NOT exceed the suggested processing speed; doing so could harm the appliance.
Controls
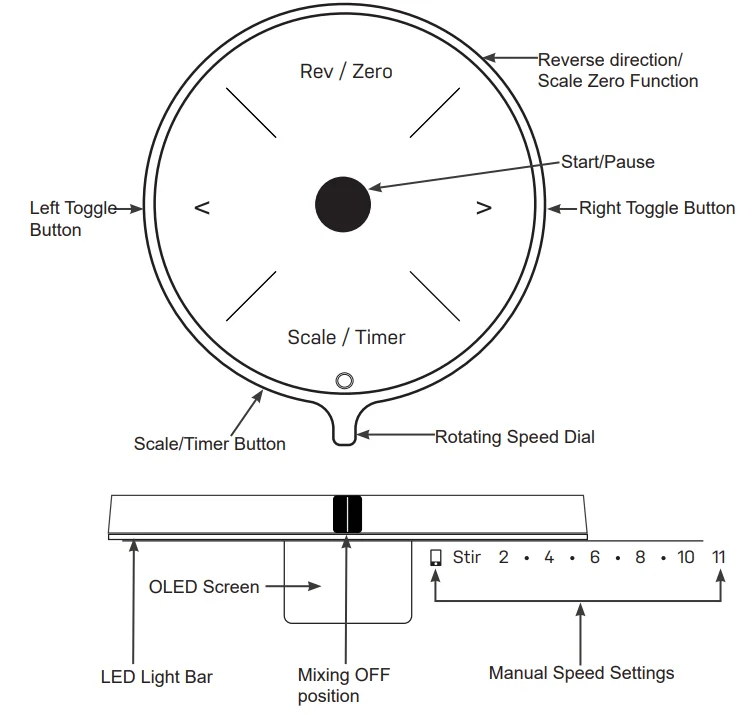
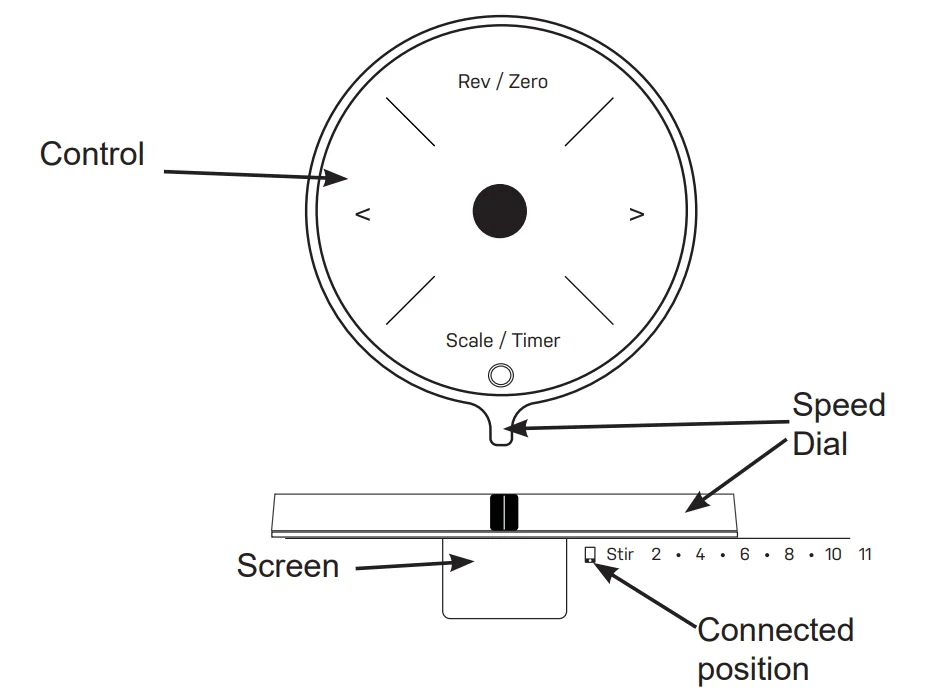
Use the speed dial to select your desired speed.
NOTE: The Rev/Zero and Scale/Timer buttons are one single button with two functions that should be pressed in the middle.
NOTE: Make sure the speed dial is off when not in use, before unplugging, and before locking the
bowl lift. See page 8 for mixing chart.
Parts Included
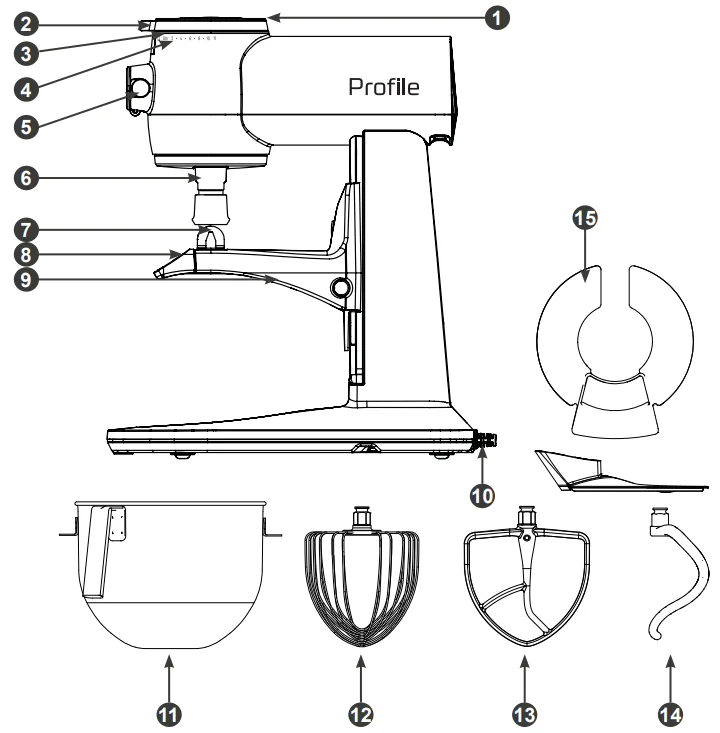
- Control Panel
- Speed Dial
- OLED Screen and LED Progress Light Bar
- Speed Settings
- Accessory Port
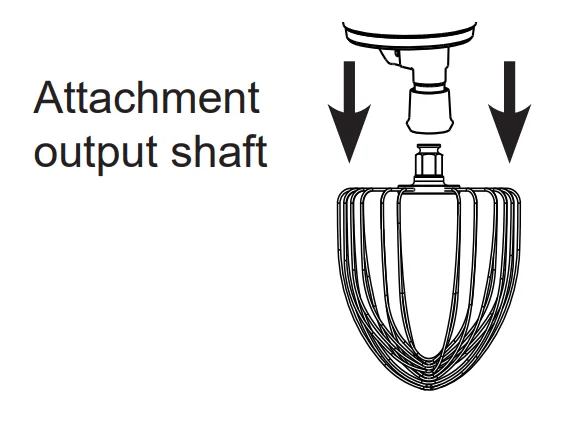
- Attachment output shaft
- Bowl Pins
- Bowl Lift Arms
- Bowl Carrier
- Power Cord
- Bowl
- 11-Wire Whisk
- Commercial Grade Stainless Steel Beater
- Commercial Grade Stainless Steel Dough Hook
- Bowl Shield
Speed Chart
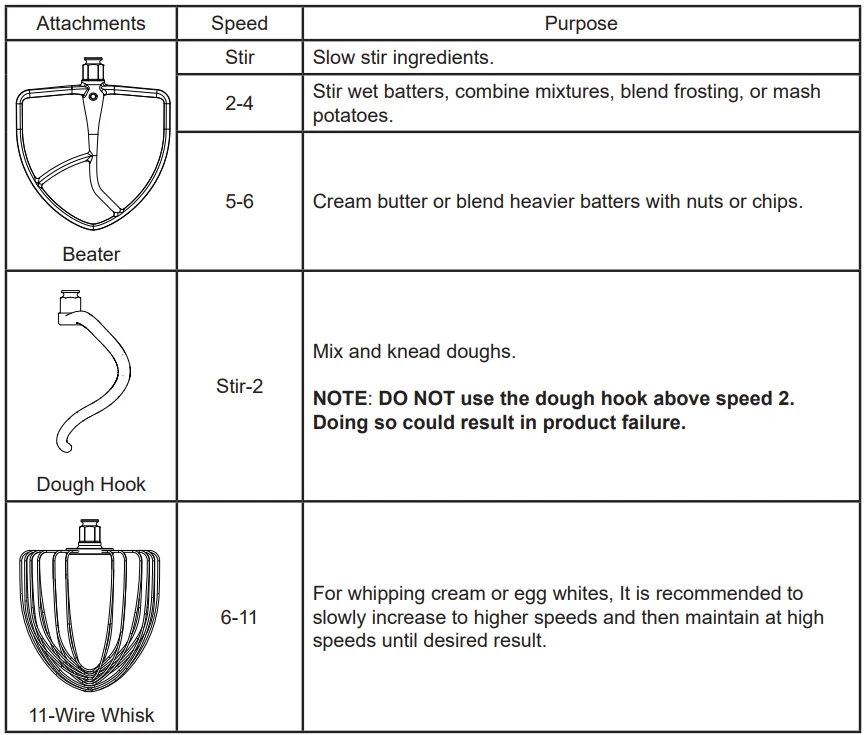
NOTE: DO NOT use the reverse function with third-party attachments.
NOTE: The Profile Smart Mixer is compatible with KitchenAid® attachments.
Tips
To avoid splatter, always increase speed gradually.
Batter
When making cake batter with the beater attachment, be careful not to overbeat the batter. This can add extra air into the batter and cause the cake to mound in the center and crack while baking.
Whisking
Always make sure your bowl and attachments are clean and dry when you are whisking egg whites or whipping cream. The weather can affect your egg whites. Humidity can make it difficult to
create the stiff white peaks due to moisture in the air. A great way to create whipping cream is to chill the 11-wire whisk and bowl in your refrigerator for 20-30 minutes before whisking.
Dough
It is sometimes helpful to start blending your dough with the beater attachment until a loose dough is formed. Then, switch the beater for the dough hook. This is not a required step, but it can be helpful with wet doughs. Make sure to stay at the recommended dough speed to prevent over-kneading. Use the dough hook to knead yeast dough for bread and pizzas. Frequent scraping of the bowl will prevent the dough from sticking to the bottom of the bowl or climbing the dough hook, especially when you have a very wet dough.
Using your Smart Mixer
Appearance may vary slightly
- Make sure the mixer is unplugged and turned off.

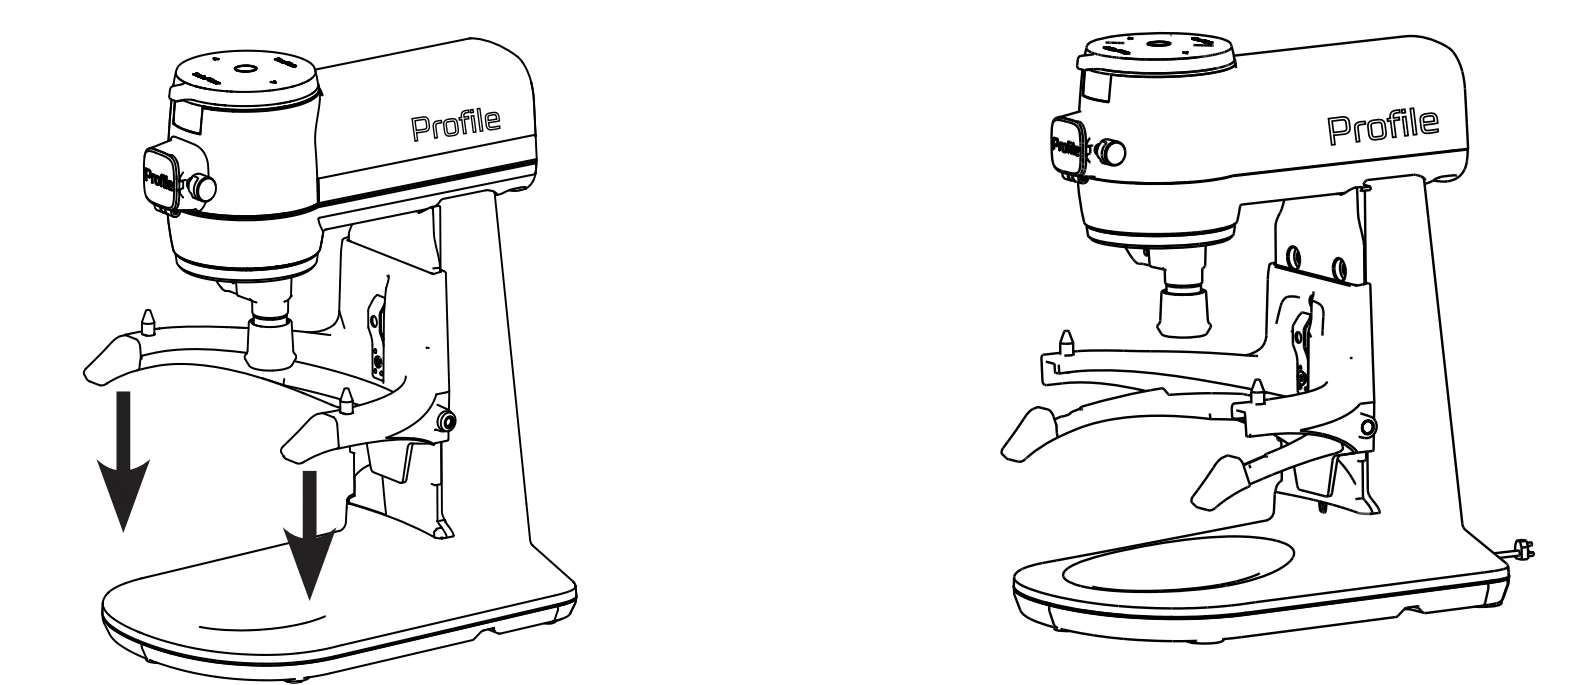
- Lower the bowl lift arms by pressing down on the lift arms.

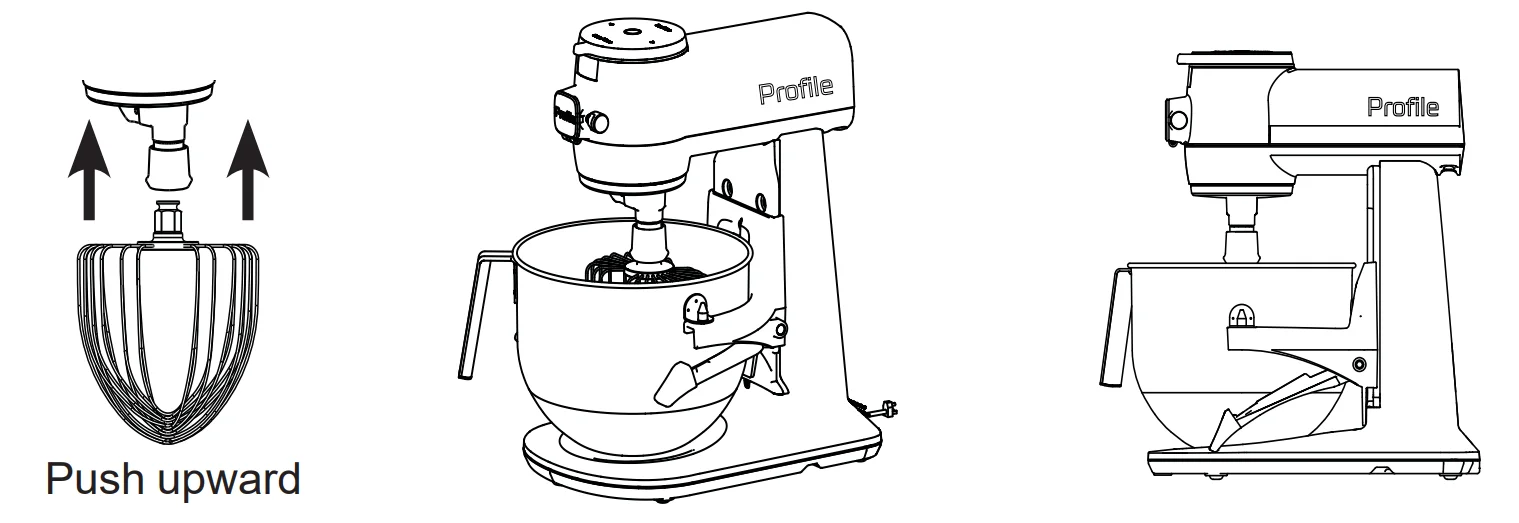
- Place the bowl into the bowl arms and align on pins. Push the bowl back towards the mixer body until it clicks into place.

- Insert your desired attachment. Push the attachment upward into the output shaft until a click is heard and the attachment is held firmly in place. This may require a slight turn to lock into place. See the speed chart on page 9 for a guide on attachment use.

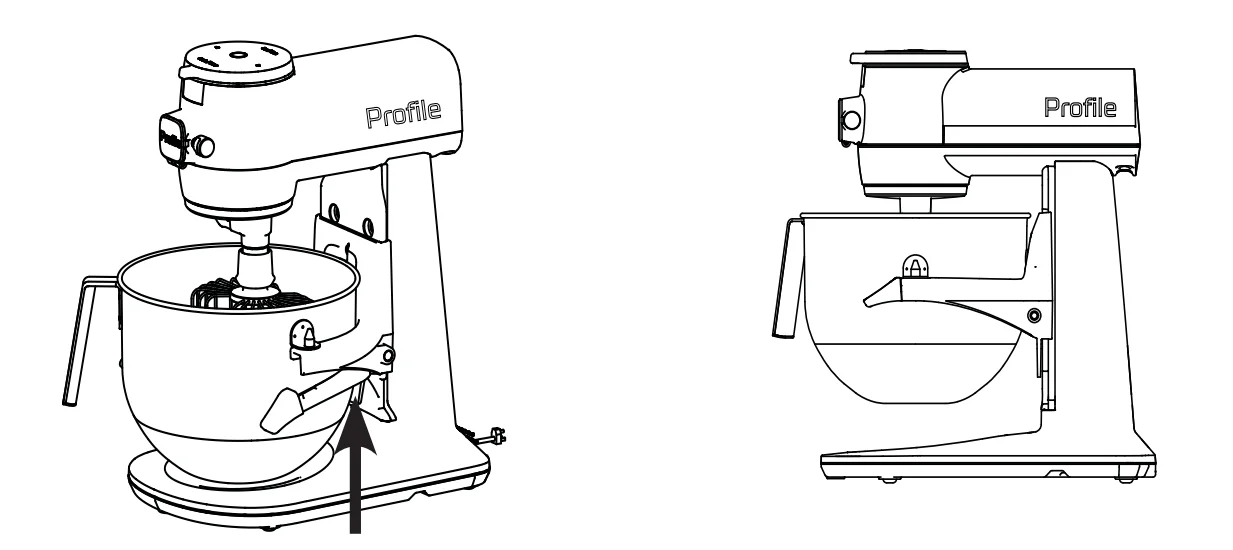
- When the bowl and arms are in place, raise the bowl arms by slowly pushing up on the arms until they lock into place.

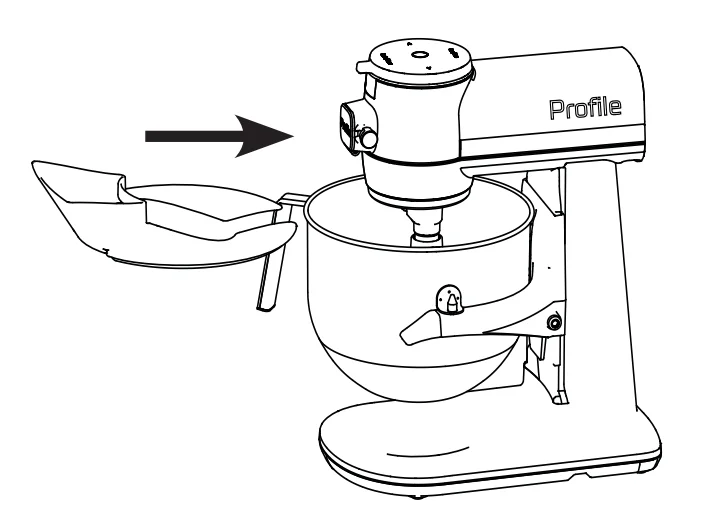
- Slide the bow shield onto the bow if desired.

- Plug the mixer into an outlet.

- Use the speed dial and turn to your desired speed. When finished, turn back to the mixing OFF position.

- Pull down on the quick change to release your attachment.

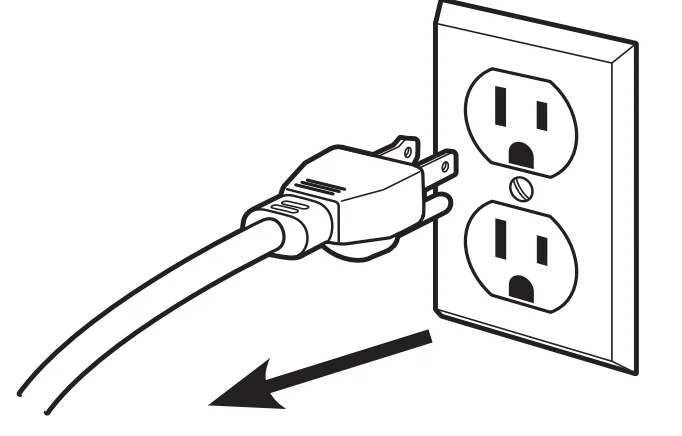
- Unplug the mixer from the outlet.




Smart Mixer Settings
NOTE: If your smart mixer is plugged in and not turned on, press any button to wake up the machine.
Speed Control
The Speed Control allows the user to set their speed by rotating the speed dial between stir and 11. “Ready” will appear on the screen when the mixer is turned on. The speed will appear on the screen when the speed dial is turned. When finished, rotate the speed dial back to the mixing OFF position, and OFF will appear on the screen.
Pause
Press the center button to pause during your mix cycle.
Reverse
At any time during Manual Speed Control mode, the mixer direction can be reversed. Press the Rev/Zero button to reverse the direction. An “R” will appear on the screen next to the speed.
Smart Mixer Settings
NOTE: If your smart mixer is plugged in and not turned on, press any button to wake up the machine.
Scale

The Manual Scale mode measures the amount of ingredients in grams/iblkgloz. The direct weight can be taken in the mixer bowl or in any container on the base of the smart mixer. To start, in the mixing OFF position, press. The ScalefTimer Button. The light bar will show yellow. Make sure the screen shows zero before weighing your ingredients. Then the screen will read the weight. Example: “200g”. To zero the scale feature, press the Rev/Zero button. The Smart mixer screen will show” while it is setting to zero. Then “0g” will show on the screen when it is complete. If the screen does not show zero, press the ReviZero button to reset. Make sure the screen shows zero before weighing your ingredients. Use the toggle arrows when using the scale to change the scale’s units.
Timer

Press the Timer button to initiate the Timer setting. The screen will briefly read “Timer,” then switch to 00:00. The light bar will show blue. Use the left and right arrows to set the timer to your desired mix time. Press the center button to start the timer. To cancel the timer when the unit is not mixing, rotate the speed dial to any position on the right and back quickly.
NOTE: The Timer increases at 15-second increments with a single press. Press and hold the Scale/Timer button to increase by 1-minute increments.
Auto Shutoff
After starting the timer, turn the speed dial to the desired mixing speed. The automatic shutoff feature turns the Smart Stand Mixer off when the timer ends for extra convenience and perfectly executed recipes.
NOTE: Time can be added while the timer is running.
Control Lock

To lock the control panel and dial, press and hold the left and right arrows at the. same time for 3 seconds. The light bar will show white. Use the same action to unlock.
WiFi Connect
Download the SmartHQ™ app from the App Store or Google Play. Rotate the speed dial to the connected icon and follow the directions within the SmartHQ™ app to get connected. Once connected, follow the directions within the app for how to use the Smart Features.
Over-the-air (OTA) updates
With over-the-air updates, you get new features like Auto Sense and Guided Recipes as they become available, so the smart mixer keeps getting better with time.
NOTE: If the LED ring shows red, please see the troubleshooting section.
Smart Features
Your Smart mixer is equipped with smart features to enhance your baking and cooking experience. Download the SmartHQ™ app from the App Store or Google Play to access these features.
Auto Sense Technology
Actively monitors changes in texture and viscosity through motor torque feedback to optimize mixing performance. Over-mixing and undermixing fails are no longer a risk in recipes” that previously required intuition and experience, as an automatic shut-off feature will turn the mixer off when completion is reached (*Based on recipes available in the app. Recipes will continue to be added and updated over time.) Follow the directions provided in the SmartHQ™ app.
Adjusting the Bowl Height

- Unplug the mixer from the outlet.
- Make sure the bowl arms are down.
- Attach your desired attachment.
- Turn the bowl lift screw behind the bowl with a flathead screwdriver to raise and lower the bowl height. You want your attachment to sit right above the bottom of the bowl. The attachment should not touch the bowl. Turn the screw counterclockwise to raise the bowl and clockwise to lower the bowl.
- Once your bowl is in the desired position, push the bowl arms up.
Connected Guided Recipes
The Connected Guided Recipes feature provides recipes and steps on how to complete each recipe. Use the SmartHQ app for guided recipes.
Care and Cleaning
WARNING: Unplug the appliance before cleaning. Refer to the table below before cleaning the parts with water, a damp cloth, or using any parts in the dishwasher. DO NOT soak attachments in acidic liquid. Failure to do so can result in death, fire, electrical shock, or personal injury
- Clean the main unit with a damp cloth.
- Clean the other parts in hot water, either in the sink or dishwasher, after referring to the table.
- Store the appliance in a dry place after cleaning.

Attachment Output Shaft Cleaning Tips:

- Wipe down the attachment output shaft after each use to remove excess flour.
- For dry ingredients, use a warm, damp cloth to gently wipe down the exterior and remove any dust that might remain.
- For wet ingredients, use a warm, damp, soapy cloth to gently wipe down the exterior and any dough that might remain.
- To ensure the full range of motion is cleaned, pull the attachment output shaft down and clean the revealed surface.
- Use a cleaning brush to remove any dough that may have blocked the attachment output shaft.
NOTE: Attachment must be inserted into the attachment output shaft for full range of motion.
Troubleshooting


GE Appliances Limited Warranty
If your appliance fails to operate properly while in use under normal household conditions within the warranty period, visit geappliances.com/contact for product care/maintenance self-help. To initiate a warranty claim, please visit geappliances.com/contact or call 1-800-GECARES. Please have your model number and serial number available. Return and packing instruction information will be provided at that time.

What GE Appliances Will Not Cover:
- Service trips to your home.
- Improper installation, delivery, or maintenance.
- Failure of the product if it is abused, misused, or used for other than the intended purpose, or used commercially.
- Replacement of house fuses or resetting of circuit breakers.
- Damage caused after delivery.
- Damage to the product caused by accident, fire, floods, or acts of God.
- Incidental or consequential damage caused by possible defects with this appliance.
- Labor and other charges to install and/or remove the product
EXCLUSION OF IMPLIED WARRANTIES
Your sole and exclusive remedies are product exchange or refund as provided in this Limited Warranty. Any implied warranties, including the implied warranties of merchantability or fitness for a particular purpose, are limited to one year or the shortest period allowed by law.
For US Customers: This limited warranty is extended to the original purchaser for products purchased for home use within the USA. In Alaska and Hawaii, the limited warranty does not include the costs of shipping units. Some states do not allow the exclusion or limitation of incidental or consequential damages. This limited warranty gives you specific legal rights, and you may also have other rights which vary from state to state. To know what your legal rights are, consult your local or state consumer affairs office or your state’s Attorney General.
- Warrantor: GE Appliances, a Haier company, Louisville, KY 40225
For Customers in Canada: This limited warranty is extended to the original purchaser and any succeeding owner for products purchased in Canada for home use within Canada. In-home warrant service will be provided in areas where it is available and deemed reasonable by Mabe to provide. For extended warranty information, visit geappliances.ca/purchase-extended-warranty
- Warrantor Canada: MC Commercial, Burlington, Ontario, L7R 586
Consumer Support
Service and Registration
Register your new appliance online at your convenience! Timely product registration will allow for enhanced communication and prompt service under the terms of your warranty, should the need arise.
- Register your appliance at GEAppliances.com/register.
- In Canada, geappliances.ca/after-sales-support
Contact Us
If you are not satisfied with the service you receive from GE Appliances, contact us on our website with all the details, including your phone number, or write to:
- In the US: General Manager, Customer Relations | GE Appliances, Appliance Park | Louisville, KY 40225
GEAppliances.com/contact - In Canada: Director, Consumer Relations, MC Commercial Inc. | Suite 310, 1 Factory Lane | Moncton, N.B. E1C 9M3
GEAppliances.ca/contact-us
For more manuals by GE Appliances, visit ManualsLibraryy
GE Profile Smart Mixer with Auto Sense-FAQs
What is the GE Profile Smart Mixer with Auto Sense?
The GE Profile Smart Mixer with Auto Sense is a smart kitchen mixer designed to simplify baking and cooking tasks. It uses built-in technology to detect changes in mixture texture and speed, helping users achieve more accurate mixing results with less effort.
How does the Auto Sense feature work?
The Auto Sense feature monitors the consistency of ingredients while mixing. It can automatically adjust the mixing speed and power to maintain smooth performance and improve recipe accuracy.
Is the GE Profile Smart Mixer better than KitchenAid?
Both brands are popular, but they focus on different strengths. KitchenAid is widely known for traditional mixing performance, while GE Profile emphasizes smart technology, connectivity, and automated features.
How is GE Profile different from regular GE appliances?
GE Profile appliances usually include smarter controls, enhanced designs, and additional convenience features. Standard GE appliances focus more on basic functionality and affordability.
Is GE Profile considered a premium appliance line?
GE Profile is known as GE’s advanced appliance series. It includes modern designs, smart technology features, and upgraded performance compared to standard GE appliances.
Does the mixer include multiple speed settings?
Yes, the GE Profile Smart Mixer offers several speed levels to handle different recipes and mixing needs, from slow stirring to high-speed whipping.
How do I connect the mixer to Wi-Fi?
To connect the mixer, download the SmartHQ app, create an account, and follow the pairing instructions in the app. Make sure your Wi-Fi network is active and the mixer is powered on during setup.
Is the GE Profile Smart Mixer good for baking?
Yes, it is well-suited for baking tasks such as mixing dough, batter, whipped cream, and cookie mixtures. Its automatic sensing technology helps deliver consistent results for home bakers.
Which app is used for the GE Profile Smart Mixer?
The mixer works with the SmartHQ mobile app. The app helps users manage smart features, follow step-by-step recipes, and connect other compatible GE appliances.
Can I connect the GE Profile Smart Mixer to my phone?
Yes, the mixer supports smartphone connectivity through the SmartHQ app. This allows users to access guided recipes, control settings, receive updates, and monitor the mixer from a mobile device.