
![]()
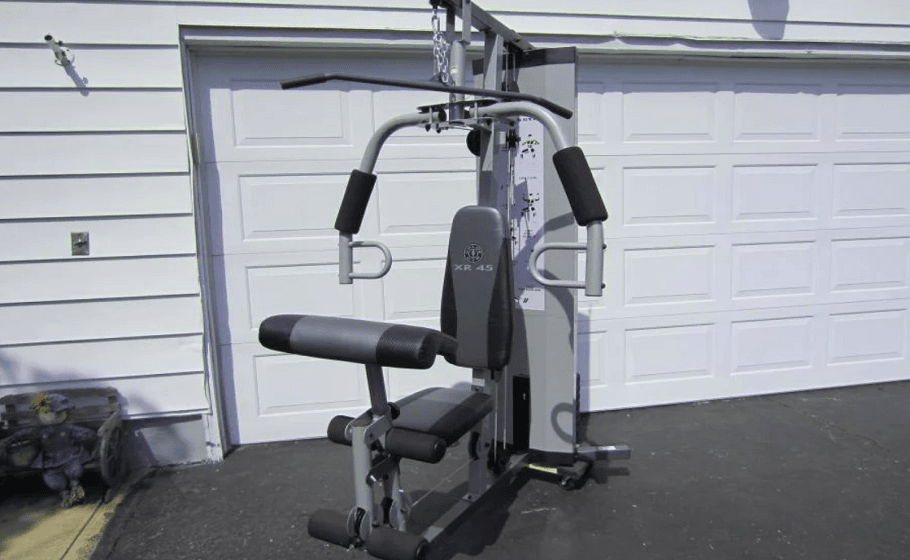
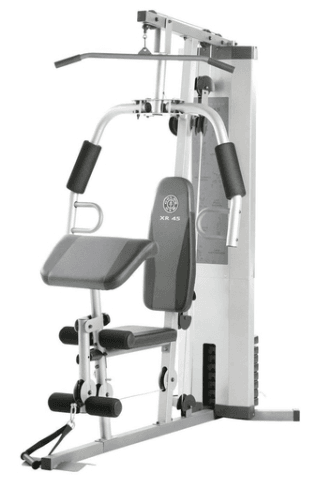
Gold’s Gym XR 45 Home Gym
BEFORE YOU BEGIN
- Before reading further, please review the drawing below and familiarize yourself with the parts that are labeled.

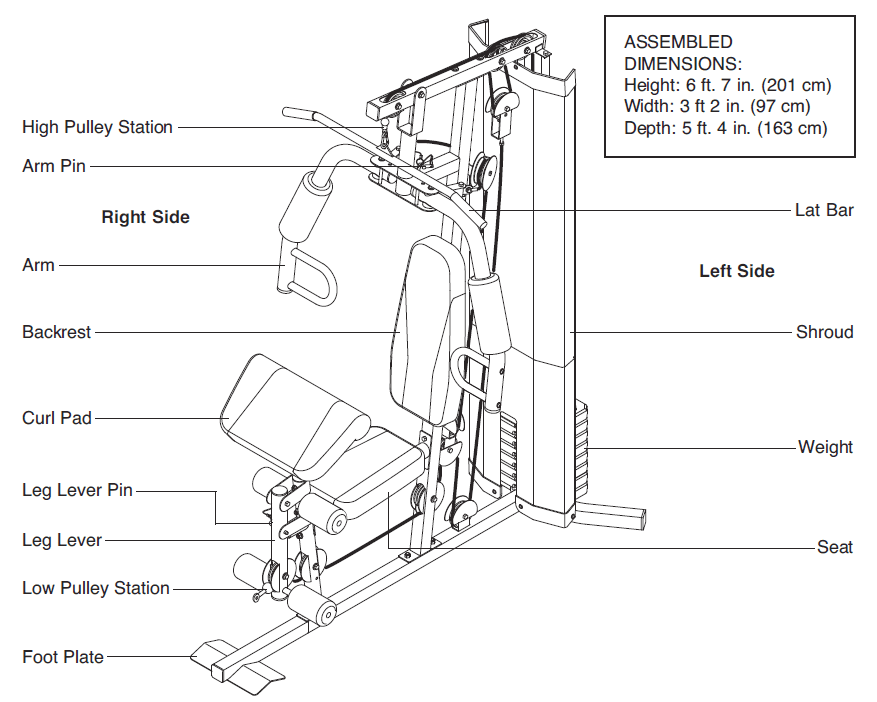
ASSEMBLY
The Four Stages of the Assembly Process
- Frame Assembly—You will begin by assembling the base and the uprights that form the skeleton of the weight system.
- Arm Assembly—During this stage, you will assemble the arms and the leg lever.
- Cable Assembly—During this stage, you will attach the cables and pulleys that connect the arms to the weights.
- Seat Assembly—During the final stage, you will assemble the seat and the backrest
Frame Assembly
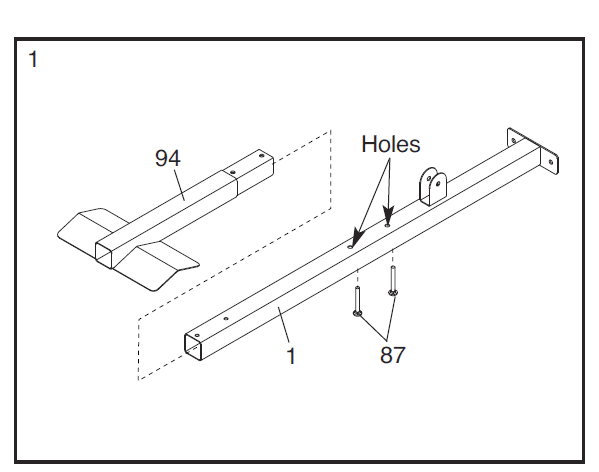
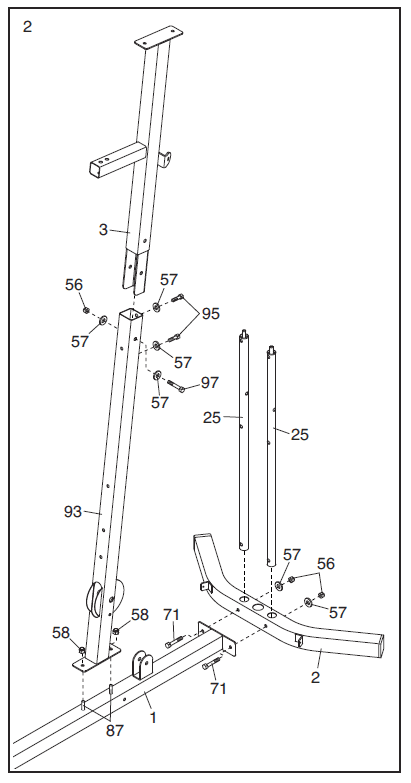
- Insert the Front Base (94) into the Base (1). Then, insert two M8 x 63mm Carriage Bolts (87) up into the indicated holes in the Base. Note: It may be helpful to place a piece of tape over the bolt heads to hold them in place

- Attach the Lower Weight Guides (25) and the Base (1) to the Stabilizer (2) with two M10 x 67mm Bolts (71), two M10 Washers (57), and two M10 Locknuts (56); firmly tighten the Locknuts. Insert the Upper Upright (3) into the Lower Upright (93). Attach the Upper Upright with an M10 x 65mm Bolt (97), two M10 x 20mm Screws (95), four M10 Washers (57), and an M10 Locknut (56). Attach the Lower Upright (93) to the Base (1) with the two indicated M8 x 63mm Carriage Bolts (87) and two M8 Locknuts (58). Do not tighten the Locknuts yet.

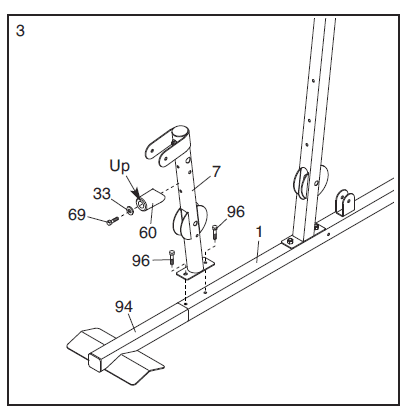
- Attach the Front Leg (7) to the Base (1) and to the Front Base (94) with two M8 x 20mm Screws (96). Do not tighten the Screws yet. Attach the Leg Bumper (60) to the Front Leg (7) with an M4 x 20mm Self-tapping Screw (69) and an M4 Washer (33). Make sure that the end of the Leg Bumper is pointing upward.

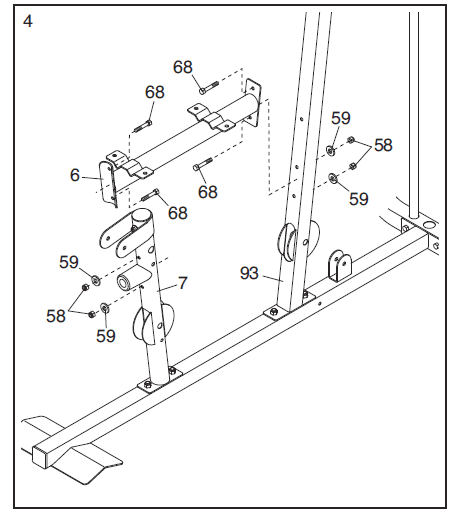
- Attach the Seat Frame (6) to the Lower Upright (93) with two M8 x 65mm Bolts (68), two M8 Washers (59), and two M8 Locknuts (58). Do not tighten the Locknuts yet. Attach the Seat Frame (6) to the Front Leg (7) in the same way.

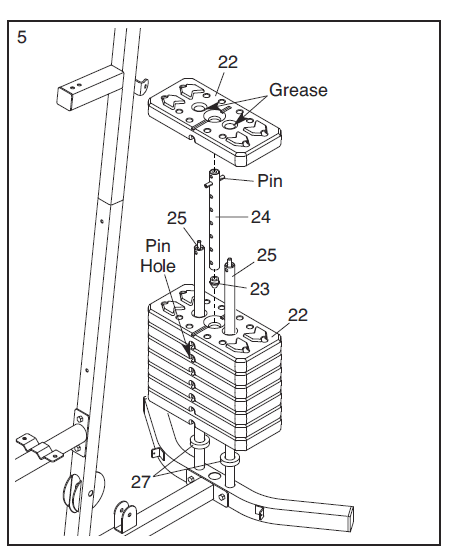
- Slide the two Weight Bumpers (27) onto the Lower Weight Guides (25). Orient seven Weights (22) so that the pin holes are on the bottom as shown. Slide the Weights onto the Lower Weight Guides (25).

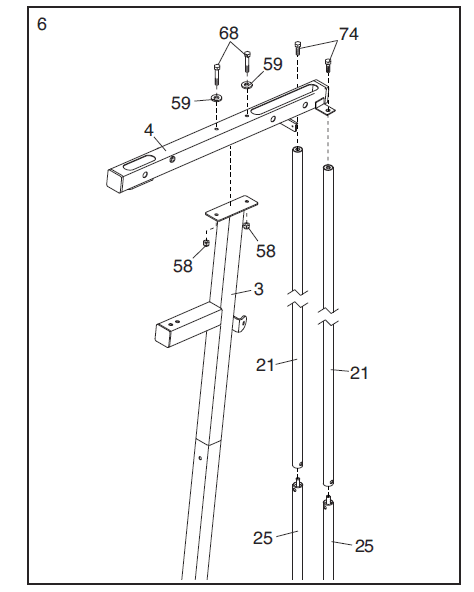
- Tighten the Upper Weight Guides (21) onto the Lower Weight Guides (25). Next, attach the Top Frame (4) to the Upper Upright (3) with two M8 x 65mm Bolts (68), two M8 Washers (59), and two M8 Locknuts (58). Do not tighten the Locknuts yet.

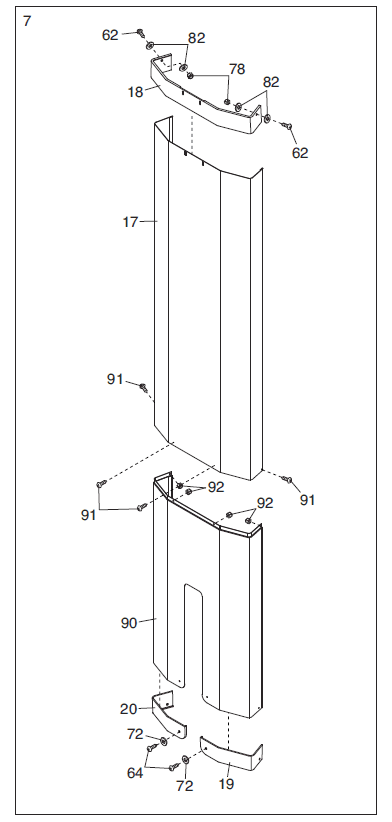
- Attach the Left Cap (19) and the Right Cap (20) to the Lower Shroud (90) with two M5 x 20mm Self-tapping Screws (64) and two M5 Washers (72). Do not tighten the Self-tapping Screws yet. Attach the Top Cap (18) to the Upper Shroud (17) with two M6 x 16mm Screws (62), four M6 Washers (82), and two M6 Locknuts (78). Do not tighten the Screws and the Locknuts yet.

Arm Assembly
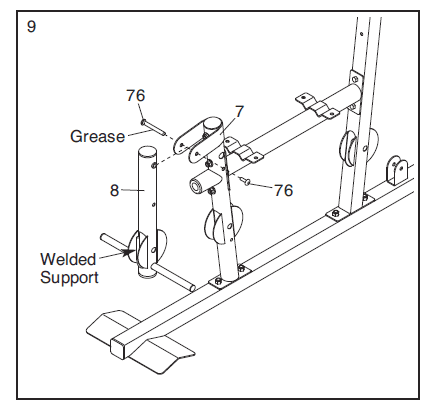
- Apply grease to the outside of the barrel of an M10 x 64mm Bolt Set (76). Orient the Leg Lever (8) so that the welded support is on the side shown. Attach the Leg Lever to the Front Leg (7) with the M10 x 64mm Bolt Set (76). Make sure that the barrel of the Bolt Set is inserted through both sides of the bracket on the Front Leg

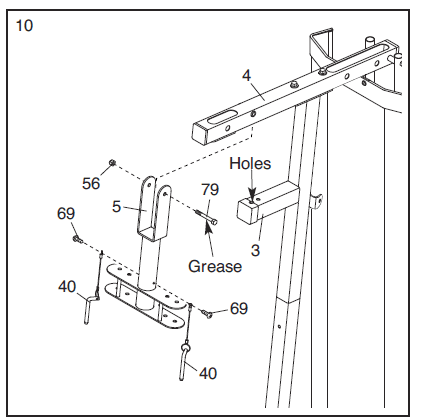
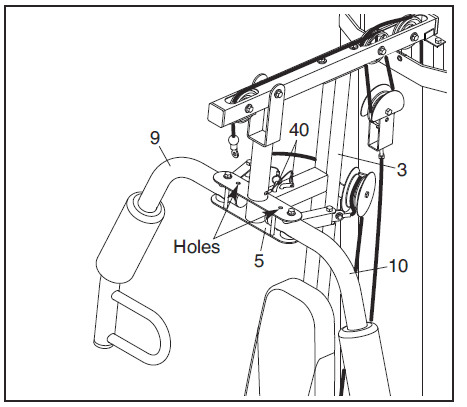
- Apply grease to an M10 x 77mm Bolt (79). Attach the Pivot Frame (5) to the Top Frame (4) with the M10 x 77mm Bolt (79) and an M10 Locknut (56). Do not overtighten the Locknut; the Pivot Frame must pivot easily. Attach the two Arm Pins (40) to the Pivot Frame (5) with two M4 x 20mm Self-tapping Screws
(69). Insert the Arm Pins (40) into the two holes in the Upper Upright (3).
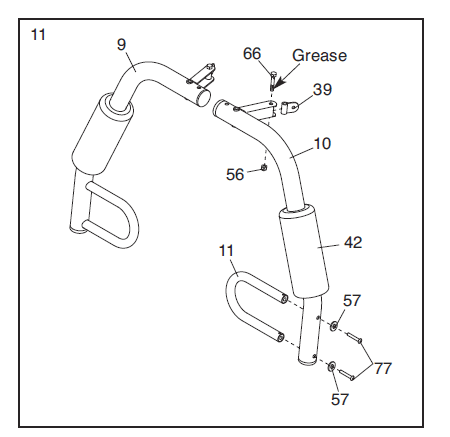
- Apply grease to an M10 x 51mm Bolt (66). Attach a Cable Pivot (39) to the Left Arm (10) with the M10 x 51mm Bolt (66) and an M10 Locknut (56). Do not overtighten the Locknut; the Cable Pivot must pivot easily. Wet the inside of a Large Foam Pad (42) with soapy water. Slide the Large Foam Pad onto the Left Arm (10).

Cable Assembly
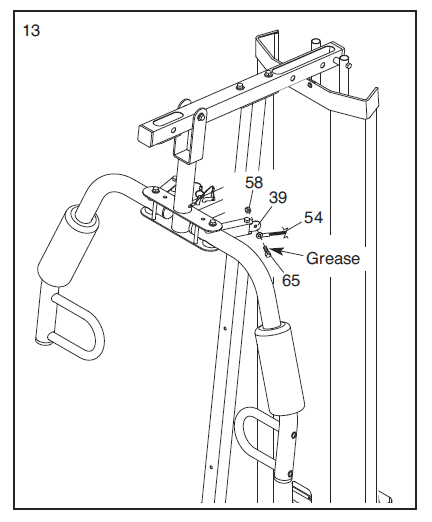
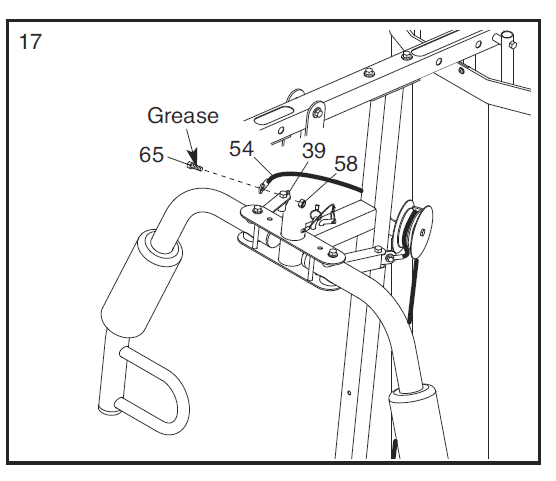
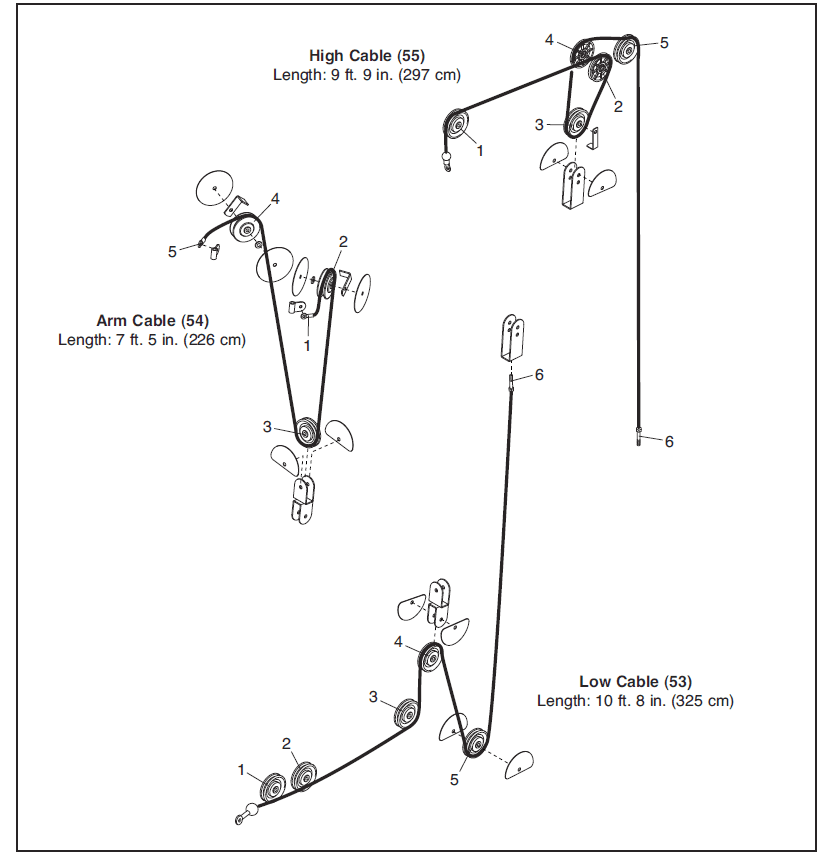
- See the CABLE DIAGRAM on page 25 and identify the Arm Cable (54). Apply grease to an M8 x 22mm Shoulder Bolt (65). Attach the Arm Cable (54) to the indicated Cable Pivot (39) with the M8 x 22mm Shoulder Bolt (65) and an M8 Locknut (58)

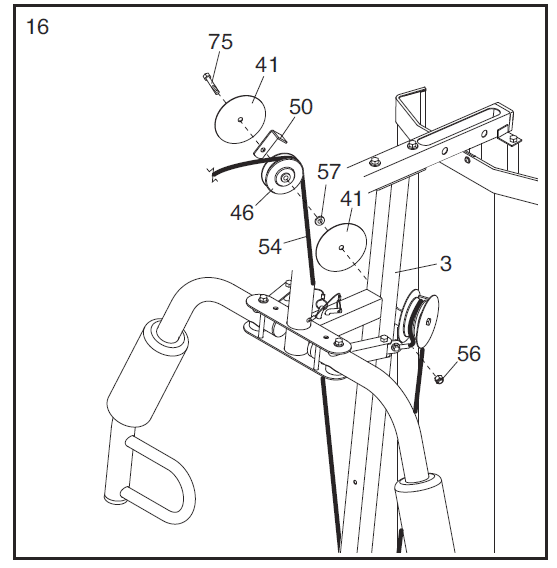
- Route the Arm Cable (54) over a “V”-pulley (46). Attach the “V”-pulley (46), a Large Cable Trap (50), two Full Finger Guards (41), and an M10 Washer (57) to the Upper Upright (3) with an M10 x 63mm Bolt (75) and an M10 Locknut (56). Make sure that the Large Cable Trap is oriented to hold the Arm Cable (54) in the groove of the “V”-pulley.

- Route the Arm Cable (54) over a “V”-pulley (46). Attach the “V”-pulley (46), a Large Cable Trap (50), two Full Finger Guards (41), and an M10 Washer (57) to the Upper Upright (3) with an M10 x 63mm Bolt (75) and an M10 Locknut (56). Make sure that the Large Cable Trap is oriented to hold the Arm Cable (54) in the groove of the “V”-pulley.

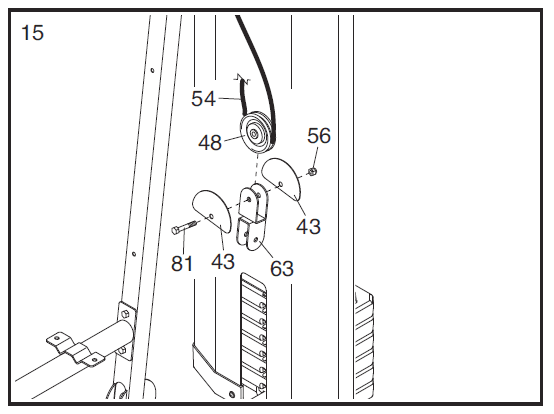
- Route the Arm Cable (54) under a 90mm Pulley (48). Attach the 90mm Pulley (48) and two Half Finger Guards (43) to the Double “U”-bracket (63) with an M10 x 46mm Bolt (81) and an M10 Locknut (56). Make sure that the Half Finger Guards are on the outside of the Double “U”-bracket as shown.

- Route the Arm Cable (54) over a “V”-pulley (46). Attach the “V”-pulley (46), a Large Cable Trap (50), two Full Finger Guards (41), and an M10 Washer (57) to the Upper Upright (3) with an M10 x 63mm Bolt (75) and an M10 Locknut (56). Make sure that the Large Cable Trap is oriented to hold the Arm Cable (54) in the groove of the “V”-pulley

- Apply grease to an M8 x 22mm Shoulder Bolt (65). Attach the Arm Cable (54) to the indicated Cable Pivot (39) with the M8 x 22mm Shoulder Bolt (65) and an M8 Locknut (58

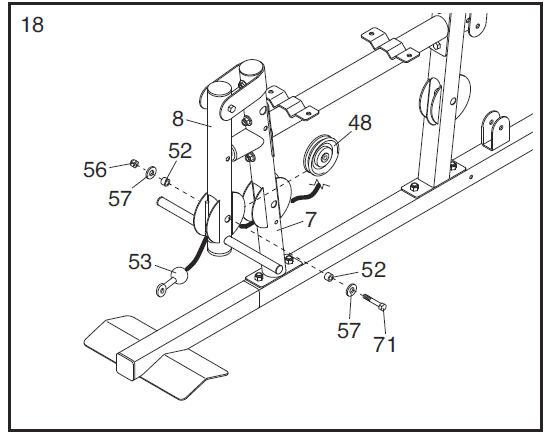
- See the CABLE DIAGRAM on page 25 and identify the Low Cable (53). Route the Low Cable (53) through the Leg Lever (8) and the Front Leg (7). Attach a 90mm Pulley (48) inside the Leg Lever (8), over the Low Cable (53), with an M10 x 67mm Bolt (71), two M10 Washers (57), two 12mm Spacers (52), and an M10 Locknut (56).

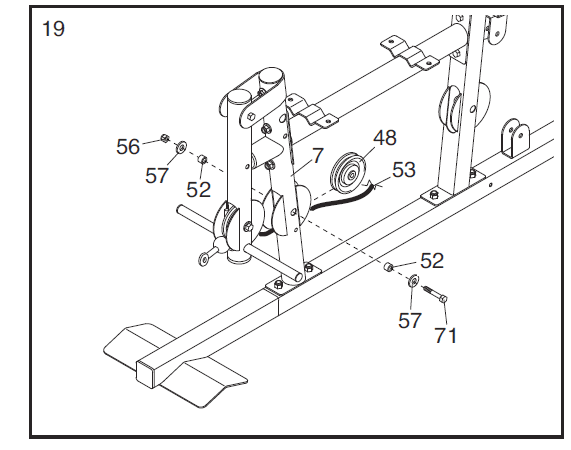
- Attach a 90mm Pulley (48) inside the Front Leg (7), over the Low Cable (53), with an M10 x 67mm Bolt (71), two M10 Washers (57), two 12mm Spacers (52), and an M10 Locknut (56).

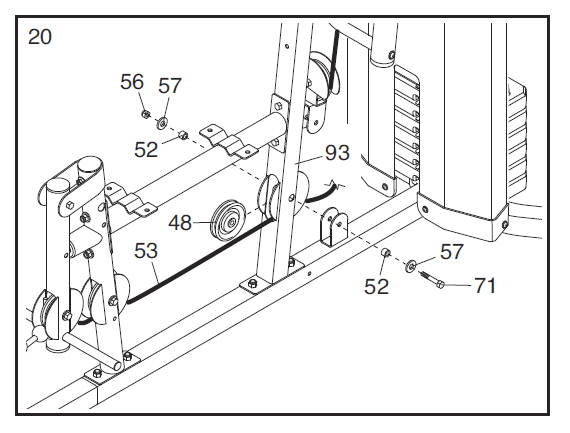
- Route the Low Cable (53) under a 90mm Pulley (48) and through the Lower Upright (93). Attach the 90mm Pulley (48) inside the Lower Upright (93) with an M10 x 67mm Bolt (71), two M10 Washers (57), two 12mm Spacers (52), and an M10 Locknut (56).

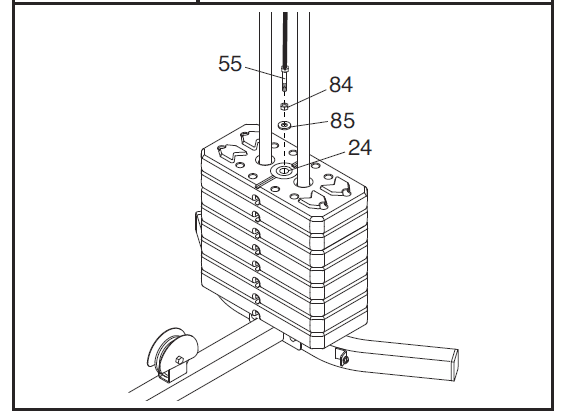
- Note: For clarity, the Shrouds are not shown in this step. Thread an M12 Nut (84) as far as possible onto the High Cable (55). Then, place a Large Washer (85) on top of the Weight Tube (24). Tighten the High Cable (55) into the Weight Tube (24) until all the slack is removed from the cables. Then, tighten the M12 Nut (84) against the Large Washer (85).


Seat Assembly
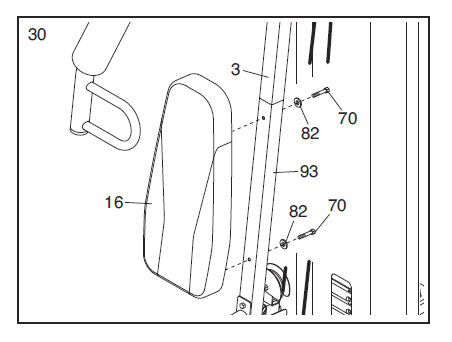
- Attach the Backrest (16) to the Lower Upright (93) and the Upper Upright (3) with two M6 x 63mm Screws (70) and two M6 Washers (82)

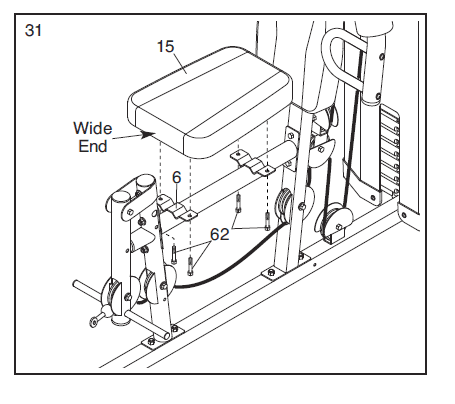
- Attach the Seat (15) to the Seat Frame (6) with four M6 x 16mm Screws (62) as shown.

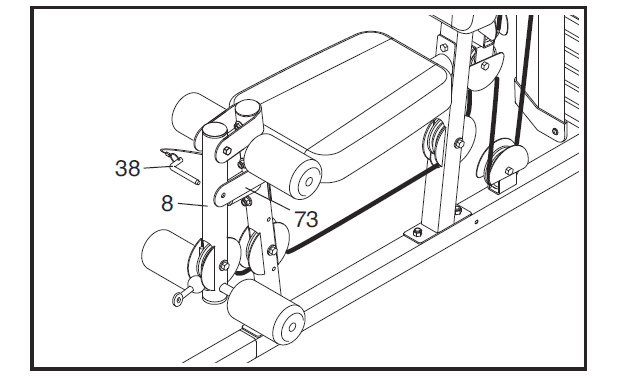
- Attach the Lock Plate (73) to the Front Leg (7) with an M10 x 70mm Bolt (86), an M10 Washer (57), and an M10 Locknut (56). Do not overtighten the Locknut; the Lock Plate must pivot easily. Attach the Leg Lever Pin (38) to the Front Leg (7) with an M4 x 20mm Self-tapping Screw (69). Insert the Leg Lever Pin through the Leg Lever (8) and the Lock Plate (73).
ADJUSTMENT
CHANGING THE WEIGHT SETTING
- To change the setting of a weight stack, insert a Weight Pin (26) under the desired Weight (22). Insert the Weight Pin so that the bent end touches the weight stack. Turn the bent end downward.
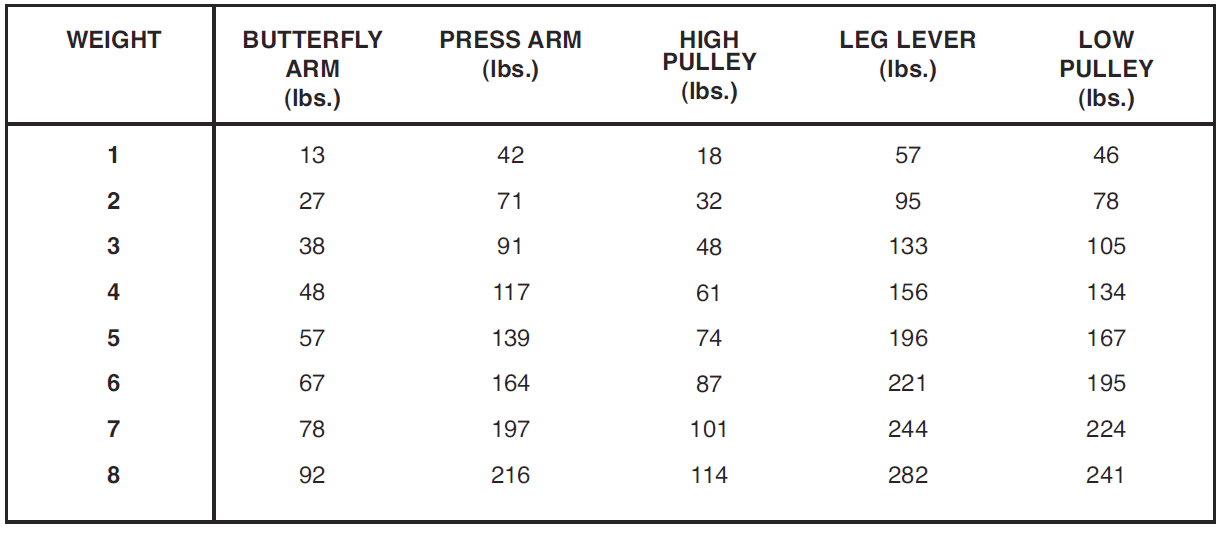
Note: Due to the cables and pulleys, the amount of resistance at each exercise station may vary from the weight setting. Use the WEIGHT RESISTANCE CHART on page 24 to find the approximate amount of resistance at each weight station.

ATTACHING THE ACCESSORIES
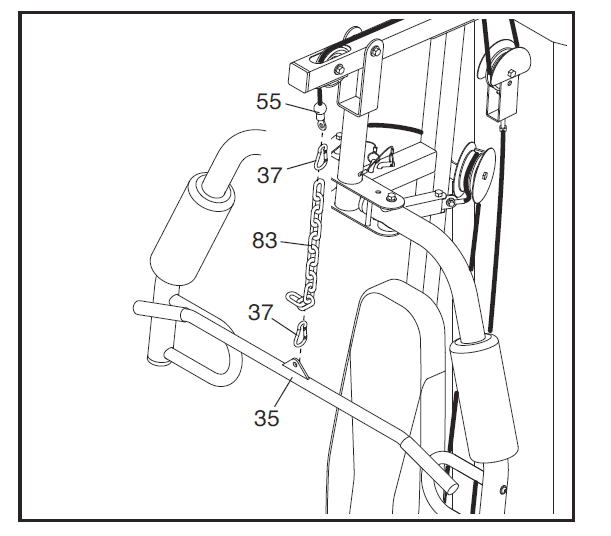
- Attach the Lat Bar (35) to the High Cable (55) at the high pulley station with a Cable Clip (37). For some exercises, the Chain (83) should be attached between
the Lat Bar and the Cable with two Cable Clips. Adjust the length of the Chain between the Lat Bar and the Cable so that the Lat Bar is in the correct starting
position for the exercise to be performed. The Lat Bar (35) or the Handle Strap (not shown) can be attached at either pulley station in the same way. Always engage the Lock Plate (not shown) when using the low pulley station (see USING THE LOCK LEVER on page 23).
USING THE LOCK LEVER
- When using the low pulley station, engage the Leg Lever Pin (38) into the Leg Lever (8) and the Lock Plate (73)

CONVERTING THE ARMS
- To use the Arms (9, 10) as butterfly arms, insert the Arm Pins (40) into the holes in the Upright (3) and the Pivot Frame (5) as shown. To use the Arms (9, 10) as press arms, insert the Arm Pins (40) into the holes in the Pivot Frame (5) and Arms

WEIGHT RESISTANCE CHART
CABLE DIAGRAM
MAINTENANCE
TIGHTENING THE CABLES
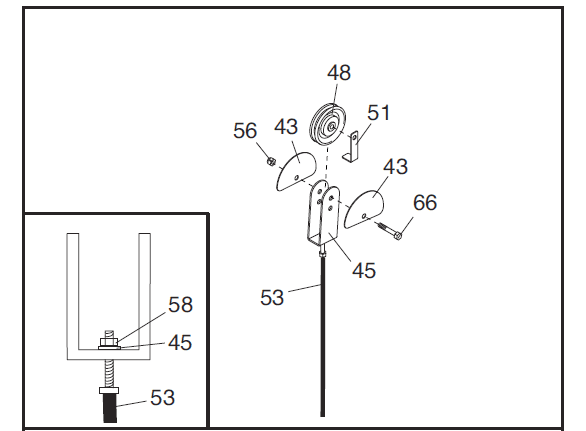
- Woven cable, the type of cable used on the weight system, can stretch slightly when it is first used. If there is slack in the cables before resistance is felt, the cables should be tightened. To tighten the cables, first, insert the weight pin into the middle of the weight stack. Slack can be removed from these cables in several ways:
- See the inset drawing. Tighten the M8 Locknut (58) that connects the end of the Low Cable (53) to the “U”-bracket (45).
- Remove the M10 Locknut (56) and the M10 x 51mm Bolt (66) from the Cable Trap (51), the 90mm Pulley (48), the two Half-Finger Guards (43), and the “U”- bracket (45). Reattach the Pulley, Cable Trap, and Half Finger Guards to the other hole in the “U”-bracket. Make sure that the Cable Trap is in the proper position and that the Low Cable (53) and Pulley move smoothly.

- Loosen the M12 Nut (84) on the High Cable (55). Tighten the Cable into the Weight Tube (24) until the slack is removed from the Cable. Then, retighten the Nut against the Large Washer (85)

For more manuals by Golds Gym visit, ManualsLibraryy
Gold’s Gym XR 45 Home Gym-FAQs
How much weight does the Gold’s Gym XR 45 support?
The Gold’s Gym XR 45 offers up to 210 lbs of resistance, providing multiple workout options in a compact, vertical design.
Are 2kg dumbbells good for strength training?
A 2kg dumbbell is suitable for high-rep, low-resistance exercises. If you reach fatigue within 10-12 reps, it is an appropriate weight. If not, consider a heavier option.
Are 5kg dumbbells heavy enough for beginners?
Yes, 5kg dumbbells are great for beginners performing exercises like bicep curls, shoulder presses, and squats. As you gain strength, you can increase the weight.
Is a 20kg barbell the same as 45 lbs?
Yes, most standard Olympic barbells weigh 20kg (45 lbs) and are typically 7 feet long, designed for use with weight plates.
What is the best barbell size for a home gym?
A 6 to 7-foot barbell is ideal for home gyms and accommodates basic strength training exercises like squats, deadlifts, and bench presses.
Can beginners start with 5kg dumbbells?
Yes, beginners can start with 5kg dumbbells for exercises like bicep curls, shoulder presses, and lunges. Focus on proper form and gradually increase reps as strength improves.
How can I build muscle effectively?
Muscle growth requires resistance training using free weights, weight machines, bodyweight exercises, or resistance bands. Train 2-3 times per week to allow proper muscle recovery.
How do you perform a proper bicep curl?
1. Hold a dumbbell with your palm facing upward.
2. Slowly curl the weight upward by bending your elbow.
3. Keep your elbow close to your body.
4. Lower the weight slowly back to the starting position.
This exercise targets the biceps in the front of your upper arm.