
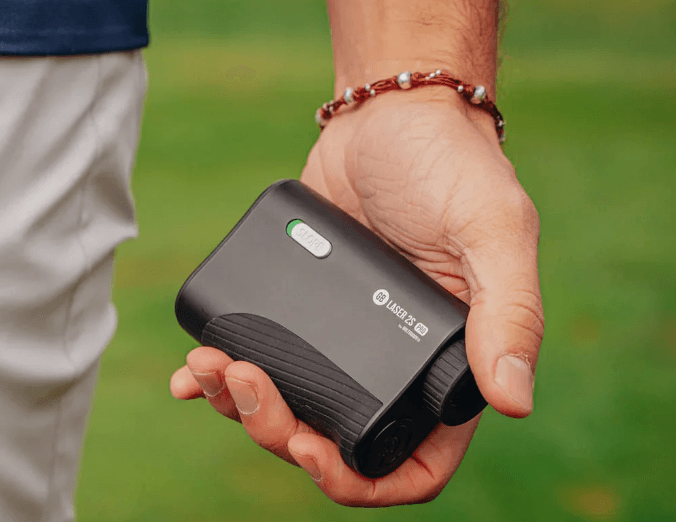
GolfBuddy Laser 2S PRO Golf Range Finder
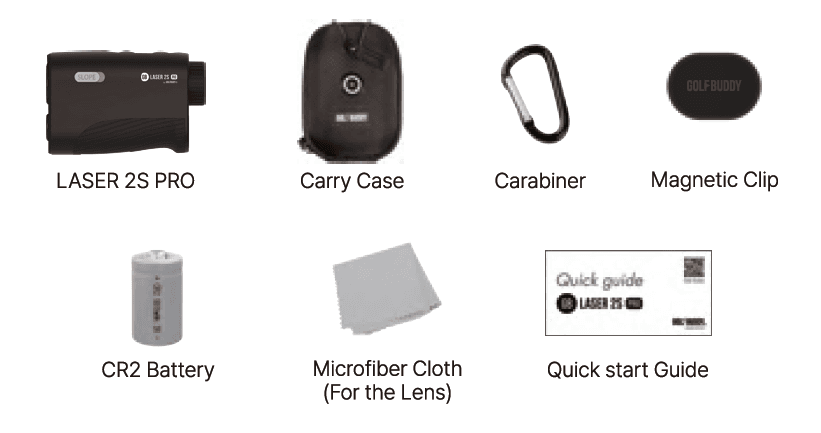
PACKAGE INCLUDES
Overview
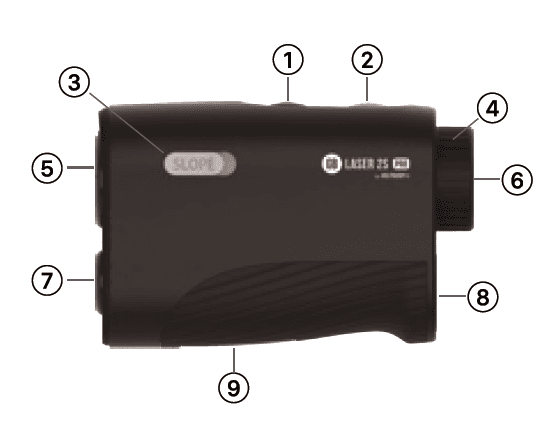
- Mode Button
- Power/Measurement Button
- Slope On/Off Switch
- Lens Adjustment
- Objective Lens
- Sx Monocular Eyepiece
- Laser Aperture
- Battery Compartment
- Product Label and Serial Number
LCD DESCRIPTION
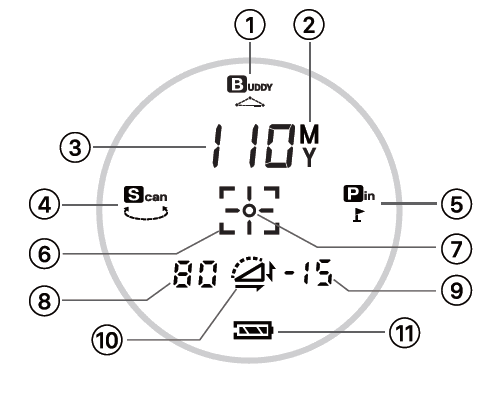
 Displays when buddy mode is activated
 Distance unit (Meters/Yards}
 Slope-adjusted distance
 Displays when scan mode is activated
 Displays when pin finder mode is activated.
 Focus Square (Blinks when searching the target; stops when the target is captured)
 Targeting Crosshair
 Measured Distance
 Height of the Target (uphill: +, downhill:-)
 Slope ON
 Battery Indicator
GETTING STARTED
INSERTING THE BATTERY & QUICK GRAB

- Remove the battery cover.
- Lift and rotate the battery cap counterclockwise
- Remove the protective film between the battery and the cap
- Insert a CR2 3V battery into the compartment with the negative end facing in

- QUICKGAAB
- Built-in magnet so you can easily attach it to a golf cart and club.

- Built-in magnet so you can easily attach it to a golf cart and club.
How to operate
- Click the Power/ Measurement button
- Select the mode
(Standard-+Scan➔ Buddy➔Standard) - Place the target on the targeting crosshair.
- Click the Power/ Measurement button to display the distance
How to change the distance unit
- ON/OFF setting by the slope switch located on the side
About the slope function
- Slope ON: At the bottom of the display, the height difference(+/-) and straight distance appear with
 the icon
 - Slope OFF: Displays straight distance at the center of the display
How to turn ON/ OFF Slope
- ON/OFF setting by the slope switch located on the side

Setting Focus: adjusting the diopter dial.
- Use the viewfinder to aim and turn the lens dial until you can see the target.

Mode Setting: 2 Modes
- With the click of the Mode Button, the mode changes in the following order
Standard ➔ Scan -+ Buddy ➔ Standard. - You can only change Modes when the rangefinder is turned on.
Please ensure the rangefinder is turned on before trying to switch modes.
- To activate the device, please press the Power button on top of the rangefinder.
Standard Mode and Pin Finder Mode

- Press the Power/ Measurement button to display the distance along with vibration.
- Press and hold the Power/ Measurement button for more than 1 second to activate Pin finder mode.
- Pin finder mode is used to display the closest target when two or more targets are found, even if there are any other objects, such as trees or rocks, behind the pin.
- Press the Power/Measurement button once against an object behind the pin (tree), then move towards the pin. Once the pin is found, the distance will be displayed,d, and you will feel a slight vibration
Scan Mode
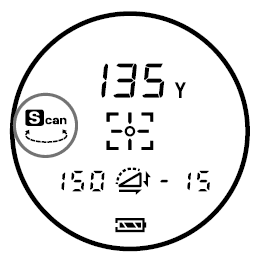
- Useful when acquiring distances of various targets.
- Press the Power / Measurement Button once to continuously scan for 5 seconds to show the distance to varying targets(1-CLICK SCAN).
- In Scan Mode, the device will start measuring the distance once the Power/ Measurement button is clicked.
- The button does not need to be clicked more than once
Buddy Mode: Triangulation feature
Power on by pressing the power button

- Click the Mode button twice to enter Buddy Mode
- P1 shows the distance of the first target.
- P2 shows the distance of the second target.
Measure target #1

- P1 distance is then shown in the bottom left of the viewfinder.
- Measure target #2 after target #1.
- Target #2 distance is then shown in the bottom right of the viewfinder.
After measuring target #2, the triangulated distance between target #1 and #2 is displayed at the top of the viewfinder.

Resetting the product

- Press and hold the power button for 10 seconds with the power off.
- The viewfinder will then vibrate for one second and blink three times.
- Place the 25 PRO on a level surface for 5 seconds.
- You must do this to correct the lens focus.
- A factory reset is complete when the viewfinder says “Pass”.
SAFETY WARNING, CARE, AND MAINTENANCE
Please read the manual guide carefully before using the device.
- Do NOT aim directly at the sun •• it may cause blindness
- Do NOT turn the device on while looking into the laser aperture or objective lens (as it may cause blindness)
- Golf Rangefinders may fail to measure the distance when the target is measured through glass.
- Do not leave the device in direct sunlight for a long period,•• it may cause damage to the unit.
- Keep the device away from children.
- If any type of liquid or substance gets on the device, use the cloth in the accessory to remove It Immediately.
- Keep the device away from heavy rain or water as the device only features. Lres needs to be an IPX rating
- Do NOT disassemble the device arbitrarily, as this will void the warranty.
- Any defect caused by the customer is not eligible for free repair service.
WARNING
GOLFBUDDY is not liable for damages caused by user misuse. (Warranty is void even if it is still in effect.)
TROUBLESHOOTING
When the screen does not display
- Make sure the protective film between the battery and the cap is removed
- Check that the battery has been inserted the correct way (+/-)
- Replace with a new battery if needed
The distance is not shown on the display
- Check the mode setting (Standard/ Scan)
- Check if there is any object that is blocking the lens.
- Lacie of light, target movement, non-reflective object, object size, backlit object, and the weather may affect the display of the unit.
- Distances under 1m (1yd) or over 1,000m (1,093 yd) cannot be measured.
The display view is not clear
- Make adjustments to the display using the lens dial
- Check the remaining battery status
*For more Information, visit our website at www.golfbuddy.com
SPECIFICATION
- Item: Spec
- Magnification: 6)(
- Physical size: 99.4 X 85 X 38.3 mm
- weight: 161g (CR2 Included)
- Measuring Speed: 0.15 seconds ….. 2-1oe3v 12-,oooM -·- +/-1 yard
- Objective lens diameter: 20mm
- EyeRelief: 17.7mm
- Battery type: CR23V Lithium
- Pin finder with vibration: Yes
- Slope-adjusted: Yes
- Triangulation feature: Yes
For more manuals by GolfBuddy, visit ManualsLibrary
GolfBuddy Laser 2S PRO Golf Range Finder- FAQs
How long does it take to fully charge the GolfBuddy Laser 2S PRO?
It takes approximately 4 hours to fully charge the device. For best results, use a wall charger instead of a computer USB port.
How do I turn on my GolfBuddy Laser 2S PRO?
To power it on, press and hold the power button on the left side of the device. You’ll first see the GolfBuddy logo, followed by a screen indicating it’s searching for satellite signals.
What should I do if my GolfBuddy isn’t working?
Try removing and reinserting the battery, then restart the unit. Make sure the charging cable is connected properly. A solid red light while charging indicates proper connection.
How does the GolfBuddy Laser 2S PRO work?
It measures distances using laser technology. Aim at a target—like a flag or a player—and it calculates the exact distance, helping you make more informed shots.
Is there a GolfBuddy app?
Yes, the GolfBuddy Smart App connects to Bluetooth-enabled GolfBuddy devices. It allows you to update golf courses and find nearby ones using GPS and internet access.
How do I charge the GolfBuddy Voice 2S?
Plug the data cable into the power adapter and connect it to the device. The screen will show a battery icon during charging.
Why won’t my GolfBuddy start?
Common causes include a low or dead battery, incorrect charging cable insertion, or an old battery that may need replacement (especially if it’s over 2 years old).
Can I replace the battery in my GolfBuddy device?
Yes. If your device is older than two years, the battery may need replacing. Ensure the charging cable and wall charger are fully inserted when charging.

 Displays when pin finder mode is activated.

