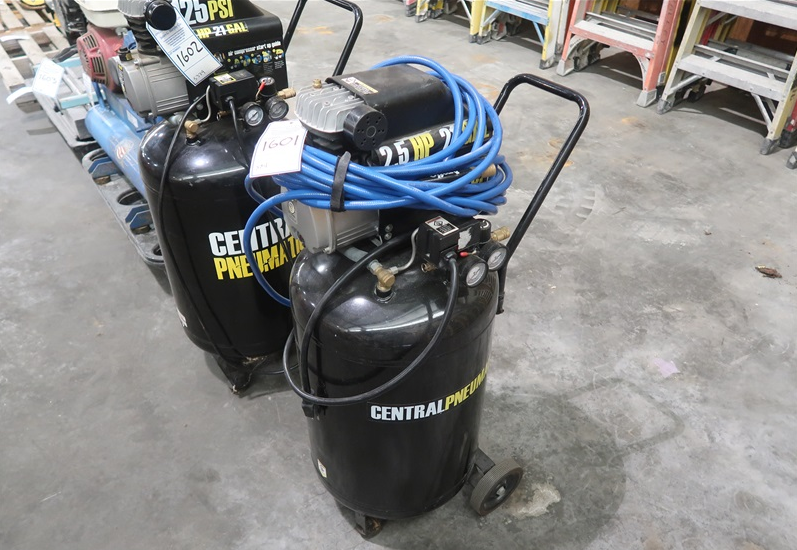
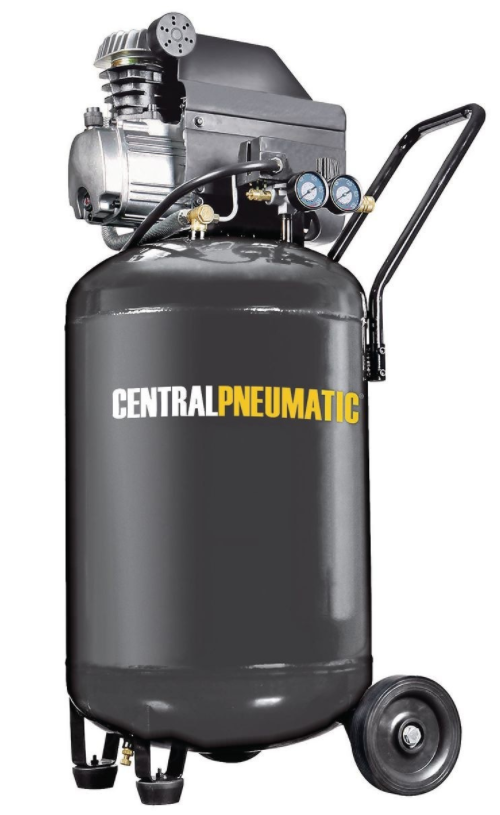
Harbor Freight Tools 67847 Air Compressor
- Risk of fire or explosion – Do not spray flammable liquid in a confined area or towards a hot surface. The spray area must be well-ventilated. Do not smoke while spraying or spray where sparks or flames are present. Arcing parts – Keep the compressor at least 20 feet away from explosive vapors, such as when spraying with a spray gun.
- Risk of bursting – Do not adjust the regulator higher than the maximum stated pressure of attachment.
- Risk of injury – Do not direct an air stream at people or animals.
- To reduce the risk of electric shock, do not expose yourself to rain. Store indoors.
- Wear ANSI-approved safety goggles during use.
- Do not use it to supply breathing air.
- Do not use the air hose to move the compressor.
- Drain the Tank daily and after use. Internal rust causes tank failure and explosion
- Add the correct amount of compressor oil before first use and every use. Operating with the incorrect amount of oil causes permanent damage and voids the warranty. To prevent damage, do not use it with overfilled or low oil. Slowly fill to full line, wait 2 minutes, and fill back up to full line. The compressor has small passages that will fill slowly.
- Do not remove the Pressure Switch (54) cover or adjust the internal components.
- Do not use the air hose to move the compressor.
- The compressor head gets hot during operation. Do not touch it or allow children nearby during or immediately following the operation.
- Release the pressure in the storage tank before moving.
- The use of accessories or attachments not recommended by the manufacturer may result in a risk of injury to persons.
- All air line components, including hoses, pipe, connectors, filters, etc, must be rated for a minimum working pressure of 125 PSI, or 150% of the maximum system pressure, whichever is greater.
- USE OF AN EXTENSION CORD IS NOT RECOMMENDED. If you choose to use an extension cord, use the following guidelines:
- Industrial applications must follow OSHA guidelines.
- Maintain labels and nameplates on the compressor. These carry important safety information. If unreadable or missing, contact Harbor Freight Tools for a replacement.
- This product is not a toy. Keep it out of reach of children.
- Operate the unit on a level surface. Check oil level daily and fill to the marked level if needed.
- People with pacemakers should consult their physician(s) before use. Electromagnetic fields in proximity to a heart pacemaker could.
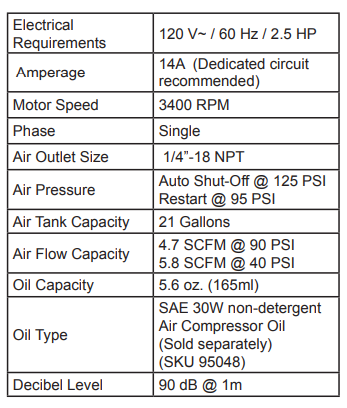
Specifications
Unpacking
When unpacking, make sure that the item is intact and undamaged. If any parts are missing or broken, please call Harbor Freight Tools at 1-800-444-3353 as soon as possible.
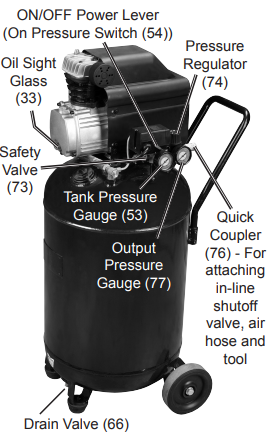
Functions
Work Piece and Work Area Set Up
- Designate a clean work area and well-lit. The work area must not allow access by children or pets to prevent injury.
- Locate the Compressor on a flat level surface to ensure proper pump lubrication and to prevent damage to the unit. Keep at least 12” of space around the unit to allow air circulation.
- Route the power cord from the compressor to the grounded wall outlet, along a safe path without creating a tripping hazard or exposing the power cord to possible damage.
Assembly/Mounting
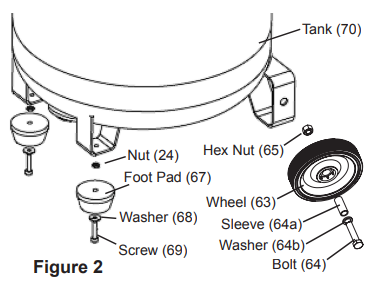
- Attach the Wheels (63) to the Tank (70), using the Bolts (64), Washers (64b), Sleeves (64a), and Hex Nuts (65). Attach the Foot Pads (67) to the bottom of the Tank (70) using the Screws (69) and Washers (68).

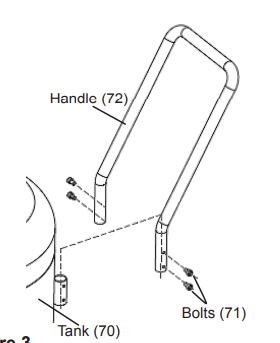
- Slide the Handle (72) into the two slots on the top of the Tank (70) and secure in place with four Bolts (71).

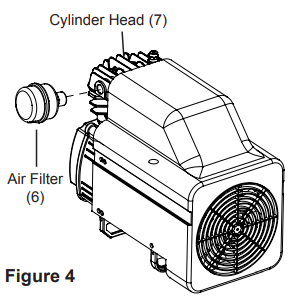
- Thread the Air Filter (6) onto the side of the Cylinder Head (7).
- Break in the new Air Compressor as follows:
- a. Make sure the Power Lever is OFF and the unit is unplugged. Insert a
male coupler (sold separately) into the female Quick Coupler (76) and fully open all regulators and valves. - b. Plug in the Power Cord.
- c. Turn the Power Lever ON.
- d. Let the unit run for 30 minutes. Air will expel freely through the Coupler.
- e. Turn the Power Lever OFF.
- f. Unplug the Power Cord and remove the male coupler.

- a. Make sure the Power Lever is OFF and the unit is unplugged. Insert a
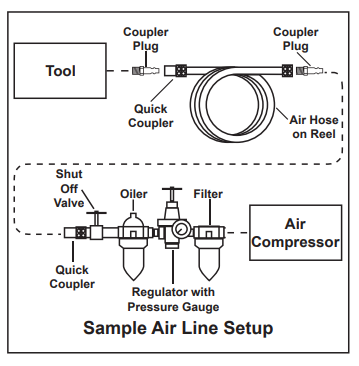
- Connect a regulator valve, an in-line shut-off valve, and a 1/4” NPT air hose (all sold separately) to the Quick Coupler (76). The air hose must be long enough to reach the work area with enough extra length to allow free movement while working.
- Depending on the tool that you will be using with this compressor, you may need to incorporate additional components, such as an in-line oiler, a filter, or a dryer (all sold separately). Consult your air tool’s manual for needed accessories.
Checking the Oil
- Check the oil level before operation. Fill the Pump Crankcase (39) with premium quality SAE 30-weight, nondetergent air compressor oil.
- The oil level should be at the center of the “full” level on the oil level sight glass, as shown in Figure 5. Add oil as needed to maintain this level. Do not let the oil level go below the center dot (LOW as shown above), and do not overfill the oil so that it is above the center dot (OVERFILL as shown above) on the sight glass.
- To add oil:
- a. Remove the Oil Plug (37).
- b. Using a funnel to avoid spills, pour enough oil into the Pump Crankcase
(39) to reach the “full” level in the Oil Sight Glass (33). - c. Replace the Oil Plug.
Cold Weather Operation
Premium quality 30-weight, nondetergent air compressor oil (sold separately) is recommended for use with this compressor. Start the compressor in a heated area if outdoor temperatures drop below 32°F. If this is not practical, drain out the old pump oil and use SAE 10W Nondetergent Air Compressor Oil in the pump crankcase instead whenever the compressor’s temperature falls below 40°. Do not use multiviscosity oil (such as 10W-30), as it leaves carbon deposits on pump components and leads to accelerated failure. Heavy operation may require a heavier viscosity oil.
General Operating Instructions
- Close the Drain Valve (66) by turning it clockwise.
- Make sure all nuts and bolts are tight.
- Check for oil leaks and check the oil level (See Checking the Oil).
- Close the in-line Shutoff Valve between the compressor and the air hose.
- Make sure the air tool’s throttle or switch is in the off position.
- Connect the air tool to the air hose.
- Plug the Air Compressor Power Cord into a grounded 120 V electrical outlet.
- Open the in-line Shutoff Valve.
- Turn the Power Lever ON.
- Allow the Air Compressor to build up pressure until it cycles off.
- Adjust the Air Compressor’s Pressure Regulator (74) so that the air output is enough to properly power the tool, but the output will not exceed the tool’s maximum air pressure at any time. Turn the knob clockwise to increase the pressure and counterclockwise to decrease the pressure. Adjust the pressure gradually, while checking the air output gauge to set the pressure.
- Use the air tool as needed.
- After the job is complete, turn the Power Lever OFF.
- Unplug the Air Compressor.
- Close the in-line Shutoff Valve.
- Bleed air from the tool, then disconnect the tool.
- Turn the Drain Valve (66) at the bottom of the Tank, counterclockwise, to release any built-up moisture and the internal tank pressure. Close the valve after moisture has drained out. Do not remove the Drain Valve.
- Clean, then store the Air Compressor indoors
Emergency Depressurization
If it is necessary to quickly depressurize the Compressor, turn the Power Lever OFF. Then, pull on the ring on the Safety Valve (73) to quickly release stored air pressure.
Automatic Shut-off System

- If the Compressor automatically shuts off, or hums, then shuts off:
- a. Shut off all tools.
- b. Wait until the Compressor cools down (about 10 minutes);
- c. If the unit does not start up again on its own, press the Reset Button to start the compressor
- d. Resume operation.
- Possible causes of repeated automatic shut-off of the compressor are:
- a. Using an extension cord that is too long or narrow;
- b. An air leak or open hose causing the compressor to cycle too often and
build up heat
- Correct any issues before further use to avoid damage to the compressor.
Maintenance And Servicing
Cleaning, Maintenance, and Lubrication
- BEFORE EACH USE, inspect the general condition of the Air Compressor. Check for loose hardware, misalignment or binding of moving parts, cracked or broken parts, damaged electrical wiring, and any other condition that may affect its
safe operation - After Use, wipe the external surfaces of the tool with a clean cloth.
- WARNING! If the supply cord of this power tool is damaged, it must be replaced only by a qualified service technician.
The following are general guidelines for maintenance checks of the Air Compressor.
Daily:
- a. Check oil level.
- b. Check for oil leaks.
- c. Make sure all nuts and bolts are tight.
- d. Drain moisture from the air tank.
- e. Check for abnormal noise or vibration.
- f. Check for air leaks.*
- g. Wipe off any oil or dirt from the compressor.*
Weekly:
- a. Inspect Air Filter (6).
- b. Inspect Oil Plug (37).
- To check for air leaks, apply soapy water to joints while the Air Compressor is
pressurized. Look for air bubbles. - To clean the compressor surface, wipe with a damp cloth, using a mild detergent
or mild solvent
Troubleshooting
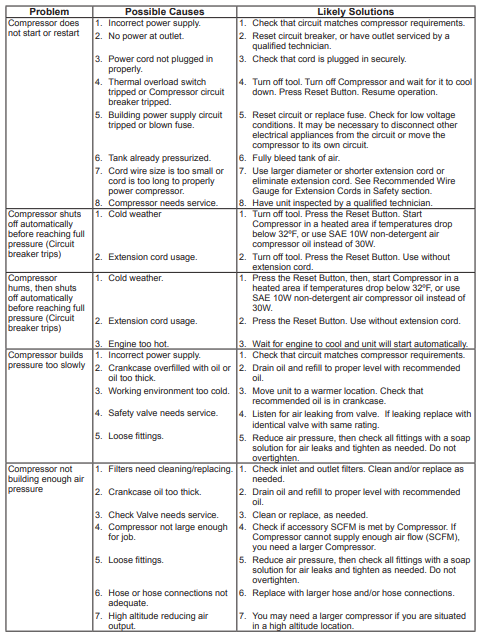
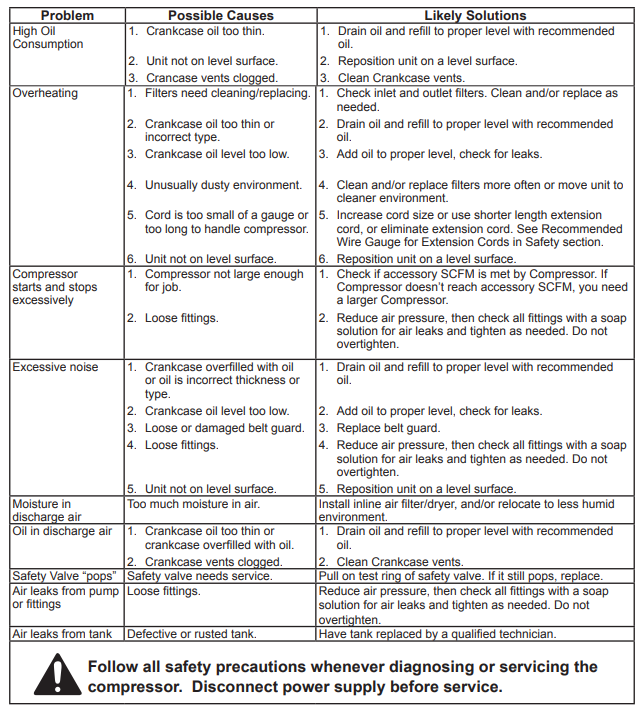
FOR MORE MANUALS BY Harbor Freight, VISIT MANUALSLIBRARYY
Harbor Freight Tools 67847 Air Compressor-FAQs
Q1. What size air compressors does Harbor Freight offer?
Harbor Freight provides a wide range, including 1–6 gallon portable units, 8–17 gallon mid-size models, and 20–30 gallon larger compressors for heavier tasks. The right size depends on your project needs.
Q2. How do I check the oil level in my Central Pneumatic air compressor?
Use the sight glass or dipstick on the unit. The oil should be at the center mark. If it’s below, add compressor oil to maintain proper lubrication.
Q3. How often should I change or add oil to my air compressor?
Check oil levels before each use. For oil changes, follow the manual, but generally every 100–200 hours of operation or every few months is recommended.
Q4. What happens if my compressor is low on oil?
Running with low or no oil can cause overheating, damage to internal components, or even complete compressor failure. Always maintain the correct level.
Q5. What PSI is best for most air tools?
Most pneumatic tools operate well between 70–90 PSI. Ensure your compressor provides slightly more airflow than required for efficient performance.
Q6. What does CFM mean in an air compressor?
CFM (Cubic Feet per Minute) measures the volume of air a compressor can deliver. Higher CFM allows the use of more demanding tools or multiple tools at once.
Q7. How do I adjust the PSI on my air compressor?
Turn the regulator knob clockwise to increase pressure or counterclockwise to decrease it. Make small adjustments while checking the gauge.
Q8. Should I drain my air compressor tank after use?
Yes. Draining removes moisture buildup that can cause rust and reduce the lifespan of the tank. It’s best to drain it after every use.
Q9. Can I use regular motor oil in my compressor?
No. Only use oil specifically made for air compressors, such as non-detergent compressor oil, to avoid damage and ensure smooth operation.
Q10. What is the main function of the Harbor Freight 67847 air compressor?
Its primary role is to compress air and deliver it at controlled pressure to power air tools, inflate tires, and perform other tasks requiring pressurized air.

