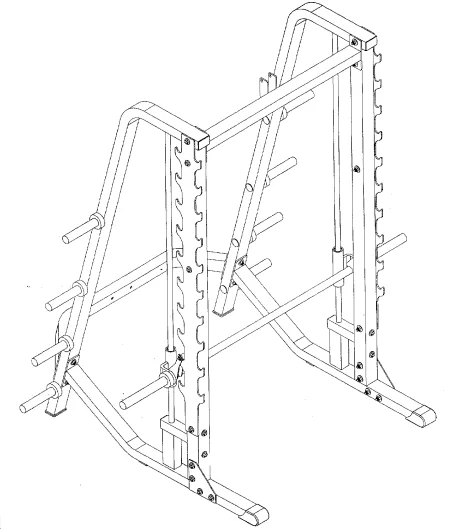
Hoist Fitness HF-985 Home Gym

ASSEMBLY
Step 1
INSTRUCTIONS
Before beginning assembly, please take the time to read the instructions thoroughly. Please use the catalog in this manual to make sure that all parts have been included in your shipment. When ordering, use the part number and description from the catalog. Use only Hoist replacement parts when servicing. Failure to do so will void your warranty and could result in personal injury.
Hoist equipment is designed to provide the smoothest, most effective exercise motion possible. After assembly, you should check all functions to ensure correct operation. If you experience problems, first recheck the assembly instructions to locate any possible errors made during assembly. If you are unable to correct the problem, call your authorized Hoist dealer. Be sure to have your serial number and this catalog when calling. When all parts have been accounted for, continue on to Step 2.
SUGGESTED TOOLS
- Socket Wrench
- 9/16″, 3/4″ Socket
- Crescent Wrench
- Rubber Mallet
- Tape Measure
Step 2
FRAME ASSEMBLY
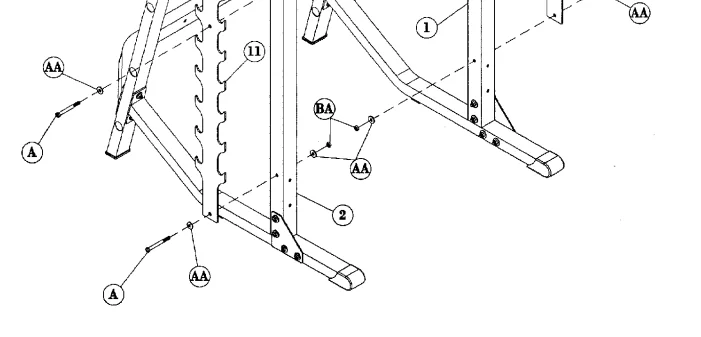
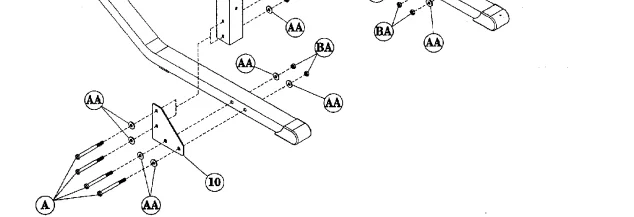
Step 2a
Part Descriptions
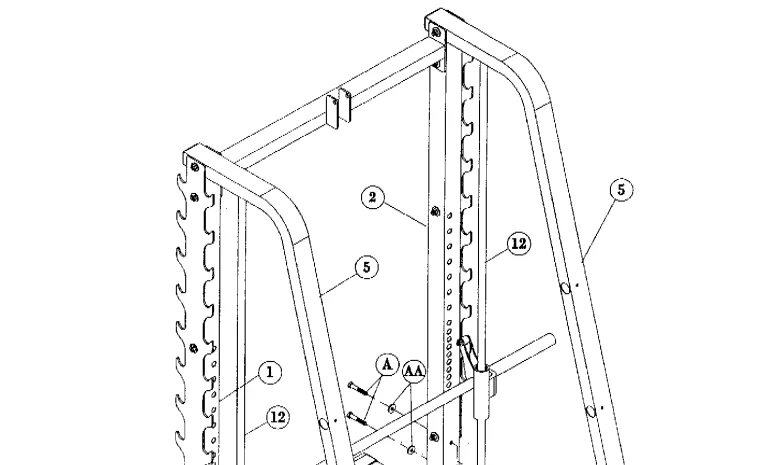
- 1 – Right Support Beam
- 2 – Left Support Beam
- 4 – Base Support
- 10 – Gusset Plate
Hardware Descriptions
- A – 1/2-13 UNC x 4″ Hex Bolt
- AA – 1/2″ Flat Washer
- BA – 1/2″ Nylok Nut
NOTE: Parts (1) and (2) are not the same. There are holes on the back side of the parts that are closer to one edge. That edge mounts to the inside of the unit (as shown in the diagram below). If mounted on the wrong side, the Safety Tier option will not work.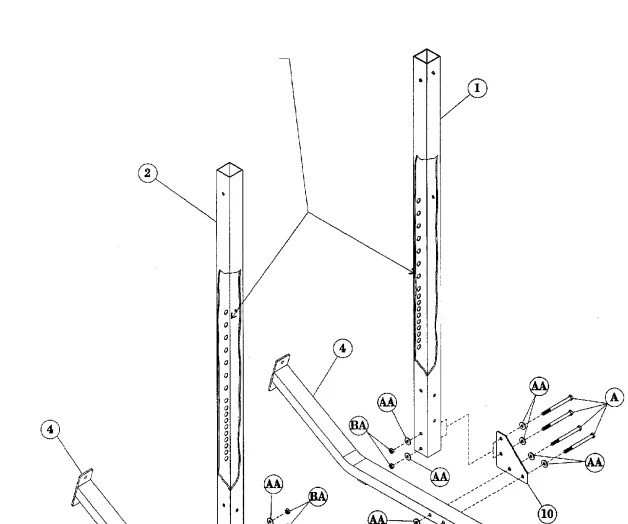
Step 2b
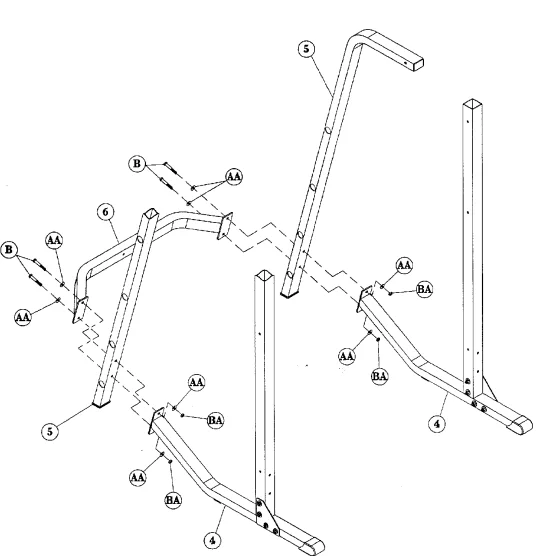
Part Descriptions
- 4 – Base Support
- 5 – Rear Support
- 6 – Rear Cross Member
Hardware Descriptions
- B – 1/2″-13 UNC x 3 1/4″ Hex Bolt
- AA – 1/2″ Flat Washer
- BA – 1/2″ Nylok Nut

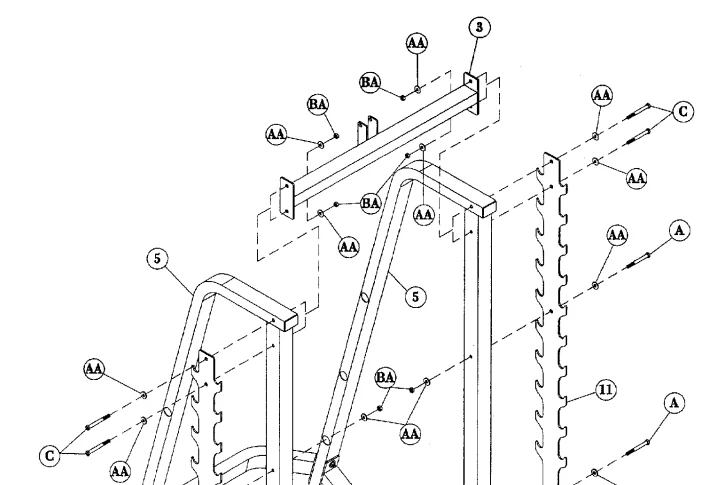
Step 2c
Part Descriptions
- 1 – Right Support Beam
- 2 – Left Support Beam
- 3 – Top Cross Member
- 5 – Rear Support
- 11 – Bar Rack
Hardware Descriptions
- A – 1/2″-13 UNC x 4″ Hex Bolt
- C – 1/2″-13 UNC x 4 1/4″ Hex Bolt
- AA – 1/2″ Flat Washer
- BA – 1/2″ Nylok Nut


Step 2d
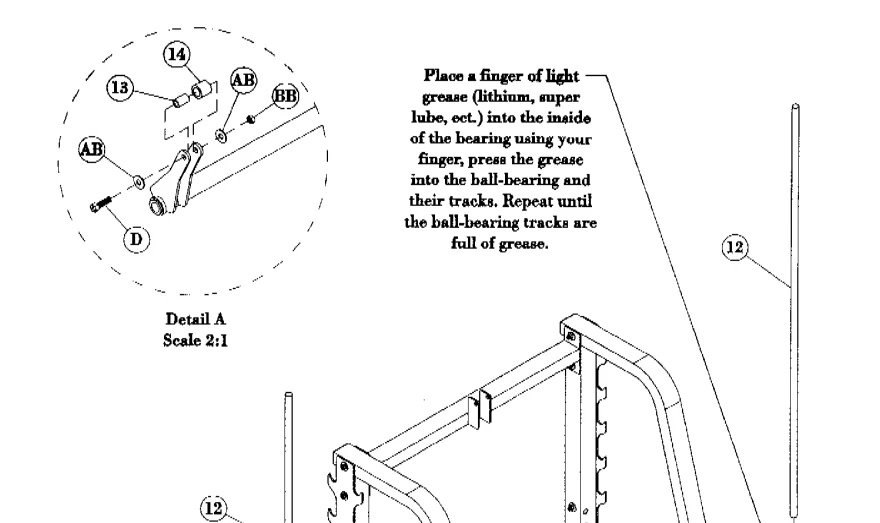
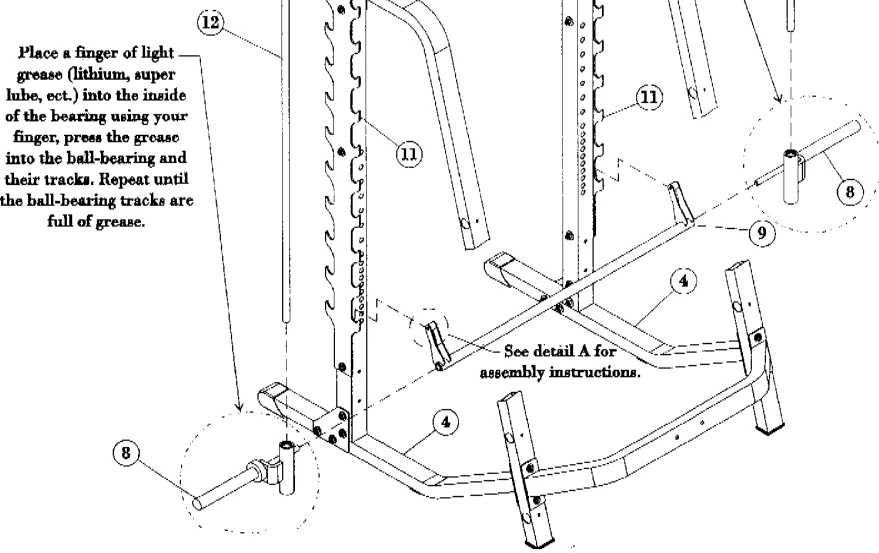
In this step, first slide (13) into (14) and secure it to one side of (9). Repeat for the other side of (9) and wrench tighten bolts. Hook (9) onto both (11)s. Next, place a finger of light grease (lithium, super lube, etc.) into the inside of the bearings on both 8)s. Using your finger, press the grease into the ball bearings and their tracks.
Repeat until the ball-bearing tracks are full of grease. Slide (12) into (8), then (8) into (9), and let (12) rest on (4); it will be secured in a later step. Repeat the process for the other side of (9).
Part Descriptions
- 1 – Base Support
- 8 – Olympic Weight Mount
- 9 – Olympic Weight Bar
- 11 – Bar Rack
- 12 – Linear Shaft
- 13 – Hook Sleeve
- 11 – Hook Roller
Hardware Descriptions
- D – 3/8-16 UNC x 2 1/4″ Hex Bolt
- AB – 3/8″ Flat Washer
- BB – 3/8″ Nylok Nut


Step 2e
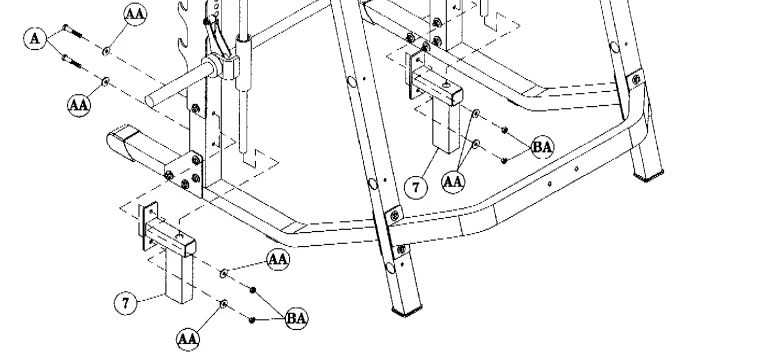
Slide the top of (12) up into the hole on the bottom of (5). Next, slide the bottom of (12) into (7) and secure one (7) to (1), and the other (7) to (2). Wrench tighten bolts.
Part Descriptions
- 1 – Right Support Beam
- 2 – Left Support Beam
- 5 – Rear Support Beam
- 7 – Guide Rod Support
- 12 – 25mm Linear Shaft
Hardware Descriptions
- A – 1/2″-13 UNC x 4″ Hex Bolt
- AA – 1/2″ Flat Washer
- BA – 1/2″ Nylok Nut


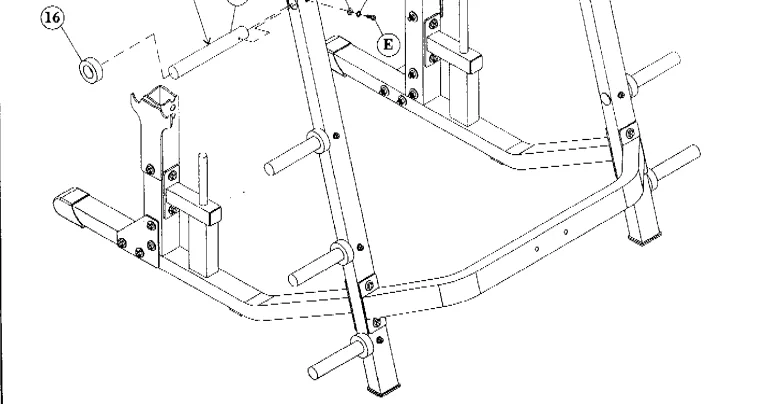
Step 2f
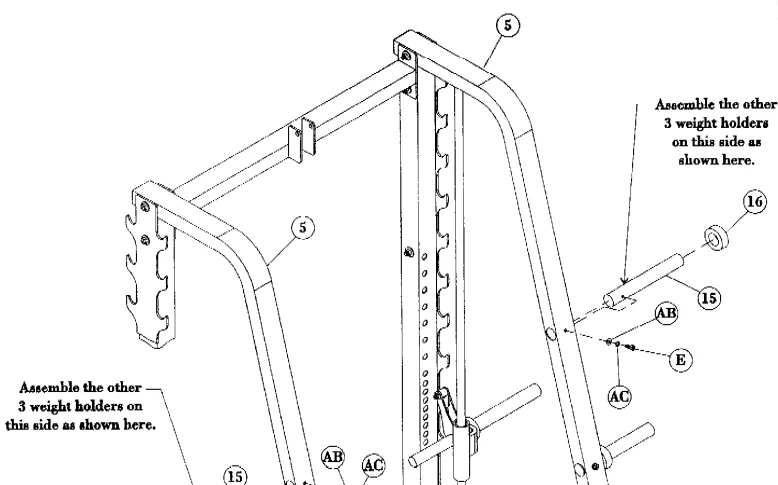
Part Descriptions
- 5 – Rear Support
- 15 – Weight Holder
- 16 – Rubber Donut
Hardware Descriptions
- E – 3/8″-13 UNC x 1″ Hex Bolt
- AB – 3/8″ Flat Washer
- AC – 3/8″ Lock Washer


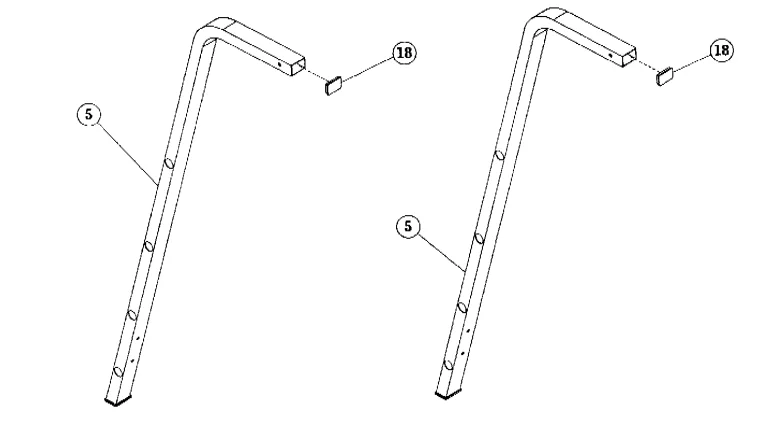
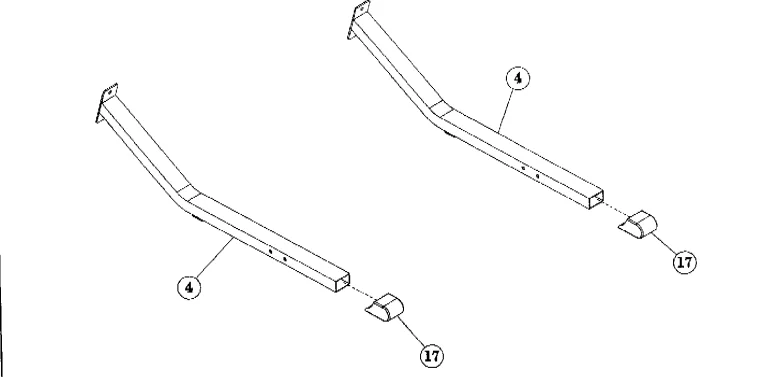
Step 3a
PRE-ASSEMBLY PARTS
Part Descriptions
- 4 – Base Support5 – Rear Support
- 17 – 2″ x 3″ Foot Cap
- 18 – 2″ x 3″ End Cap


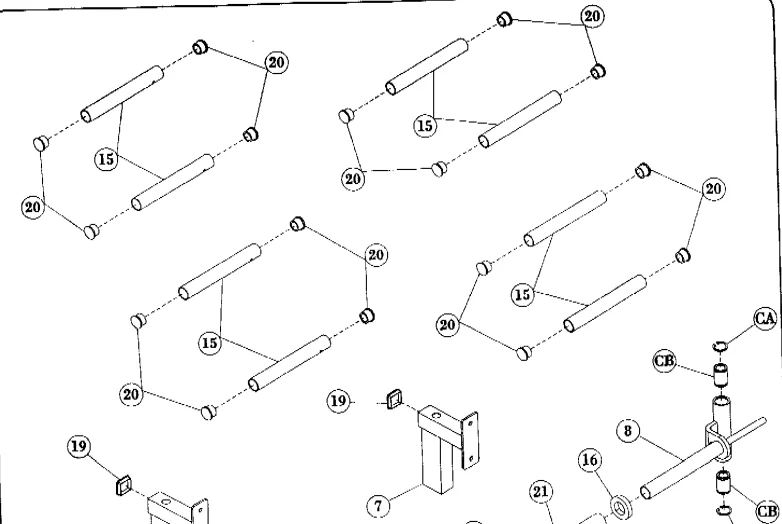
Step 3b
Part Descriptions
- 7 – Guide Rod Support
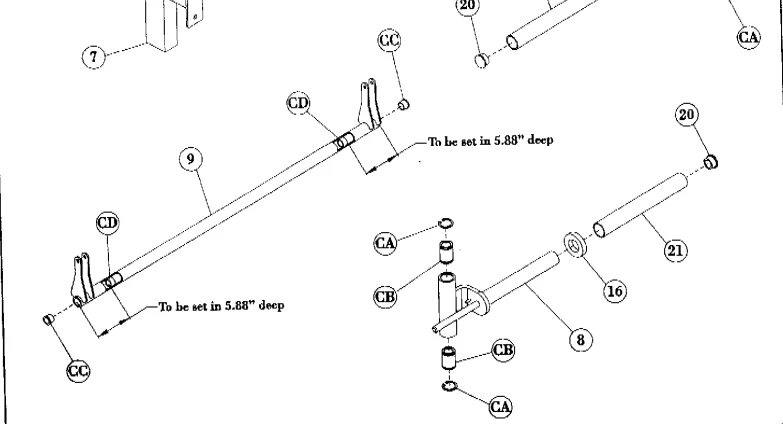
- 8 – Olympic Weight Mount
- 9 – Olympic Weight Bar
- 15 – Weight Holder
- 16 – Rubber Donut
- 19 – 2″ x 2″ End Cap
- 20 – 1 5/8″ Dia. End Cap
- 21 – Weight Horn Sleeve
Hardware Descriptions
- CA – Retaining Clip
- CB – 25mm Linear Bearing
- CC – 3/4″ Flanged Oilite Bearing
- CD – 3/4″ I.D. Sleeved Oilite Bearing


WEIGHT TRAINING TIPS
- Always consult your physician before starting any exercise program. Hoist equipment is designed to maximize your time spent working out. Having an exercise routine planned out in advance will allow you to get the most benefit out of the time spent exercising and will also enable you to work all the major muscle groups.
- Warm up properly before engaging in weight resistance training. Stretching, yoga, jogging, calisthenics, or other cardiovascular exercise can help prepare your body for the heavier workload of lifting weights.
- Learn how to perform the exercise correctly before using heavy weights. Correct form is important to avoid injury and to ensure that you work the proper muscle groups.
- Know your limitations. If you are new to weight training or are embarking on an exercise regimen after a long layoff, start slowly and build foundational strength over a longer period of time.
- Pay attention to your breathing. Exhale when you exert is a general rule of thumb. Never hold your breath.
HOIST FITNESS SYSTEMS
GENERAL MAINTENANCE INFORMATION
Links, Pull-Pins, Snap Locks, Swivels, Weight Stack Pins:
- Check all pieces for signs of visible wear or damage.
- Check springs in snap hooks and pull pins for proper tension and alignment.
- If the spring sticks or has lost its rigidity, replace it immediately.
Upholstery:
- To ensure prolonged upholstery life and proper hygiene, all upholstered pads should be wiped down with a damp cloth after every workout.
- Periodically, take the time to use a mild soap or an approved vinyl upholstery cleaner to deter the onset of cracking or drying. Avoid using any abrasive cleaners or cleaners not intended for use on vinyl.
- Replace ripped or worn upholstery immediately.
- Keep sharp or pointed objects clear of all upholstery.
Guide Rods:
- Wipe clean with a dust-free rag. Lubricate once a week with a silicon or Teflon-based lubricant.
Decals:
- Inspect and familiarize yourself with any safety warnings or other user information posted on each decal.
Nuts and Bolts:
- Inspect all nuts and bolts for any loosening and tighten if needed.
- Go through a retightening sequence periodically to ensure that all hardware is tensioned properly.
Anti-Skid Surfaces:
- These surfaces are designed to supply a secure footing and need to be replaced if they appear worn or become slippery.
Cables:
- Hoist uses only aircraft-quality cable, which meets or exceeds military specifications. Although our cables are designed to last for years, to ensure optimum performance and as a routine safety precaution, we recommend that all cables be replaced yearly.
- Visually inspect the cable for fraying, cracking, peeling, or discoloration.
- While the machine is not in use, carefully run your fingers along the cable to feel for thinning or bulging areas.
- Replace cables immediately at the first signs of damage or wear. Do not use the equipment until the cables have been replaced.
Cable Tension:
- Referring to the Assembly/Owner’s Manual, check all cable bolts and attachments to be sure they are properly attached.
- Check slack in cables and readjust cable tension if needed.
Seat Sleeves, Turcite Bushings:
- Wipe down adjusting tubes with a dust-free rag before applying lubricant.
- Lubricate seat sleeves and Turcite bushings with a silicon or Teflon-based lubricant spray.
Linear Bearings:
- Referring to the Assembly/Owner’s Manual, carefully disassemble the bearing from its housing and place a finger full of light grease (lithium, super lube, etc.) into the inside of the bearing. Using your finger, press the grease into the ball bearings and their tracks. Repeat until the ball-bearing tracks are full of grease. Insert the shaft back into the bearing and wipe off excess grease.
Hoist Fitness Systems LIMITED LIFETIME WARRANTY
Hoist Fitness Systems warrants this product to the original purchaser to be free from defects in workmanship and/or materials under normal use or service. If at any time a part is defective, Hoist Fitness Systems shall repair or replace it (at Hoist Fitness Systems’ option) within a reasonable period of time. This warranty does not cover costs of removal, transportation, or reinstallation. This warranty shall not apply if the defect was caused by misuse, neglect, or normal wear and tear.
Starting from the original date of purchase, normal wear and tear shall be considered as follows: all malfunctions of upholstery and paint that occur after 90 days; all malfunctions of electronic components, belts, or cables that occur after one year; all malfunctions of pulleys, bearings, or bushings that occur after five years. The frame and all welded components are warranted for the life of the product.
Hoist Fitness Systems’ sole responsibility shall be to repair or replace the component within the terms stated above. Hoist Fitness Systems shall not be liable for any loss or damage of any kind, including any incidental or consequential damages resulting, directly or indirectly, from any warranty expressed or implied or any other failure of this product.
WHAT IS NOT COVERED BY THIS WARRANTY
Hoist’s sole obligation under this warranty is limited to either repair or replacement of parts, subject to the additions below. This warranty neither assumes nor authorizes any person to assume obligations other than expressly covered by this warranty.
NO CONSEQUENTIAL DAMAGES. Hoist is not responsible for economic loss, profit loss, or special, indirect, or consequential damages.
WARRANTY IS NOT TRANSFERABLE. This warranty is not assignable and applies only in favor of the original purchaser/user to whom delivered. Any such assignment or transfer shall void the warranties herein made and shall void all warranties, express, implied, or statutory, except the one (1) and five (5) year warranty described above. These warranties are exclusive and instead of all other warranties, including implied warranty and merchantability, or fitness for a particular purpose. There are no warranties that extend beyond the description on the face hereof.
ALTERATION, NEGLECT, ABUSE, MISUSE, NORMAL WEAR & TEAR, ACCIDENT, DAMAGE DURING TRANSIT OR INSTALLATION, FIRE, FLOOD, ACTS OF GOD. Hoist is not responsible for the repair or replacement of any parts that Hoist determines have been subjected after the date of manufacture to alteration, neglect, abuse, misuse, normal wear and tear, accident, damage during transit or installation, fire, flood, or an act of God.
TRANSPORTATION COSTS. Hoist will accept parts covered under this warranty freight collect, provided that the shipment has received prior approval. Hoist is not responsible for any other transportation costs, but will ship freight collect parts either repaired or replaced under these warranties.
WARRANTY CLAIMS. All claims should include model number, serial number, proof of purchase, date of installation, and all pertinent information supporting the existence of the alleged defect.
Hoist Fitness Systems
9990 Empire St., #130 San Diego, Calif. 92126
(800) 548-5438
Website: www.hoistfitness.com
For More Manuals By Hoist Fitness, Visit ManualsLibraryy.
Hoist Fitness HF-985 Home Gym-FAQs
1. How do I use the Hoist HF-985 Home Gym?
Adjust the seat, select the desired weight, and follow the exercise stations step by step. Maintain proper form to prevent injury.9. How long should a workout be for results?
2. Is Hoist Fitness equipment good for home gyms?
Yes. Hoist Fitness machines are designed for smooth motion, ergonomic comfort, and compact setups, making them ideal for any home gym.
3. How does a Hoist machine work?
It uses pulleys and cables to provide resistance. The design allows smooth, controlled movement for strength training exercises.
4. What is the Hoist V4 Home Gym?
The Hoist V4 Elite features an articulating press arm with adjustable motion and attachable strap handles for versatile workouts.
5. Can gym machines really build muscle?
Yes. Machines are excellent for isolating muscles, providing stability, and helping beginners learn proper movements.
6. What is the 3-3-3 gym rule?
It’s a weekly workout plan: 3 days strength training, 3 days cardio, and 3 days rest or active recovery.
7. Can a home gym replace a gym membership?
Yes, if you’re self-motivated. Home gyms save long-term costs but require space and equipment updates.
8. How can I lose belly fat with machines?
Machines like treadmills, rowing machines, and spin bikes burn calories and increase metabolism. Strength training also helps by building muscle.
9. How long should a workout be for results?
Even 30 minutes of focused strength or cardio exercises daily can be effective for beginners and muscle growth.


