 Honeywell RTHL2510 Programmable Thermostat
Identify System Type
This thermostat is compatible with the following systems:
- Gas, oil, or electric furnace
- Central air conditioner
- Hot water system with or without pump
- Millivolt system
- Central heating and cooling system
- Heat pump without auxiliary/backup heat
- Heat pump with auxiliary/backup heat
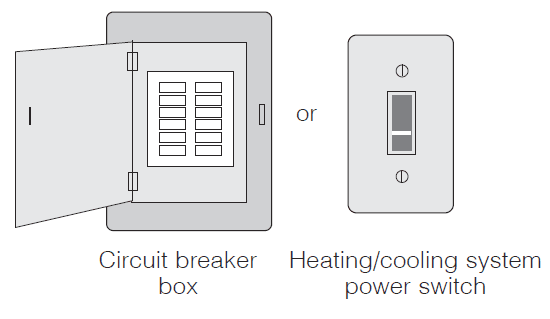
Turn Off Power to the Heating/Cooling System
Remove Old Thermostat
- Remove the old thermostat but leave the wallplate with wires attached.

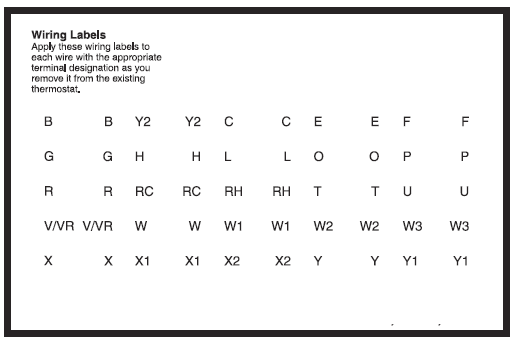
Label Wires with Tags
- Label the wires using the supplied wire labels as you disconnect them


Separate Wallplate from New Thermostat
- Remove the wallplate from the new thermostat and mount it onto the wall.

Mount Wallplate
- Mount the new wallplate using the included screws and anchors.

- Drill 3/16-in. holes for drywall
- Drill 3/32-in. holes for plaster
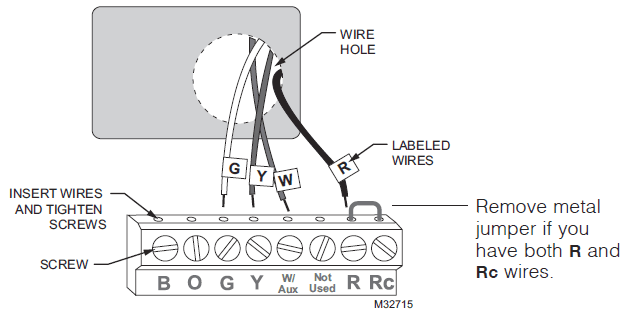
Connect Wires
- Simply match wire labels.
- If labels do not match the letters on the thermostat, check “Alternate Wiring (Conventional Systems)” on page 6 and connect to the terminal as shown (see notes, below).

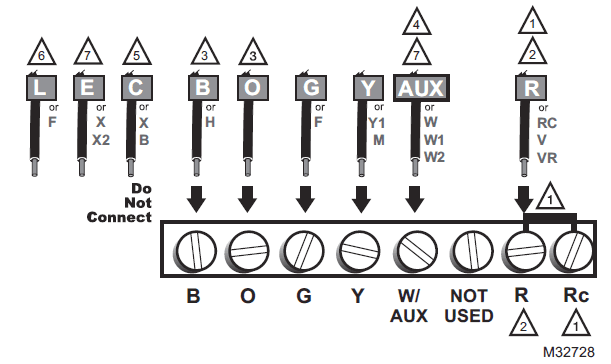
Alternate Wiring (Conventional Systems)
- If labels do not match the letters on the thermostat, check the chart below and connect to the terminal as shown here (see notes, below).

- If wires will be connected to both R and Rc terminals, remove the metal jumper.
- Do not use C or X. Wrap the bare end of the wire with electrical tape.
- If you have a heat pump without auxiliary/backup heat connect O or B, not both. If you do not have a heat pump, do not connect B. Wrap the bare end of the wire with electrical tape.
- Place a jumper (piece of wire) between Y and W if you are using a heat pump without auxiliary/backup heat.
Alternate Wiring (Heat Pump)
- If labels do not match the letters on the thermostat, see page 7.

Alternate wiring (for heat pumps with auxiliary or backup heat only)
- If labels do not match the letters on the thermostat, check the chart below and connect to the terminal as shown here (see notes, below).

- Leave metal jumper in place, connecting R & Rc terminals.
- If your old thermostat had both V and VR wires, stop now and contact a qualified contractor for help.
- If your old thermostat had separate O and B wires, wrap the B wire in electrical tape and do not connect.
- If your old thermostat had Y1, W1, and W2 wires, stop now and contact a qualified contractor for help.
- Do not use C or X wire. Do not use B wire if you already have O wire. Wrap the bare end of the wire with electrical tape.
- Do not use L wire. Wrap the bare end of the wire with electrical tape.
- If your old thermostat had E and Aux wires (or alternate wires), connect both wires to the Aux terminal
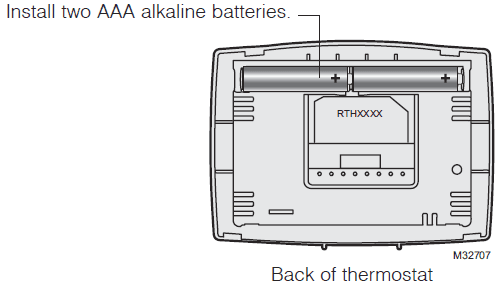
Install Batteries
Set fan operation switch
Move the switch to the proper setting:
- Gas or Oil: For gas or oil heating systems, leave the fan operation switch in this factory-set position (for systems that control the fan in a call for heat).

- Electric or Heat Pump: Change the switch to this setting for heat pumps or electric heat systems. (This setting is for systems that allow the thermostat to control the fan in a call for heat if a fan wire is connected to the G terminal.)
Install Thermostat onto Wallplate
- Install the thermostat on the wallplate.

Changing Settings
- Press the s or t button to change the setting.
- Press the s and t buttons simultaneously for one second to advance to the next function.
- Press the RUN button to exit and save settings.

NOTE: If you do not press any button for 60 seconds while you are in the setup menu, the thermostat automatically saves any changes made and exits the menu
| Function | Description Press the .6. or T button to | Setting |
| 1 | select system type | 0 Heating & cooling: Gas, oil or electric heating with central air conditioning or heat pump without auxiliary/back-up heat. 1 Heat pump with auxiliary/backup heat: Outside compressor provides both heating and cooling. |
| 5 | select your heating system and optimize its operation | 5 Gas or oil furnace: Use this setting if you have a standard gas or oil furnace that is less than 90% efficient. 6 Electric furnace: Use this setting if you have any type of electric heating system. 3 Heat pump, hot water or high-efficiency furnace: Use this setting if you have a hot water system or a gas furnace of greater than 90% efficiency. 2 Gas/oil steam or gravity system: Use this setting if you have a steam or gravity heat system. |
| 13 | select Early Start | 1 On 0 Off |
| 14 | select Fahrenheit or Celsius temperature display | 0 Fahrenheit temperature display (°F) 1 Celsius temperature display (°C) |
| 15* | select Compressor Protection settings | 1 On 0 Off |
| 20 | select clock display | 0 12-hour display 1 24-hour display |
| 40 | restore program schedule to default settings | 0 Off 1 On: Program schedule default settings are listed on page 12. |
About your new thermostat
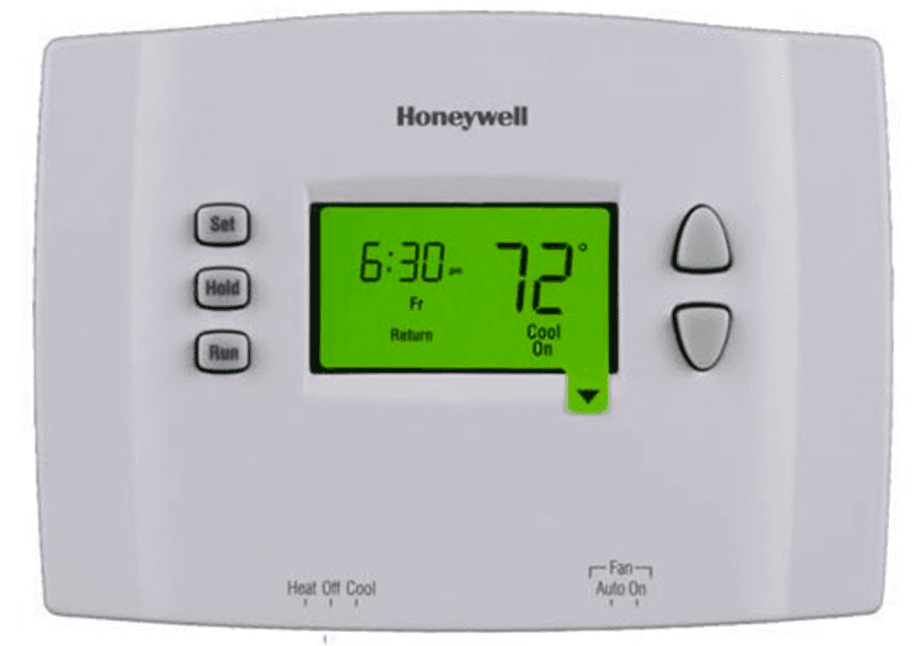
Your new Honeywell thermostat has been designed to give you many years of reliable service and easy-to-use, push-button climate control.
- Backlit display is easy to read
- Displays ambient (measured) temperature at all times
- One-touch access to setpoint temperature
- Preset program settings
- Temporary and permanent override of schedule
- Early start ensures the right temperature at the right time
- Built-in compressor protection
Thermostat controls

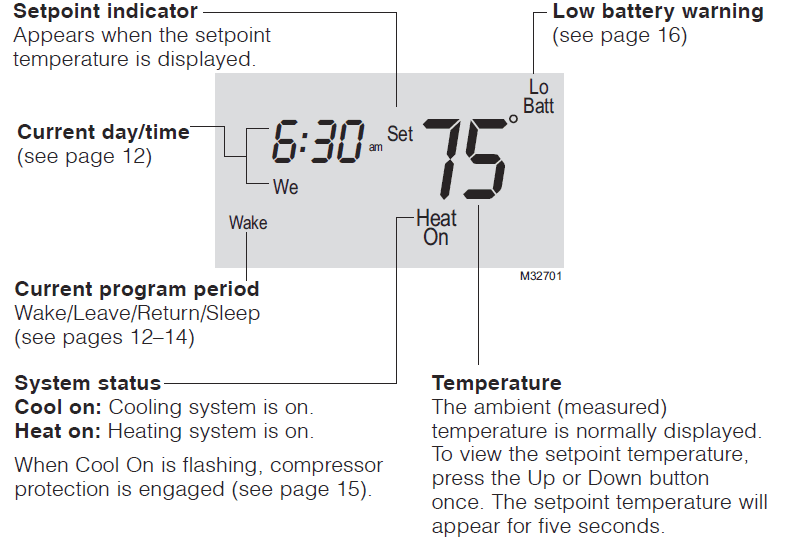
Display screen
Early Start
- This feature allows the heating or cooling to turn on before the program start time, so the temperature is reached at the time you set. For example: Set the Wake time to 6 am, and the temperature to 70°. The heat will come on before 6 am, so the temperature is 70° by the time you wake at 6. The next time period is displayed when the system is activated before a scheduled time period.
Troubleshooting
If you have difficulty with your thermostat, please try the following suggestions. Most problems can be corrected quickly and easily.
- Display is blank
- Check the circuit breaker and reset if necessary.
- Make sure the power switch at the heating & cooling system is on.
- Make sure furnace door is closed securely.
- Make sure fresh AAA alkaline batteries are correctly installed.
- The heating or cooling system does not respond
- Set the stem switch to Heat. Make sure the temperature is set higher than the Inside temperature.
- Set the system switch to Cool. Make sure the temperature is set lower than the Inside temperature.
- Wait 5 minutes for the system to respond
1-year limited warranty
- Honeywell warrants this product, excluding the battery, to be free from defects in the workmanship or materials, under normal use and service, for a period of one (1) year from the date of purchase by the consumer. If at any time during the warranty period, the product is determined to be defective or malfunctions, Honeywell shall repair or replace it (at Honeywell’s option). If the product is defective,
- (i) Return it, with a bill of sale or other dated proof of purchase, to the place from which you purchased it; or
- (ii) call Honeywell Customer Care at 1-800-468-1502. Customer Care will make the determination whether the product should be returned to the following address: Honeywell Return Goods, Dock 4 MN10-3860, 1885 Douglas Dr. N., Golden Valley, MN 55422, or whether a replacement product can be sent to you.
- This warranty does not cover removal or reinstallation costs. This warranty shall not apply if it is shown by Honeywell that the defect or malfunction was caused by damage that occurred while the product was in the possession of a consumer.
- Honeywell’s sole responsibility shall be to repair or replace the product within the terms stated above. HONEYWELL SHALL NOT BE LIABLE FOR ANY LOSS OR DAMAGE OF ANY KIND, INCLUDING ANY INCIDENTAL OR CONSEQUENTIAL DAMAGES RESULTING, DIRECTLY OR INDIRECTLY, FROM ANY BREACH OF ANY WARRANTY, EXPRESS OR IMPLIED, OR ANY OTHER FAILURE OF THIS PRODUCT. Some states do not allow the exclusion or limitation of incidental or consequential damages, so this limitation may not apply to you.
For more manuals by Honeywell visit, ManualsLibraryy
Honeywell RTHL2510 Programmable Thermostat-FAQs
How do I manually adjust the temperature on my Honeywell thermostat?
Use the “+” and “-” buttons to set your desired temperature. Press the “Hold” button to maintain the selected temperature until you change it manually.
How do I set the temperature on my Honeywell thermostat?
Press the ▲ button to increase and the ▼ button to decrease the temperature. To turn the thermostat off, press and hold the designated button for 2 seconds. To turn it back on, repeat the process.
How do I reset my Honeywell thermostat to factory settings?
Turn off the thermostat and press the center button to access the menu. Navigate to “Settings,” then select “Reset,” and choose “Factory Reset” from the options.
How does the Auto mode on my Honeywell thermostat work?
In Auto mode, the thermostat follows the programmed temperature schedule, ensuring comfort while optimizing energy savings.
What does “Prog” mean on my thermostat?
“Prog” refers to a programmable thermostat feature, allowing you to set different temperature schedules for specific times of the day to maximize comfort and energy efficiency.
What is the difference between “Hold” and “Run” on a thermostat?
The “Hold” setting maintains a constant temperature, overriding scheduled settings. The “Run” setting follows the pre-programmed temperature schedule to optimize energy efficiency.
What is the difference between “Fan On” and “Fan Auto” on a thermostat?
When set to “On,” the fan runs continuously, even when heating or cooling is off. In “Auto” mode, the fan only runs when the heating or cooling system is actively operating.
How do I reset the primary control on my Honeywell thermostat?
Press and hold the reset button until the LED flashes (about 30 seconds). This allows the system to enter the pump priming cycle if needed.
How can I check if my thermostat is reading the correct temperature?
Compare your thermostat’s reading with a portable indoor thermometer. Alternatively, you can use a temperature-checking app to verify accuracy.


 Honeywell RTHL2510 Programmable Thermostat
