![]()
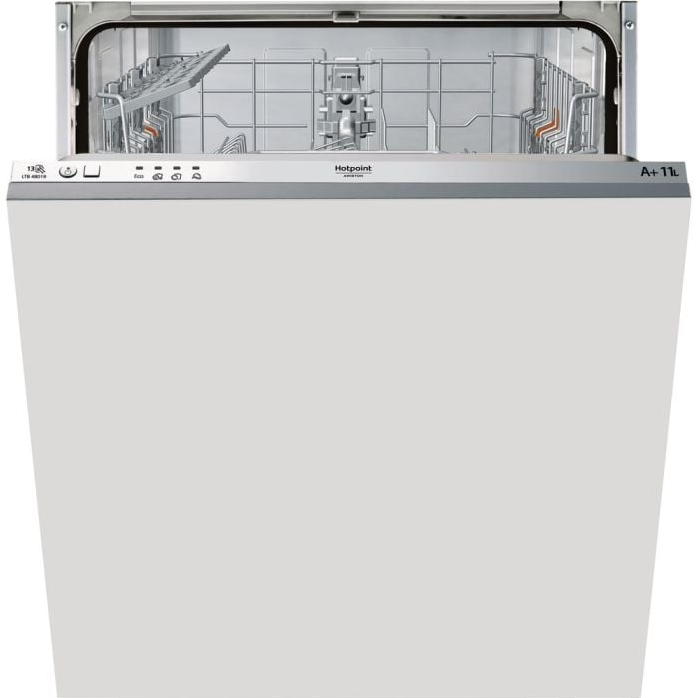
Hotpoint LTB 4B019 Integrated Dishwasher
Installation
If the appliance must be moved at any time, keep it in an upright position; if absolutely necessary, it may be tilted onto its back.
Positioning and levelling
- Position the dishwasher on a level, sturdy floor. If the floor is uneven, the front feet of the appliance may be adjusted until it reaches a horizontal position. If the appliance is levelled correctly, it will be more stable and much less likely to move or cause vibrations and noise while it is operating.
- Before recessing the dishwasher, stick the adhesive transparent strip* under the wooden shelf in order to protect it from any condensation which may form.
- Place the dishwasher so that its sides or back panel are in contact with the adjacent cabinets or the wall. This appliance can also be recessed under a single worktop* (see the Assembly instruction sheet).
- To adjust the height of the rear foot, turn the red hexagonal bushing on the lower central part at the front of the dishwasher using a hexagonal spanner with an opening of 8 mm. Turn the spanner in a clockwise direction to increase the height and in an anticlockwise direction to decrease it. (see Building-in instruction sheet attached to the documentation)
The dishwasher meets the requirements set out by the regulations in force concerning safety and electrical equipment.
Connecting the water supply
The water inlet and outlet hoses may be positioned towards the right or the left in order to achieve the best possible installation.
Make sure the dishwasher does not bend or squash the hoses.
Connecting the water inlet hose
- To a 3/4” gas cold or hot water connection point (max. 60°C).
- Run the water until it is perfectly clear.
- Screw the inlet hose tightly into position and turn off the tap.
Connecting the drain hose
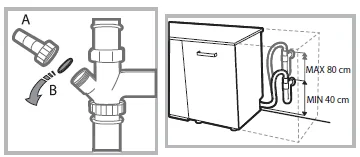
Connect the drain hose (without bending) to a drain duct with a minimum diameter of 2 cm. (A)
The drain hose connection must be at a height ranging from 40 to 80 cm (from 15’’ to 31’’) from the floor or surface where the dishwasher rests.
- before connecting the drain hose, remove any internal restrictions; this will prevent a buildup of debris, which could cause a blockage.
- remove any restrictions from the waste spigot and ensure that the sealing bung is removed (B).

Changing the Plug
Wires in the mains lead are coloured in accordance with the following code:
- Green/Yellow – Earth
- Blue – Neutral
- Brown – Live
If you change the plug, the colour of the wires in the mains lead may not correspond with the terminal markings in the plug, which if not coloured, could be:
- EARTH ‘E’ or

- NEUTRAL ‘N’
- LIVE ‘L’
Description of the appliance
Overall view
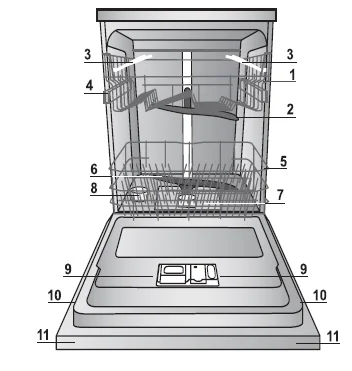
- Upper rack
- Upper spray arm
- Tip-up dispensers
- Rack height adjuster
- Lower rack
- Lower spray arm
- Washing filter
- Salt dispenser
- Detergent dispenser and rinse-aid dispenser
- Data plate
- Control panel
Control panel
Refined Salt and Rinse Aid
Measuring out the refined salt
The use of salt prevents the formation of LIMESCALE on the dishes and on the machine’s functional components.
- It is important that the salt dispenser be never empty.
- It is important to set the water hardness.
The salt dispenser is located in the lower part of the dishwasher (see Description) and should be filled:
- When the LOW RINSE AID indicator light in the control panel is lit;
- When the green float on the cap of the salt dispenser is no longer visible.
- See autonomy in the water hardness table.
- Remove the lower rack and unscrew the container cap (anticlockwise).
- Only the first time you do this: fill the water dispenser up to the edge.
- Position the funnel (see figure) and fill the salt container right up to its edge (approximately 1 kg); it is not unusual for a little water to leak out.
- Remove the funnel and wipe any salt residue away from the opening; rinse the cap under running water and then screw it on. It is advisable to perform this procedure every time you add salt to the container.
Make sure the cap is screwed on tightly so that no detergent can get into the container during the wash cycle (this could damage the water softener beyond repair).
Setting the water hardness
For perfect water softener operation, it is essential that the adjustment be based on the water hardness in your house. Ask your local water supplier for this information. The factory setting is for medium water hardness.
Switch the dishwasher on using the On/Off button.
- Switch it off using the On/Off button
- Hold down the button P for 5 seconds until you hear a beep.
- Switch it on using the On/Off button
- The current selection level number and salt indicator light flash (flashing indicator only).
- Press button P to select the desired hardness level (see hardness table).
- Switch it off using the On/Off button
- Setting is complete!
Even if using multi-functional tablets, the salt dispenser should still be filled.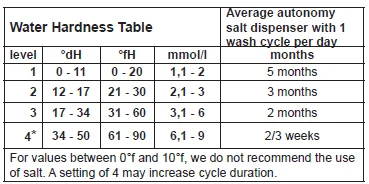
Measuring out the rinse aid
Rinse aid makes dish DRYING easier. The rinse aid dispenser should be filled:
- When the LOW RINSE AID indicator light on the panel/display is lit;
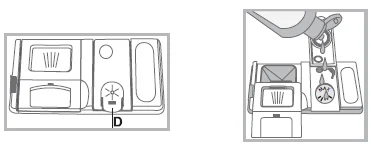
- When the dark optical indicator* on the dispenser door “D” becomes transparent.

- Open the dispenser “D” by pressing and pulling up the tab on the lid.
- Carefully introduce the rinse aid as far as the maximum reference notch of the filling space – avoid spilling it. If this happens, clean the spill immediately with a dry cloth.
- Press the lid down until you hear a click to close it. NEVER pour the rinse aid directly into the appliance tub.
Rinse-aid dispenser setting
If you are not completely satisfied with the drying results, you can adjust the quantity of rinse aid used.
- Switch the dishwasher on using the On/Off button.
- Switch it off using the On/Off button
- Press button P three times – a beep will be heard.
- Switch it on using the On/Off button
- The current selection level number and rinse aid indicator light flash (flashing indicator only).
- Press button P to select the level of rinse aid quantity to be supplied.
- Switch it off using the On/Off button
- Setting is complete!
If the rinse aid level is set to ZERO (ECO), no rinse aid will be supplied. The LOW RINSE AID indicator light will not be lit if you run out of rinse aid.
A maximum of 4 levels can be set according to the dishwasher model. The factory setting is for a medium level.
- If you see bluish streaks on the dishes, set a low number (1-2).
- If there are drops of water or limescale marks on the dishes, set a high number (3-4).
Loading the racks
Lower rack
The lower rack can hold pans, lids, dishes, salad bowls, cutlery, etc. Large plates and lids should ideally be placed at the sides. Very soiled dishes and pans should be placed in the lower rack because in this sector, the water sprays are stronger and allow a higher washing performance.
Several dishwasher models are fitted with tip-up sectors.
They can be used in a vertical position when arranging dishes or in a horizontal position (lower) to load pans and salad bowls easily.
Upper rack
Load this rack with delicate and lightweight crockery such as glasses, cups, saucers and shallow salad bowls.
Several dishwasher models are fitted with tip-up sectors. They can be used in a vertical position when arranging tea/ dessert saucers or in a lower position to load bowls and food containers.
Adjusting the height of the upper rack
In order to make it easier to arrange the crockery, the upper rack may be moved to a higher or lower position.
The height of the upper rack should be adjusted WHEN THE RACK IS EMPTY.
NEVER raise or lower the rack on one side only.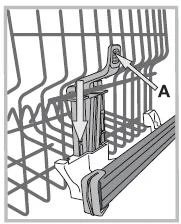
If the rack is equipped with a Lift-Up device (see figure), lift it up by holding its sides. To restore the lower position, press the levers (A) at the sides of the rack and follow the rack down.
Detergent and dishwasher use
Measuring out the detergent
Good washing results also depend on the correct amount of detergent being used. Exceeding the stated amount does not result in a more effective wash and increases environmental pollution.
The amount can be adjusted according to the soil level.
In the case of normally soiled items, use approximately either 35g (powder detergent) or 35ml (liquid detergent). If tablets are used, one tablet will be enough.
If the crockery is only lightly soiled or if it has been rinsed with water before being placed in the dishwasher, reduce the amount of detergent used accordingly.
For good washing results, also follow the instructions shown on the detergent box.
For further questions, please ask the detergent producers.
To open the detergent dispenser, use the opening device “A”.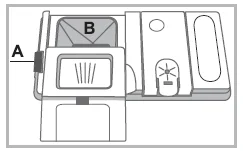
Introduce the detergent into the dry dispenser “B” only. Place the amount of detergent for pre-washing directly inside the tub.
- When measuring out the detergent, refer to the Table of wash cycles to add the proper quantity. Compartment B comprises a level showing the maximum quantity of liquid or powder detergent that can be added to each cycle.
- Remove detergent residues from the edges of the dispenser and close the cover until it clicks.
- Close the lid of the detergent dispenser by pulling it up until the closing device is secured in place.
The detergent dispenser automatically opens up at the right time according to the wash cycle.
If all-in-one detergents are used, we recommend using the TABS option, because it adjusts the cycle so that the best washing and drying results are always achieved.
Starting the dishwasher
- Turn the water tap on.
- Open the door and press the ON/OFF button.
- Measure out the detergent. (see adjacent information).
- Load the racks (see Loading the racks).
- Select the wash cycle in accordance with the type of crockery and its soil level (see Table of wash cycles) by pressing the P button.
- Select the wash options. (see Special wash cycles and Options).
- Start the wash cycle by shutting the door.
- The end of the wash cycle is indicated by beeps and by the flashing of the indicator light of the selected wash cycle. Open the door, switch off the appliance by pressing the ON/OFF button, shut off the water tap and unplug the appliance from the electricity socket.
- Wait a few minutes before removing the crockery in order to avoid burns. Unload the racks, beginning with the lower level.
Changing a wash cycle in progress
If a mistake was made in the wash cycle selection process, it is possible to change the cycle provided that it has only just begun: open the door, taking care to avoid the escaping steam, and press and hold the ON/OFF button; the machine will switch off. Switch the machine back on using the ON/OFF button and select the new wash cycle and any options desired; start the cycle by closing the door.
Adding extra crockery
Without switching off the machine, open the door, taking care to avoid the escaping steam, and place the crockery inside the dishwasher. Close the door: the cycle starts from the point at which it was interrupted.
Accidental interruptions
If the door is opened during the wash cycle or there is a power cut, the cycle stops. It starts again from the point at which it was interrupted once the door has been shut or the electricity supply restored.
Wash cycles
Instructions on wash-cycle selection and detergent dosage
- The ECO wash cycle is the standard cycle to which the energy label data refers. It can be used to wash crockery with a normal soil level and is the most efficient cycle in terms of energy and water consumption for this type of crockery. 27 gr/ml + 6 gr/ml** – 1 Tab (**Quantity of pre-washing detergent)
- Heavily soiled dishes and pans (not to be used for delicate items). 30 gr/ml – 1 Tab
- Normally soiled pans and dishes. 27 gr/ml + 6 gr/ml** – 1 Tab
- Pre-wash while awaiting completion of the load with the dishes from the next meal. No detergent.
Standby consumption: Left-on mode consumption: 5 W – Off mode consumption: 0.5 W.
Care and maintenance
Shutting off the water and electricity supplies
- Turn off the water tap after every wash cycle to avoid leaks.
- Always unplug the appliance when cleaning it and when performing maintenance work.
Cleaning the dishwasher
- The external surfaces of the machine and the control panel can be cleaned using a non-abrasive cloth which has been dampened with water. Do not use abrasive detergents or solvents.
- Any marks on the inside of the appliance may be removed using a cloth dampened with water and a little vinegar.
Cleaning the filters
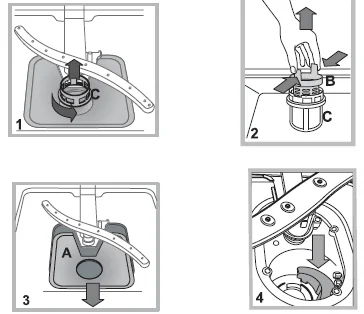
The filter assembly consists of three filters, which remove food residues from the washing water and then recirculate the water.
They must be cleaned if you wish to achieve the best results in every wash.
After several washes, check the filter assembly and, if necessary, clean it thoroughly under running water, using a non-metallic brush and following the instructions below:
- Turn the cylindrical filter C in an anti-clockwise direction and pull it out (fig. 1).
- Remove the cup filter B by exerting a slight pressure on the side flaps (fig. 2);
- Slide out the stainless-steel plate filter A. (fig. 3).
- Inspect the trap and remove any food residues. NEVER REMOVE the wash-cycle pump protection (black detail) (fig.4).

After cleaning the filters, replace the filter assembly and fix it in position correctly; this is essential for maintaining the efficient operation of the dishwasher.
Leaving the machine unused for extended periods
- Disconnect the appliance from the electricity supply and shut off the water tap.
- Leave the door of the appliance ajar.
- When you return, run a wash cycle when the dishwasher is empty.
Troubleshooting
The dishwasher does not start or cannot be controlled.
- The water supply tap is not turned on.
- Switch off the appliance by pressing the ON/OFF button, switch it back on after approximately one minute and reset the wash cycle.
- The appliance has not been plugged in properly, or another electricity socket should be used.
- The dishwasher door has not been closed properly.
The door won’t close.
- Make sure that the racks are inserted all the way.
- The lock was released. Strongly push the door until a “clacking” noise is heard.
No water drains out of the dishwasher.
- The wash cycle has not finished yet.
- The water drain hose is bent (see Installation).
- The drain duct is clogged up.
- The filter is clogged up with food residues.
- Check the height of the drain hose.
The dishwasher makes excessive noise.
- The dishes are rattling against each other or against the spray arms. Place the dishes properly and make sure the spray arms can rotate freely.
- Too much foam: the detergent has not been measured out correctly, or it is not suitable for use in dishwashers. (See Detergent and dishwasher use.) Do not prewash the dishes by hand.
The dishes and glasses are covered in a white film or limescale deposits.
- No refined salt.
- Water hardness adjustment is not suitable: increase the relevant values. (See Refined Salt and Rinse Aid.)
- The salt and rinse-aid dispenser cap has not been closed properly.
- The rinse aid has been used up, or the dosage is too low.
The dishes and glasses are streaked or have a bluish tinge.
The rinse aid dosage is too high.
Essential Contact Information
Hotpoint Service
We are the largest service team in the country, offering you access to 400 skilled telephone advisors and 1000 fully qualified engineers on call to ensure you receive fast, reliable, local service.
- UK: 08448 224 224
- Republic of Ireland: 0818 313 413
- www.hotpointservice.co.uk
Parts and Accessories
We supply a full range of genuine replacement parts as well as accessory products that protect and hygienically clean your appliance to keep it looking good and functioning efficiently throughout its life.
- UK: 08448 225 225
- Republic of Ireland: 0818 313 413
- www.hotpointservice.co.uk
For more Manuals by Hotpoint, visit ManualsLibraryy
Hotpoint LTB 4B019 Integrated Dishwasher-FAQs
Does the Hotpoint LTB 4B019 dry dishes effectively?
Yes, it uses a full wash-and-dry system designed to leave dishes clean and cupboard-ready after each cycle.
Why do some dishwashers run for 3 hours or more?
Modern dishwashers use less water and energy, so they run longer to maintain cleaning performance while staying efficient.
What are the most common problems with dishwashers?
Typical issues include leaks, poor drainage, unclean dishes, odors, and faulty sensors. Regular cleaning helps prevent most of these.
What is the shortest cycle on a Hotpoint dishwasher?
Many Hotpoint models offer a 30-minute express cycle, ideal for lightly soiled dishes.
What is the 1-hour wash cycle used for?
It quickly cleans lightly soiled items using higher temperatures and slightly more water than a standard wash.
Do I need to add salt to my Hotpoint dishwasher?
Yes. Salt softens hard water, prevents limescale, and improves cleaning results. Refill when the salt light or “S” symbol appears.
What happens if I use my dishwasher without salt?
Dishes may appear cloudy, and limescale can build up, reducing cleaning efficiency and damaging internal components.
How can I tell if my dishwasher needs more salt?
Most models show a salt indicator light (S symbol) when the level is low. You can also check the salt reservoir manually.
Is vinegar safe to clean my dishwasher?
Yes—vinegar helps remove grime and odors. Place a cup of vinegar on the top rack and run a hot cycle. (Avoid overuse on rubber parts.)
How much does it cost to run a dishwasher for 2 hours?
A typical cycle costs $0.14–$0.30 depending on electricity rates and model efficiency.

