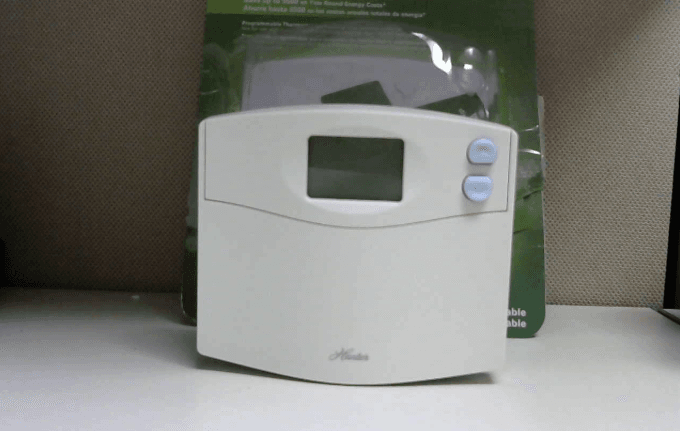
Hunter 44150 Digital Programmable Thermostat
Read This Before Installing Thermostat
IMPORTANT
- Read the entire installation section of this Owner’s Manual thoroughly before you begin to install or operate your Hunter Thermostat. Remove the mylar label from the display window.
INSTALLATION
- All installation is normally performed at your thermostat.
PROGRAMMING
- You can practice programming before installing your thermostat by inserting and connecting the batteries and following the instructions on page 14. This can be done while you relax in your favorite chair and is a very good way to familiarize yourself with all the functions of your Hunter Thermostat.
OPERATION
- Your Hunter Thermostat is designed to operate with most gas, oil, electric or 2-wire hot water heating, and air conditioning systems that have 24-volt or millivolt control. This Hunter Thermostat will not control multistage heating or cooling systems, 110/220 V systems, or 3-wire zone systems.
COMPRESSOR PROTECTION
- The thermostat provides a 4-minute delay after shutting off the compressor before it can be restarted. This feature will prevent damage to your air conditioner compressor caused by rapid cycling. It does not provide a delay when there are power outages.
TEMPERATURE RANGE
- Your thermostat can be programmed between 40°F and 95°F (5°C and 35°C). However, it will display room temperatures from 32°F to 99°F (0°C to 37°C).
POWER FAILURE
- Whenever the main power is interrupted or fails, the battery power retains the programs and current time.
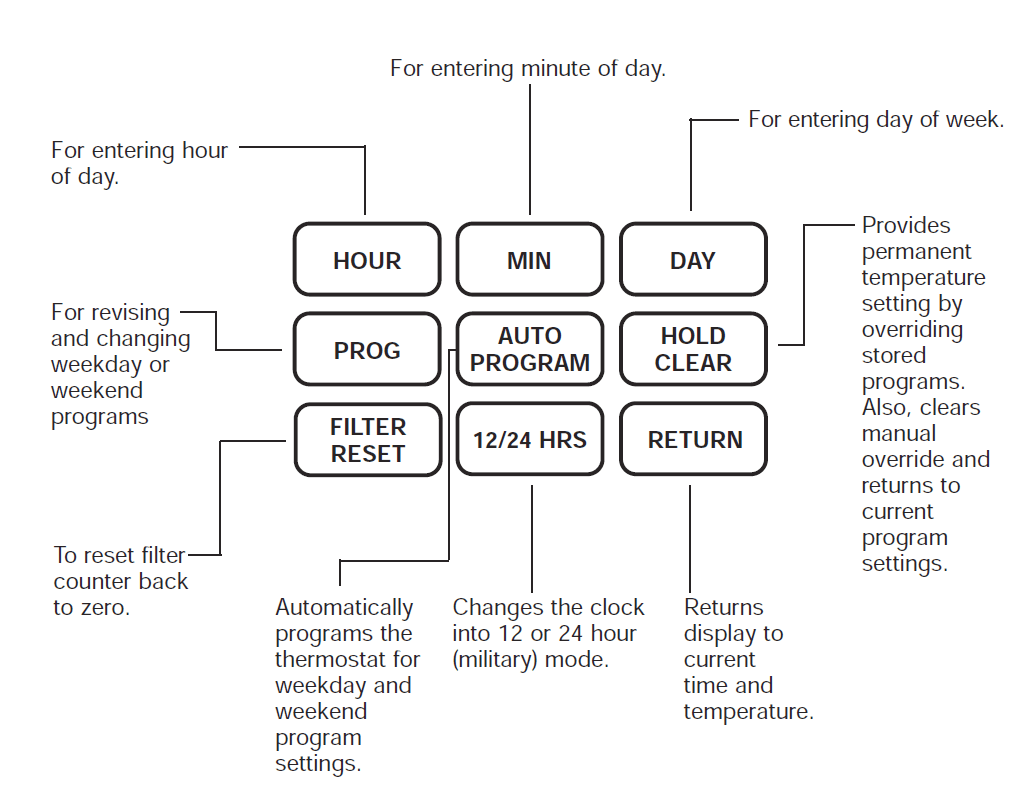
Features
Installation
Remove Old Thermostat
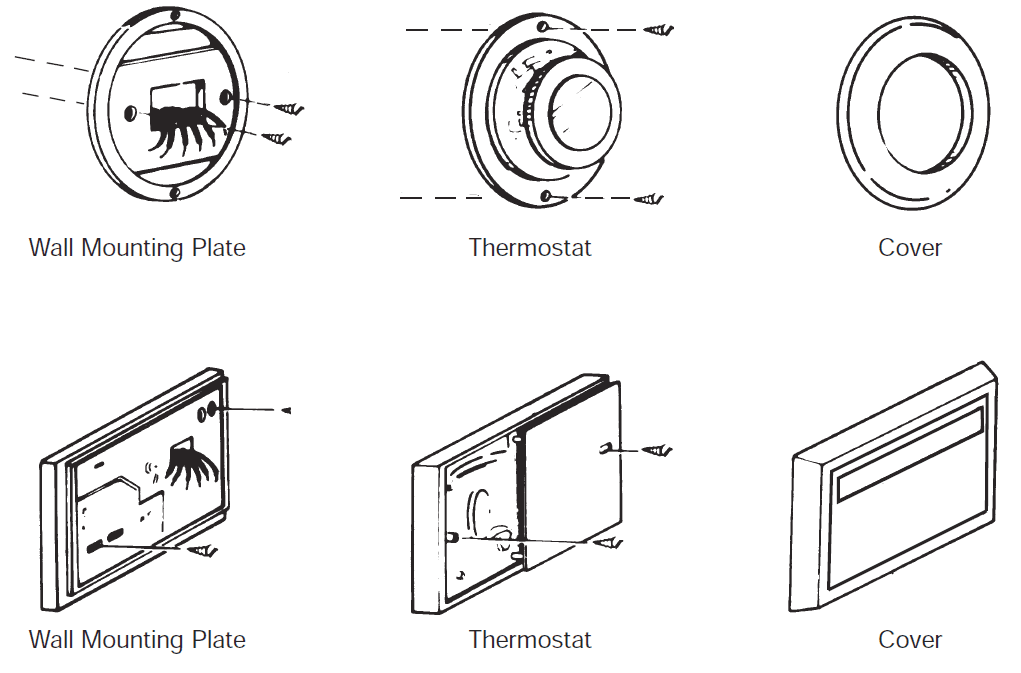
- Remove the existing thermostat cover and thermostat. See Figure 1. Some thermostats will have screws or other locking devices that must first be removed. Once the wall mounting plate is exposed, look for wires.
- If wires are not visible, they may be connected to the back of the wallplate. Again, look for screws, tabs, etc. Some models have doors that open to expose wires and mounting screws. (See Figure 1).
TYPICAL HOME THERMOSTATS
FIGURE 1
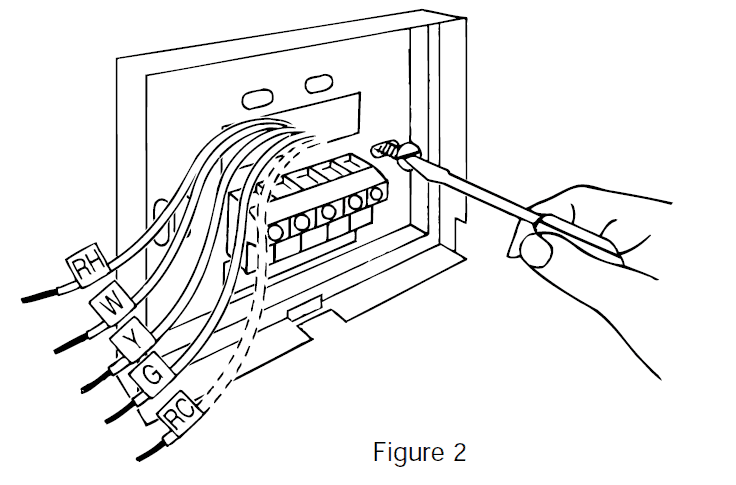
Label Wires
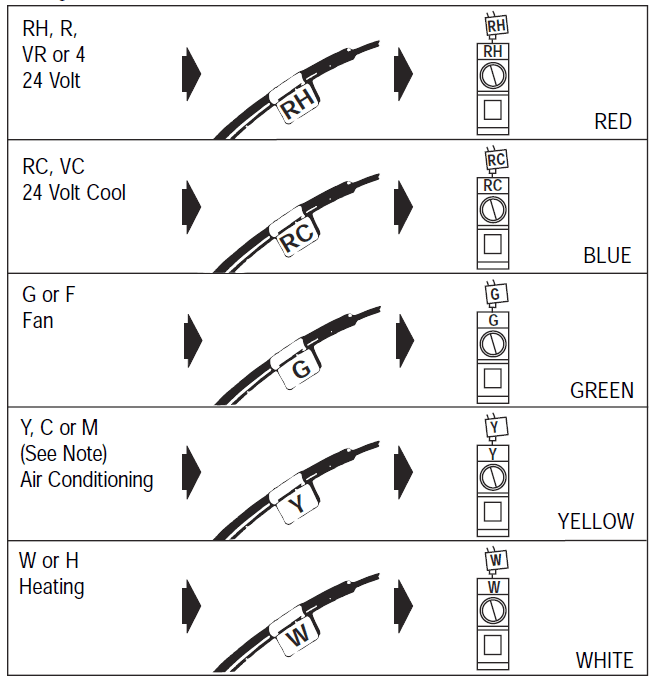
- Each wire coming from the wall to the existing thermostat is connected to a terminal point on that thermostat. Each of these terminal points is usually marked with a code letter as shown in Table A on page 11.
- The number of wires in your system can be as few as two (for heat-only systems), as many as eight, or any number in between. If you follow the labeling procedures correctly, you do not have to be concerned about how many wires there are.
- There is often no terminal marking on the existing thermostat of two-wire, heat-only systems. Do not worry, just connect either of the wires to the RH terminal, then connect the other wire to the W terminal to complete the circuit.
Wire Labeling
- This table will help you match the labels to the wires so you can attach them to your Hunter Thermostat.
- NOTE: Follow the labels when connecting wires since many installations do not follow the color coding of wires.

- NOTE: Follow the labels when connecting wires since many installations do not follow the color coding of wires.
Mount Wallplate and Thermostat
- Snap open the wallplate from your thermostat by pressing the release tab on the bottom of the thermostat. Position the wallplate on the wall and pull existing wires through a large opening. Then level for appearance. Mark holes for plastic anchors provided if existing holes do not line up with Hunter Thermostat holes

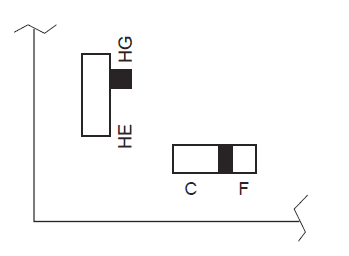
Selector Switches
- Heating system selector
- The heating system selector is a switch on the printed circuit board inside the thermostat. The switch is at the “HG” position. Leave it in this position if you have a gas furnace or an oil burner.
- If you have an electric furnace, test to see whether the heat and fan come on as expected. Leave the switch in the “HG” position. If the fan does not come on when the thermostat calls for heat, change the switch position to “HE.” The system selector has no effect in the cooling mode.
- NOTE: The “HG” position is for gas and most other systems. The “HE” position is for certain electric systems having a fan relay.
- F°/C° selector (Fahrenheit/Centigrade)
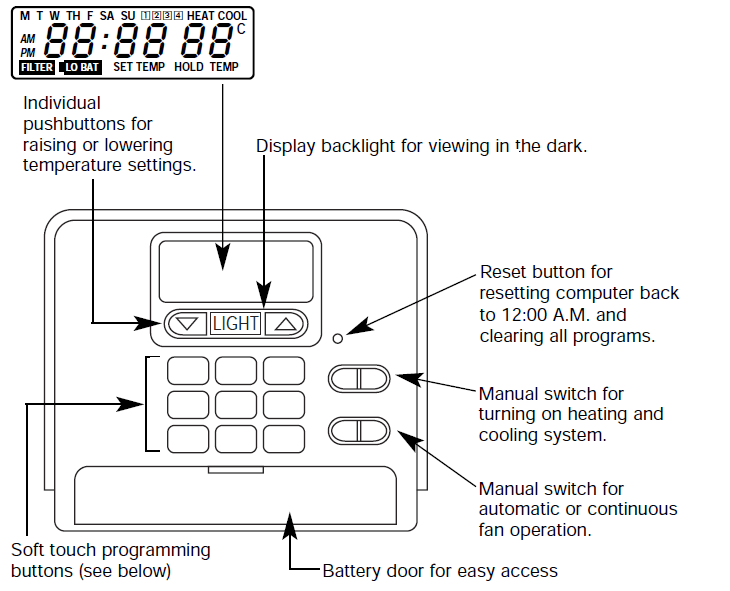
- Your thermostat is set for F° mode from the factory. In order to change to C° mode, slide the switch to C° and press the reset button on the front of the thermostat with a paper clip. The reset button is located near the display.
- NOTE: Unless the reset button is pressed, the thermostat will not change the mode.

- Be sure to tighten the terminal screws securely, otherwise, a loose wire could cause operational problems with your system or thermostat.
- Push excess wire back into the hole to prevent interference with the mounting of the thermostat cover.
- Make sure the Function Switch is set at OFF, and the FAN-AUTO Switch is in AUTO.
- Insert the bottom tab on the thermostat body into the slot at the bottom of the wallplate. Press the top of the thermostat body to snap it into the wallplate. (NOTE: Do not force the thermostat onto the wallplate, as the terminal pins may be damaged. If it does not snap properly, the thermostat may not work.)
- Insert the two AA-size batteries, observing the polarity marked on the unit.
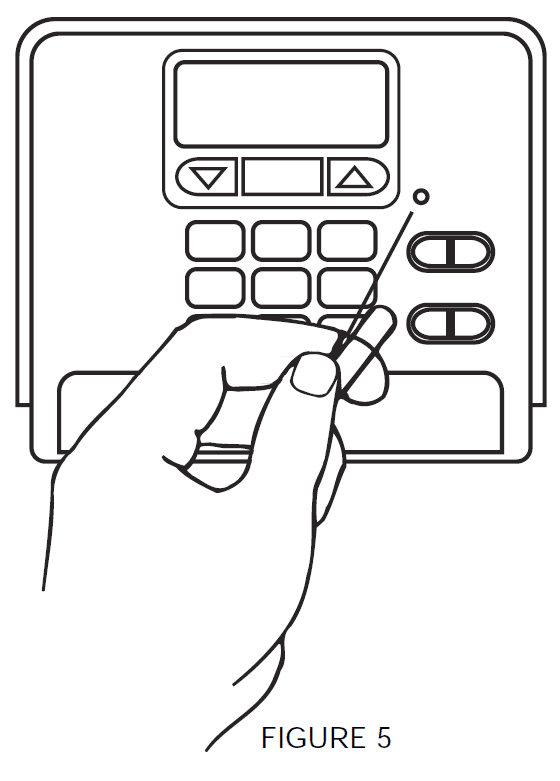
- Switch on the main power. Press the reset button. (See Figure 5.)

- The LCD display indicates the current room temperature of your house. If it shows random numbers or partial digits, press the reset button once again.
- The installation is now complete. Continue reading the Owner’s Manual for complete operating instructions
Programming
- Remove the mylar label covering the display window.
- When the heating or cooling system is actually operating, “HEAT” or “COOL” will appear on the display.
- If power is interrupted the batteries will keep all programs.
- If the “LOW BATT” indicator appears on the display replace the batteries.
Typical Suggested Summer and Winter Programs for Maximum Savings
- Studies conducted by the Department of Energy estimate that setting your thermostat back 10°F for two 8-hour periods during winter can reduce your fuel bill by as much as 30%. By setting your thermostat up 5° for two 8-hour periods during summer you can reduce your fuel bill by up to 25%.
- Your thermostat is capable of holding up to 4 separate programs for heat or cooling for weekdays and 4 separate programs for each weekend day.

Personal Program Schedule
- Before programming or changing the program, use this Personal Program Schedule to determine which times and temperature settings will best satisfy both your comfort and energy-saving requirements. Use a pencil so you can revise your records each time you change your temperature settings.
- FOR WINTER
PROGRAM NUMBER WAKE
1LEAVE 2 RETURN 3 SLEEP 4 MON. thru FRI.
TIME TEMP TIME TEMP TIME TEMP TIME TEMP SAT. and SUN.
TIME TEMP
TIME TEMP
TIME TEMP
TIME TEMP
- FOR SUMMER
PROGRAM NUMBER WAKE 1 LEAVE 2 RETURN 3 SLEEP 4 MON. thru FRI.
TIME TEMP TIME TEMP TIME TEMP TIME TEMP SAT. and SUN.
TIME TEMP
TIME TEMP
TIME TEMP
TIME TEMP
Auto-program method
- In the auto-program method, you can program your thermostat instantly for the entire week by simply pressing the “Auto Prog.” key once. When this key is pressed, the standard program gets activated and your thermostat is programmed automatically. The standard program is shown in Table 3.
- If you wish to change this program to suit your lifestyle, you can do so by changing the time and the temperatures of those programs that you want to be different than standard programs. The method is explained in the manual method of programming. Press AUTO PROG Your thermostat will be programmed automatically according to Table 3.
PROGRAM NUMBER TIME
TEMP
IN
F° (C°)
HEAT COOL 1 5:00 AM 68 (20) 78 (25) 2 7:00 AM 60 (15) 85 (29) 3 3:00 PM 68 (20) 78 (25) 4 10:00 PM 62 (16) 82 (27)
Reviewing Programs
- You may want to review the programs to see that the settings are compatible with your lifestyle
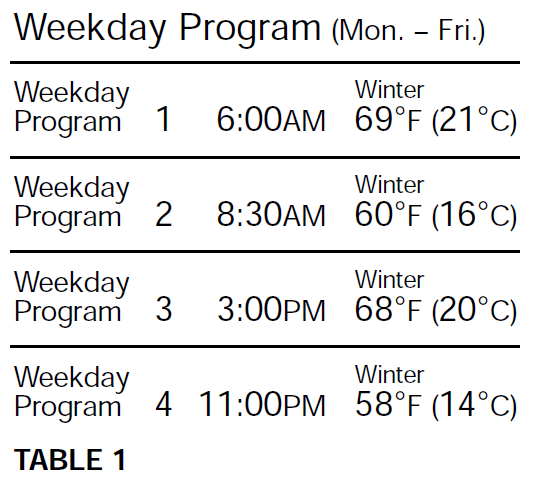
- Weekday Program

- Continue pressing PROG to review programs.
- NOTE: The temperatures you have entered will NOT take effect immediately but at the next program time change. The thermostat is pre-set to 68°F in heat
mode and 78°F in cool mode. - If you want a temperature other than 68°F or 78°F right away, you must use the manual override feature described below to enter the temperature you want
Temperature Span
- Your thermostat is pre-programmed at the factory to cycle when the temperature rises 1° above or 1° below the temperature setting to provide maximum comfort. It cannot be changed.
Backlighting
- Press LIGHT Your thermostat comes with an electroluminescent lamp for easy viewing of the display in the dark. To activate press the “light” button between the up and down arrow keys. The display will remain backlit for approximately five (5) seconds. If another button is pushed, the five-second timer will reset, and the light will turn off for five seconds after the last button is pressed.
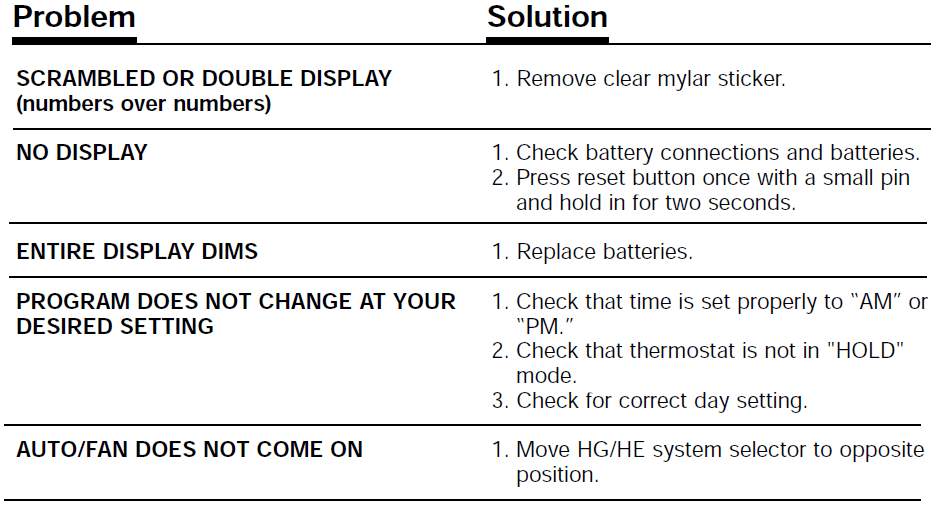
Troubleshooting
For more manuals by Hunter visit, ManualsLibraryy
Hunter 44150 Digital Programmable Thermostat-FAQs
How do I reset my Hunter thermostat?
To perform a hard reset, locate the reset button under the day/time button on the front of the thermostat. Use a paperclip to press it, which will reset all settings, including time and schedules.
Why is my Hunter thermostat not showing the correct temperature?
If the room temperature and the set temperature don’t match, your thermostat may need recalibration or could have a wiring issue. Also, check if the batteries need replacing.
How do I change the thermostat mode?
Turn the dial to highlight Mode, then press the thermostat toward the wall to select it. Choose between Heat, Cool, or Auto and confirm your selection.
How do I set the temperature on my Hunter thermostat?
Use the Up and Down buttons to adjust the temperature. To manually override scheduled settings, press Hold/Return until the Hold icon appears.
How do I program a schedule on my thermostat?
Select a day of the week, then input the start time and desired temperature for the first period. Repeat for the remaining periods. Some models allow you to copy schedules for multiple days.
Why is the “Cool On” light blinking?
A blinking “Cool On” means the system is in a 5-minute delay mode to protect the compressor. If the blinking doesn’t stop, the thermostat may have a wiring issue or be malfunctioning.
How do I control my thermostat?
1. Manual adjustment: Use the Up/Down buttons to change the temperature.
2. Programming: Follow the manual to set schedules for different times of the day.
3. Mode selection: Choose between Heat, Cool, or Auto based on your needs.
How do I manually test my thermostat?
Have someone stand by the furnace while you turn the thermostat from “Off” to “Heat” and increase the temperature. You should hear both the thermostat and furnace activate if it’s working properly.
Can dead batteries affect my thermostat’s temperature readings?
Yes! Low or dead batteries can cause inaccurate temperature readings and affect performance. Replace the batteries if you notice inconsistent readings.

