iLive IHTB159B Home Theater System
Setup
Features
- Bluetooth Wireless – range 60 ft.
- Voice prompts announce speaker functions
- Optical audio input
- HDMI audio input
- 6, 5.1 surround sound audio inputs
- 2 stereo audio inputs
Includes
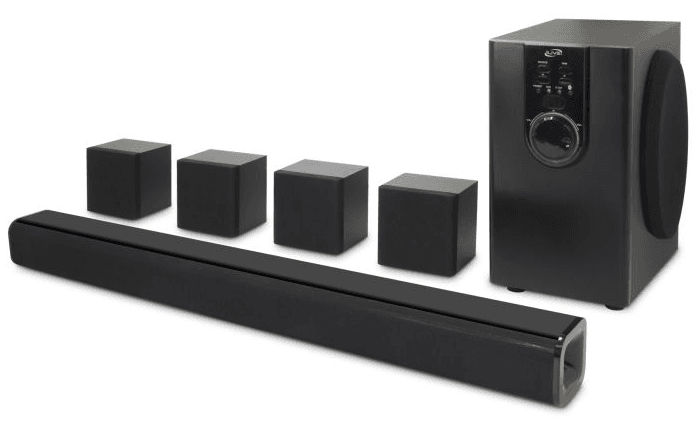
- Subwoofer (main unit)
- 32″ sound bar with 4 satellite speakers
- Remote control: requires CR2025 battery (included)
- Optical audio cable
- 3 RCA stereo audio cables
- 3.5mm to RCA audio cable
- AC/DC power adapter
- Wall mount hardware and instructions
Power
Plug the AC/DC power adapter (included) into a standard wall outlet and the DC power input on the rear of the subwoofer.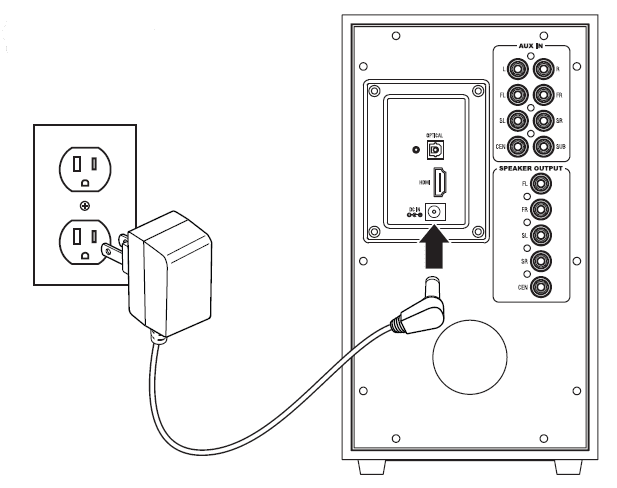
Connect Satellite Speakers
Connect each speaker wire with the corresponding port on the rear of the subwoofer. Be sure to match the plugs to the correct port or the speakers will not function properly.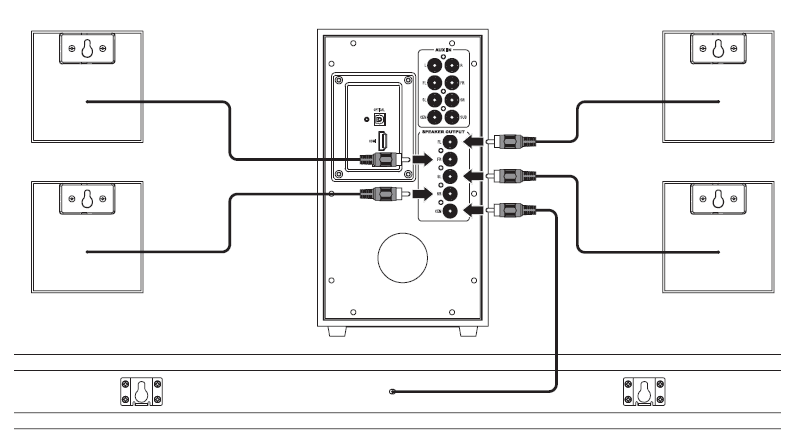
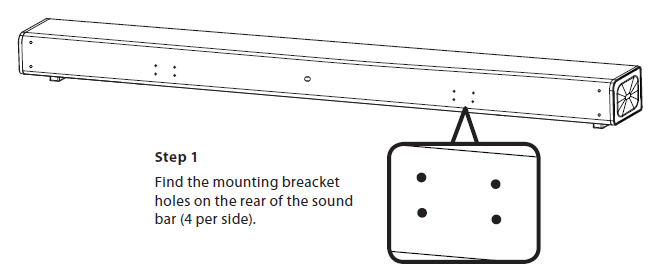
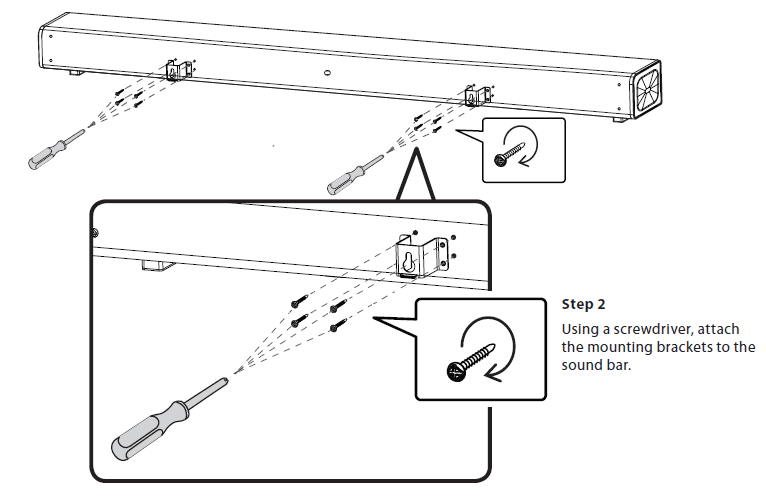
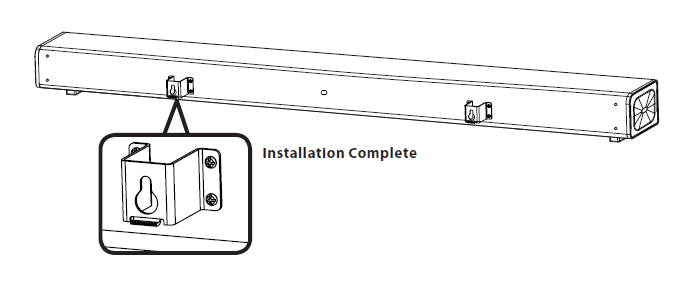
Wall Mount Bracket Installation
Orientation
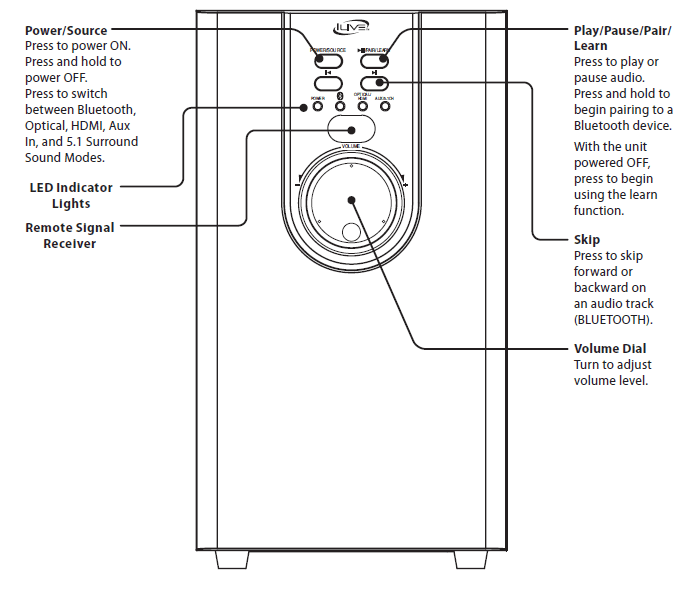
Subwoofer Front View
Subwoofer Rear View
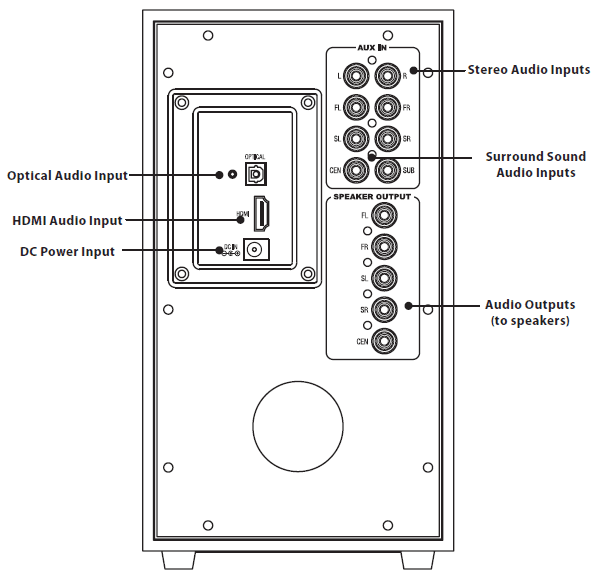
Remote
Functions
Note: When using the remote, be sure to aim at the remote signal receiver located on the front of the subwoofer.
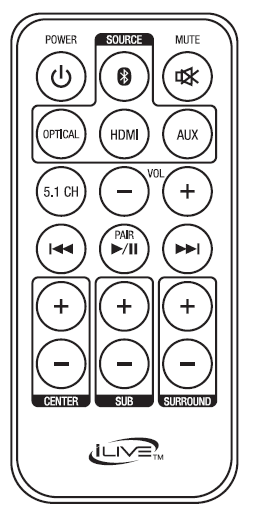
- Power: Press to turn the system ON or OFF.
- Mute: Press to mute the volume.
 : Press to switch to Bluetooth Mode.
- Optical: Press to switch to Optical Mode.
- HDMI: Press to switch to HDMI Mode.
- Aux: Press to switch to Aux In (RCA) Mode.
- 5.1CH: Press to switch to 5.1 Surround Sound Mode. Press and hold for 5 seconds to turn voice prompts ON/OFF.
- Volume-/+: Press to adjust the volume for all speakers.
- Pair/Play/Pause: Press and hold to begin pairing to a Bluetooth device.
Press to play or pause the selected track (BLUETOOTH). - Skip Back/Fwd: In Bluetooth Mode, press to skip the selected track.
- Center/Sub/Surround: Press to adjust the volume for individual speakers.
Remote Batteries
Requires 1 CR2025 battery (pre-installed).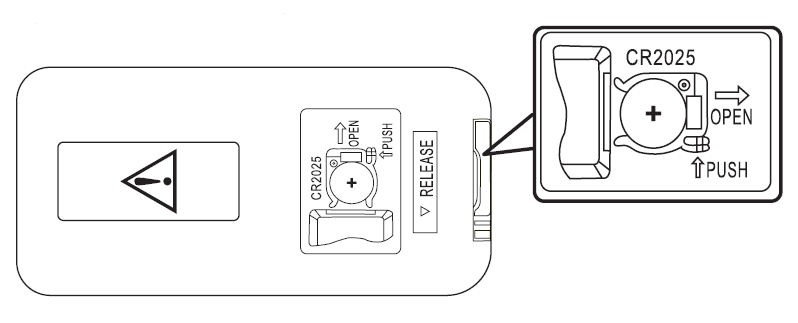
Bluetooth Wireless
Pairing & Playing Audio
- When the system first powers ON it defaults to Bluetooth Mode and is ready to pair automatically. When pairing, remain within 3 feet of the Bluetooth device.
- Using the controls on your Bluetooth device, select IHTB159 in the Bluetooth Settings to pair. If need be, refer to the user’s manual for your specific device for more information.
- When successfully paired, a voice will announce, “Bluetooth is connected.” Your Bluetooth device will now be heard through the speaker.
- Use the controls on the connected Bluetooth device to select and play audio. Use the subwoofer controls or the connected Bluetooth device to play, pause, skip, and adjust the volume level.
After the initial pairing, the speaker will automatically connect to the last Bluetooth device used whenever it is in Bluetooth Mode. If your device should become unpaired or you find it is unable to connect, press & hold the Pair button to enter Pairing Mode. The blue pairing indicator will flash quickly, a voice will announce, “Bluetooth is connecting,” and you can then connect to the speaker manually.
Learn Feature
What Is the Learn Feature?
The Learn feature captures remote commands from your television remote, and teaches your soundbar to operate when these commands are pressed. Power, volume and mute are a few examples of commands that the bar speaker can learn.
Why Use the Learn Feature?
Teaching the bar speaker remote commands will reduce the number of remotes needed, save time searching for remote codes, and improve the ease of operation.
Note: Not all functions of the sound bar will be available through your own remote control, such as bass and treble. Use the included remote for these functions. While your IHTB159 soundbar is able to learn most IR protocols, not all can be programmed.
Using the Learn Feature
- With the power Off, press the Play/Pause/Pair/Learn button on the unit. An indicator will flicker red.
- Press the button you desire to be learned on the included remote. For example: Volume +
- The red light will continue to flicker, and another indicator will display a blue light.
- Press the corresponding button on your remote.
- The red light will continue to flicker, and another indicator will display a green light.
- When the green light turns off, the button command is saved.
- The programmed button on your remote will now be able to control your sound bar.
Note: It is necessary to program each button i.e. channel and volume + and – separately. - To start over, press and hold the Play/Pause/Pair/Learn button for 5 seconds. If the soundbar has failed to learn a command, the Red lights will flash and another indicator will display a blue light. Please try again with a different remote.
Audio Inputs
HDMI
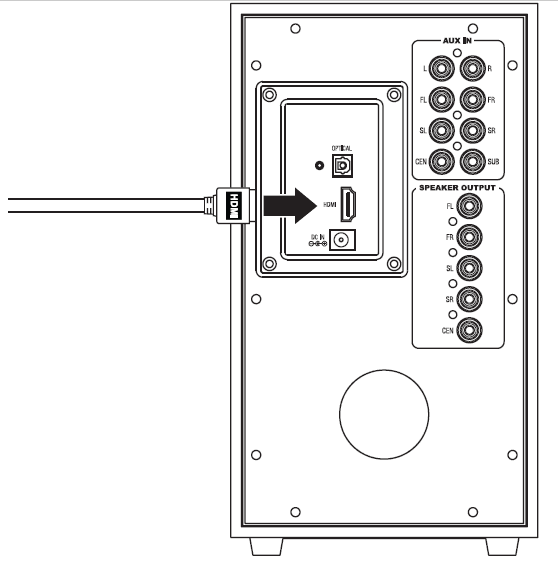
If your television has an HDMI port with Audio Return Channel (ARC), you can connect to the HDMI input on the subwoofer. An HDMI connection is the easiest way to connect the stereo system to your television.
Your TV must have HDMI-ARC for this audio connection to function. A regular HDMI port is not equivalent to HDMI-ARC.
Requires a TV with HDMI-ARC and a HDMI cable (not included).
- Using a standard HDMI cable, connect your television’s HDMI-ARC port to the HDMI input on the subwoofer. Depending on the TV, ARC may need to be enabled through the Audio or Source settings menu.
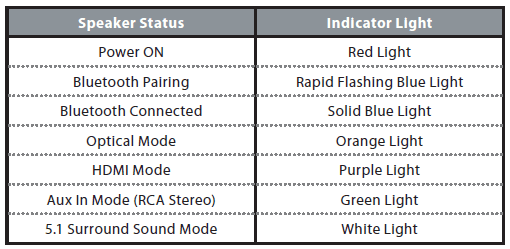
- With the unit powered ON, select HDMI Mode through the Source button on the subwoofer or through the HDMI button on the remote. A voice prompt and a solid purple light will indicate that HDMI Mode has been selected.
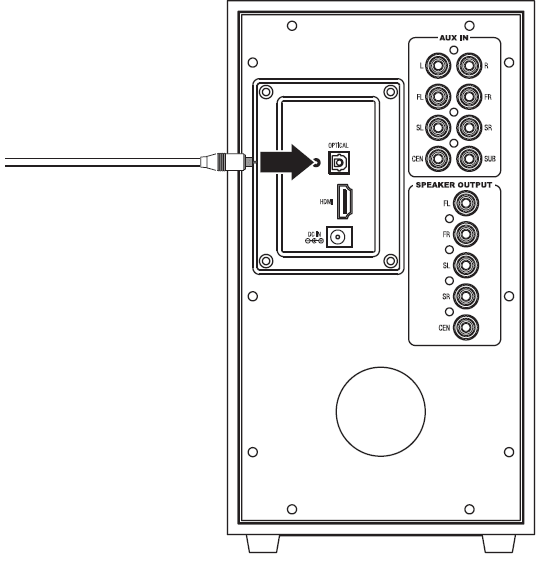
Digital Optical Audio
Requires a device with an Optical audio output and a Digital Optical audio cable (included).
- Using a Digital Optical Audio Cable, connect your media player’s Optical output to the Optical input on the subwoofer.
- With the unit powered ON, select Optical Mode through the Source button on the subwoofer or through the Optical button on the remote. A voice prompt and a solid orange light will indicate that Optical Mode has been selected.
Important tips for optical audio
- The optical output source should be set to output PCM or Optical Audio and not Dolby Digital.
- Use the correct optical audio cable and make sure that it is firmly seated in both source and subwoofer sockets.
- Optical audio output is activated from the audio source (a red light should be visible from the optical socket). It may be labeled SPDIF in the settings menu of the source.
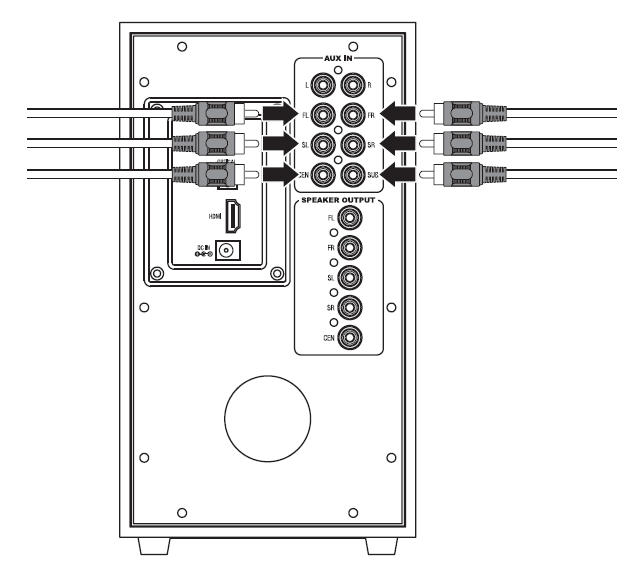
6 Port 5.1 Surround Sound RCA Inputs (5.1 CH)
If your TV, DVD, or other media player has 6 ports of audio output, use the 6 lower audio inputs on the rear of the subwoofer for 5.1 surround sound audio.
Requires 3 RCA stereo audio cables (included)
- Using an RCA stereo audio cable, connect your media player’s Surround Sound stereo outputs to the Surround Sound inputs on the subwoofer. When connecting the audio cables, match the colored plugs to the same colored ports.
- With the unit powered ON, select Surround Sound Mode through the Source button on the subwoofer or through the 5.1CH button on the remote. A voice prompt and a solid white light will indicate that Surround Sound Mode has been selected.

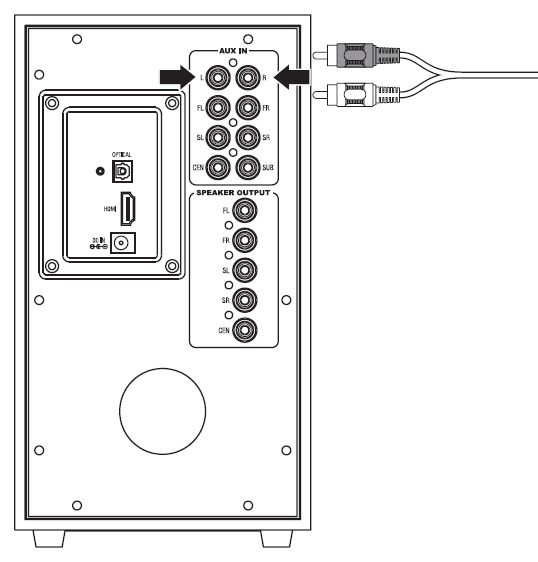
2 Port Stereo RCA Inputs (Aux)
If your TV, DVD, or other media player has only 2 ports of audio output, use the top 2 audio inputs (Left/Right channel) on the rear of the subwoofer for stereo audio.
Requires an RCA stereo audio cable (included).
- Using an RCA stereo audio cable, connect your media player’s RCA stereo outputs to the to the RCA stereo inputs on the subwoofer. When connecting the audio cables, match the colored plugs to the same colored ports.
- With the unit powered ON, select Aux Mode through the Source button on the subwoofer or through the Aux button on the remote. A voice prompt and a solid green light will indicate that Aux Mode has been selected.
Customer Support
Contact Information
Website: www.iLiveElectronics.com
Email Support: prodinfo@dpiinc.com
Email Parts: partsinfo@dpiinc.com
Phone Support: 1-888-999-4215
Warranty
For Warranty Information and the most up-to-date version of this User’s Guide, go to: www.iLiveElectronics.com
International Support
To download this User’s Guide in English, Spanish, and French, or to get answers to frequently asked questions, visit the support section at: www.iLiveElectronics.com
For more manuals by iLive, visit ManualsLibraryy
iLive IHTB159B Home Theater System-FAQs
What do I need to set up a home theater system?
To create a home theater, you’ll need a display (TV or projector), a sound system, and comfortable seating. These elements are key to achieving a true cinematic experience at home.
How does home theater sound work?
Home theater systems use multiple speakers to create surround sound. A basic setup includes a stereo amplifier and two speakers, while more advanced setups use 5.1 or 7.1 channel systems with front, rear, center, and subwoofer speakers for immersive audio.
Does surround sound work through HDMI?
Yes, HDMI supports multi-channel surround sound formats like Dolby TrueHD and DTS-HD Master Audio, making it ideal for high-quality audio from Blu-ray players and streaming devices.
What is the best audio connection for home theater systems?
The best connection depends on your devices. RCA (Red and White) is a common analog option, while Digital Coaxial and HDMI offer better digital sound quality.
Can I connect my iPhone to my stereo system?
Yes! If your stereo supports CarPlay or has a USB port, you can connect your iPhone directly using a USB cable. Look for a CarPlay or smartphone icon near the port.
What does “Cinema” or “Theatre” sound mode do?
This mode enhances bass and treble to simulate a movie theater experience. It’s best for action-packed movies and cinematic soundtracks.
Can HDMI be converted to optical audio?
Yes, you can use an HDMI to Optical Audio Converter to connect HDMI devices (like gaming consoles or Blu-ray players) to audio systems that use optical input.
What does ARC mean on my TV?
ARC (Audio Return Channel) allows sound to travel both ways through an HDMI cable. It lets your TV send audio to your home theater system without needing extra cables.
How does a theater work in general?
Theater is a mix of visuals, sound, performance, and storytelling, whether it’s live on stage, in films, or on TV. Home theater systems aim to recreate that immersive experience in your living room.


