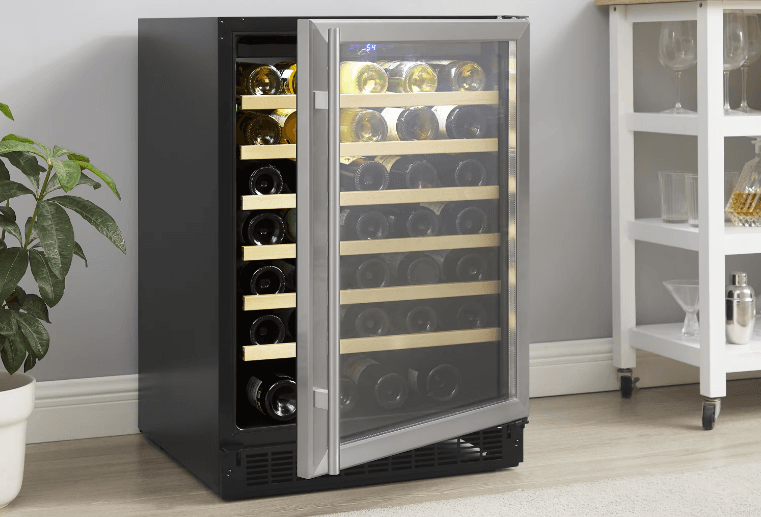
Insignia NS-BI1ZWC 61-Bottle Built-In Wine Cooler
Package contents
- 61-bottle built-in wine cooler
- Wire shelves (6)
- Handle
- Hardware Bag, including:
- Hex key
- Handle screws (2)
- M5 x 10 Door pivot bracket screws (2)
- Door axis sleeve
- M5 x 14 Door frame decorative screws (2)
- M4 x 12 Hinge screws (3)
- Black decorative plastic plugs (3)
- Left top hinge
- Left door pivot bracket
- Black washer (2)
- User Guide
Components
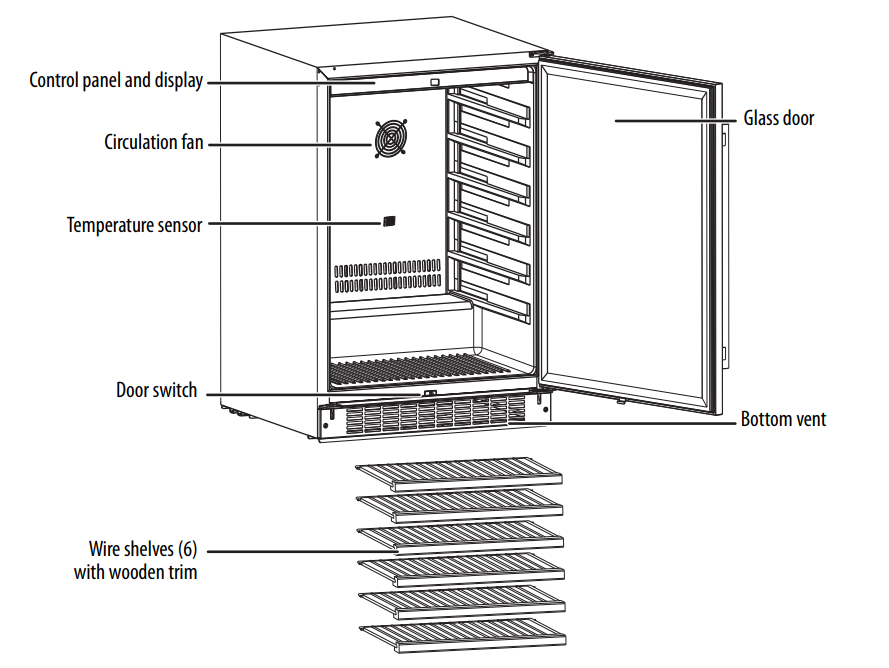
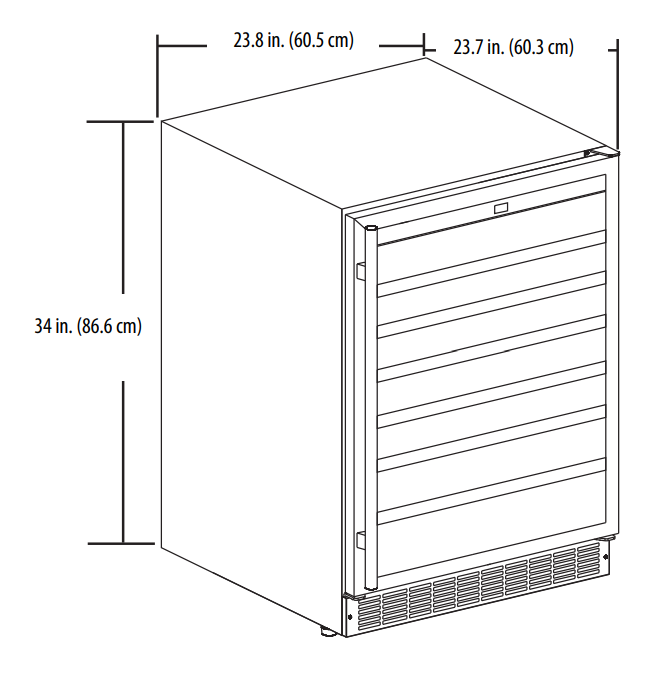
Dimensions
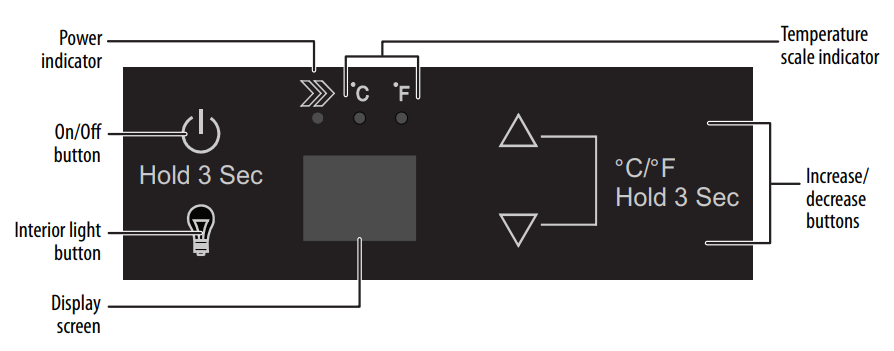
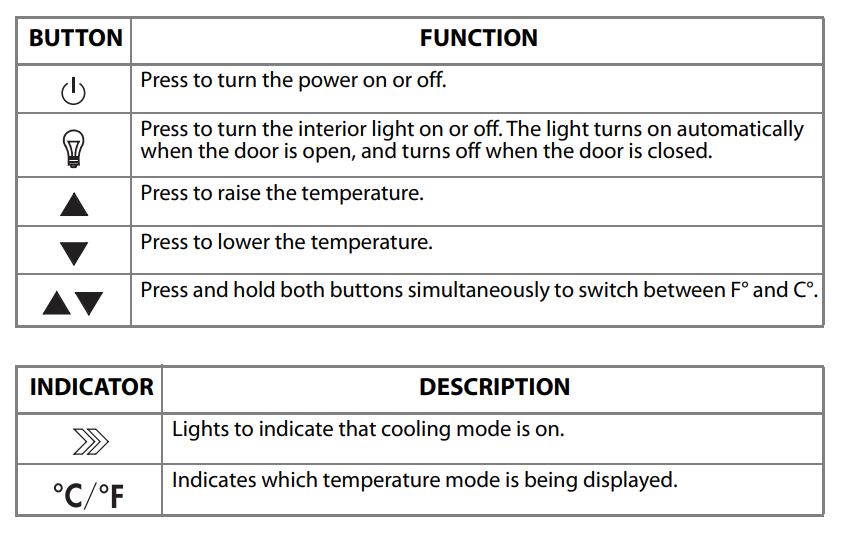
Control and display panel
Setting up your wine cooler
Before using your cooler
- Remove the exterior and interior packing.
- Let your cooler stand upright for approximately six hours before connecting it to power. This reduces the possibility of a malfunction in the cooling system from improper handling during transportation.
- Clean the exterior surface of your cooler with a soft, dry cloth, and clean the interior surface with lukewarm water using a soft cloth.
Finding a suitable location
- Your cooler is designed to be built-in or free-standing.
- Place your cooler on a floor, countertop, or cabinet that is strong enough to support it when it is fully loaded.
- Locate your cooler away from direct sunlight and sources of heat (stove, heater, radiator, and so on). Direct sunlight may affect the acrylic coating, and heat sources may increase electrical consumption.
- Ambient temperatures below 68° F (20° C) or above 90° F (32° C) will hinder the performance of your cooler. Your cooler is not designed for use in a garage or any other outside installation.
- Avoid locating your cooler in moist areas.
- Your cooler is intended for household use only. It is not designed for outside installation, including anywhere that is not temperature-controlled (such as garages, porches, or vehicles). Your cooler is not designed to be installed in an RV or used with an inverter.
- Do not stack beverage coolers.
Installing the handle
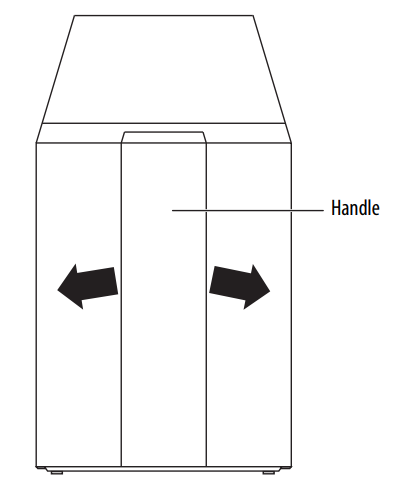
- Remove the door handle and hardware bag from your cooler. The hardware bag contains a hex key and two extra screws.

- Place your cooler carefully on its back.
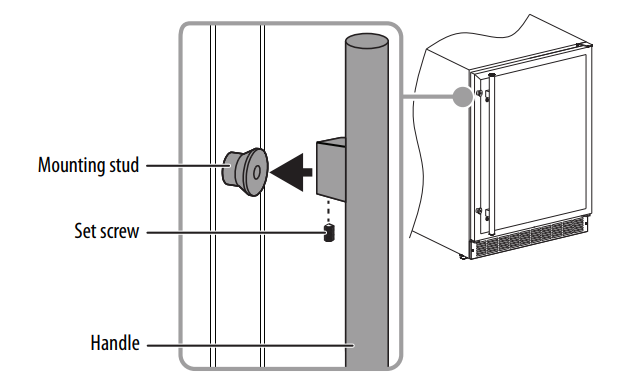
- Place the handle on the mounting studs. The set screws are pre-installed in the handle and should face down when installed correctly.

- Push the door handle tightly against the door.
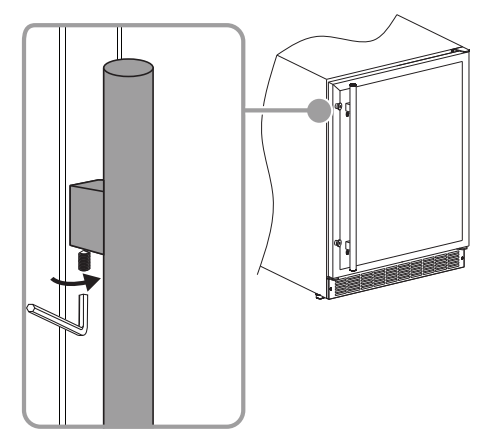
- Insert the short end of the hex key into the set screw and tighten until snug (do not overtighten). The set screw is not recessed into the handle.

- Repeat Step 5 for the other set screw.
- Keep the hex key with these installation instructions for future use.
Front vent
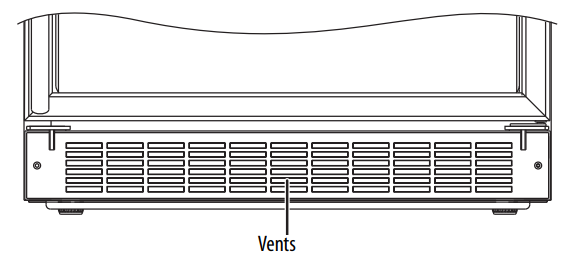
Your cooler is front-vented. Do not block the front air vent. Doing so will result in high operating temperatures, higher energy usage, and possible system overheating and failure.
Building in your wine cooler
Required tools

Preparing the enclosure
We do not recommend that you install your cooler into a corner or directly beside a wall. The door needs to be opened more than 90° to allow full extension of the shelves. If it is necessary to place the unit next to a wall or in a corner, leave at least 2.4 – 4 in. (6 -10 cm) between the wall and the appliance to allow for the door opening.
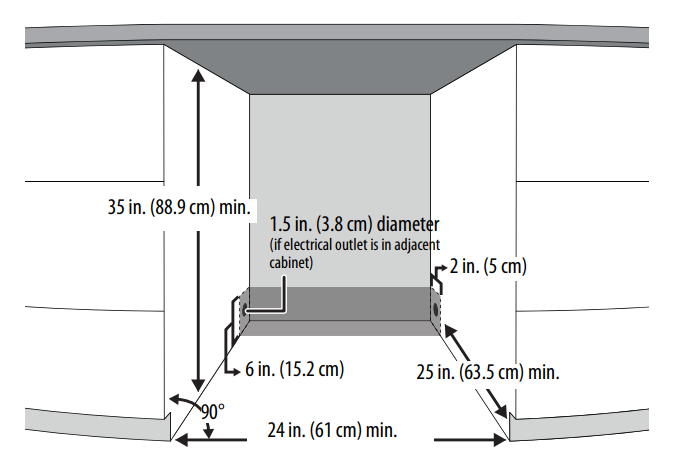
If you are installing your cooler between frameless cabinets, a 0.5 in.(1.3 cm) wide filler strip or side panel may be needed on both sides of your cooler. The filler strip provides a space between the appliance case and the adjacent cabinet door swing. The width of the opening must include the filler panels. The door should extend at least 1 in. (2.6 cm) beyond the surrounding cabinets.
Leveling your cooler
Your cooler needs to be level to function properly. If your cooler is not leveled during installation, the door may not close or seal properly, causing cooling, frost, or moisture problems.
- Move your cooler to its final location.
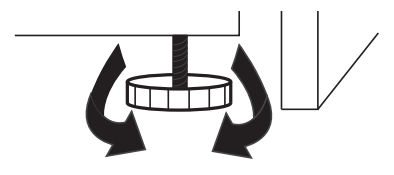
- Turn the leveling foot counter-clockwise until it touches the bottom of the cabinet.
- Slowly turn the leveling foot clockwise until your cooler is level.
Reversing the door
- Remove all bottles from the cooler.
- Remove the parts from the hardware bag.
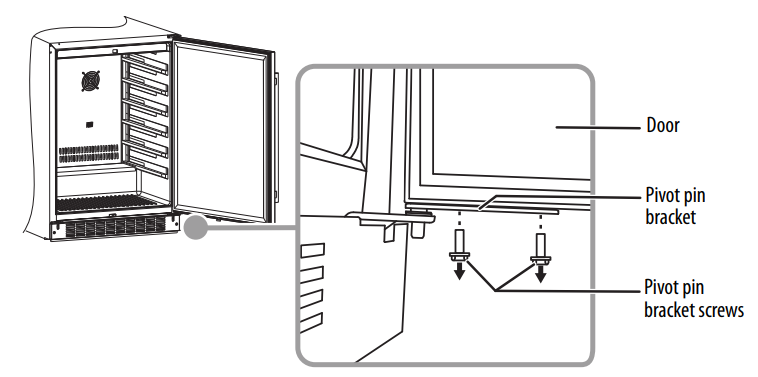
- Open the door, then use a Phillips screwdriver to remove the pivot pin bracket screws from the bottom of the door.

- Pull the bottom of the door out, then move the door down to release it from the top hinge.
- Place the door on a blanket or carpet to avoid damage.
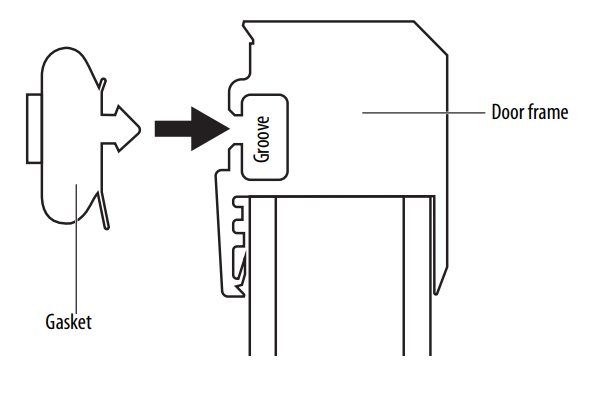
- Remove the top and bottom door gaskets by gently pulling the gaskets out of the mounting groove in the door frame with your fingers.
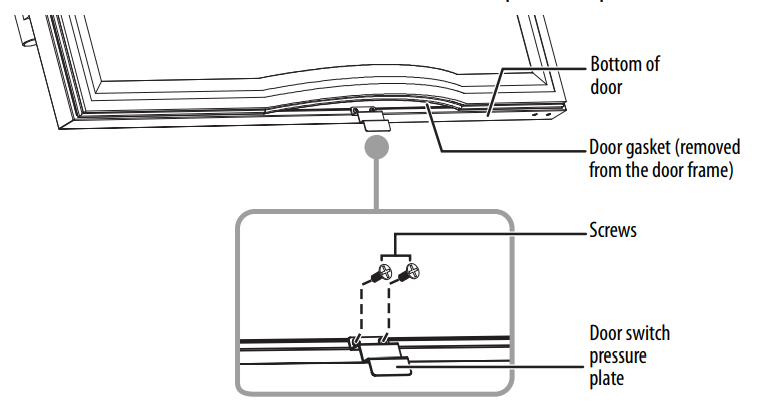
- Use a screwdriver to remove the door switch pressure plate screws from the bottom of the door and remove the pressure plate.

- Install the door switch pressure plate to the top of the door with the screws you removed.
- Attach the door gasket by aligning the corners, then pressing it into the groove in the door frame. Make sure that the gasket is firmly in the groove and makes even contact with both the door and the cooler when the door is closed.

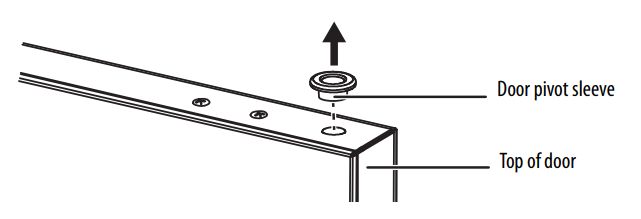
- Use a thin, flat-blade screwdriver or knife blade to remove the door pivot sleeve from the top of the door, then take the new door pivot sleeve from the hardware bag and install it on the bottom of the door in the hole provided.

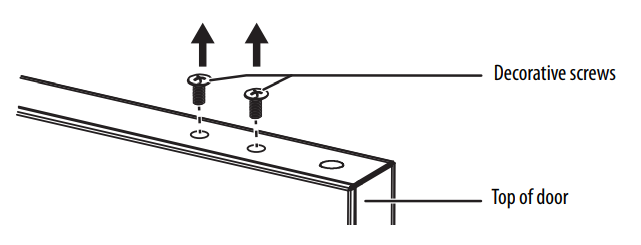
- Remove the decorative screws from the top of the door, then take the new decorative screws from the hardware bag contents and install them in the bottom of the door.

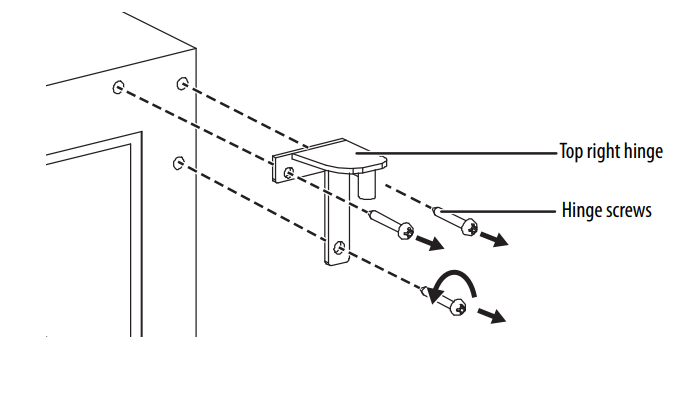
- Remove the screws securing the top right hinge to the cooler, then remove the hinge.

- Remove three black decorative plugs from the hardware bag and install them in the three top right hinge holes.

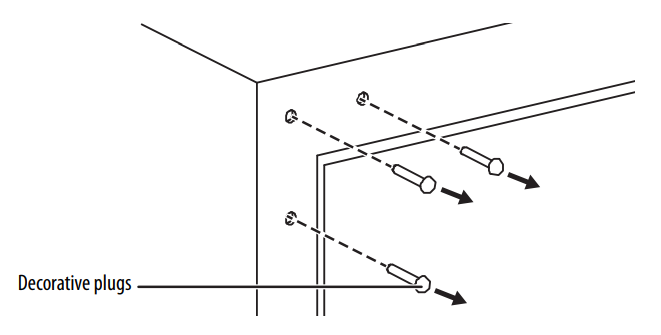
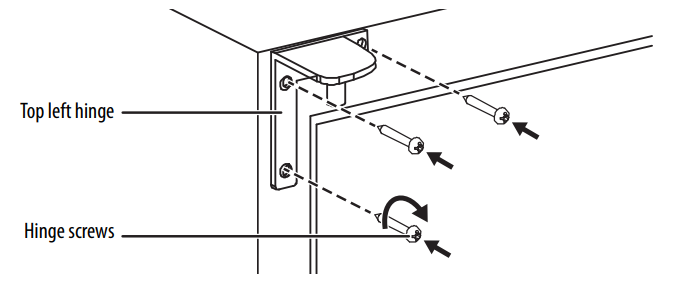
- Use a thin, flat-blade screwdriver or knife blade to remove the three black decorative plugs from the top left hinge holes.

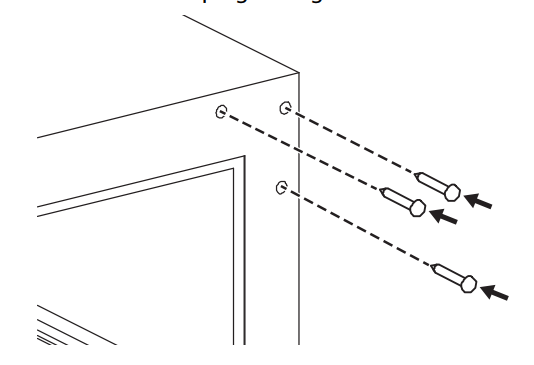
- Install the top left hinge with three M4 x 12 screws from the hardware bag.

- Rotate the glass door 180°, making sure that the door axis sleeve is on the left top side and the door switch pressure plate is on the bottom side.
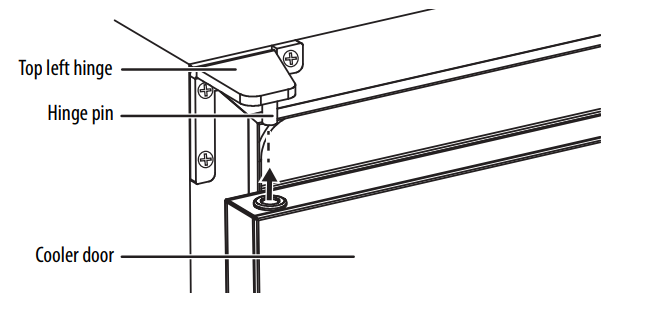
- Hold the door and insert the door pivot sleeve into the hinge pin on the top left hinge.

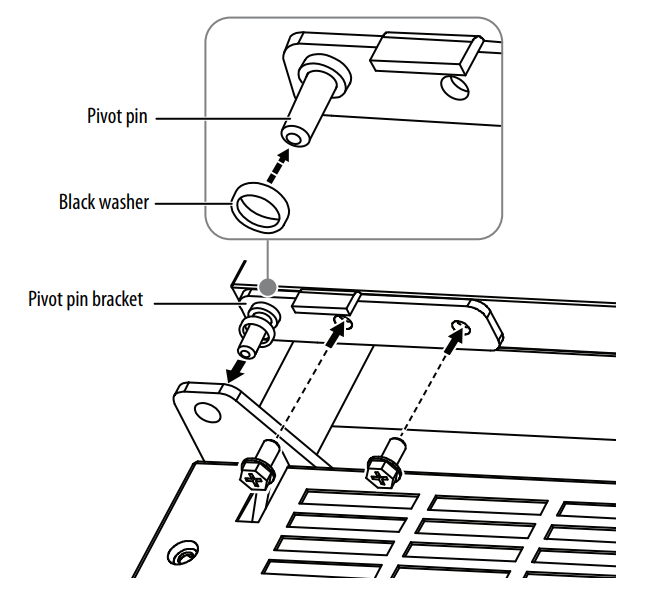
- Take the left pivot pin bracket from the hardware bag.
- Place a black washer over the pivot pin, then insert the pivot pin bracket into the hole in the bottom left hinge, push the bottom of the door in, and align the door with the holes in the pivot pin bracket. Secure the bracket with M5 x 10 screws from the hardware bag.

- Remove the handle, then reinstall it so that the set screws face the bottom. See Installing the handle on page 10 for instructions.
Grounding requirement
Your cooler must be grounded. Your cooler is equipped with a cord having a grounding wire with a three-prong grounding plug. The plug must be inserted into an outlet that is properly installed and grounded. Consult a qualified electrician or service person if the grounding instructions are not completely understood, or if doubt exists as to whether your cooler is properly grounded.
Connecting to power
- Plug your cooler into a dedicated, properly installed grounded wall outlet. Your cooler should be operated on a separate electrical circuit from other appliances. Any questions concerning power and/or grounding should be directed toward a certified electrician or an authorized service center.
- Plug in and run your cooler for three to four hours before making any temperature adjustments and before adding wine. This allows your cooler to reach a stable temperature.
- Do not use an extension cord with your cooler. If the power cord is too short, have a qualified electrician install an outlet near your cooler. Use of an extension cord can negatively affect your cooler’s performance.
Storing wine
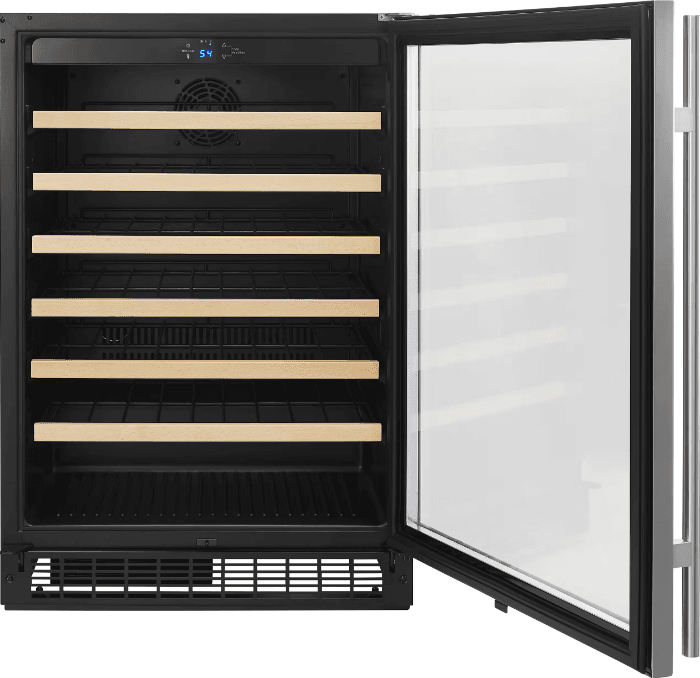
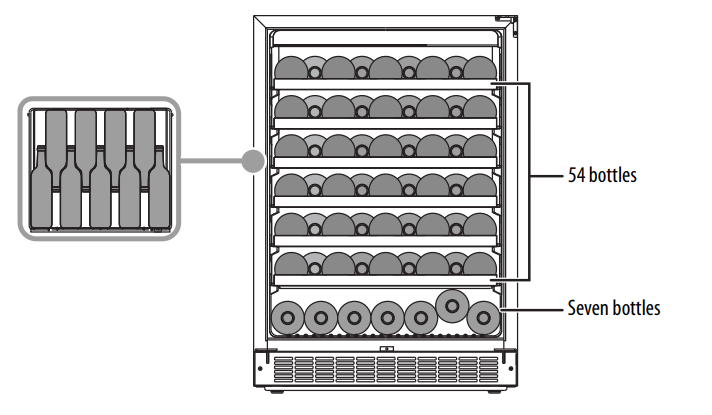
It is necessary to position the bottles alternately on the upper six shelves. This allows for the storage of nine 750 ml bottles on each of the six shelves and seven bottles on the bottom shelf, for a total storage capacity of 61 wine bottles. Shelves can be removed to accommodate larger bottles.
Removing a shelf
- Remove all bottles from the shelves.
- Tilt one side of the shelf upward and then gently pull out the shelf.
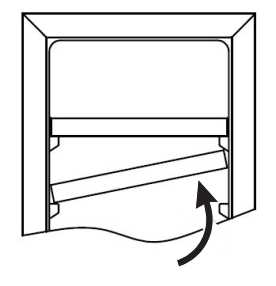
Replacing a shelf
- To reinstall the shelf, make sure that it is resting securely on the support brackets, then push inward until it clicks into place.
Serving and storage tips
We suggest that you pour wine at a temperature below the ideal serving temperature, because the wine warms up quickly after it’s been poured into a glass.
| WINE TYPE | IDEAL SERVING TEMP |
| Red Bordeaux | 64.4° F (18° C) |
| Côtes du Rhône Red/Barolo Louis Family Dry Red Wine/Barolo | 62.6° F (17° C) |
| Burgundy Red | 60.8° F (16° C) |
| Port | 59° F (15° C) |
| Young Burgundy Red | 57.2° F (14° C) |
| Young Red Wine | 53.6° F (12° C) |
| Young Beaujolais/All White Wines (low sugar) | 51.8° F (11° C) |
| Old White Wines/Chardonnay | 50° F (10° C) |
| Sherry | 48.2° F (9° C) |
| Young White Wines (late vintage) | 46.4° F (8° C) |
| White Wines Loire/Entre-deux-Mers | 44.6° F (7° C) |
- To maintain good air circulation in your cooler, do not let the bottles touch the back of your cooler.
- Do not store bottled wine by the box or case in your cooler.
- The cork of an opened bottle should always be moistened when returning it to the bottle.
- Red wine should be allowed to breathe (oxygenate) before drinking. We suggest that you put pink/rose type wines on the table two to five hours before drinking, and red wine four to five hours before drinking. That also allows them to reach the suitable serving temperature. White wine, on the other hand, can be served right away.
- Champagne should always be stored in your cooler and taken out immediately before drinking.
Maintaining your wine cooler
Your cooler is designed for year-round use with only minimal cleaning and maintenance.
When you first receive it, wipe the cabinet with a mild detergent and warm water, then wipe dry with a dry cloth. Do this periodically to keep your cooler looking new.
Cleaning the interior of your cooler:
- Turn off your cooler and unplug it from the wall outlet.
- Remove all wine.
- Wash the inside with a warm, damp cloth soaked in a solution of one quart of lukewarm water and two tablespoons of baking soda.
- Be sure to keep the door gasket (seal) clean to keep your cooler running efficiently.
- Dry the interior and exterior with a soft cloth.
Defrosting your cooler
Your cooler is equipped with an automatic defrost function and does not require manual defrosting. Defrost water from your cooler is channeled into a drip tray located above the compressor. Heat transfer from the compressor causes the defrost water to evaporate.
Alarms
Door ajar alarm
- If the door is not closed completely for five minutes, an alarm sounds. Close the door to silence the alarm.
- If the door is closed and the alarm continues to sound, make sure that the actuator at the bottom of the door is making contact with the switch on your cooler.
- If the door alarm sounds when filling your cooler, it can be silenced by pressing the power button once.
Temperature alarms and error codes
If the inner cabinet temperature is higher than 73°F (23°C) for one hour, the error code “HI” shows on the display and an alarm sounds. If the inner cabinet temperature is lower than 332°F(0° °C the error code “LO” shows on the display, and an alarm sounds.
If the inner cabinet temperature remains at 32°F (0 °C) for more than 30 minutes, the error code “CL” shows on the display, an alarm sounds, and your cooler stops functioning to prevent the contents from freezing.
Storing your cooler
- Turn off your cooler and unplug it from the wall outlet.
- Remove all wine.
- Clean your cooler.
- Leave the door open slightly to avoid the possible formation of condensation, mold, or odor.
Moving your wine cooler
- Turn off your cooler and unplug it from the wall outlet.
- Remove all wine.
- Securely tape down all loose items inside your cooler.
- Turn the leveling foot up to avoid damage.
- Tape the door shut.
- Protect the outside of your cooler with a blanket or similar item.
- Make sure that your cooler stays in the upright position during transportation. If that is not possible and your cooler must be placed on its back or side during transportation, upon reaching the destination, allow it to remain upright for six hours before plugging it in to avoid damage to internal components.
Troubleshooting
Error codes
If the “HI”, “LO”, or “CL” error codes appear on the display for more than five minutes, a power reset may rectify the issue (see Temperature alarms and error codes on page 22). Unplug your cooler, wait five minutes, then plug it back in. If the error code persists, contact consumer care or an authorized service agent.
| PROBLEM | SOLUTION |
| Your cooler does not operate. |
|
| Your cooler door does not close completely. |
|
| Your cooler is not cold enough. |
|
| PROBLEM | SOLUTION |
| Your cooler makes unusual noises or vibrates. |
|
| Moisture is building up on the interior walls and door of your cooler. |
|
| Moisture is building up on the exterior of your cooler. |
|
| Your cooler turns on and off frequently. |
|
| The display shows an error code, and an alarm sounds |
|
Specifications
| Dimensions (HxWxD) | 34 × 23.8 × 23.7 in. (86.6 × 60.5 × 60.3 cm) |
| Net weight | 107 lbs. (48.5 kg) |
| Capacity | 61 bottles (750 ml) |
| Power requirements | 115V~60Hz |
| Current | 1.2A |
| Operating temperature | 41° F to 64° F (5° C to 18° C) |
| Refrigerant type | R600a |
| Humidity level in your cooler (normal) | 50%-80% |
| Noise (dB) level | 42 |
| Annual energy cost | 19.00 dollars |
| Cord length | 70.8 in. (≥180 cm) |
FOR MORE MANUALS BY INSIGNIA, VISIT MANUALSLIBRARYY
Insignia NS-BI1ZWC 61-Bottle Built-In Wine Cooler- FAQs
How do I adjust the temperature on my Insignia wine cooler?
Use the temperature control knob located inside the cooler near the bottom right. There are four settings, with “Cold” being the warmest. The temperature range is 59°F to 68°F (15°C to 20°C).
Why won’t my wine cooler let me change the temperature?
If the control panel is unresponsive, your wine cooler may be in lockout mode. Press the Red Wine key, and if “LOC” appears, the controls are locked.
What is the most common issue with wine coolers?
The most frequent problem is that the unit doesn’t cool properly or maintain the set temperature. This could be due to a faulty thermostat or poor ventilation.
Why has my wine cooler stopped cooling?
Common causes include a malfunctioning thermostat, dirty condenser coils, or a damaged door seal, all of which can interfere with proper cooling.
What temperature should I set my wine cooler to?
1. Red wine: 50°F to 65°F (11°C to 18°C)
2. White wine: 45°F to 50°F (7°C to 11°C)
If you have a dual-zone cooler, you can store both types at their ideal temperatures.
How does the freezer temperature control work on an Insignia fridge?
Press the FREEZER button to cycle through the settings.
1. 1 light = warmest setting
2. 3 lights = coldest setting
Why is my wine cooler running constantly?
If your wine cooler is in a very hot or cold environment, it may need to run constantly to maintain the desired internal temperature.
How can I make my wine cooler colder?
Start by turning the temperature knob to a colder setting. If needed, place an ice tray inside the top shelf to help reduce the temperature temporarily.

