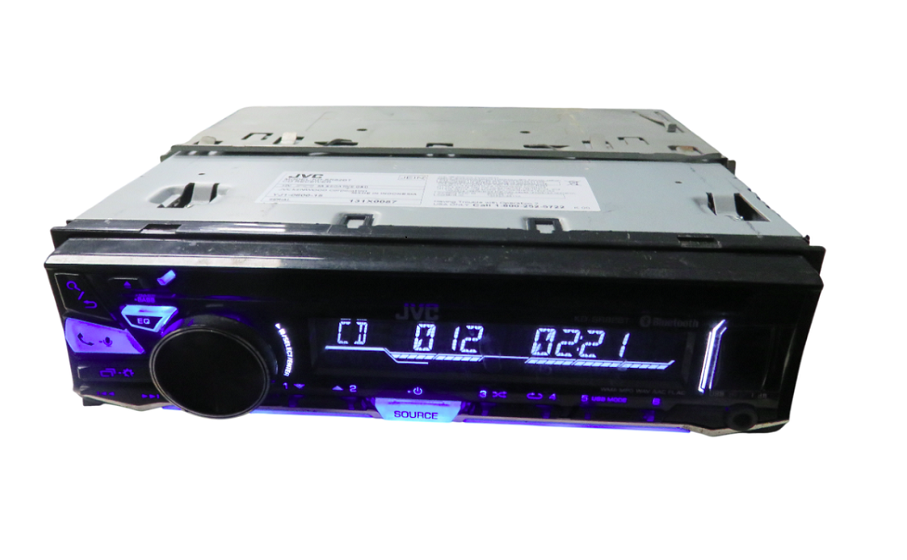
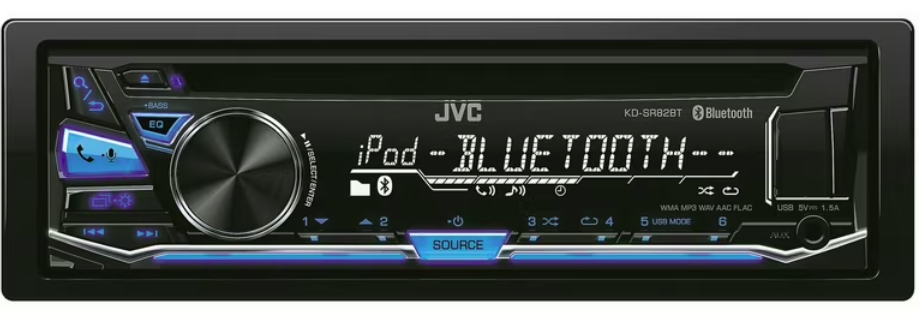
JVC KD-SR82BT In-Dash CD Bluetooth Receiver
BEFORE USE
IMPORTANT
- To ensure proper use, please read through this manual before using this product. You must read and observe the Warning and Caution in this manual.
- Please keep the manual in a safe and accessible place for future reference.
Volume setting
- Adjust the volume so that you can hear sounds outside the car to prevent accidents.
- Lower the volume before playing digital sources to avoid damaging the speakers by the sudden increase of the output level.
General
- Avoid using the external device if it might hinder safe driving.
- Make sure all important data has been backed up. We shall bear no responsibility for any loss of recorded data.
- Never put or leave any metallic objects (such as coins or metal tools) inside the unit to prevent a short circuit.
- If a disc error occurs due to condensation on the laser lens, eject the disc and wait for the moisture to evaporate.
Remote control (RM-RK52)
- Do not leave the remote control in hot places, such as on the dashboard.
- The Lithium battery is in danger of exploding if replaced incorrectly. Replace it only with the same or equivalent type.
- The battery pack or batteries shall not be exposed to excessive heat, such as sunshine, fire, or the like.
- Keep the battery out of reach of children and in its original packaging when not in use. Dispose of used batteries promptly. If swallowed, contact a physician immediately.
BASICS
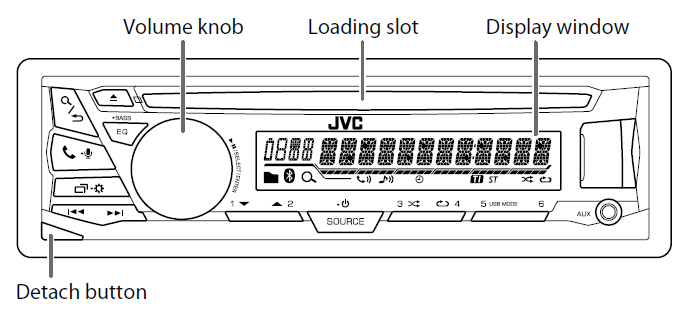
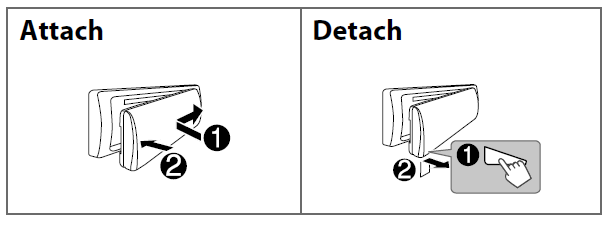
Faceplate
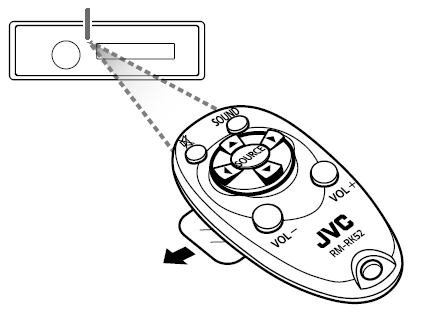
Remote control (RM-RK52)
 .
.
- Remote sensor (Do not expose to bright sunlight.)
- Pull out the insulation sheet when using for the first time.

GETTING STARTED

Cancel the demonstration
When you turn on the power for the first time (or [FACTORY RST] is set to [YES]), the display shows: “CANCEL DEMO” “PRESS” “VOLUME KNOB”
- Press the volume knob. [YES] is selected for the initial setup.
- Press the volume knob again. “DEMO OFF” appears.
Set the clock
- Press and hold.
- Turn the volume knob to select [CLOCK], then press the knob.
- Turn the volume knob to select [CLOCK SET], then press the knob.
- Turn the volume knob to make the settings, then press the knob. Day Hour Minute
- Turn the volume knob to select [24H/ 12H], then press the knob.
- Turn the volume knob to select [12 HOUR] or [24 HOUR], then press the knob.
- Press to exit. To return to the previous setting item, press

RADIO

Search for a station
- Press repeatedly to select FM or AM.
- Press (or press on RM-RK52) to search for a station automatically. (or)
- Press and hold (or press and hold on RM-RK52) until “M” flashes, then press repeatedly to search for a station manually.
CD / USB / iPod / ANDROID
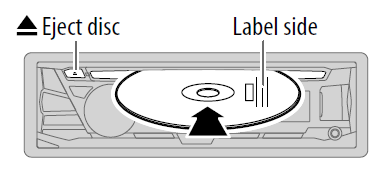
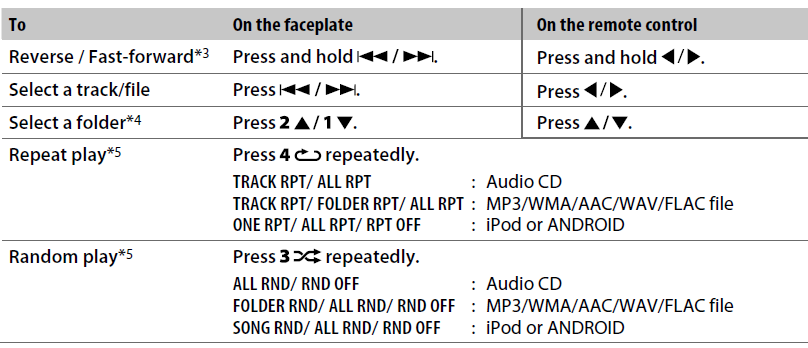
Start playback
- The source changes automatically and playback starts.
CD
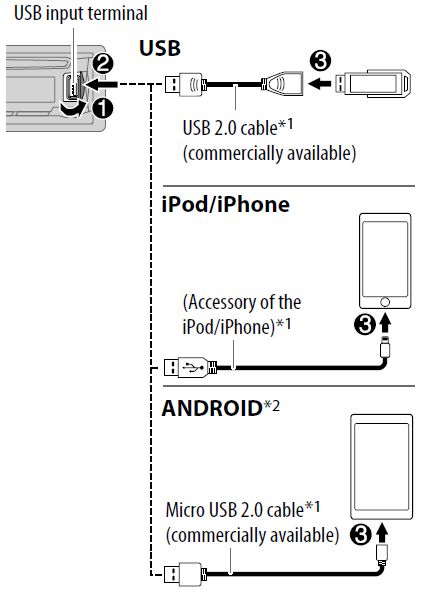

- Do not leave the cable inside the car when not in use.
- When connecting an Android device, “Press [VIEW] to install JVC MUSIC PLAY APP” is shown. Follow the instructions to install the
application. You can also install the latest version of the JVC MUSIC PLAY application on your Android device before connecting. ( 23) - For ANDROID: Applicable only when [AUTO MODE] is selected. ( 8)
- For CD: Only for MP3/WMA/AAC files. This does not work for iPod/ ANDROID.
- For iPod/ ANDROID: Applicable only when [HEAD MODE]/ [AUTO MODE] is selected. ( 8)
Select the music drive
- Press 5 USB mode repeatedly.
The stored songs in the following drive will be played back.
- Selected internal or external memory of a smartphone (Mass Storage Class).
- Selected the drive of a multiple-drive device.
Pandora
Preparation
Install the latest version of the Pandora application on your device (iPhone/ iPod touch), then create an account and log in to Pandora.
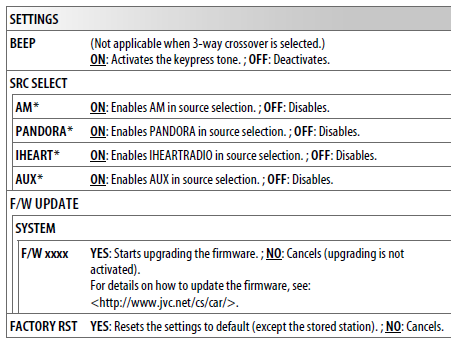
- Select [ON] for [PANDORA] in [SRC SELECT]. ( 4)
Start listening
- Open the Pandora application on your device.
- Connect your device to the USB input terminal.

Create and save a new station
- Press.
- Turn the volume knob to select [NEW STATION], then press the knob.
- Turn the volume knob to select [FROM TRACK] or [FROM ARTIST], then press the knob. A new station is created based on the current song or artist.
- Press and hold the number button 3, 4, 5 or 6 to store. To select a stored station, press the number buttons 3, 4, 5 or 6.
BLUETOOTH®
BLUETOOTH — Connection
Supported Bluetooth profiles
- Hands-Free Profile (HFP)
- Advanced Audio Distribution Profile (A2DP)
- Audio/Video Remote Control Profile (AVRCP)
- Serial Port Profile (SPP)
- Phonebook Access Profile (PBAP)
Supported Bluetooth codecs
- Sub-Band Codec (SBC)
- Advanced Audio Coding (AAC)
Connect the microphone
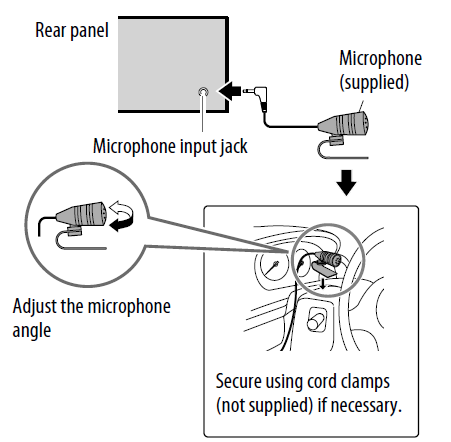
Pair and connect a Bluetooth device for the first time
- Press to turn on the unit.
- Search and select “JVC UNIT” on the Bluetooth device.
- “BT PAIRING” flashes on the display.
- For some Bluetooth devices, you may need to enter the Personal Identification Number (PIN) code immediately after searching.
- Perform (A) or (B) depending on what scrolls on the display.
- For some Bluetooth devices, the pairing sequence may vary from the steps described below.
- (A) “[Device Name]” “XXXXXX” “VOL – YES” “BACK – NO”
- “XXXXXX” is a 6-digit passkey randomly generated during each pairing.
- Ensure that the passkey that appears on the unit and the Bluetooth device is the same.
- Press the volume knob to confirm the passkey.
- Operate the Bluetooth device to confirm the passkey.
BLUETOOTH — Mobile phone

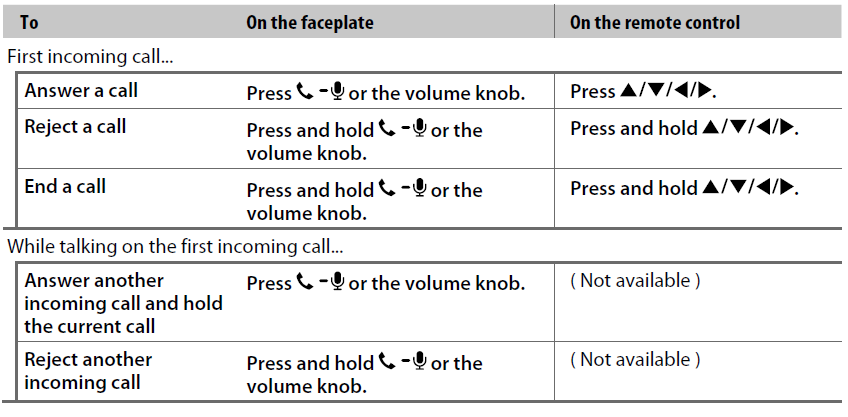
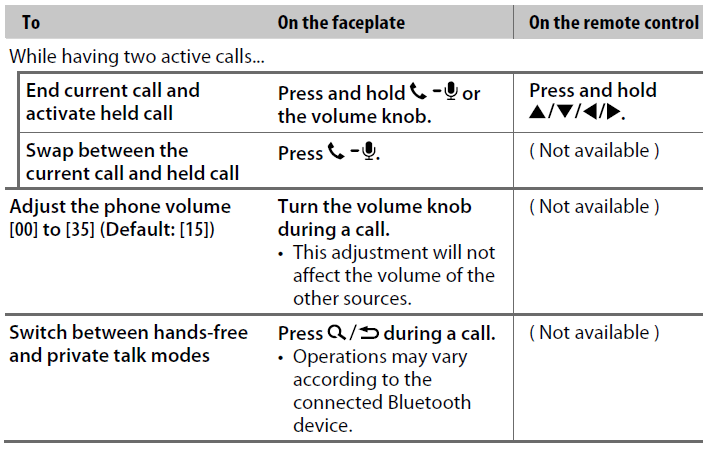
Receive a call
When there is an incoming call:
- The buttons will blink in the blinking pattern you have selected in [RING ILLUMI]. ( 13)
- The unit answers the call automatically if [AUTO ANSWER] is set to a selected time. ( 13)


Make a call
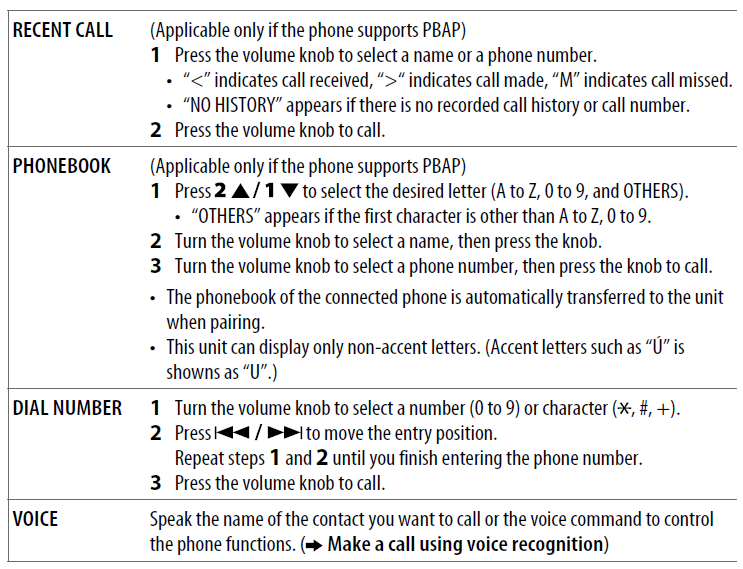
You can make a call from the call history, phonebook, or by dialing the number. Call by voice is also possible if your mobile phone has the feature.
- Press to enter Bluetooth mode.
- Turn the volume knob to select an item (see the following table), then press the knob.
- Repeat step 2 until the desired item is selected/activated or follow the instructions stated on the selected item. To return to the previous setting item, press.

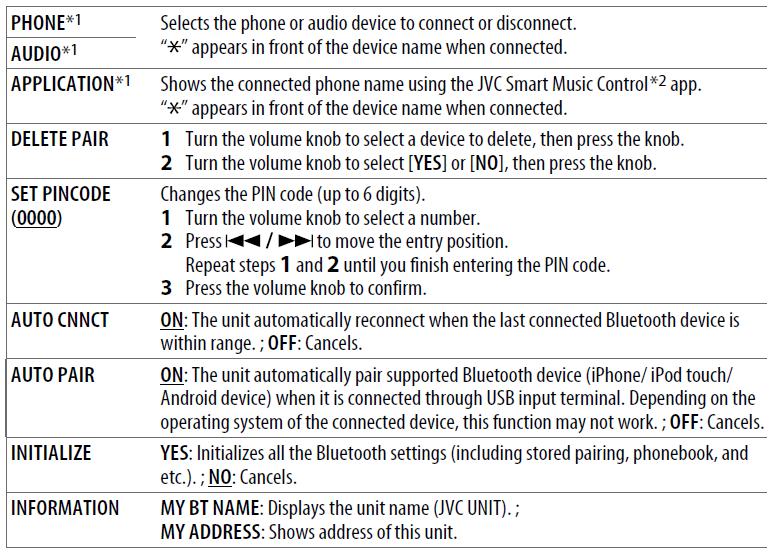
Bluetooth mode settings
- Press and hold.
- Turn the volume knob to select [BLUETOOTH], then press the knob.
- Turn the volume knob to select an item (see the following table), then press the knob.
- Repeat step 3 until the desired item is selected/activated or follow the instructions stated on the selected item.
- Press to exit.

AUDIO SETTINGS

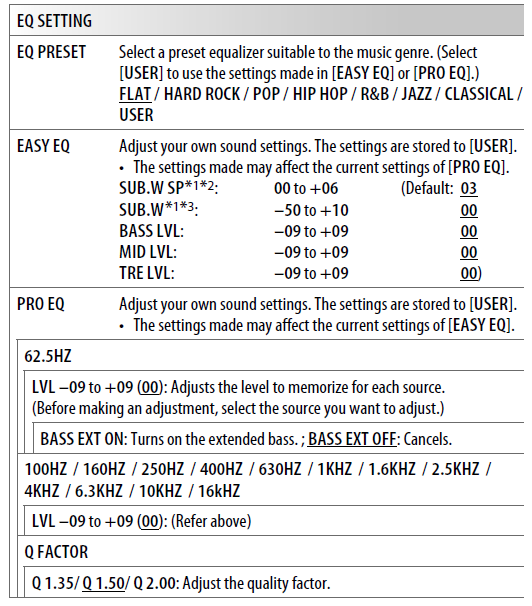
Store your own sound settings
- Press and hold EQ-BASS to enter the EASY EQ setting.
- Turn the volume knob to select an item, then press the knob.
- Refer to [EASY EQ] for setting ( 18), and the result is stored in [USER].
- To return to the previous setting item, press.
- To exit, press EQ-BASS
Other settings
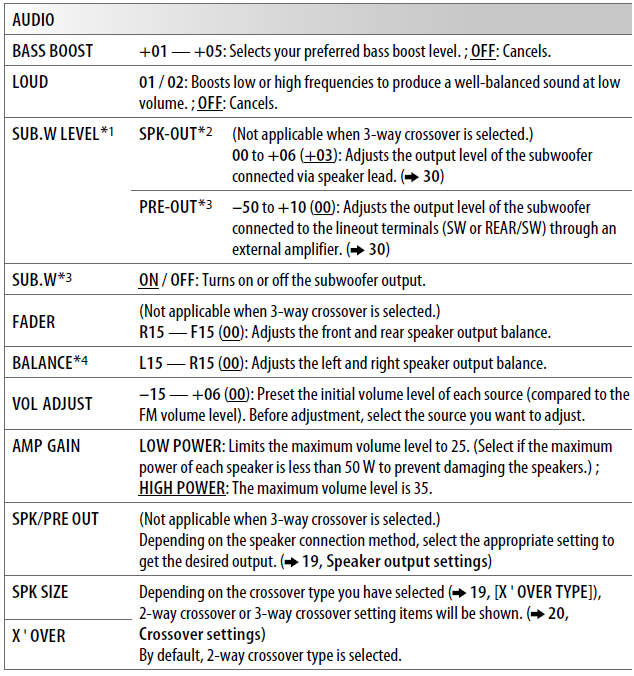
Speaker output settings
Connection via lineout terminals
- For connections through an external amplifier. ( 30)

Crossover settings
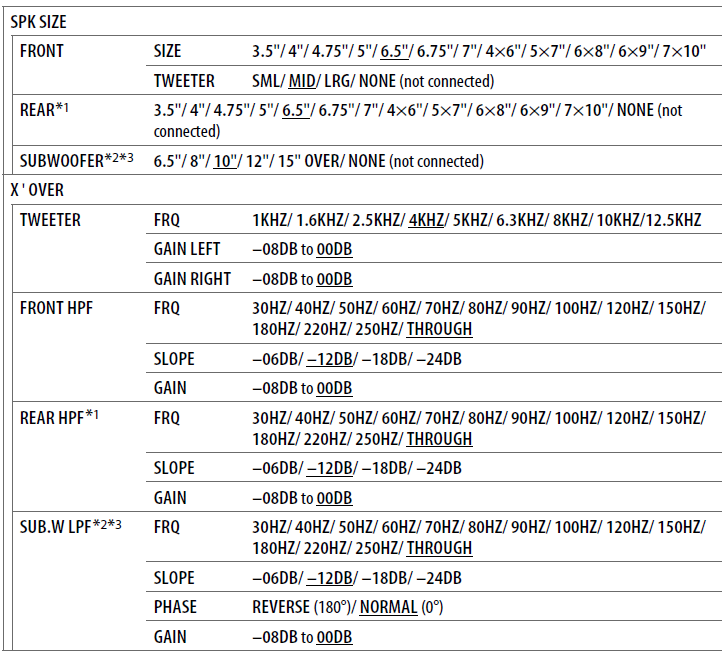
- Below are the available setting items for 2-way crossover and 3-way crossover.
SPK SIZE (speaker size)
Selects according to the connected speaker size for optimum performance.
- The frequency and slope settings are automatically set for the crossover of the selected speaker.
- If [NONE] is selected for [TWEETER] of [FRONT], [REAR], and [SUBWOOFER] for [SPK SIZE], the [X ‘ OVER] setting of the selected speaker is not available
2-way crossover setting items
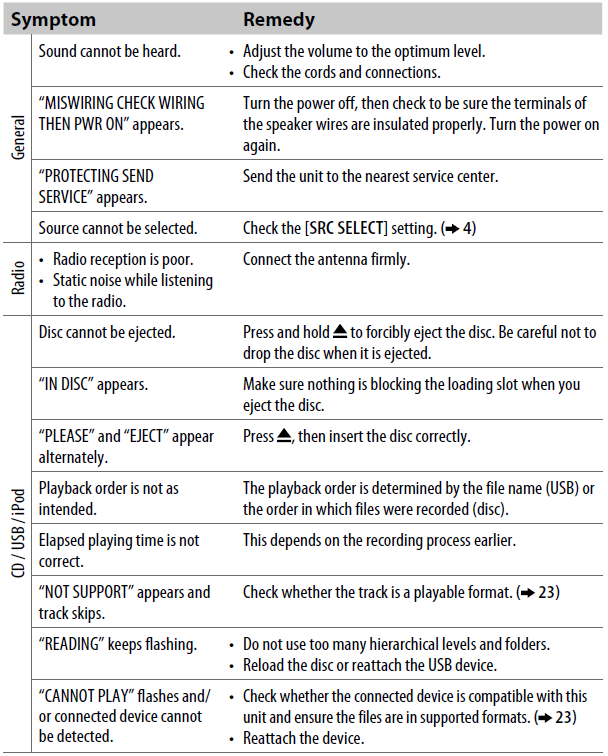
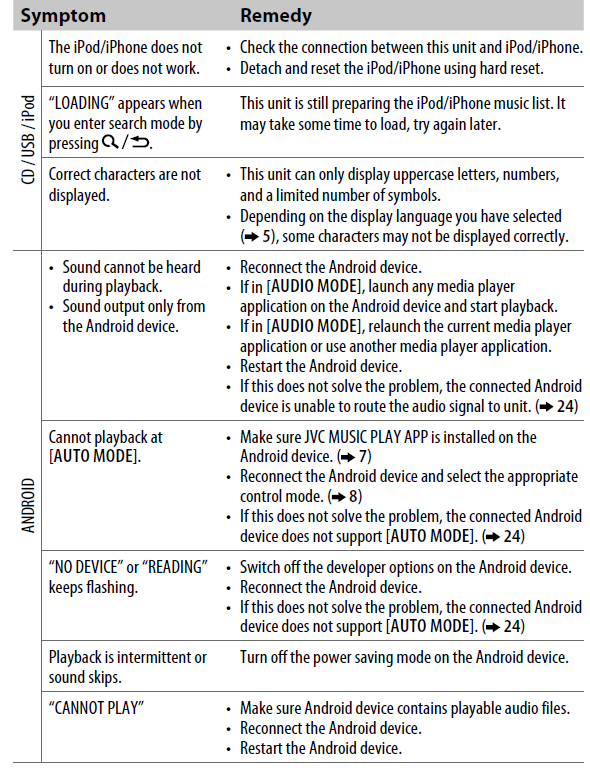
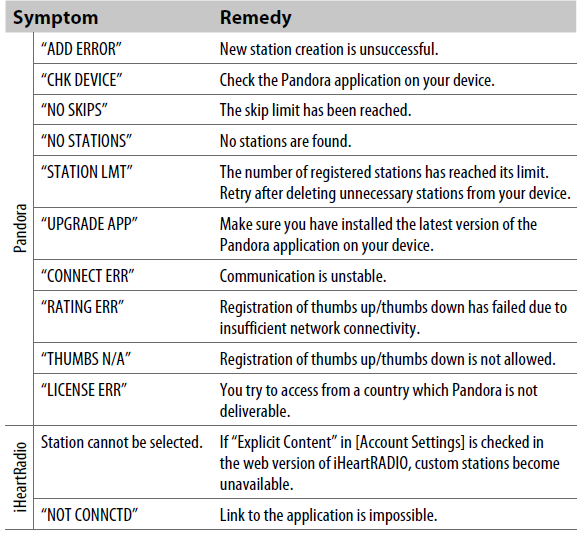
TROUBLESHOOTING
For more manuals by JVC, visit ManualsLibraryy
JVC KD-SR82BT In-Dash CD Bluetooth Receiver-FAQs
How do I turn on AV mode on my JVC radio?
To activate AV mode, go to the Home screen. Swipe or touch the screen to navigate and select a source. You can tap, hold, or swipe to switch pages or access settings.
How do I reset the Bluetooth on JVC earphones?
Place both left and right earphones into the charging case. Wait until the charging lights turn on. Then, press and hold the button on the left earphone for about 15 seconds to reset.
How do I pair my JVC device with Bluetooth speakers or phones?
Put your Bluetooth device (like a speaker or phone) in pairing mode—usually indicated by a flashing light. Then, select the device name from your JVC receiver’s Bluetooth menu to complete pairing.
How do I charge a JVC Bluetooth speaker?
Use the included micro-USB cable to connect the speaker to a computer or USB charger. The indicator light will flash while charging and stay lit when fully charged.
Why won’t my JVC radio connect to Bluetooth?
Try these steps:
1. Restart both your JVC receiver and the JVC Remote app.
2. Toggle Bluetooth off and on again on your phone.
3. Delete any saved Bluetooth devices from both the radio and your phone, then re-pair them.
What is the AV input on a JVC radio?
The AV input lets your radio receive audio and video signals from external devices like DVD players, game consoles, or cameras.
How do I manually change the frequency on my JVC radio?
1. Press the TUNER/BAND button to select FM or AM.
2. Hold the ► or ◄ button until “M” blinks on the screen.
3. While it blinks, press ► or ◄ again to adjust the frequency manually.
How do I update the Bluetooth firmware on my JVC radio?
1. Turn on the car receiver.
2. Press and hold both the [DISP] and [>>|] buttons until the display shows “BLUETOOTH” → “UPDATE MODE” → “BT F/W ####”.
This shows the current firmware version and starts the update mode.
How can I delete a Bluetooth device from my JVC radio?
1. Use the control knob to go to: Settings → Pairing → Device Delete.
2. Select the device you want to remove and confirm deletion.

