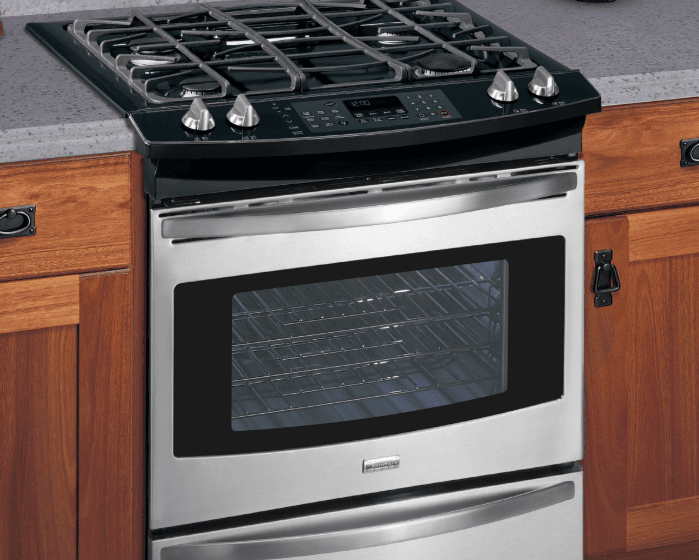
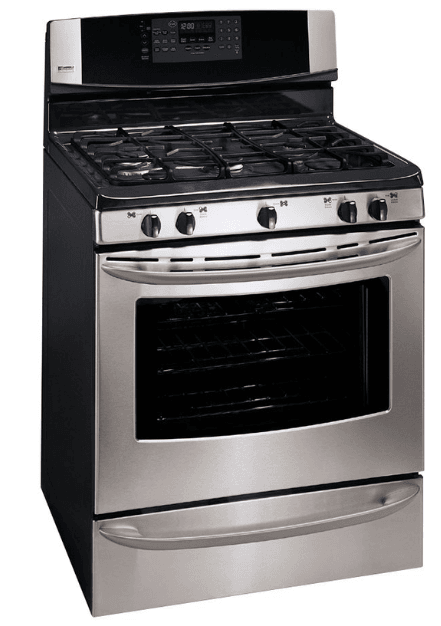
Kenmore 7907830 Elite Gas Range
Range Features
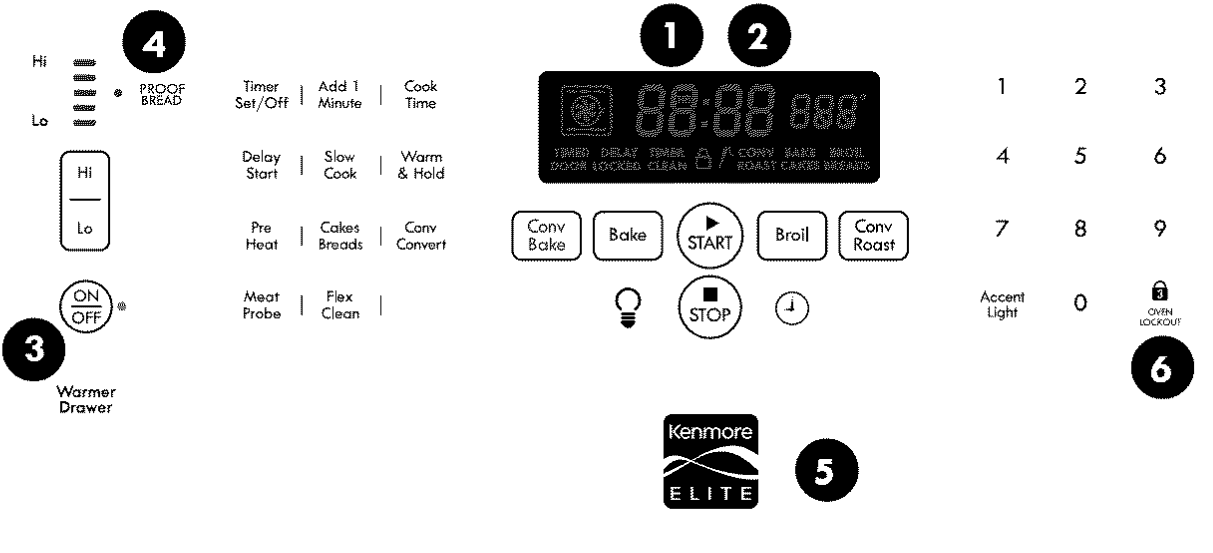
Your gas range features include:
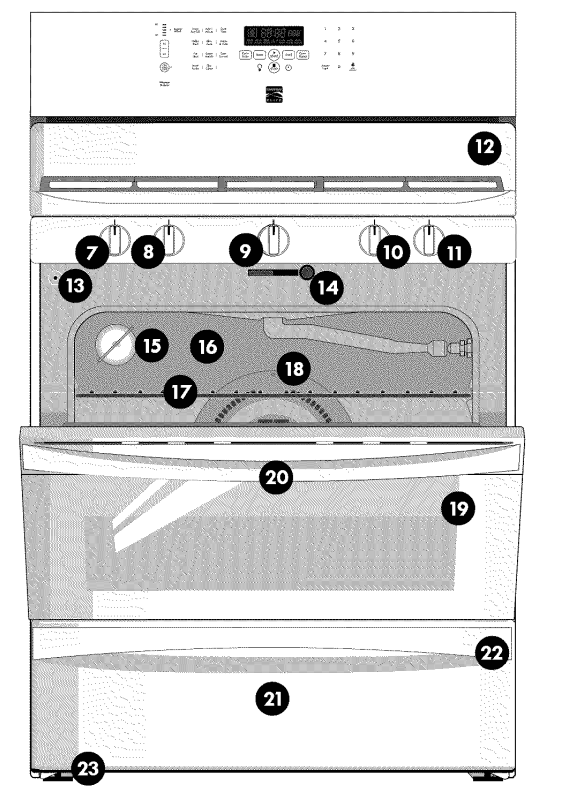
- Electronic oven control with timer.
- Glass touch-sensitive control panel.
- Warm & Ready TM drawer control & indicator light.
- Proofread indicator light.
- Accent Light.
- Oven Lockout control.
- Left Front burner valve & knob.
- Left Rear burner valve & knob.
- Center Burner valve & knob.
- Right Front burner valve & knob.
- Right Rear burner valve & knob.
- Easy to clean upswept the cooktop.
- Automatic door interior light switch.
- Oven door latch mechanism.
- Two interior oven lights with protective covers.
- Self-cleaning oven interior.
- Adjustable heavy-duty porcelain oven racks.
- Oven convection fan & cover.
- Full-width oven door with a large window.
- Large 1-piece oven door handle.
- Warm & Ready TM Drawer.
- Large 1-piece warmer drawer handle.
- Leveling legs and Anti-tip bracket (included).
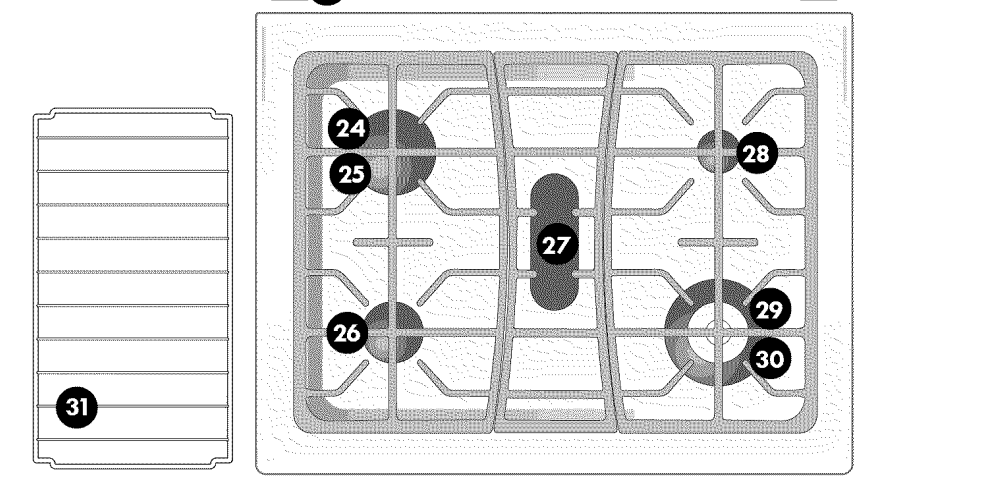
- 12,000 BTU burner (some models)
- 14,200 BTU Power Burner (some models).
- 9,500 BTU burner
- 10,000 BTU Center Burner (some models).
- 5,000 BTU Simmer Burner.
- 18,000 BTU Turbo Boil burner (some models).
- 650 to 18,000 BTU double-ring burner (on some models).
- Warmer drawer rack
Before Setting Oven Controls
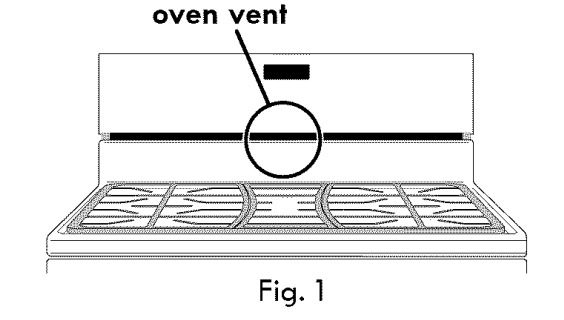
Oven vent location
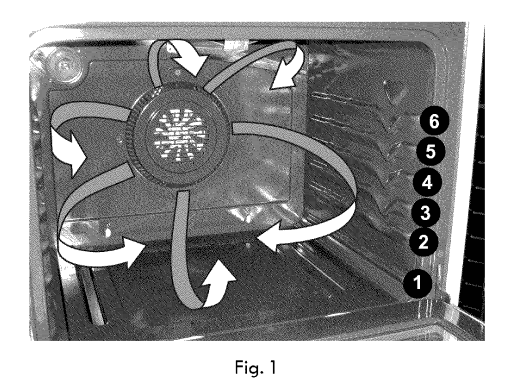
- The oven vent is centered just below the control panel as shown in Fig. 1. When the oven is on, warm air passes through this vent. This venting is necessary for proper air circulation in the oven and good baking results. Do not block the oven vent.

Removing, replacing, and arranging oven racks
- ALUMINUM FOIL to line the oven bottom. Only use aluminum foil as recommended in this manual. Improper installation of these liners may result in a risk of electric shock, or fire.
- Arranging – always arrange the oven racks when the oven is cool (prior to operating the oven).
- To remove – pull the rack forward until it stops. Lift up the front of the rack and slide out.
- To replace – fit oven rack onto the rack guides on both sides of oven walls. Tilt the front of the oven rack upward and slide the rack back into place. Be sure oven racks are level before using.

Types of oven racks
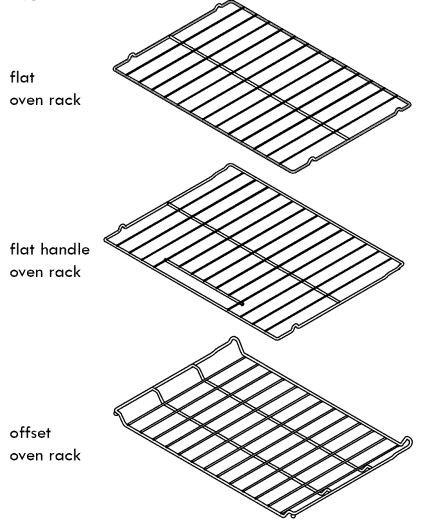
- The flat oven rack (some models) or flat handle oven rack (some models) may be used for most cooking needs.
- The offset oven rack (some models) is designed to place the base of the rack about 1/2 of a rack position lower than flat oven racks. This design provides several additional possible positions between the flat rack positions.
Setting Surface Controls
Setting surface burners
- Your gas appliance may be equipped with different-sized surface burners. The ability to heat food quicker and in larger volumes increases as the burner size increases. It is important to select cookware that is suitable for the amount and type of food being prepared.
To set surface burners:
- Place cooking utensils on the center of the surface burner grate. Be sure the cooking utensils are stable on the burner grate.
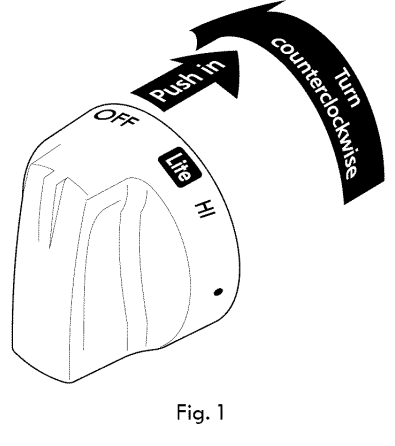
- Push the desired surface control knob in and turn counterclockwise out of the OFF position (Fig. 1).
- Release the surface control knob and rotate to the LITE position. Visually check that the burner has lit.
- Once the burner has a flame, push the control knob in and turn counterclockwise to the desired flame size. Use the control knob markings and adjust the flame as needed.

- Important notes:
- DO NOT cook with the surface control knob left in the LITE position. The electronic ignitor will continue to spark if the control knob setting remains in the LITE position. When setting any surface control knob to the LITE position, all electronic surface ignitors will spark at the same time. However, only the surface burner you are setting will ignite.
Operating the Double Ring Burner:
- Push the right front surface burner control knob in and turn counterclockwise out of the OFF position -Fig. 1.
- Release the knob and rotate to the Lite position.
- Visually check that both inner and outer rings for the Double-ring burners are lit (See Fig. 3). Once lit, push in the control knob and to turn counterclockwise out of the Lite position, and adjust to the desired flame size.
- When adjusting for a low or simmer-type flame setting, continue to rotate the control knob counterclockwise from the MED setting towards LO (See Fig 2). Between the MED and LO setting the flame for the outer ring portion of the burner will turn off leaving only the inner burner with a flame for simmering (See Fig. 4). Make any further flame adjustments as needed.

Oven Control Functions
- For satisfactory use of your oven, become familiar with the various keypad functions and features of the oven.

Oven control keypads
- Timer Set/Off – Use to set or cancel Timer.
- Delay Start – Use Bake, Cony Bake, Cony Convert, and Flex Clean functions to program a delay start time or delay start the self-cleaning cycle.
- Preheat – Use to pre-condition the oven temperature.
- Meat Probe – Use to set meat probe.
- Add 1 Minute – Use to add additional minutes to the Timer.
- Slow Cook – Use to set the Slow Cook function.
- Cakes Breads – Use to select the Cakes or Breads function.
- Flex Clean – Use to set a 2 to 4-hour self-clean cycle.
- Cook Time – Use to enter the length of cook time desired.
- Warm & Hold – Use to select the Warm & Hold function.
- Conv Convert – Use to select the Conv Convert function
- Conv Bake – Use to select the Conv Bake function.
- Bake – Use to start the normal Bake function.
- Oven Light – Use to turn the oven lights ON or OFF.
- START – Use to start oven functions.
- STOP – Use to cancel any oven function previously entered except the Clock and Timer.
- Broil – Use to select the Broil function.
- Clock – Use to set the time of day.
- Conv Roast – Use to select the Conv Roast function.
- Accent Light – Use to turn Accent Light ON or OFF.
- Oven Lockout – Use to lock out oven functions and doors.
Setting Oven Controls
- Changing oven temperature display mode
- The oven control is preset to display °F (Fahrenheit) when shipped from the factory. The control can be changed to display either Fahrenheit or Celsius.
Oven Lockout
- The control may be programmed to lock the oven door and lock the oven control keypads.
To activate the Oven Lockout feature:
- Be sure the oven door is completely closed.
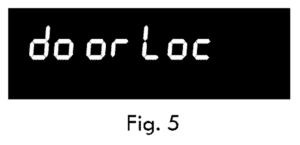
- Press and hold the OVEN LOCKOUT keypad for 3 seconds, and door Loc (See Fig. 5) will appear in the display. The motor-driven door latch mechanism will begin locking the oven door automatically. Do not open the oven door. Allow about 15 seconds for the oven door to completely lock. Once the oven door is locked, the Loc will appear in the display (See Fig. 6).

Setting Oven Controls
Conv Bake
Benefits of the convection bake feature
- Foods may cook up to 25 to 30% faster, saving time and energy.
- Multiple rack baking.
- No special pans or bakeware is needed.
- Convection functions use a fan to circulate the oven’s heat uniformly and continuously around the oven. This improved heat distribution allows for fast, even cooking and browning results.
- Heated air flows around the food from all sides, sealing in juices and flavors.
- Most foods will cook faster and more evenly with the convection feature.
- Conv Bake may be set for any oven temperature between 300°F (149°C) to 550°F (288°C).
- Suggestions for Convection baking:
- Reduce oven temperature to 25°F from the recipe’s recommended oven temperature. Follow the remainder of the recipe’s instructions using the minimum recommended cooking time.
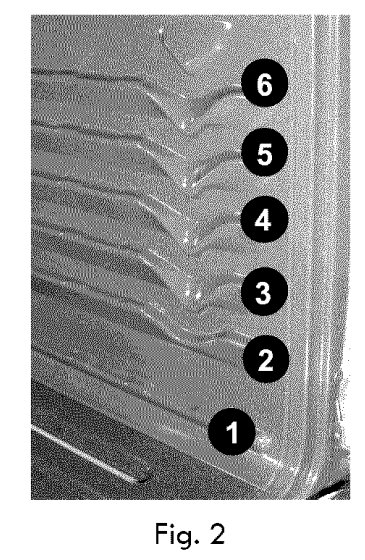
- For best results when using a single oven rack, place the rack in position 3 or 4 (See Fig. 1). When using 2 oven racks, place them in positions 1 and 4. When using 3 oven racks place in positions 1, 3, and 6 (use offset oven rack only in position 6).

Broil
- Use the broil function to cook meats that require direct exposure to radiant heat for optimum browning results. The broil feature is factory preset to broil at 550°F. The Broil function temperature may be set at any temperature between 400°F (205°C) and 550°F (288°C).
- Be aware that the suggested broil settings table (Fig. 2) are recommendation only. Increase or decrease broiling times, or move to a different oven rack position to suit doneness. If the food you are broiling is not listed on the table, follow the instructions provided in your cookbook and watch the item closely.
Proper meat probe placement:
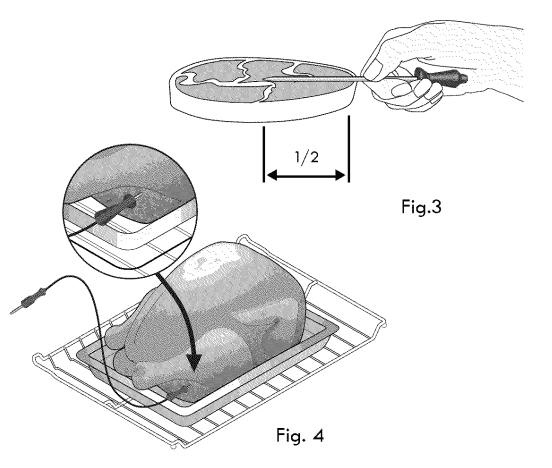
- Always insert a meat probe so that the probe tip rests in the center of the thickest part of the meat. Do not allow the meat probe to touch bone, fat, gristle or cookware. For bone-in ham or lamb, insert a meat probe into the center of the lowest large muscle or joint. For dishes such as meatloaf or casseroles, insert a meat probe into the center of the food. To find the center of the food visually measure using a probe as a guide (See Fig. 3). When cooking fish, insert a meat probe just above the gill.
- For whole poultry or turkey, insert a meat probe into the thickest part of the inner thigh, below the leg (See Fig. 4).

Care & Cleaning
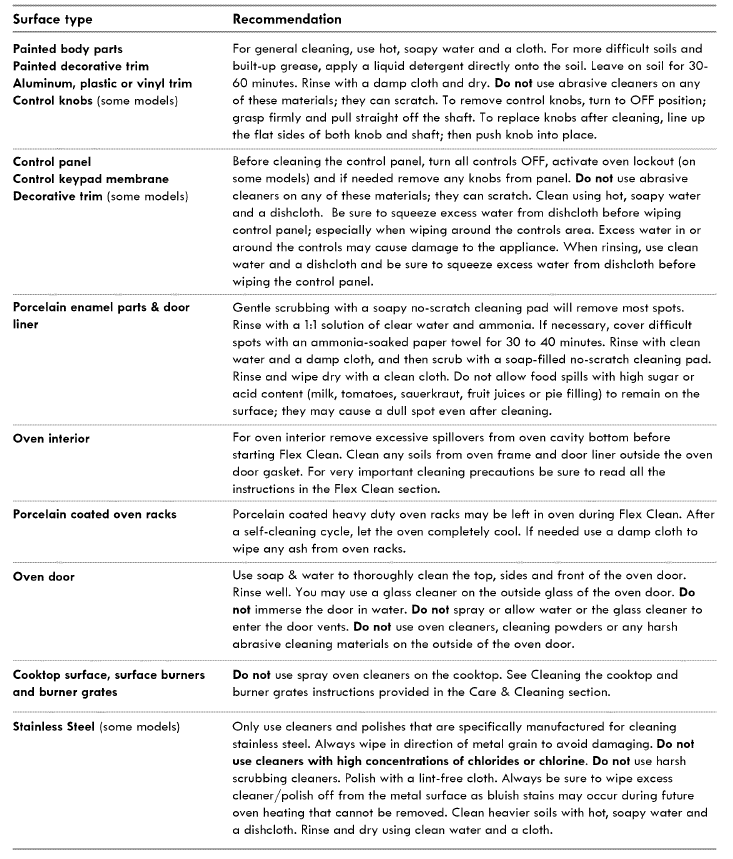
Cleaning recommendation table
For more manuals by Kenmore visit, ManualsLibraryy
Kenmore 7907830 Elite Gas Range-FAQs
How long does a Kenmore gas range last?
A Kenmore gas range typically lasts around 15 years with proper maintenance. Regularly cleaning the vent hood filter helps prevent grease buildup and extends its lifespan.
How do I lock or unlock the gas range controls?
To activate or deactivate the Gas/Control Lockout feature, press and hold the Gas/Control Lockout button for 3 seconds. The Clear/Off button remains functional even when the control is locked.
What color should the gas flame be?
A blue flame is normal for natural gas, while blue with slightly yellow tips is typical for LP gas. If the flame is entirely yellow or orange, the burner may need cleaning or adjustment.
Why is my gas flame turning yellow or orange?
A yellow or orange gas flame indicates an improper oxygen-to-gas ratio, often due to dust, dirt, or a clogged burner. Cleaning the burner should resolve the issue.
Who manufactures Kenmore gas ranges?
Kenmore appliances are produced by various manufacturers, including Whirlpool, Samsung, LG, Electrolux, Panasonic, Cleva North America, and Winia Electronics.
How often should a gas stove be serviced?
Experts recommend servicing gas stoves every 1 to 2 years to ensure efficiency, safety, and peak performance—similar to routine car maintenance.
What does a blue flame on my gas stove indicate?
A blue flame means the stove is functioning properly with the correct gas and oxygen mix. A red or yellow flame may indicate incomplete combustion and should be inspected.
How do I clean my gas stove?
1. Remove grates, burner caps, and heads.
2. Wash them with dish soap and warm water.
3. Make a paste with baking soda and water and apply it to the parts.
4. Let them sit for up to an hour before rinsing and drying.
Why is my gas burner turning black?
Soot buildup is a sign of incomplete combustion, often caused by dirty or misaligned burner parts. Cleaning and properly positioning the burner components can resolve the issue.

