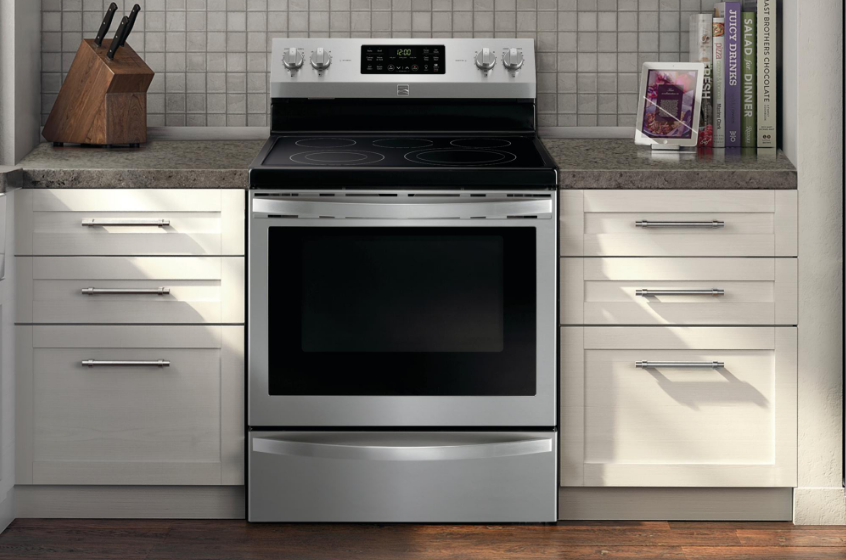
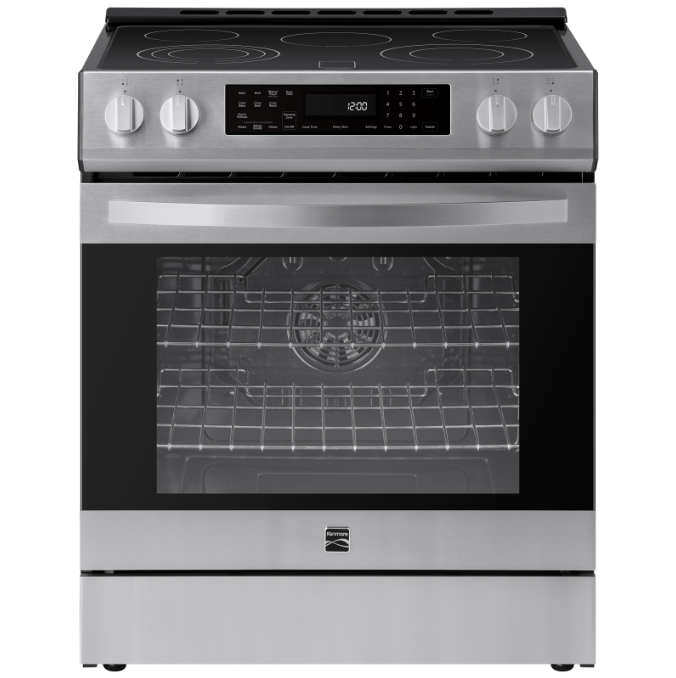
Kenmore 7909021 Electric Range
Important Safety Instructions
Read all instructions before using this appliance.
- Remove all tape and packaging before using the range. Destroy the carton and plastic bags after unpacking the range. Never allow children to play with packaging material.
- User servicing–Do not repair or replace any part of the appliance unless specifically recommended in the manuals. All other servicing should be done only by a qualified technician. This may reduce the risk of personal injury and damage to the range. Ask your dealer to recommend a qualified technician and an authorized repair service. Know how to disconnect the power to the range at the circuit breaker or fuse box in case of an emergency.
- Remove the oven door from any unused range if it is to be stored or discarded.
- Do not attempt to operate the range during a power failure. If the power fails, always turn off the range. If the range is not turned off and the power resumes, the range will begin to operate again. Once the power resumes, reset the clock and oven function.
- DO NOT LEAVE CHILDREN ALONE. Children should not be left alone or unattended in the area where the appliance is in use. They should never be allowed to sit or stand on any part of the appliance, including the storage drawer, lower broiler drawer, warmer drawer, or lower double oven.
- Do not store items of interest to children in the cabinets above a range or on the backguard of the range. Children climbing on the range to reach items could be seriously injured.
- DO NOT TOUCH SURFACE HEATING UNITS, SURFACE COOKING ELEMENTS, AREAS NEAR THESE SURFACE HEATING UNITS, OR THE INTERIOR SURFACE OF THE OVEN. Both surface heating and oven heating elements may be hot even though they are dark in color. Areas near surface cooking units may become hot enough to cause burns. During and after use, do not touch or let clothing or other flammable materials touch these areas until they have had sufficient time to cool. Among these areas are the cook top, surfaces facing the cook top, the oven vent openings and surfaces near these openings, the oven door, and the oven door window.
- Wear proper apparel — loose-fitting or hanging garments should never be worn while using the appliance. Do not let clothing or other flammable materials contact hot surfaces.
- DO NOT USE WATER OR FLOUR on grease fires _ Smother the fire with a pan lid, or use baking soda, a dry chemical, or foam foam-type extinguisher.
- When heating fat or grease, watch it closely. Fat or grease may catch fire if allowed to become too hot.
IMPORTANT INSTRUCTIONS FOR USING YOUR COOKTOP
- Know which knob controls each surface heating unit. Place a pan of food on the surface element unit before turning it on, and turn the element off before removing the pan.
- Use proper pan size — This appliance is equipped with one or more surface units of different sizes. Select utensils having flat bottoms, large enough to cover the surface unit heating element. The use of undersized utensils will expose a portion of the heating element to direct contact and may result in the ignition of clothing. A proper relationship of utensil to element will also improve efficiency.
- Utensil handles should be turned inward and not extend over adjacent surface elements — To reduce the risk of burns, ignition of flammable materials, and spillage due to unintentional contact with the utensil, the handle of the utensil should be positioned so that it is turned inward, and does not extend over adjacent surface units.
- Never leave surface elements unattended at high heat settings — Boilovers cause smoking and greasy spillovers that may ignite, or a pan that has boiled dry may melt.
- Glazed cooking utensils — Only certain types of glass, glass/ceramic, ceramic, earthenware, or other glazed utensils are suitable for cooktop service without breaking due to the sudden change in temperature. Check the manufacturer’s recommendations for cooktop use.
- When flaming foods under a ventilating hood, turn the fan on.
COIL COOK TOP MODELS
Protective liners — Do not use aluminum foil to line surface unit drip bowls or reflector pans. Only use aluminum foil as recommended in this manual. Improper installation of these liners may result in the risk of electric shock or fire.
Make sure reflector pans or drip bowls are in place–Absence of these pans or bowls during cooking may subject wiring or components underneath to damage.
Before Setting Oven Controls
Oven vent location
The oven vent is located under the left rear surface element. When the oven is on, warm air passes through this vent. This venting is necessary for proper air circulation in the oven and good baking results. Do not block the oven vent.
Removing, replacing, and arranging racks
CAUTION: Always use pot holders or oven mittens when using the oven. When cooking, the oven interior and exterior, oven racks and cooktop will become very hot which can cause burns.
WARNING: Protective Liners, DO NOT USE ALUMINUM FOIL to line the oven bottom. Only use aluminum foil as recommended in this manual. Improper installation of these liners may result in the risk of electric shock or fire.
Arranging
Always arrange the oven racks when the oven is cool (prior to operating the oven).
To remove
Pull the rack forward until it stops. Lift up the front of the rack and slide out.
To replace
Fit the oven rack onto the rack guides on both sides of the oven walls. Tilt the front of the oven rack upward and slide the rack back into place. Be sure oven racks are level before using.
Types of oven racks
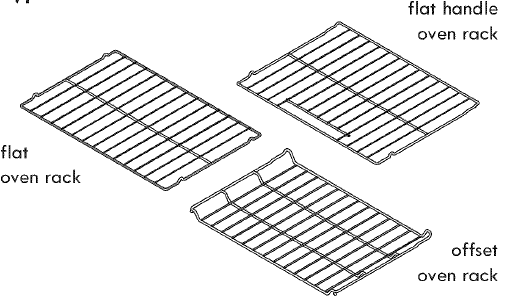
The flat oven rack or flat handle oven rack (on some models) may be used for most cooking needs.
The offset oven rack (on some models) will place the base of the rack about 1/2 of a rack position lower than a flat oven rack. This feature provides several additional possible oven rack positions.
Air circulation in the oven
For best baking results allow 2-4″ (5-10 cm) around the cookware for proper air circulation and be sure pans and cookware do not touch each other, the oven door, sides or back of the oven cavity. Hot air must be able to circulate around the pans and cookware in the oven for even heat to reach around the food.
Baking layer cakes with I or 2 oven racks
For best results when baking cakes or cookies using 2 oven racks, place cookware on rack positions 2 and 5 (6 using the offset oven rack on some models). For best results when baking cakes or cookies using a single oven rack, place cookware on the rack in positions 2, 3, or 4.
Before Setting Surface Controls
About the surface elements
The element temperature rises gradually and evenly. As the temperature rises, the element will glow red.
For efficient cooking, turn OFF the surface element just before cooking is complete. This will allow residual heat to complete the cooking process.
CAUTION: Surface elements may appear to have cooled after they have been turned off. The surface element may still be hot, and burns may occur if the surface element is touched before it has cooled sufficiently.
Do not use aluminum foil to line surface unit drip bowls or reflector pans. Only use aluminum foil as recommended in this manual. Improper installation of these liners may result in the risk of electric shock or fire.
Do not place an aluminum tool or ANY material that could melt on the surface elements.
Make sure reflector pans or drip bowls are in place. Absence of these pans or bowls during cooking may subject wiring or components underneath to damage.
Element On indicator lights
The ELEMENT ON indicator lights are marked on the control panel and will glow when a surface cooking element is turned ON. A quick glance at these indicator lights after cooking is an easy check to be sure ALL surface controls are turned OFF.
Using proper cookware
The size and type of cookware used will influence the surface element power level setting needed for best cooking results. Be sure to follow the recommendations for using proper cookware.
Check for flatness by rotating a ruler across the bottom of the cookware. Cookware should have flat bottoms that make good contact with the entire surface heating element.
- Flat bottom and straight sides.
- Tight-fitting lids.
- The weight of the handle does not tilt the pan. Pan is well balanced.
- Pan sizes match the amount of food to be prepared and the size of the surface element.
- Made of material that conducts heat well.
- Easy to clean.
- Always match pot diameter to surface element size.
- Curved and warped pans.
- Cookware larger than the surface element on the cooktop by more than one-half inch or 12mm.
- Heavy handle tilts the pan.
- Pan is smaller than the surface element on the cooktop.
Setting Surface Controls
Surface element settings
The size and type of utensil used, and the amount and type of food being cooked, will influence the surface element power level setting needed for best cooking results.
The suggested settings found in Fig. 1 below are based when cooking with medium-weight aluminum pans with lids. Settings may vary when using other types of pans.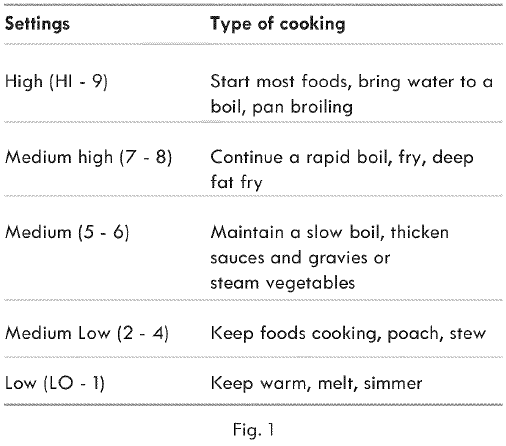
CAUTION: Do not place plastic items such as salt and pepper shakers, spoon holders, or plastic wrappings on the top of the range when it is in use. These items could melt or ignite. Potholders, towels, or wooden spoons could catch fire if placed too close to the surface elements.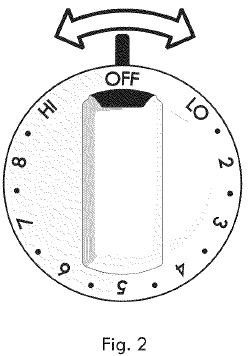
To operate the single radiant element:
- Place correctly sized cookware on the surface element.
- Push in and turn the surface control knob in either direction to the desired setting (See Fig. 2).
- When cooking is complete, turn the surface element OFF before removing the cookware.
Oven Control Functions
For satisfactory use of your oven, become familiar with the various key pad functions and features of the oven.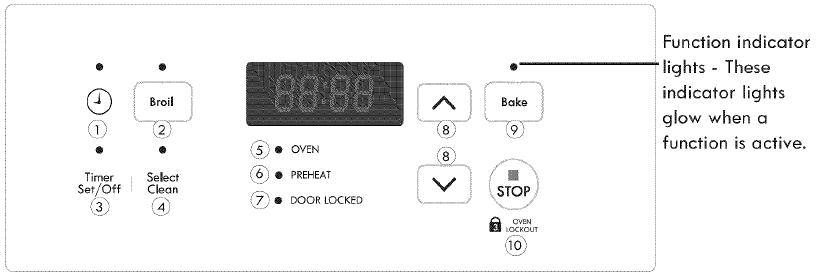
Oven control keypads
- Clock- Use to set the time of day.
- Broil – Use to select the variable broil function.
- Timer Set/Off – Use to set or cancel the timer. Timer Set/Off is used to set the continuous bake feature.
- Select Clean – Use to select a 2, 3, or 4-hour Self-Clean cycle time.
- OVEN indicator light – The OVEN light will glow each time the oven turns on to maintain the set oven temperature.
- PREHEAT indicator light – The PREHEAT light will glow when the oven is first set for cooking and remain on until the oven reaches the set temperature.
- DOOR LOCKED indicator light – The DOOR LOCKED light will glow when the oven door locks or unlocks, oven lockout is active, or when Select Clean is active.
- Up / Down arrow key pads – Use with the function key pads to accept settings and to adjust temperature and times.
- Bake – Use to select the Bake function.
- STOP – Use to cancel any active oven function except the clock or timer. Use to activate or cancel OVEN LOCKOUT.
Setting Oven Controls
Broil
Use the broil function to cook meats that require direct exposure to flame heat for optimum browning results. The Broil function is factory preset to broil at 550°F. The suggested broil settings table (See Fig. 3) is provided for recommendations only. Increase or decrease broiling times, or move to a different rack position to suit doneness. If the food you are broiling is not listed in the table, follow the instructions provided in your cookbook and watch the item closely.
To set Broll:
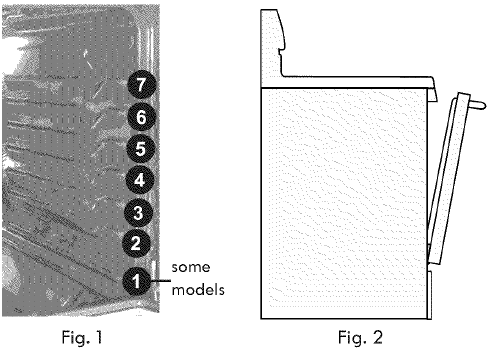
- Arrange the oven racks when cool. For optimum browning results, preheat the oven for 5 minutes before adding food.
- Position the cookware in the oven. Leave oven door open at broil stop position when broiling (See Fig. 2).
- Press the Broil key pad. —- will appear in the display.
- Press the UP or DOWN key pad until the desired broil setting level appears in the display. Press UP for HI broil or DOWN for LO broil setting. Most foods may be broiled at the HI broil setting. Select the LO broil setting to avoid excess browning or drying of foods that should be cooked to the well-done stage.
- Broil on one side until the food is browned. Turn and broil food on 2nd side.
- When finished, broiling press STOP.
To cancel Broil at any time, press STOP.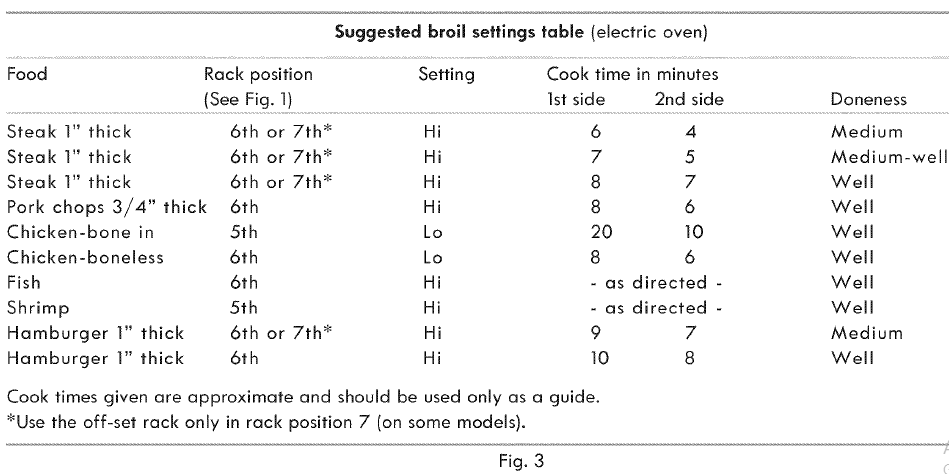
Care & Cleaning
General cleaning
Refer to the Cleaning recommendation table in the Care & Cleaning section for more detailed information about cleaning specific parts of the range.
CAUTION: Before manually cleaning any part of the range, be sure all controls are turned OFF and the range is COOL. The range may be hot and can cause burns.
Ammonia must be rinsed before operating the oven. Provide adequate ventilation.
Remove soils using hot, soapy water. Do not allow food spills with a high sugar or acid content (such as milk, tomatoes, saukerkraut, fruit juices, or pie filling) to remain on the surface, as they may cause a dull spot even after cleaning. Remove spillovers and heavy soiling as soon as possible. Regular cleaning will reduce the effort required for major cleaning later.
Cleaning oven bottom (some models)
CAUTION: Oven elements may appear to have cooled after they have been turned off. The oven bake and broil elements may still be hot and burns may occur if touched before they have cooled sufficiently.
Please note:
On some models, the lower oven bake element is visible. The following cleaning instruction applies ONLY to models that have a visible lower bake element.
The lower bake element may be tilted from the front for better access to the oven bottom for cleaning purposes. Be careful not to raise the element more than 4 or 5 inches from the resting position.
Raising and lowering the cooktop (some models)
To raise and lower the cooktop:
- Remove all items from the cooktop and set aside.
- Grasp the sides of the cooktop and then lift from the front.
- Lift the cooktop high enough to allow the support rods to snap into place. The lift-up rods will support the cooktop in the raised position.
- If necessary, clean underneath using hot, soapy water and a clean cloth; then dry.
- To lower the cooktop, grasp the front corner of each side of the top while pushing back on each rod with the heel of your hand. This will release the notched support. Hold the range cooktop and gently slide the top back down level of the range.
Before You Call
Solutions to common problems
Before you call for service, review the following list. It may save you time & expense. Possible solutions to these problems are provided with the problem listed:
Poor baking results.
Many factors affect baking results. Make sure the proper oven rack position is used. Center food in the oven and space pans to allow air to circulate. Allow the oven to preheat to the set temperature before placing food in the oven. Try adjusting the recipe’s recommended temperature or baking time. If you feel the oven is too hot or cool, see Adjusting oven temperature in the Setting Oven Controls section.
The appliance is not level.
- Be sure the floor is level, strong & stable enough to adequately support the range.
- If the floor is sagging or sloping, contact a carpenter to correct the situation.
- Poor installation. Place the oven rack in the center of the oven. Place a level on the oven rack. Adjust leveling legs at the base of the appliance until the rack is level.
- Kitchen cabinet alignment may make the range appear not level. Be sure cabinets are square & have sufficient room for appliance clearance.
Select Clean does not work.
The oven control is not set properly. Review instructions in the Select Clean section.
Drip bowls are turning color or distorted.
Bottom surface of cookware extends beyond the surface element and touches the cooktop surface. This can cause high enough temperatures to discolor the drip bowls. DO NOT use cookware of this type. Pan sizes should be matched to the size of the element. Replacement drip bowls may be purchased from your appliance dealer.
For more Manuals by Kenmore, visit ManualsLibraryy
Kenmore 7909021 Electric Range-FAQs
Why is my Kenmore electric range not heating?
Common causes include:
Faulty heating element (visible cracks or damage)
Defective control board (needs reset or replacement)
Broken bake element (check for continuity with a multimeter)
Tripped circuit breaker (reset the breaker)
Where is the model number on a Kenmore electric stove?
Look for the serial plate in these locations:
Inside the oven door frame
Back of the range
Under the cooktop (lift the front edge)
How do I know if my oven is convection or conventional?
Conventional: Heating elements only (top and bottom).
Convection: Has a fan inside to circulate hot air (usually labeled “Convection Bake”).
How long do Kenmore ovens last?
Electric ovens: ~13–15 years
Gas ovens: ~15 years
Dual-fuel ovens: ~15 years
How do I reset my Kenmore electric range?
Unplug or turn off the circuit breaker for 2+ minutes.
Restore power and set the clock.
Test the oven—if issues persist, check for error codes.
Why does my Kenmore oven take so long to preheat?
Possible reasons:
Faulty heating element
Damaged door seal (lets heat escape)
Temperature sensor issues
Low voltage supply
Where is the heating element in a Kenmore oven?
Bake element: Bottom of the oven cavity.
Broil element: Top of the oven cavity.
How to check if the heating element is working?
Preheat the oven – The element should glow red.
Use a multimeter – Test for continuity (no continuity = replace).
Where is the thermal fuse located?
Typically near the blower motor or control board (consult the manual for exact location).
How long should preheating to 400°F take?
Standard oven: ~15–20 minutes

