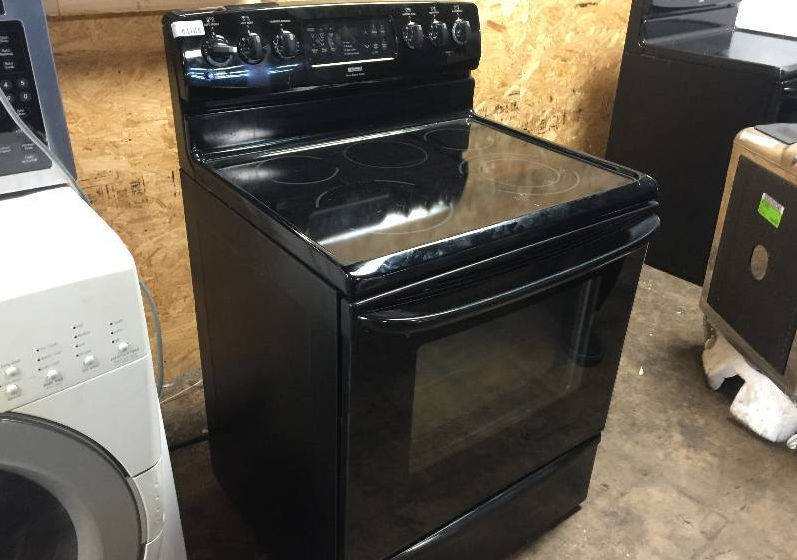
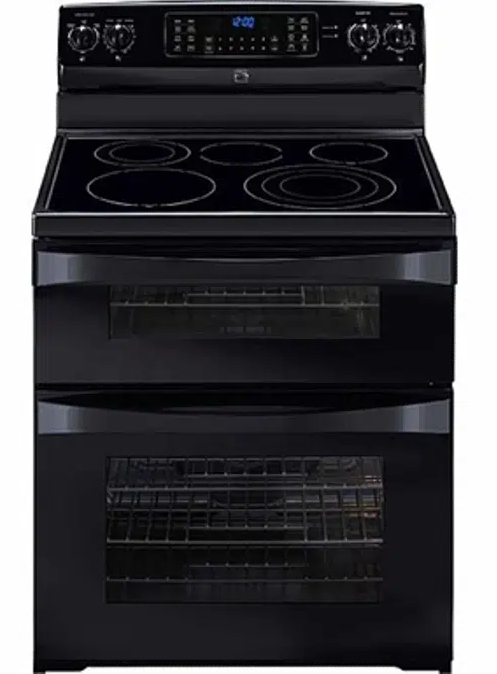
Kenmore 7909700 Series Electric Range
IMPORTANT SAFETY INSTRUCTIONS
Read all instructions before using this appliance.
- Remove all tape and packaging before using the range. Destroy the carton and plastic bags after unpacking the range. Never allow children to play with packaging material.
- Proper installation—Be sure your appliance is properly installed and grounded by a qualified technician in accordance with the National Electrical Code ANSI/NFPA No. 70, latest edition, and local electrical code requirements. Install only per the installation instructions provided in the literature package for this range.
- Do not attempt to operate the range during a power failure. If the power fails, always turn off the range. If the range is not turned off and the power resumes, the range will begin to operate again. Once the power resumes, reset the clock and oven function.
- User servicing—Do not repair or replace any part of the appliance unless specifically recommended in the manuals. All other servicing should be done only by a qualified technician. This may reduce the risk of personal injury and damage to the range.
Ask your dealer to recommend a qualified technician and an authorized repair service. Know how to disconnect the power to the range at the circuit breaker or fuse box in case of an emergency.
- Never modify or alter the construction of a range by removing the leveling legs, panels, wire covers, anti-tip brackets/screws, or any other part of the range.
Warning
Stepping, leaning, or sitting on the door or drawers of a range can result in serious injuries and also cause damage to the appliance. DO NOT allow children to climb or play around the range. The weight of a child on an open oven door may cause the range to tip, resulting in serious burns or other injuries.
Storage in or on appliance — flammable materials should not be stored in an oven, near surface units, or in the storage drawer, warmer drawer, or lower oven. This includes paper, plastic, and cloth items, such as cookbooks, plasticware, and towels, as well as flammable liquids. Do not store explosives, such as aerosol cans, on or near the range.
- Remove the oven door from any unused range if it is to be stored or discarded.
IMPORTANT INSTRUCTIONS FOR USING YOUR COOKTOP
- Know which knob controls each surface heating unit. Place a pan of food on the surface element unit before turning it on, and turn the element off before removing the pan.
- Use proper pan size — This appliance is equipped with one or more surface units of different sizes. Select utensils having flat bottoms, large enough to cover the surface unit heating element. The use of undersized utensils will expose a portion of the heating element to direct contact and may result in the ignition of clothing. A proper relationship of utensil to element will also improve efficiency.
- Utensil handles should be turned inward and not extend over adjacent surface elements — To reduce the risk of burns, ignition of flammable materials, and spillage due to unintentional contact with the utensil, the handle of the utensil should be positioned so that it is turned inward, and does not extend over adjacent surface units.
- Never leave surface elements unattended at high heat settings — Boilovers cause smoking and greasy spillovers that may ignite, or a pan that has boiled dry may melt.
- Glazed cooking utensils — Only certain types of glass, glass/ceramic, ceramic, earthenware, or other glazed utensils are suitable for cooktop service without breaking due to the sudden change in temperature. Check the manufacturer’s recommendations for cooktop use.
- When you are frying foods under a ventilating hood, turn the fan on.
Before Setting Oven Controls
Oven vent location
The oven vent is located under the left side of the control panel (See Fig. 1). When the oven is on, warm air passes through this vent. This venting is necessary for proper air circulation in the oven and good baking results. Do not block the oven vent.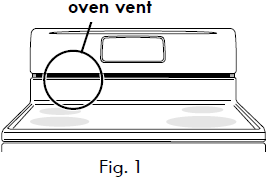
Removing, replacing, and arranging racks
CAUTION
Always use pot holders or oven mittens when using the oven. When cooking, the oven interior and exterior, oven racks, and cooktop will become very hot, which can cause burns.
WARNING
Protective Liners — DO NOT USE ALUMINUM FOIL to line the oven bottom. Only use aluminum foil as recommended in this manual. Improper installation of these liners may result in the risk of electric shock or fire.
Arranging
Always arrange the oven racks when the oven is cool (prior to operating the oven).
To remove
Pull the rack forward until it stops. Lift up the front of the rack and slide out.
To replace
Fit the oven rack onto the rack guides on both sides of the oven walls. Tilt the front of the oven rack upward and slide the rack back into place. Be sure oven racks are level before using.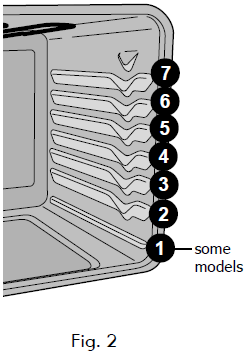
Types of oven racks
The flat oven rack (some models) or flat handle oven rack (some models) may be used for most cooking needs. The offset oven rack (some models) is designed to place the base of the rack about 1/2 of a rack position lower than flat oven racks. This design provides several additional possible positions between the flat rack positions. To maximize oven cooking space, place the bottom oven rack (on some models) in the lowest rack position for roasting large cuts of meat.
Air circulation in the oven
For best standard baking results, allow 2-4″ (5-10 cm) around the cookware for proper air circulation, and be sure pans and cookware do not touch each other, the oven door, sides, or back of the oven cavity. Hot air must be able to circulate around the cookware in the oven for even heat to reach around the food.
Baking layer cakes and cookies with 1 or 2 oven racks
For best standard baking results when baking cakes or cookies using a single oven rack, place cookware on rack position 3 or 4 (See Fig. 2). For best results using 2 oven racks, place cookware on rack positions 3 and 6 (offset rack, if supplied, is recommended for position 6). See Convection Bake instructions for the best convection rack positions.
Before Setting Surface Controls
Types of cooktop surface elements
The ceramic glass cooktop has radiant surface elements located below the surface of the glass. The patterns on the ceramic glass will outline the size and type of element available.
The single radiant element or elements will have a round outline pattern shown on the cooktop. The warmer zone feature located on the center rear area of the cooktop uses a round outline and is designed to keep food warm only.
The dual (some models) radiant element allows the user to set the smaller inner portion as a single element, or both inner and outer portions may be set to heat together (See Fig. 1).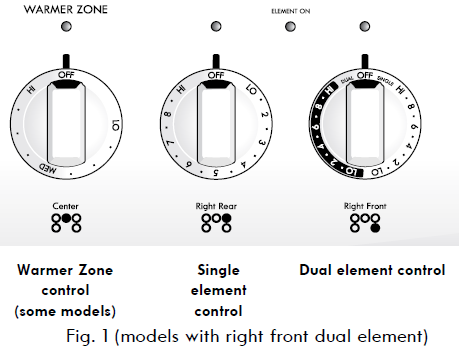
The triple (some models) radiant element feature has three element portions and may be set to heat as 1 (single), 2 (dual), or 3 (triple) element portions together (See Fig. 2).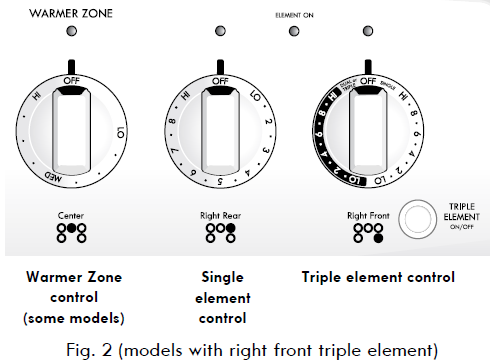
Setting Surface Controls
Radiant surface element settings
The size and type of utensil used, and the amount and type of food being cooked, will influence the surface element power level setting needed for best cooking results.
The suggested settings are based when cooking with medium-weight aluminum pans with lids. Settings may vary when using other types of pans.
CAUTION
Radiant surface elements may appear to have cooled after they have been turned off. The glass surface may still be hot, and burns may occur if the glass surface is touched before it has cooled sufficiently.
Do not place plastic items such as salt and pepper shakers, spoon holders, or plastic wrappings on top of the range when it is in use. These items could melt or ignite. Potholders, towels, or wooden spoons could catch fire if placed too close to the surface elements.
Do not allow aluminum foil, empty glass/ porcelain cookware, or ANY material that can melt to make contact with the ceramic cooktop. If these items melt on the cooktop, they may damage the ceramic cooktop.
Single radiant surface elements
To operate the single radiant element:
- Place correctly sized cookware on a single radiant surface element.
- Push in and turn the surface control knob in either direction to the desired setting.
- When cooking is complete, turn the radiant surface element OFF before removing the cookware.
Important notes:
- For efficient cooking, turn OFF the element several minutes before cooking is complete. This will allow residual heat to complete the cooking process.
- The surface control knobs do not have to be set exactly on a particular spot. Use the graphics provided as a guide and adjust the control knob as needed. Each surface element provides a constant amount of heat at each setting. Refer to the Suggested radiant surface element settings table for suggested power level settings.
- Start most cooking operations on a higher setting and then turn to a lower setting to finish cooking.
- Radiant elements have a limiter that allows the radiant heating element to cycle ON and OFF, even at the HI setting. This helps prevent damage to the ceramic smoothtop. Cycling at the HI setting is normal and will occur more often if the cookware is too small for the radiant element or if the cookware bottom is not flat.
- A glowing red surface heating area extending beyond the bottom edge of the cookware indicates the cookware is too small for the surface heating area.
Dual radiant surface element
To operate the dual radiant element:
- Place correctly sized cookware on a single radiant surface element.
- Push in and turn the surface control knob clockwise to begin heating both the inner and outer portions of the element marked dual. If only the inner heating portion is needed for smaller cookware, push in and turn the knob counterclockwise to start. Please note that you may switch from the single or dual settings at any time during cooking.
- When cooking is complete, turn the radiant surface element OFF before removing the cookware.
Important notes:
- For efficient cooking, turn OFF the element several minutes before cooking is complete. This will allow residual heat to complete the cooking process.
- The surface control knobs do not have to be set exactly on a particular spot. Use the graphics provided as a guide and adjust the control knob as needed. Each surface element provides a constant amount of heat at each setting. Refer to the Suggested radiant surface element settings table for suggested power level settings.
- Start most cooking operations on a higher setting and then turn to a lower setting to finish cooking.
- Radiant elements have a limiter that allows the radiant heating element to cycle ON and OFF, even at the HI setting. This helps prevent damage to the ceramic smoothtop. Cycling at the HI setting is normal and will occur more often if the cookware is too small for the radiant element or if the cookware bottom is not flat.
- A glowing red surface heating area extending beyond the bottom edge of the cookware indicates the cookware is too small for the surface heating area.
Triple radiant surface element
To operate the dual radiant element:
- Place correctly sized cookware on a single radiant surface element.
- Push in and turn the surface control knob clockwise to begin heating both the inner and outer portions of the element. If only the inner heating portion is needed for smaller cookware, push in and turn the knob counterclockwise to start.
- To operate all 3 elements at the same time (inner, middle and outer portions) turn right front control knob as shown (area marked on knob DUAL or TRIPLE) to the desired setting and push in the button marked TRIPLE ELEMENT). Please note that all 3 element portions will adjust to the same power level. Please note that you may switch from the single, dual, or triple settings at any time during cooking.
- When cooking is complete, turn the radiant surface element OFF before removing the cookware.
Important notes:
- For efficient cooking, turn OFF the element several minutes before cooking is complete. This will allow residual heat to complete the cooking process.
- The surface control knobs do not have to be set exactly on a particular spot. Use the graphics provided as a guide and adjust the control knob as needed. Each surface element provides a constant amount of heat at each setting. Refer to the Suggested radiant surface element settings table for suggested power level settings.
- Start most cooking operations on a higher setting and then turn to a lower setting to finish cooking.
- Radiant elements have a limiter that allows the radiant heating element to cycle ON and OFF, even at the HI setting. This helps prevent damage to the ceramic smoothtop. Cycling at the HI setting is normal and will occur more often if the cookware is too small for the radiant element or if the cookware bottom is not flat.
- A glowing red surface heating area extending beyond the bottom edge of the cookware indicates the cookware is too small for the surface heating area.
Care & Cleaning
Cooktop maintenance
Consistent and proper cleaning is essential to maintaining your ceramic glass cooktop.
Prior to using your cooktop for the first time, apply the recommended CookTop® Cleaning Creme to the ceramic surface (on the web, visit www.sears.com for replacement cooktop cleaner, item number 40079). Buff with a nonabrasive cloth or no-scratch cleaning pad. This will make cleaning easier when soiled from cooking. The special cooktop cleaning cream leaves a protective finish on the
glass to help prevent scratches and abrasions.
Sliding aluminum or copper-clad bottom pans on the cooktop can cause metal markings on the cooktop surface. These marks should be removed immediately after the cooktop has cooled using the cooktop cleaning cream. Metal marks can become permanent if not removed prior to future use.
Cookware (cast iron, metal, ceramic, or glass) with rough bottoms can mark or scratch the cooktop surface.
Do not:
- Slide anything metal or glass across the cooktop.
- Use cookware with dirt or dirt buildup on the bottom; replace it with clean cookware before using.
- Use your cooktop as a cutting board or work surface in the kitchen.
- Cook foods directly on the cooktop surface without a pan.
- Drop heavy or hard objects on the ceramic glass cooktop, and they may cause it to crack.
Solutions to common problems
Before you call for service, review the following list. It may save you time & expense. Possible solutions to these problems are provided with the problem listed:
Poor baking results.
Many factors affect baking results. Make sure the proper oven rack position is used. Center food in the oven and space pans to allow air to circulate. Allow the oven to preheat to the set temperature before placing food in the oven. Try adjusting the recipe’s recommended temperature or baking time. If you feel the oven is too hot or cool, see Adjusting oven temperature in the Setting Oven Controls section.
The appliance is not level.
- Be sure the floor is level, strong & stable enough to adequately support the range.
- If the floor is sagging or sloping, contact a carpenter to correct the situation.
- Poor installation. Place the oven rack in the center of the oven. Place a level on the oven rack. Adjust leveling legs at the base of the appliance until the rack is level.
- Kitchen cabinet alignment may make the range appear not level. Be sure cabinets are square & have sufficient room for appliance clearance.
Cannot move the appliance easily. The appliance must be accessible for service.
- Cabinets are not square or are built in too tightly. Contact the builder or installer to make the appliance accessible.
- The carpet interferes with the appliance. Provide sufficient space so the appliance can be lifted over the carpet.
For more Manuals by Kenmore, visit ManualsLibraryy
Kenmore 7909700 Series Electric Range-FAQs
How do I turn on my Kenmore electric stove top?
Press the power button (if equipped) or simply turn the control knob for the desired burner to the desired heat level.
Why is my Kenmore electric range not heating?
Common causes include:
Faulty heating element (visible cracks or damage).
Defective control board.
Broken bake element.
Tripped circuit breaker.
How many cubic feet is the Kenmore 790 range?
The Kenmore 790 Series typically has a 5.0–5.3 cu. ft. oven capacity, but check the model sticker inside the oven door for exact specs.
What is the “Warm & Hold” temperature on a Kenmore oven?
After baking, the oven automatically holds at 150°F until turned off.
Some models may hold at 170°F for 90 minutes before shutting off.
How do I unlock the cooktop on my Kenmore stove?
Press and hold the “Lock” button (if equipped) for 3–5 seconds.
If locked due to self-cleaning mode, wait for the cycle to finish or power off the range at the breaker.
Where is the thermostat on a Kenmore oven?
The temperature sensor is usually located:
Inside the oven cavity, near the back wall.
Connected to a thin metal probe.
Why is my electric stove not getting hot enough?
Troubleshooting steps:
✔ Clean burners (food debris can block heat).
✔ Check circuit breaker.
✔ Inspect wiring for damage.
✔ Test & replace faulty heating elements.
How do I remove the heating element in my Kenmore oven?
Unplug the stove or turn off power.
Unscrew the brackets holding the element.
Gently pull out the element and disconnect wires.
How do I find my Kenmore range model number?
Look for a metal tag with the model & serial number:
Inside the oven door frame.
Under the cooktop (lift-up models).
On the back panel.
How wide is a Kenmore stove?
Most Kenmore ranges are standard 30 inches wide, but compact (24″) and professional (36″) models are also available.

