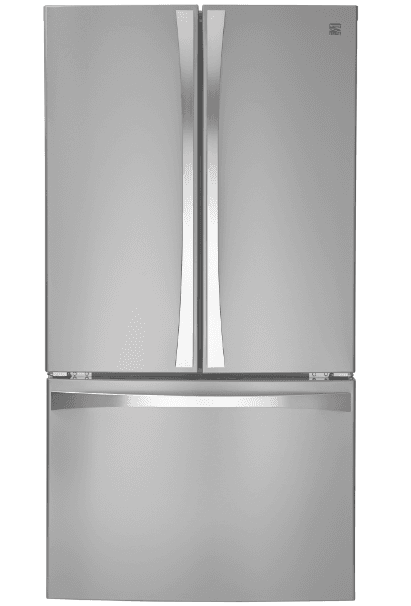
kenmore Elite Refrigerator Model 596
Installation Instructions
Proper installation will ensure that this refrigerator operates most efficiently.
Tools Required
Putty knife (blade covered with masking tape)
- 5/le” hex nut driver
- 3/8″ hex nut driver
- 9//32″hex nut driver
- Phillips screwdriver
To Remove Doors
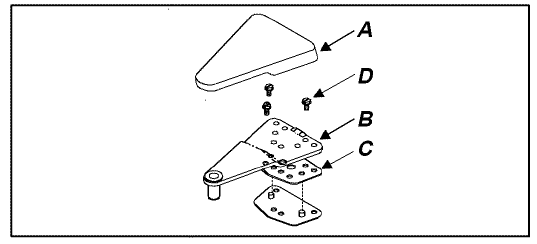
- Remove top hinge cover(A). Top hinge cover snaps off. While supporting refrigerator door, remove top hinge(B) and shim(C) using _/16″hex nut driver to remove screws (D).

- Lift refrigerator door off center hinge.
IMPORTANT: To avoid damage to interior finish, remove buckets and shelves from freezer and refrigerator door before continuing door reversal. Lay door interior-side down on carpet, or a table or floor protected with blankets or towels. - While supporting freezer door, remove center hinge pin(A) from center hinge bracket(B with 9/32″hex nut driver. Remove and retain all round washer shims(C), if present.

- Remove freezer door by lifting door off bottom hinge.
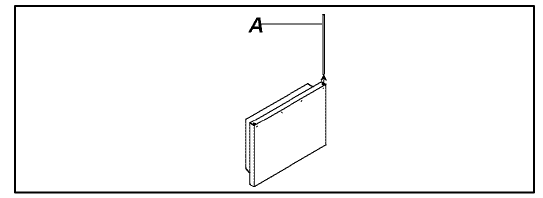
• Models have an internal support rod(A) installed in he hinge socket of door. Remove and retain for later replacement.
- Remove center hinge bracket(A) and shim(B) by removing screws(C) using Phillips screwdriver.

- Remove toe grille and bottom hinge cover. Both snap
- Remove bottom hinge(A) and shim(B) with 3/8″ hex nut driver. Remove hinge pin(C). Remove and retain all round washer shims(D), if present

To Reverse Doors
If you wish to reverse doors on unit, call 1-800-4-MYHOME sm(1-800-469-4663), to schedule a service appointment. This visit will be free of charge if appointment is made within three months of purchase date.
To Replace Doors
- Replace bottom hinge and shims. Replace bottom hinge pin in bottom hinge bracket in hole outside of cabinet, along with all washer shims retained from hinge removal.
- Replace center hinge bracket, and shims.
- Assemble top hinge, hinge shim(s), and positioning shim together. Attach loosely to cabinet to allow for door clearance.
- Place freezer door on bottom hinge pin.
- Replace center hinge pin with hex nut driver. Make sure fit is tight. Replace round shims and door closure.
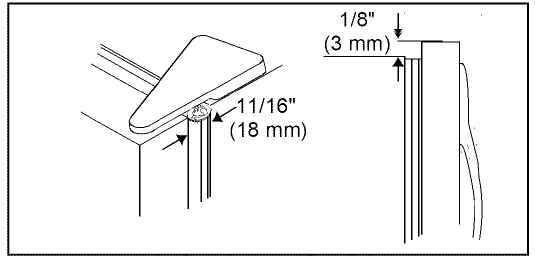
- Tighten down top hinge. Use a dime at top to space door W16″(18 mm) from cabinet.
- Handle side of door should be approximately Vs” (3 mm) higher than hinge side. Door will become level when it is loaded with food.

Connect Ice Maker Supply Line
IMPORTANT
- Before connecting water supply, contact a plumber to connect copper tubing to household plumbing in compliance with local codes and ordinances.
- Do not use a piercing-type or 3/16″ saddle valve! Both reduce water flow, become clogged with time and in addition, may cause leaks if repair is attempted. The correct type of shut-off valve requires a ¼” hole to be drilled in the water supply pipe before valve attachment.
- Do not install copper tubing in area where temperatures drop below 32°F (0°C).
Materials Required
¼” O.D. (6 mm) flexible copper tubing is required. Length of copper tubing must reach from water supply connection to water valve inlet port on back of refrigerator, plus additional 8′ (2 m) of tubing for a service loop. A service loop will allow refrigerator to be pulled away from the wall without disconnecting tubing.
Procedure
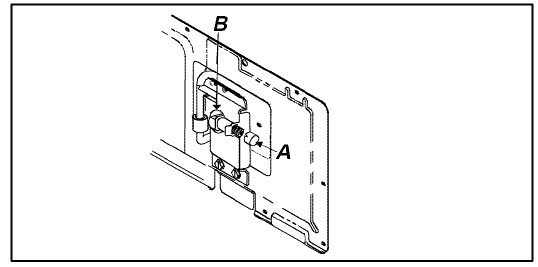
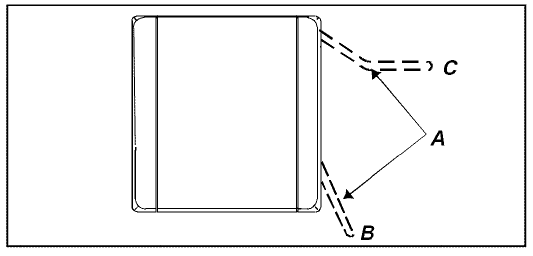
- Remove plastic cap(A) from water valve inlet port(B).

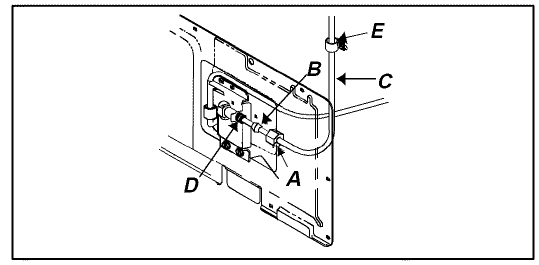
- Place brass nut(A) and brass sleeve(B) on copper tubing(C) (Brass nut and sleeve are found in your literature packet). Insert copper tubing into water valve inlet port(D). Connect brass nut(A) on copper tubing(C) to water valve inlet port(D). Make sure copper tubing is secure by pulling on copper tubing.
- Create a service loop using extreme care to avoid kinks. Secure copper tubing to refrigerator cabinet with a “P” clamp(E). It is important to secure copper tubing to refrigerator to avoid leaks when pushing refrigerator back into opening.

- Turn on water supply to refrigerator and check for leaks. Correct any leaks at connection. Be careful not to overtighten connection.
Leveling Refrigerator
- Plug in power cord.
- Move refrigerator into final location.
- Level refrigerator using a level placed on top of the refrigerator.
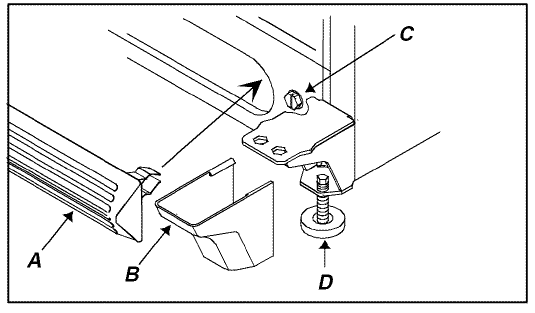
• Remove toe grille(A). Remove bottom hinge cover(B).
• Turn roller adjustment screws(C) to the right to raise cabinet, or to the left to lower cabinet. Front of refrigerator must be ¼” (6 mm), or ½ bubble on your level, higher than the back of your refrigerator.
• Make sure refrigerator cabinet is level from side to side by adjusting left and right roller adjustment screw.
• Turn stabilizing leg(D) clockwise until firmly against floor. - Replace toe grille(A) and bottom hinge cover(B). See markings on inside of toe grille to insure proper placement.
• Snap top portion into place first. Press down on lower part of grille until bottom portion snaps into place.
Controls
This refrigerator is designed to operate at normal household temperatures of 55° to 110°F (13 ° to 43°C).
Refrigerator and Freezer Controls
Refrigerator control is located on upper rear wall of refrigerator section.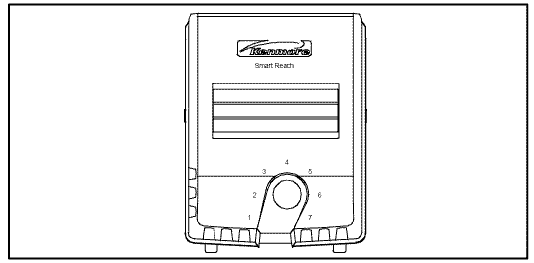
Freezer control is located on left front ceiling of freezer section.
Setting Controls
When freezer control is set to OFF, neither refrigerator nor freezer sections will cool. Initially, set both controls to 4. Wait 24 hours for refrigerator and freezer sections to stabilize temperatures. After 24 hours, adjust controls, one number at a time, as desired. 1 is warmest setting and 7 is coldest.
Set controls precisely using a household thermometer with a temperature range between -5° to 50°F (-21° to 10°C). Put thermometer snugly between frozen packages in freezer section. Wait 5-8 hours. If freezer temperature is not 0° to 2°F (-17° to -16°C), adjust freezer control 1 number at a time. Check again after 5-8 hours.
Put thermometer in a glass of water in middle of refrigerator section. Wait 5-8 hours. If refrigerator temperature is not 38° to 40°F (3° to 4°C), adjust refrigerator control 1 number at a time. Check again after 5-8 hours.
Refrigerator Features
Refrigerator Shelves
Shelves adjust to meet individual storage needs. Models feature spill proof shelves and slide out shelves. Spill proof shelves hold minor spills for easier cleaning.
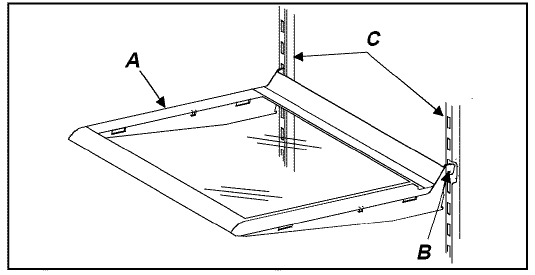
- Remove shelves(A)by lifting up shelf front, releasing hooks(B)from metal track(C), then pulling out.
- Replace shelves by inserting hooks(B)into metal track(C) and lowering front of shelf.

Slide out shelves pull forward for easy access of items in back.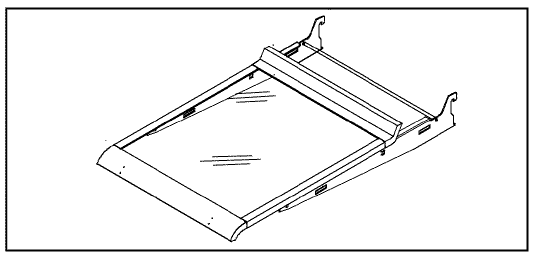
Deli Center
The Deli Center provides space saving storage underneath spill proof shelf and pulls forward for easy access.
- Remove drawer by pulling forward until drawer stops. Push tabs(A) on sides of drawer in and pull draw forward.
- Replace drawer by inserting drawer into track and sliding back.

Drawers
Humidity Controlled Crisper Drawer
The right drawer is humidity controlled. This drawer keeps produce fresh longer. Wrap produce tightly. Do not wash produce before placing in drawer. Excess moisture could cause produce to spoil prematurely. Do not line drawer with paper towels. Paper towels will retain moisture. Humidity control is located below front shelf trim. Control adjusts humidity in drawer. Slide control to right for produce with leaves such as lettuce, spinach or cabbage. Slide control to left for produce with skins such as cauliflower, corn or tomatoes.
Temperature Controlled Drawer
The left drawer is temperature controlled. This drawer keeps food fresh longer and up to 5°F (3°C) colder than refrigerator temperature. Use this drawer for deli storage or additional produce storage.
Temperature control is located below front shelf trim. Control adjusts amount of air circulating around drawer. Slide control left for normal refrigerator temperature and for colder temperature. Ice crystals may form on drawer or food on coldest setting. Cold air can decrease refrigerator temperature. Refrigerator control may need to be adjusted.
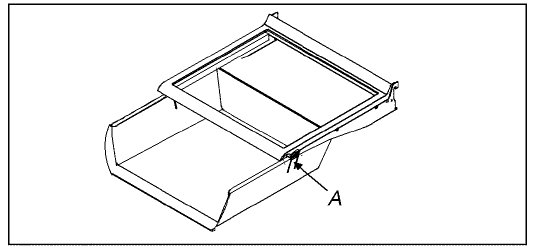
Remove shelf and drawers by completing the following steps.
- Open left drawer. For doors hinged on left, open right drawer.
- Remove glass crisper top by gently pushing up from underneath. Tilt one end up then pull out.
- Remove left* drawer by lifting front while supporting underneath then pulling out. For doors hinged on left, remove right drawer.
- Remove support post at recess in bottom center of refrigerator section by lifting.
- Remove other drawer by sliding to opposite wall. Lift front while supporting underneath then pull out.
- Replace drawers and shelf by reversing steps 1-5.
Bottle Rack
Bottle rack(A) provides convenient storage for a large bottle, eggs, etc.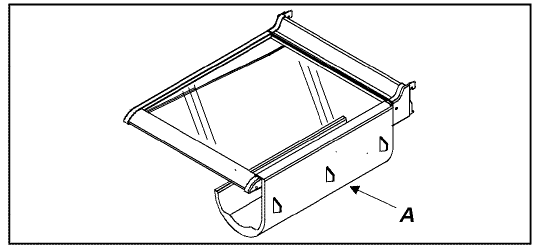
Dairy Compartment
Dairy compartment provide convenient storage for items such as butter, cheese, etc.
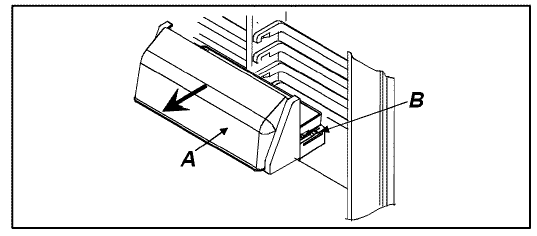
- Remove dairy compartment by lifting door(A), pushing tabs(B) toward center and pulling out.
- Replace dairy compartment by sliding in until tabs(B) lock into place and lowering door.

Door Buckets
Door buckets adjust to meet individual storage needs.
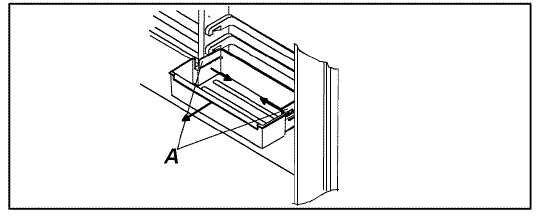
- Remove door buckets by pushing tabs(A) toward center and pulling out.
- Replace door buckets by sliding in until tabs(A)lock into place.

Door Shelf
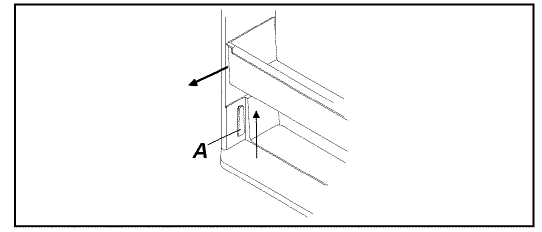
- Remove door shelf by lifting ends and pulling out.
- Replace door shelf by placing shelf on glides(A) and sliding down.

Water Filtration System
- Bypass cartridge must be removed before connecting water to unit.
- Remove bypass cartridge from water filter head in rear right corner of refrigerator section. Twist cartridge left 1¼turn and pull down to remove. Save bypass for use at a later date.
- See Water Filtration System Installation and Operation Instructions provided with water filter cartridge for filter installation and operation.
Air Filtration Cartridge
Cartridge should be replaced every three months. Strong food odors (i.e. unwrapped onions, garlic, etc.) will shorten life of cartridge.
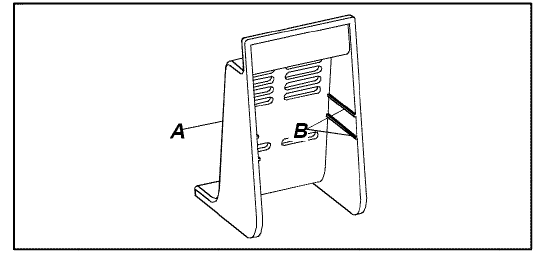
- Locate air filtration assembly at air return of refrigeration cabinet. Filter holder(A)is attached to cabinet by Velcro ®strip. Pull holder off cabinet wall.
- Insert filter by sliding into grooves(B).

Freezer Features
Frost-Free System
The refrigerator and freezer sections are completely frost free. Defrosting is automatic under normal conditions. Refrigerator and freezer sections never have to be defrosted.
Automatic Ice Maker
- Make sure ice bucket is in place and ice maker arm(A) is down(B).

- After freezer section reaches normal temperature, the ice maker fills with water and begins operating. Allow 24-48 hours after installation before first harvest of ice. Ice maker produces 7 to 9 harvests of ice in a 24-hour period under ideal conditions.
- After ice is formed, ice maker drops ice cubes into ice storage bucket. During ice production, ice maker arm raises and lowers. When ice storage bucket is full, ice maker arm(A) turns ice maker off(C).
Slide out Shelf
Slide out shelf pulls forward for easy access to items in back.
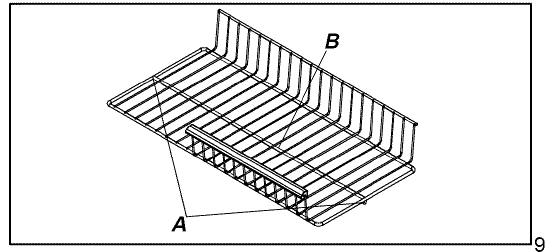
- Remove slide out shelf by sliding forward until ball point(A) beneath center rail (B) catches in molding groove.
- Grasp shelf by center rail(B), pull up, and remove.
- Slide in until ball point(A)falls into molding groove.

General Cleaning
See section on Stainless Steel Cleaning if doors are stainless steel.
- Wash surfaces with 4 tablespoons baking soda dissolved in 1 quart warm water and a soft, clean cloth.
• To clean Velcro ® strips, use warm soapy water and a soft clean cloth or brush. - Rinse surfaces with warm water. Dry surfaces with a soft, clean cloth.
• Do not use the following items: abrasive or harsh cleaners, ammonia, chlorine bleach, etc. ,concentrated and detergents or solvents metal scouring pads These items can scratch, crack and discolor surfaces.
• Do not place buckets, shelves, etc. in dishwasher.
Stainless Steel Cleaning
Damage to stainless steel finish due to improper use of cleaning products, or using non-recommended cleaning products, is not covered under warranty,
- Wash surfaces with warm soapy water and a soft, clean cloth or sponge.
- Rinse surfaces with warm water. Dry surfaces with a soft, clean cloth.
• Do not use the following harsh cleaners: abrasive or acidic cleaners (ammonia, chlorine bleach, vinegar-based product, etc. citrus-based cleaners scouring pads (metal, textured plastic, etc.) These items can scratch, discolor, or permanently tarnish surfaces. - Follow up rinsing by immediately drying with a soft, clean cloth. This will avoid water spotting on stainless steel finish.
Adhesives
- Remove adhesive residue from refrigerator surfaces by rubbing toothpaste into adhesive with fingers until adhesive loosens.
- Rinse surface with warm water. Dry surface with a soft, clean cloth.
Door Gaskets
- Clean door gaskets every 3 months according to General Cleaning instructions. Clean any spills immediately.
Condenser Coil
Clean condenser coil behind toe grille every 3 months to ensure maximum performance of refrigerator.
Accumulated dust and lint may cause the following:
- reduced cooling performance
- increased energy usage
- premature part failure
- Remove toe grille by holding ends and pulling away from refrigerator.
- Clean front surface of condenser coil with a vacuum cleaner hose nozzle.
- Replace toe grille by inserting clips in holes and snapping in.
- Raise stabilizing legs by turning counterclockwise.
Glass Shelves
Remove shelf by lifting front, releasing hooks from metal track then pulling out. Place shelf on a towel. Allow shelf to adjust to room temperature before cleaning.
Clean crevices by completing the following:
- Dilute mild detergent and brush solution into crevices using a plastic bristle brush. Let sit for 5 minutes.
- Spray warm water into crevices using faucet spray attachment.
- Dry shelf thoroughly and replace shelf by inserting hooks into metal track and lowering it from the front.
Odor Removal
- Remove all food and disconnect power to refrigerator.
- Clean all interior surfaces including ceiling, floor, and walls according to General Cleaning instructions. Pay special attention to corners, crevices, and grooves. Include all drawers, shelves, and gaskets.
- Connect power to refrigerator and return food to refrigerator. Wash and dry all containers. Wrap foods in tightly sealed containers to prevent further odor. After 24 hours, check if odor has been eliminated. Complete steps 4-9 if odor has not been eliminated.
- Place crispers on top shelf of refrigerator section. Pack refrigerator and freezer sections, including doors, with crumpled sheets of newspaper.
- Place charcoal briquettes randomly throughout newspaper.
- Close doors and let stand 24-48 hours.
- Remove charcoal briquettes and newspapers.
- Complete steps 2-3. If odor is still not eliminated, contact a Sears Service Center.
Light Bulbs
Refrigerator Light
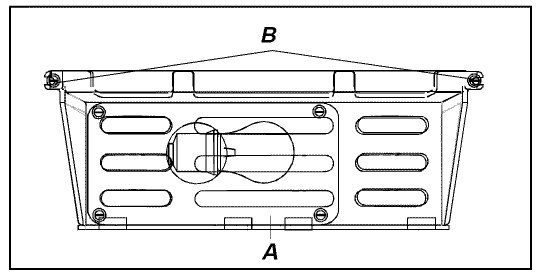
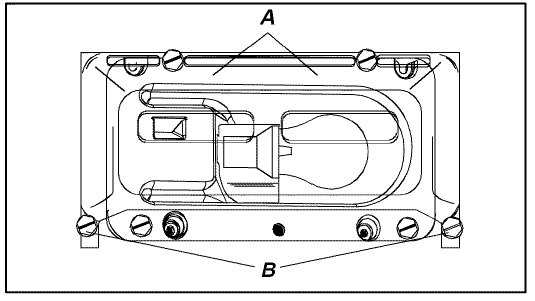
- Remove light bulb cover(A) by removing ¼” hex nut screws(B). Replace with appliance bulb no greater than 60 watts.
- Replace light bulb cover(A) by replacing 1¼,,hex nut screws (B).

Freezer Light
- Remove light bulb cover(A) by removing ¼” hex nut screws(B). Replace with appliance bulb no greater than 60 watts.
- Replace light bulb cover(A) by replacing ¼” hex nut screws (B).

Energy Tips
- Operate in normal household temperatures of 55° to 110°F (13°C to 43°C) away from heat sources and direct sunlight.
- Set refrigerator, freezer, and drawer controls no colder than necessary.
- Keep freezer section full.
- Keep door gaskets clean and pliable. Replace gaskets if worn.
- Keep condenser coils clean.
Vacation Tips
Complete the following steps for short vacations.
- Remove perishable foods. Warranty does not cover food loss. Check warranty certificate for specific coverage.
- Move ice maker arm to off position.
Complete the following steps for long vacations
- Empty refrigerator and freezer sections.
- Unplug refrigerator.
- Clean refrigerator and door gaskets according to General instructions in Care and Cleaning section.
- Prop doors open, so air can circulate inside.
- Turn water supply to refrigerator off and move ice maker arm to off position.
Normal Operating Sounds
This new refrigerator may be replacing a differently designed, less efficient or smaller refrigerator. Today’s refrigerators have new features and are more energy efficient. As a result, certain sounds may be unfamiliar. These sounds are normal and will soon become familiar. These sounds also indicate refrigerator is operating and performing as designed.
- Freezer control clicks when starting or stopping compressor.
- Freezer fan air rushes and whirs.
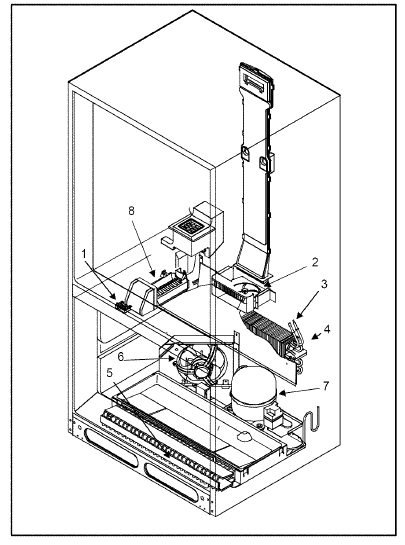
- Sealed system (evaporator and heat exchanger) refrigerant flow gurgles, pops or sounds like boiling water.
- Defrost heater sizzles, hisses or pops.
- Defrost timer sounds like an electric clock and snaps in and out of defrost cycle.
- Condenser fan air rushes and whirs.
- Compressor has a high pitched hum or pulsating sound.
- Ice cubes from ice maker drop into ice bucket. Ice maker water valve hookup buzzes when ice maker fills with water. This occurs whether or not refrigerator is connected to water supply. If refrigerator is not connected to water supply, stop sound by raising ice maker arm to off position.

Before Calling For Service
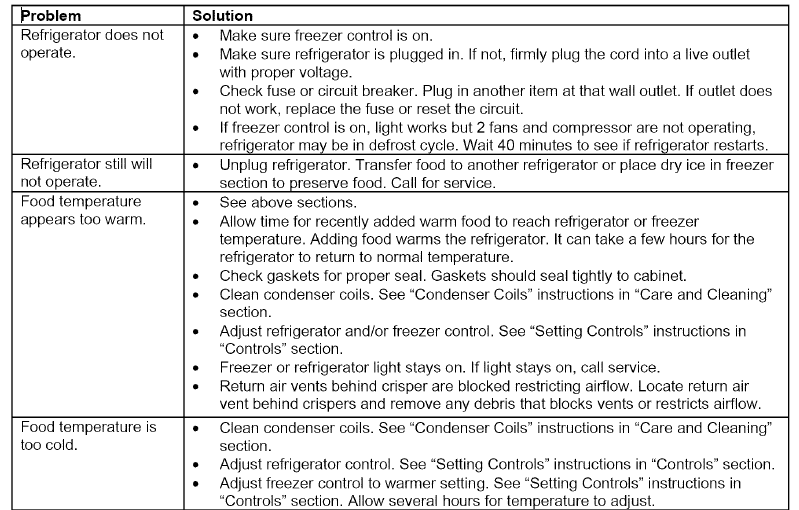
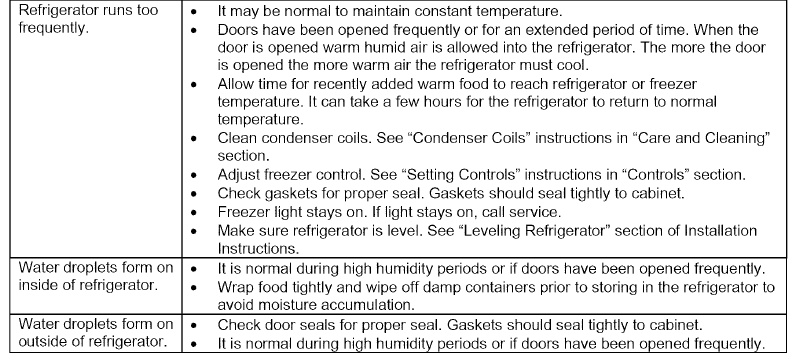
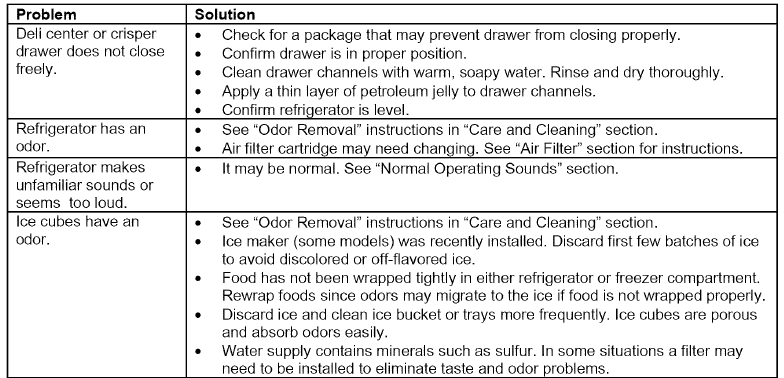
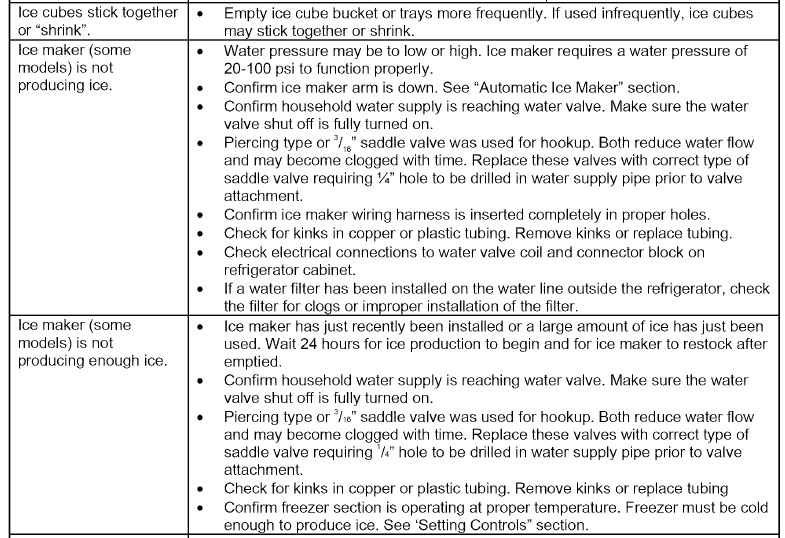
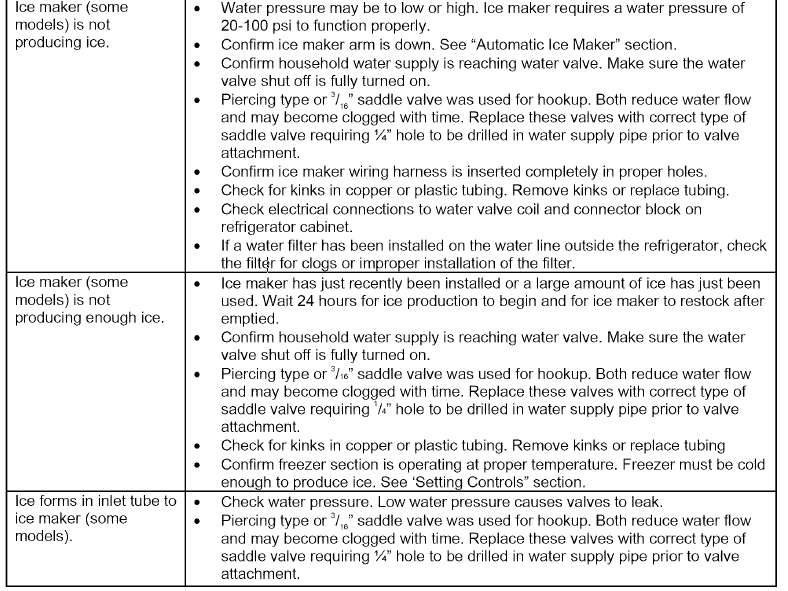
For more manuals by Kenmore visit, ManualsLibraryy
kenmore Elite Refrigerator Model 596-FAQs
How do I put my Kenmore Elite refrigerator in diagnostic mode?
To enter diagnostic mode, press and hold the Lock button for 3 seconds. Then, simultaneously press and hold the Freezer and Refrigerator buttons while pressing the Acela Ice button 5 times.
How long do Kenmore refrigerators last?
Kenmore refrigerators typically last 10 to 20 years. With proper maintenance, they can even exceed this lifespan.
Can you reset a Kenmore Elite refrigerator?
Yes, press and hold the designated buttons (commonly labeled “Power” or “Reset”) for a few seconds to reset the control panel.
What is the normal temperature for a Kenmore refrigerator?
The ideal temperature for the refrigerator compartment is 37°F (3°C). Freezer temperatures should range between -6°F and 8°F (-21°C to -13°C).
What temperature should a fridge be?
Refrigerators should be set at 5°C (40°F) or below. The optimal temperature is 37°F (3°C) to keep food fresh and safe.
What is the temperature setting for a Kenmore Elite refrigerator?
Refrigerator compartment: 37°F (3°C).
Freezer compartment: Between -6°F and 8°F (-21°C to -13°C). Adjust using the Freezer Temp button.
What is the longest-lasting refrigerator brand?
Reliable and long-lasting brands include GE, LG, and Bosch. They offer a range of models, from standard to high-end appliances.
Is Kenmore a Japanese brand?
No, Kenmore is a North American brand that designs products for homes worldwide.
What is the best temperature for a fridge?
The ideal temperature for a fridge is 37°F (3°C), which ensures food stays fresh and safe.
Why is my Kenmore Elite not freezing?
Common causes for the freezer not working include:
A failed compressor.
A malfunctioning electronic control board.
A faulty condenser fan motor.
Does Kenmore still make appliances?
Yes, Kenmore products are still manufactured and sold through various retailers, including Walmart and Home Depot.

