![]()
KitchenAid Go Cordless Hand Blender
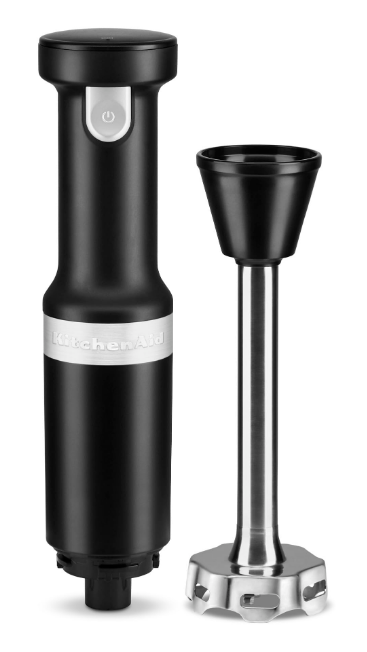
PARTS AND FEATURES
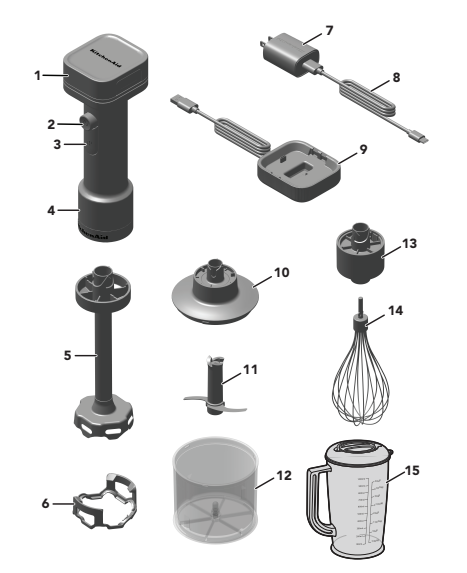
- Removable Battery
- Variable Speed Controller
- Unlock Button
- Motor Body
- Blending Arm
- Pan Guard: Use the Pan Guard to avoid damage to cookware while using the Cordless Hand Blender
- USB Adapter
- USB Cable
- Docking Station*
- Chopper Adapter
- Chopper Blade
- Chopper Bowl
- Whisk Adapter
- Whisk
- Pitcher Jar with Lid and Ingredient Cap
*Accessory sold separately.
PRODUCT SAFETY
IMPORTANT SAFEGUARDS
When using electrical appliances, basic safety precautions should always be followed, including the following:
- Read all safety warnings and instructions. Failure to follow the warnings and instructions may result in fire and/or serious injury.
- To protect against the risk of electrical shock, do not put the Motor Body of the appliance, USB Adapter, USB Cable, or Battery in water or other liquid.
- This appliance is not intended for use by persons (including children) with reduced physical, sensory, or mental capabilities, or lack of experience or knowledge, unless they are closely supervised and instructed concerning use of the appliance by a person responsible for their safety. Close supervision is necessary when any appliance is used by or near children. Children should be supervised to ensure that they do not play with the appliance.
- Remove the Battery before assembling or disassembling and before cleaning. To unplug the adapter, grasp the plug and pull from the outlet. Never pull from the power cord.
- Avoid contacting moving parts.
- Do not modify or attempt to repair the appliance or the Battery.
- Do not operate any appliance with a damaged Battery or USB Adapter, or after the appliance malfunctions, or is dropped or damaged in any manner. Return the appliance to the nearest Authorized Service Facility for examination, repair, or electrical or mechanical adjustment.
- The use of accessories/attachments not recommended or sold by KitchenAid may cause fire, electric shock, or injury to persons.
- Do not let the cord hang over the edge of the table or counter.
- Do not let the cord contact hot surfaces, including the stove.
- Keep hands and utensils out of the container while blending to prevent the possibility of severe injury to persons or damage to the unit. A scraper may be used, but it must be used only when the unit is not running.
- Blades are sharp. Handle carefully.
- When mixing liquids, especially hot liquids, use a tall container or make small quantities at a time to reduce spillage.
- To reduce the risk of injury, never place the Chopper Blade on base without first putting the Chopper Bowl properly in place.
- Be certain the cover is securely locked in place before operating the appliance.
- Do not use an extension cord. Plug the adapter directly into a power source.
- Use only with the adapter provided with the appliance. Do not attempt to use this adapter with any other product. Likewise, do not attempt to charge this appliance with any other adapter.
- Do not incinerate this appliance even if it is severely damaged. The batteries can explode in a fire.
- Keep hands and utensils away from the Chopper Blade while chopping food to reduce the risk of severe injury to a person or damage to the appliance. A scraper may be used, but only when the appliance is not running.
- Allow the appliance to cool completely before putting on or taking off parts, and before cleaning the appliance.
- Refer to the “Care and Cleaning” section for instructions on cleaning the surfaces in contact with food.
- Disconnect the Battery from the appliance before making any adjustments, changing accessories, or storing the appliance. Such preventive safety measures reduce the risk of starting the appliance accidentally.
- Prevent unintentional starting. Ensure the switch is in the off position before connecting to the Battery, picking up, or carrying the appliance. Carrying the appliance with your finger on the switch or energizing an appliance with the switch on invites accidents.
- Recharge only with the adapter specified by KitchenAid. The adapter that is suitable for one type of battery may create a risk of fire when used with another battery.
- Use appliances only with the KitchenAid 12 VDC Battery. Use of any other batteries may create a risk of injury and fire.
- When Battery is not in use, keep it away from other metal objects, like paper clips, coins, keys, nails, screws or other small metal objects, which can make a connection from one terminal to another. Shorting the Battery terminals together may cause burns or a fire.
- Under abusive conditions, liquid may be ejected from the Battery; avoid contact. If contact accidentally occurs, flush with water. If liquid contacts the eyes, additionally, seek medical help. Liquid ejected from the Battery may cause irritation or burns.
- Do not use a Battery or appliance that is damaged or modified. Damaged or modified batteries may exhibit unpredictable behavior, resulting in fire, explosion, or risk of injury.
- Do not expose a Battery or appliance to fire or excessive temperature. Exposure to fire or temperature above 265°F may cause an explosion.
- Follow all charging instructions and do not charge the Battery or appliance outside of the temperature range specified in the instructions. Charging improperly or at temperatures outside of the specified range may damage the Battery and increase the risk of fire.
- Use only UL UL-listed ITE/Class 2 USB source to charge this device. Use of any non-UL-listed USB sources may create a risk of fire.
- Never service damaged batteries. Service of batteries should only be performed by KitchenAid or authorized service providers.
- Do not use the appliance in the rain or wet conditions. Do not be exposed to rain. Store indoors.
- Do not use the appliance for anything other than its intended use.
SAVE THESE INSTRUCTIONS
This product is designed for household use only.
ELECTRICAL REQUIREMENTS
- USB Adapter:
- Input: 100–240 V~, 50/60 Hz, 0.5 A
- USB Output: 5 VDC, 2 A
- Recommended ambient charging temperature: 41-104°F
- Cordless Hand Blender:
- Voltage: 12 VDC
- External Battery (Lithium-ion): KRB12
- Nominal Voltage: 10.8 VDC
- Maximum Voltage: 12 VDC
NOTE: If the adapter does not fit in the power source, contact a qualified electrician. Do not modify the adapter in any way.
Do not use, store, or charge batteries or products in locations where the temperature is lower than 50°F or higher than 104°F.
LITHIUM-ION BATTERY OPERATED PRODUCT DISPOSAL
Always dispose of battery-operated products according to federal, state, and local regulations.
Contact a recycling agency in your area for recycling locations.
GETTING STARTED
BEFORE FIRST USE
- Charge the Battery until it is fully charged.
- Clean all the parts and accessories (see “Care and Cleaning” section).
- Remove all packaging materials, if present.
NOTE: Some dust may be on the product. This is due to the recycled materials used in packaging. This can be cleaned with a soft towel.
BATTERY CHARGING
USING THE USB CABLE
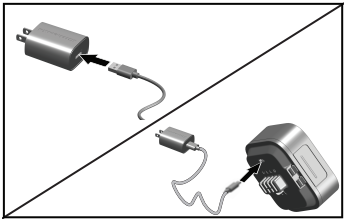
- Attach the USB Cable to an adapter. Connect the other end of the USB Cable to the Battery.

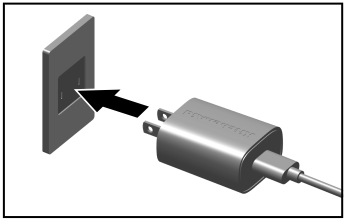
- Plug the adapter into a power source.

USING THE DOCKING STATION (OPTIONAL)
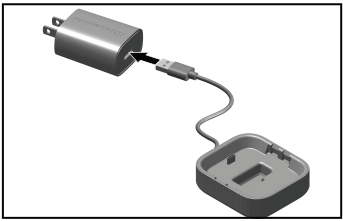
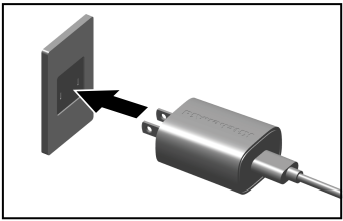
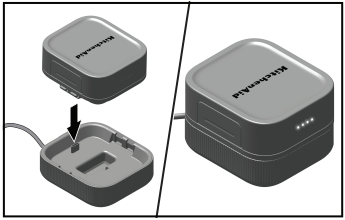
- Attach the USB cord to an adapter.

- Plug the adapter into a power source.

- Turn the Battery upside down and slide the Battery onto the dock. Press down, and the latch will snap into place.

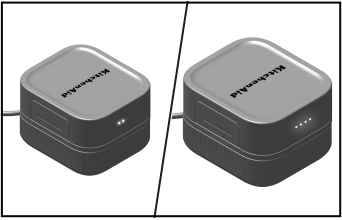
- Upon placing the Battery into the charger, the Battery LEDs will alternate for a few seconds as the charger performs a self-diagnostic of the Battery status.
- After the diagnostic is complete, the Battery will begin charging with a single LED flashing. LEDs will become solid as charging progresses. When the Battery is fully charged, all LEDs will become solid.
 NOTE: If the initial alternating light pattern continues for more than 10 seconds, the Battery may be too warm or too cold to charge. Unplug the Battery and allow it to stabilize to a normal room temperature, and try charging again. If the Battery is still not charging after this, unplug the Battery and contact customer service.
BATTERY STATUS
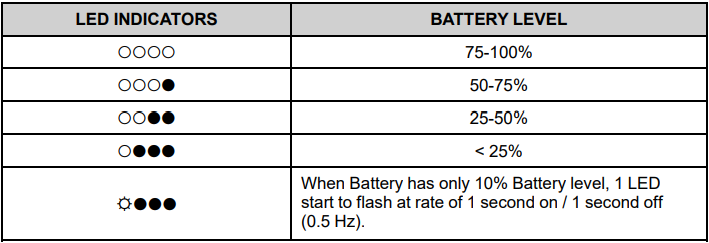
LED Legend Indicator
 = ON
= ON = OFF
= OFF = FLASH
NOTE: When the Battery is installed or when the appliance is operated, the Battery charge status LEDs will display for 5 seconds and then turn off. If the Battery charge is 10% or less, the indicator light will continue to flash until the unit is no longer in use or the battery is removed.
Full Charge: The Battery will be fully charged in approximately 3 hours.
NOTE: It is best to store the Cordless Hand Blender at room temperature.
PRODUCT USAGE
USING THE BLENDING ARM
NOTE: Do not place the Battery in an area of extreme heat or cold. It will work best at normal room temperature.
IMPORTANT: Make sure that the Variable Speed Controller ( ) is not pressed and the Battery is removed before attaching or removing parts or accessories.
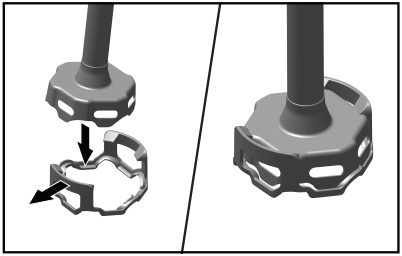
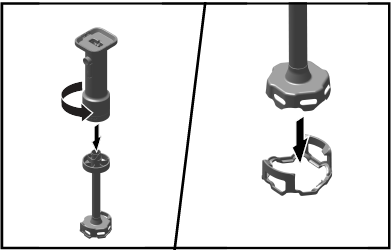
- If using a Pan Guard, place it on a flat surface. To insert the Pan Guard, angle the Blending Arm to one side of the mounting clip. Then, gently pull the other mounting clip outward and push down the Blending Arm. Ensure the mounting clips are secured in place.

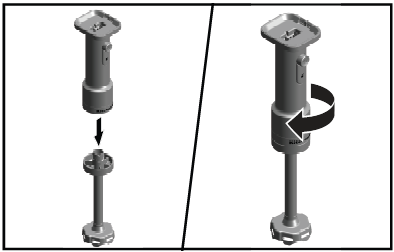
- Insert the Blending Arm into the handle and twist to lock.

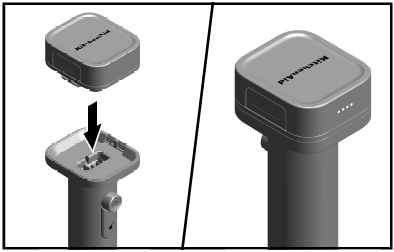
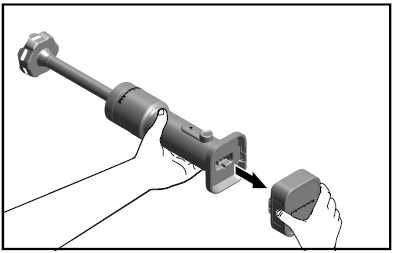
- Insert the Battery into the battery slot located at the top of the appliance, making sure it is aligned. The LED will light and display the Battery level for five seconds, then turn off.

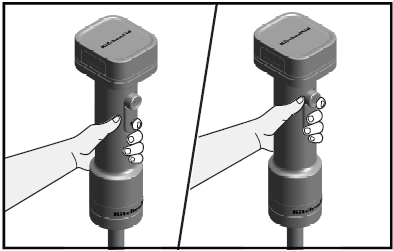
- Press and hold the Unlock Button (
 ) first, then the Variable Speed Controller (
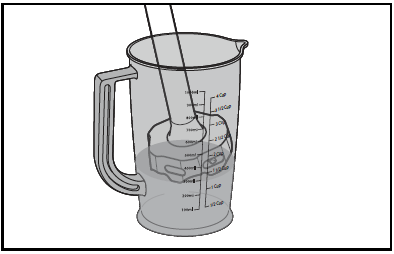
 ) to start. Use your free hand to cover the top of the Pitcher Jar for better stability and to avoid splashing. The LED will light and display the Battery level for five seconds, then turn off.
 NOTE: Do not immerse the Motor Body in liquids or other mixtures.
 - Use the draw-up motion with the Cordless Hand Blender to move the ingredients within the Pitcher Jar. Slowly draw it upwards against the side of the Pitcher Jar. Repeat the process until the ingredients are at the desired consistency.

- When finished, press and hold the battery unlock button to remove the Battery.
 TIP: A quick pulse is a one-second on and one-second off operation. Do not operate the Blending Arm or Whisk continuously for more than 1 minute.
USING THE CHOPPER ATTACHMENT
Use to cut and chop beef, onion, garlic, cheese, carrots, nuts, etc.
NOTE: Recommended volume chopper attachment: raw meat (0.4 lb), cheese (0.2 lb), vegetable (2 cups), quick pulse until desired size.
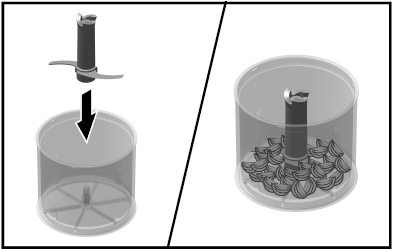
- Insert the Chopper Blade into the Chopper Bowl. Add ingredients into the Chopper Bowl. For best results, cut the food items into 3/4″ (2 cm) pieces.

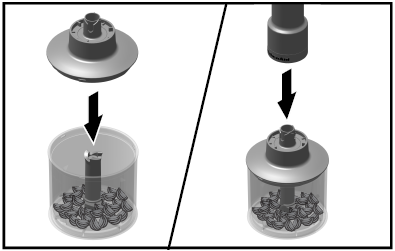
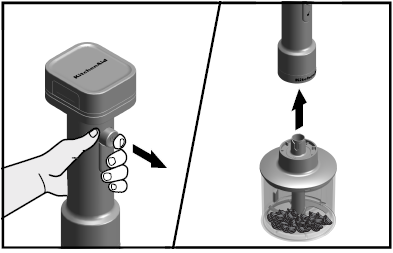
- Align the chopper attachment with the Motor Body and press together. Do not twist the Motor Body into place.

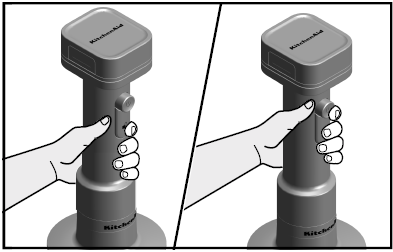
- Press and hold the Unlock Button (
 ) first, then the Variable Speed Controller (
 ) to start. For best results, “pulse” the power by pressing and releasing the Variable Speed Controller (
 ) until ingredients reach the desired consistency.
- When chopping is complete, release the Variable Speed Controller.

USING THE WHISK ATTACHMENT
Use the Whisk to whip cream, beat egg whites, mix instant puddings, vinaigrettes, mousse, or make mayonnaise.
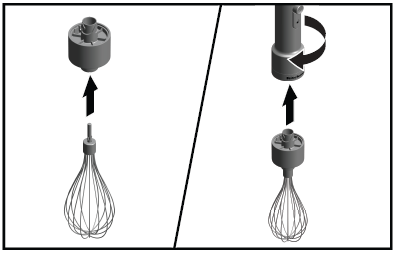
- Insert the Whisk into the Whisk Adapter until it locks in place. Insert the Whisk accessory into the Motor Body and twist to lock until it clicks.

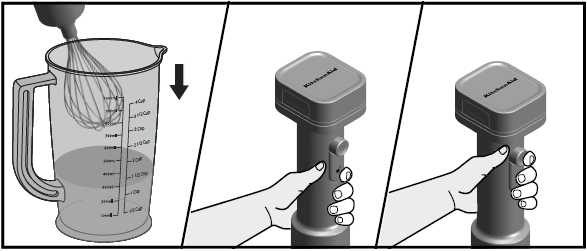
- Insert the Cordless Hand Blender into the mixture. Press and hold the Unlock Button (
 ) first, then the Variable Speed Controller (
 ) to start.
  NOTE: After whisking is complete, release the Variable Speed Controller; then remove the Cordless Hand Blender from the mixture.
CARE AND CLEANING
IMPORTANT: Allow the appliance to cool completely before putting on or taking off parts, and before cleaning the appliance. Make sure that the Variable Speed Controller (![]() ) is not pressed and the Battery is removed before attaching or removing parts or accessories.
) is not pressed and the Battery is removed before attaching or removing parts or accessories.
- Remove the Blending Arm, then remove the Pan Guard before cleaning.

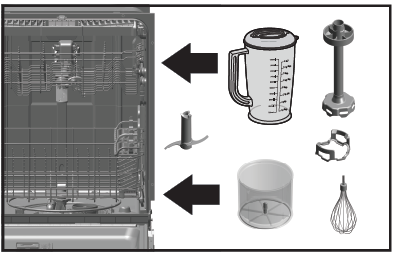
- Dishwasher-safe parts — top rack only: Pan Guard, Pitcher Jar with Lid and Ingredient Cap, Lid and Blender Arm, Chopper Bowl, Whisk, Chopper Blade.
 NOTE: Immediately remove parts from the dishwasher and dry with a soft cloth.
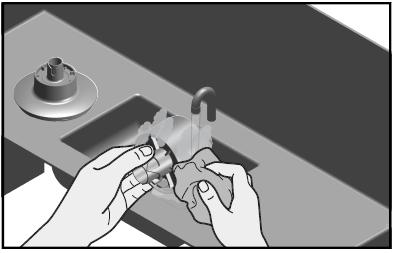
 - Hand Wash Only: Chopper Adapter and Whisk Adapter.
 NOTE: To avoid damage to the Motor Body, do not immerse it in water.
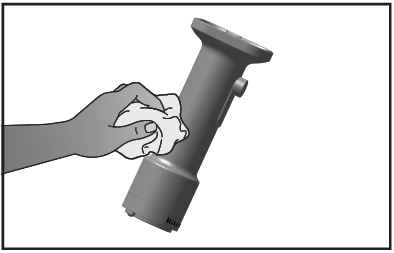
 - Wipe the Motor Body with a damp cloth. Mild dish soap may be used, but do not use abrasive cleansers.

For detailed information on the Cordless Hand Blender:
Visit www.kitchenaid.com/quickstart for additional instructions with videos, inspiring recipes, and tips on how to use and clean your Cordless Hand Blender.
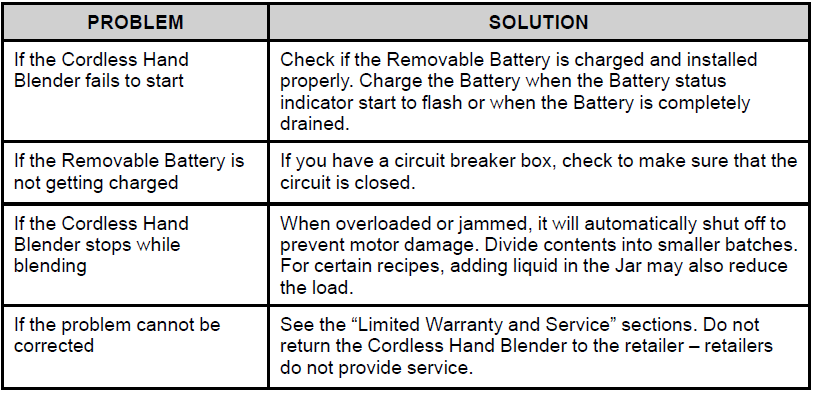
TROUBLESHOOTING
LIMITED WARRANTY AND SERVICE
KITCHENAID® PRODUCT WARRANTY FOR THE 50 UNITED STATES, THE DISTRICT OF COLUMBIA, PUERTO RICO, AND CANADA
This limited warranty extends to the original purchaser and any succeeding owner for the product operated in the 50 United States, the District of Columbia, Puerto Rico, and Canada.
Length of Warranty: One Year Limited Warranty from the date of delivery.
- KitchenAid Will Pay for Your Choice of:
 Hassle-Free Replacement of your product. See the “Arranging for Service” section in this warranty for details on how to arrange for service, or call the Customer Experience Center toll-free at 1-800-541-6390.
OR
The replacement parts and repair labor costs to correct defects in materials and workmanship that existed at the time this product was purchased. Service will be provided by an Authorized KitchenAid Service Center. - KitchenAid Will Not Pay for (What is Not Covered By This Limited Warranty):
- Commercial, non-residential, or multiple-family use or use inconsistent with product instructions and manuals.
- Defects or damage resulting from accident, alteration, misuse, abuse, fire, flood, or acts of God.
- Any shipping or handling costs to deliver your product to an Authorized Service Center.
- Replacement parts or repair labor costs for the product operated outside the 50 United States, the District of Columbia, Puerto Rico, and Canada.
- Damages, defects, or repairs caused by unauthorized service providers or use of non-genuine or third-party parts; however, use of unauthorized service providers or non-genuine or third-party parts will not void this warranty.
- Cosmetic damage (e.g., scratches, dents, chips, and other damage to finishes), unless damage results from defects in materials and workmanship and is reported to KitchenAid within 30 days from the date of delivery.
- Discoloration, rust, or oxidation of surfaces resulting from caustic or corrosive environments (e.g., high salt concentrations, high moisture or humidity, or exposure to chemicals).
- Products with original, factory-installed model/serial numbers removed, altered, or not easily determined.
- Incidental or consequential damages resulting from product failure.
- Consumable parts or accessories.
- DISCLAIMER OF IMPLIED WARRANTIES
Implied warranties, including any implied warranty of merchantability or implied warranty of fitness for a particular purpose, are limited to ten years or the shortest period allowed by law. Some states and provinces do not allow limitations on the duration of implied warranties of merchantability or fitness, so this limitation may not apply to you. - HOW STATE LAW APPLIES
This warranty gives you specific legal rights, and you may also have other rights that vary from state to state or province to province. Some states and provinces, such as California, do not allow for limitations on the date your warranty coverage begins, so this limitation may not apply to you.
HASSLE-FREE REPLACEMENT WARRANTY – 50 UNITED STATES, DISTRICT OF COLUMBIA, AND PUERTO RICO
We’re so confident the quality of our products meets the exacting standards of KitchenAid that, if your product should fail within the first year of ownership due to defects in materials or workmanship, KitchenAid will arrange to deliver an identical or comparable replacement to your door free of charge and arrange to have your original product returned to us. Your replacement unit will also be covered by a one-year limited warranty. Please follow these instructions to receive this quality service. If your product should fail within the first year of ownership, simply call our toll-free Customer Experience Center at 1-800-541-6390 Monday through Friday.
Please have your original sales receipt available when you call. Proof of purchase will be required to initiate the claim. Give the consultant your complete shipping address (no P.O. Box numbers, please). When you receive your replacement product, use the carton and packing materials to pack up your original product.
HASSLE-FREE REPLACEMENT WARRANTY – CANADA
We’re so confident the quality of our products meets the exacting standards of the KitchenAid brand that, if your product should fail within the first year of ownership, KitchenAid Canada will replace your product with an identical or comparable replacement. Your replacement unit will also be covered by our one-year limited warranty. Please follow these instructions to receive this quality service. If your product should fail within the first year of ownership, take the product or ship it to a collectible to an Authorized KitchenAid Service Center.
In the carton, include your name and complete shipping address along with a copy of the proof of purchase (register receipt, credit card slip, etc.). Your replacement product will be returned prepaid and insured. If you are unable to obtain satisfactory service in this manner, call our toll-free Customer Experience Center at 1-800-807-6777.
Or write to us at:
Customer Experience Center
KitchenAid Canada
200-6750 Century Ave.
Mississauga, ON L5N 0B7
ARRANGING FOR SERVICE AFTER THE WARRANTY EXPIRES, OR ORDERING ACCESSORIES AND REPLACEMENT PARTS
In the United States and Puerto Rico
For service information, or to order accessories or replacement parts, call toll-free at 1-800-541-6390 or write to:
Customer Experience Center, KitchenAid Small Appliances, P.O. Box 218, St. Joseph, MI 49085-0218
Outside the United States and Puerto Rico
Consult your local KitchenAid dealer or the store where you purchased the product for information on how to obtain service.
For service information in Canada
Call toll-free 1-800-807-6777.
Or write to:
Customer Experience Center
KitchenAid Canada
200 – 6750 Century Ave.
Mississauga, ON L5N 0B7
For more manuals by KitchenAid, visit ManualsLibraryy
KitchenAid Go Cordless Hand Blender- FAQs
What can I use the KitchenAid Go Cordless Hand Blender for?
This versatile blender is perfect for:
✔ Blending soups, smoothies, and sauces
✔ Whipping cream or egg whites (with whisk attachment)
✔ Chopping herbs, nuts, or cheese
✔ Making baby food or salad dressings
Is this blender cordless?
Yes! It runs on a rechargeable 12V MAX battery with up to 30 minutes of continuous use per charge.
How do I charge the hand blender?
Unlock and remove the blending arm by twisting it.
Plug the charger into a power outlet.
Connect the charger pin to the blender’s charging port.
Wait until fully charged (LED indicator will show status).
Can I use it while charging?
No, the blender must be unplugged during use.
What attachments are included?
Blending shaft (for liquids and soft foods)
Whisk attachment (for whipping)
Chopper/processor (for herbs, nuts, etc.)
Is it dishwasher-safe?
Blending jar & lid: Yes (top rack only).
Motor body & attachments: Wipe with a damp cloth (do not submerge).
Why won’t my blender turn on?
Check if the battery is charged.
Ensure the speed control dial is set to OFF before attaching parts.
Try a different power outlet.
Why does my blender keep stopping?
Overloaded ingredients? Reduce the quantity.
Battery low? Recharge fully.
Motor overheating? Let it cool for 10 minutes.
Why is the blender leaking?
Ensure the sealing ring is properly placed (flat side down).
Avoid overfilling the blending jar.
How powerful is it compared to corded blenders?
With variable speed control, it performs like a corded model but offers greater portability.

 NOTE: If the initial alternating light pattern continues for more than 10 seconds, the Battery may be too warm or too cold to charge. Unplug the Battery and allow it to stabilize to a normal room temperature, and try charging again. If the Battery is still not charging after this, unplug the Battery and contact customer service.
 NOTE: Do not immerse the Motor Body in liquids or other mixtures.
 TIP: A quick pulse is a one-second on and one-second off operation. Do not operate the Blending Arm or Whisk continuously for more than 1 minute.
 NOTE: After whisking is complete, release the Variable Speed Controller; then remove the Cordless Hand Blender from the mixture.
 NOTE: Immediately remove parts from the dishwasher and dry with a soft cloth.
 NOTE: To avoid damage to the Motor Body, do not immerse it in water.
 Hassle-Free Replacement of your product. See the “Arranging for Service” section in this warranty for details on how to arrange for service, or call the Customer Experience Center toll-free at 1-800-541-6390.