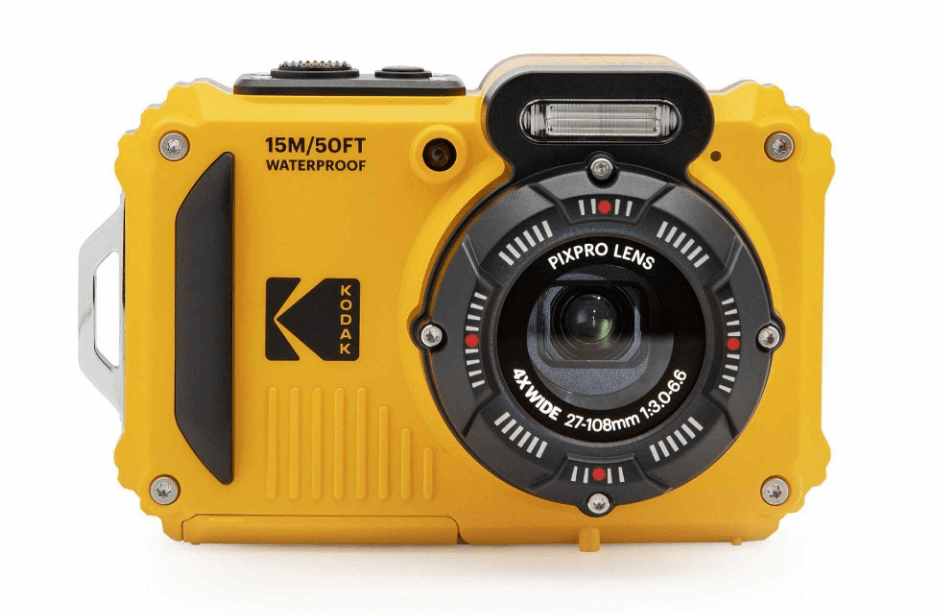
Kodak PixPro WPZ2 Digital Camera
GETTING STARTED
Accessories Included
Your camera box should contain the camera model you purchased, along with the following accessories. If anything is missing or appears to be damaged, please contact your retailer first or our customer service center. (The AC Adapters may be a little different in shape due to the differences in countries or regions where this type of camera is sold, and are subject to matching the physical product.)
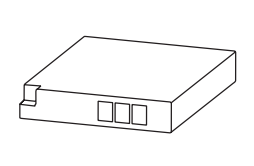 Rechargeable Li-ion Battery
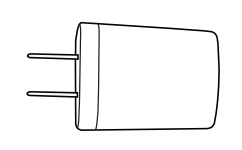 AC Adapter
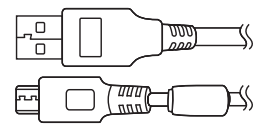 Micro USB Cable
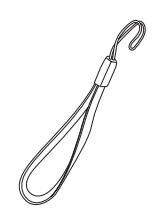 Wrist Strap
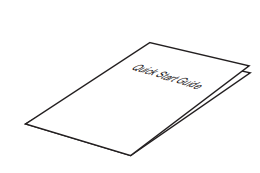 Quick Start Guide
 Warranty Card
 Service Card
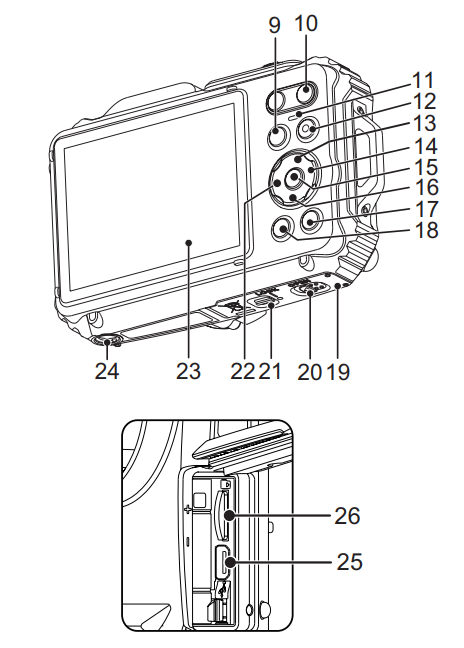
Part Names
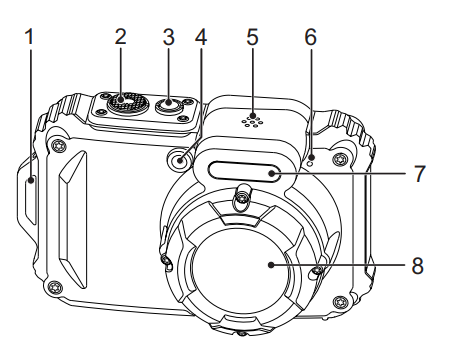
- Strap Eyelet
- Shutter Button
- Power Button
- Auto Focus (AF) Assist Beam/ Self-Timer Lamp
- Speaker
- Microphone
- Flash Lamp
- Lens

- Mode Button
- Zoom Button
- Indicator Lamp
- Quick Video Recording Button
- Display Button/Arrow Button (Up)
- Flash Button/Arrow Button (Right)
- SET Button
- Delete Button/Self-Timer Button/Arrow Button (Down)
- Playback Button
- Menu Button
- Battery Cover Door
- Battery Cover Door (Open) Toggle Switch
- Battery Cover Door Lock
- Macro Button/Arrow Button (Left)
- LCD
- Tripod Socket (1/4’’ Standard)
- Micro USB Port
- Micro SD Card Slot (32GB max)
Installing Battery and Micro SD Memory Card
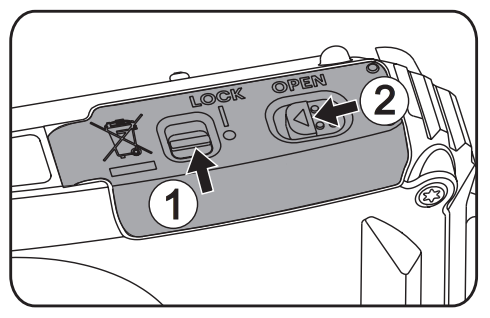
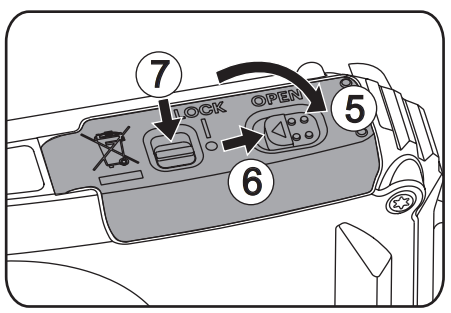
- Unlock the battery cover door lock as shown in step ①, push the battery cover door open switch to open the battery cover door as shown in step ②.

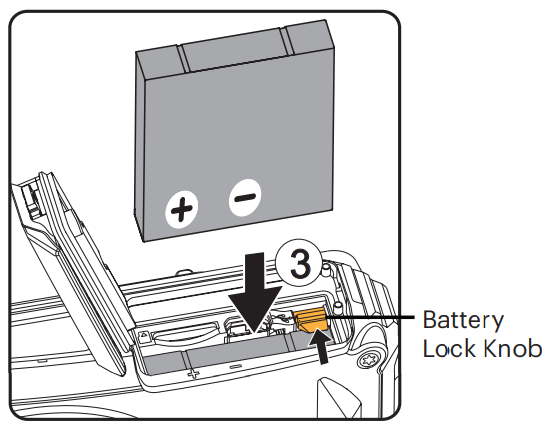
- Insert the battery into the battery compartment as shown in step ③, being sure to line up the metal contacts on the bottom of the battery with the contacts in the slot. Push the battery down until it locks in place.

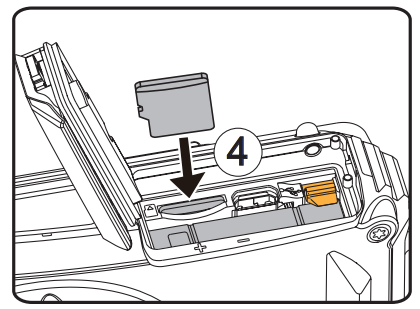
- Insert the Micro SD memory card (not to exceed 32GB) into the memory card slot as shown in step ④, push the exposed edge of the Micro SD memory card fully into the slot with your fingertip.

- Close the battery cover door as shown in step ⑤, push the battery cover door switch to close the battery cover door as shown in step ⑥, and be sure to lock the battery cover door latch as shown in step ⑦.
Charging the Battery
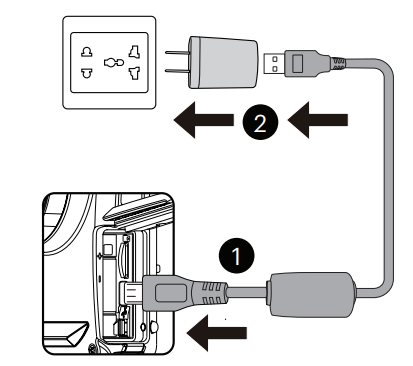
Before you charge your battery, make sure the camera is off and the battery is inserted correctly.
- Connect the camera to the power charger using the supplied USB cable.
- Insert the plug of the power charger into the wall outlet to charge the battery.
Turning Camera On and Off
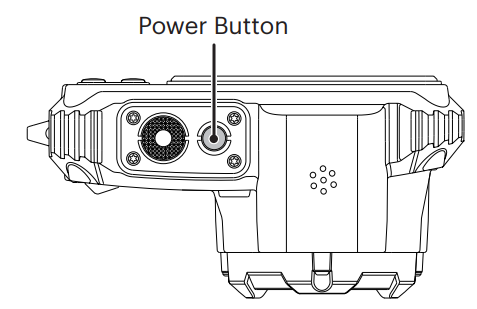
Press the Power button to turn the camera on. To turn the camera off, press the Power button again.n
How to Take Pictures
- Hold the camera with both hands, being careful not to block the flash and lens with fingers.
- Point the lens toward the object you want to take a picture of, then frame it with the LCD.
- Use the zoom button to select Tele or Wide position to zoom in or out on your subject(s).
- Gently press the shutter button halfway down to focus on your subject(s). When the focus frame turns green, press the shutter button completely down to take your photo.
Set your Language, Date/Time
Set your Language, Date/Time after the First Power-On
- When you turn the camera on for the first time, the language selection screen appears.
- Press the arrow buttons to select your desired language.
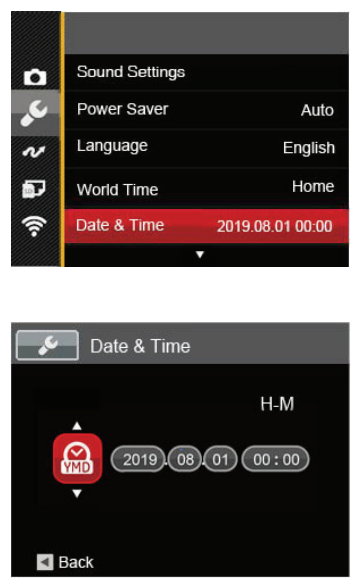
- After you press the button to confirm your language selection, the Date/Time settings screen will appear.
- Press the left/right arrow buttons to select the Date/Time to be adjusted: Time is displayed in YYYY.MM.DD/HH: MM.
- Press the up/down arrow buttons to adjust the value for the desired Date/Time.
- Press the set button to confirm the time settings, and the snapshot screen will appear.
Resetting your Language
After you set your language for the first time, follow the instructions below to reset your desired language.
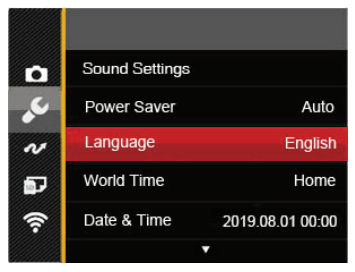
- Press the button and press the up/down arrow buttons to select. Press the button
to enter the menu. - Press the up/down arrow buttons to select, and press the button or right arrow button to enter the menu.
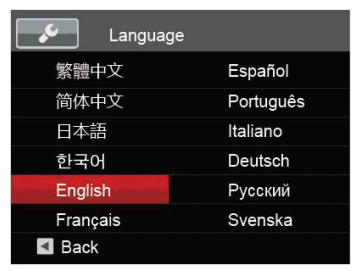
- Press the up/down arrow buttons to select [Language] and press the button or right arrow button to enter the menu.
- Press the arrow buttons to select your desired language and press the button to confirm.
- Press the button, and the snapshot screen will appear.
Resetting Date/Time
After you set your Date/Time for the first time, follow the instructions below to reset the date and time.
- Press the button and press the up/down arrow buttons to select. Press the button
to enter the menu. - Press the up/down arrow buttons to select and press the button or right arrow button to enter the menu.
- Press the up/down arrow buttons to select [Date & Time] and press the button or right arrow button to enter the menu.
- Press the left/right arrow buttons to select the Date/Time to be adjusted: Time is displayed in YYYY.MM.DD/HH: MM.
- Press the up/down arrow buttons to select the value for your selected entry. After you finish your settings, press the button to confirm.
- Press the butt, on and the following snapshot screen will appear.
MODE OVERVIEW
Display Setting
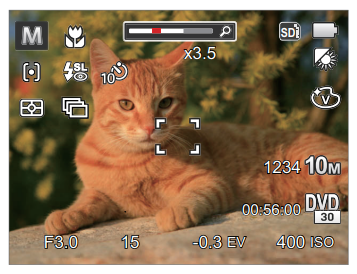
Press the DISP button to display the settings: Classic, Full, Off. Classic: Displays the camera parameters on screen
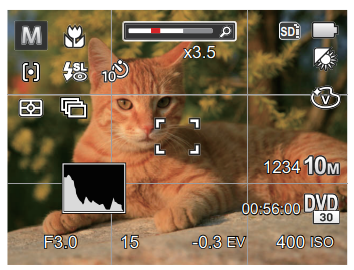
Full: Camera parameters with Grid and Histogram
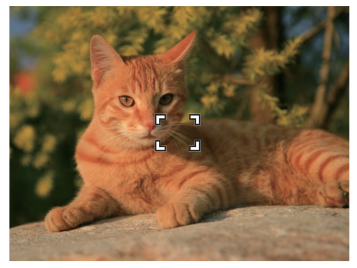
Off: Does not display any additional icons on screen
LCD Screen Display
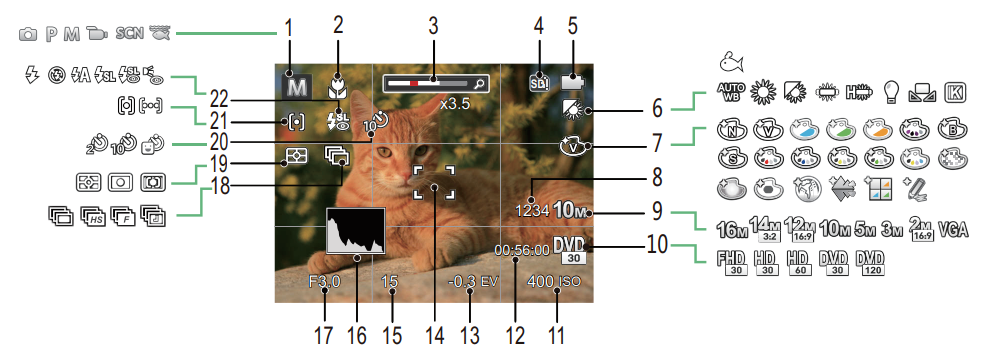
Overview of the Screen Icons in Photo Shooting Mode

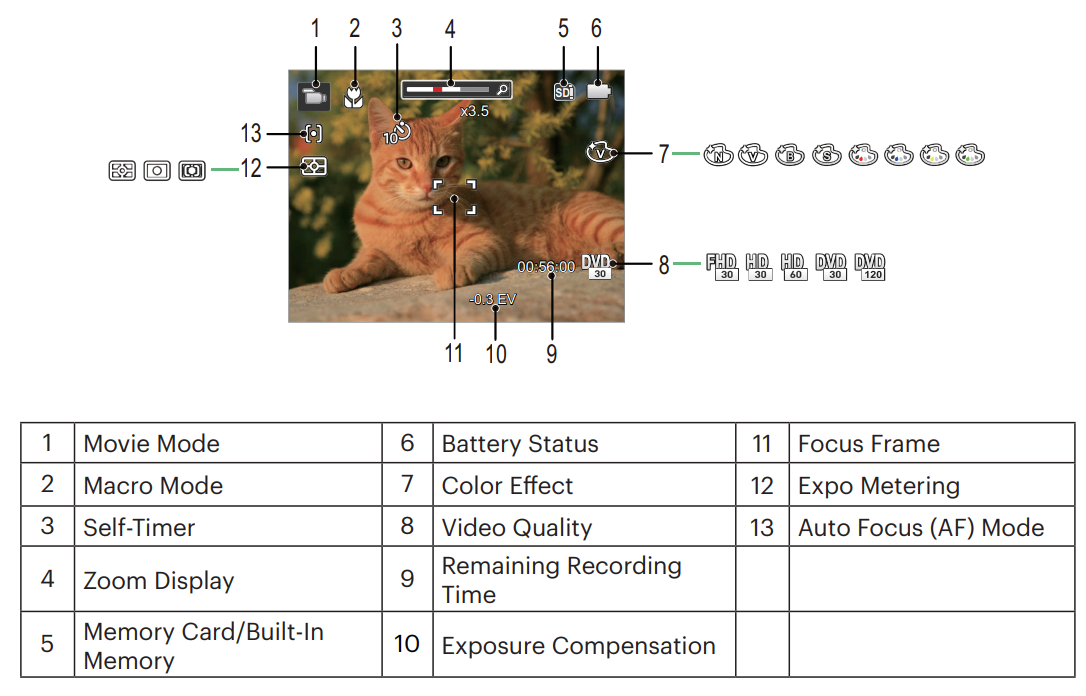
Overview of the Screen Icons in Movie Mode
Using the Mode Button
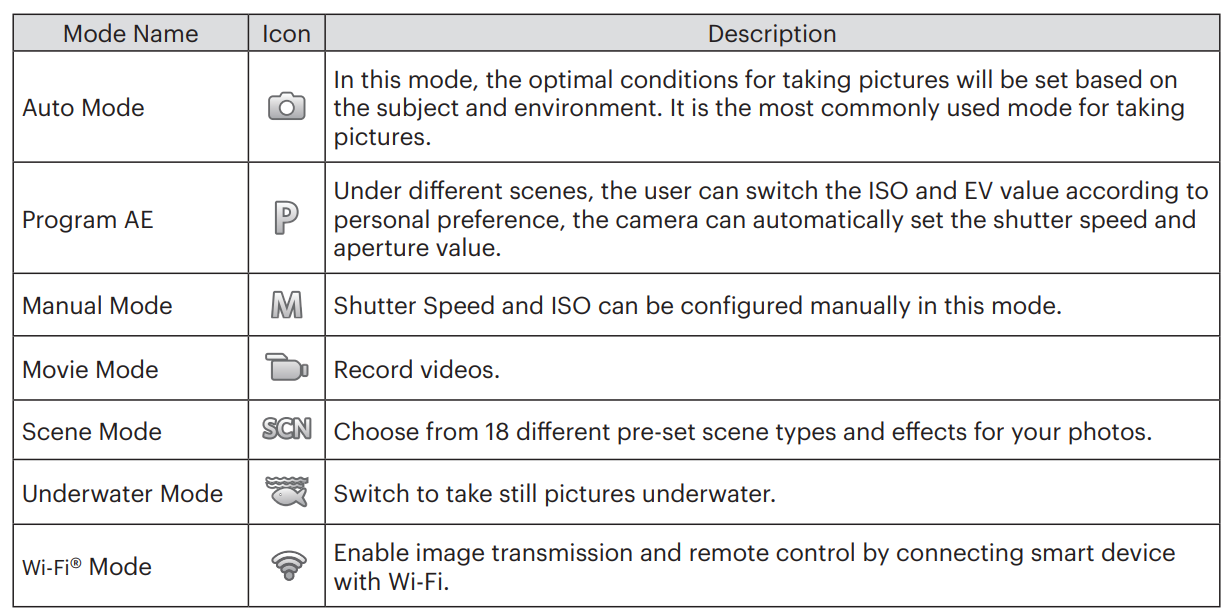
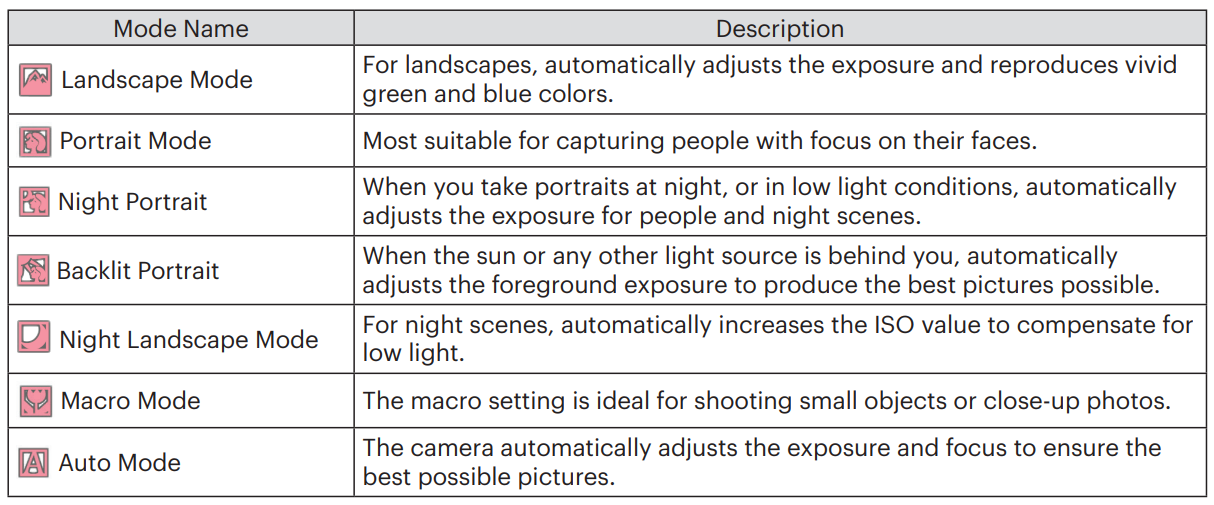
This camera provides a convenient Mode button that allows you to switch easily between different modes. After pressing the Mode button to enter the Mode Selection Menu, press the left/right button to choose the selected mode. Press the button to confirm your selection. All the available modes are listed below:
Auto Mode
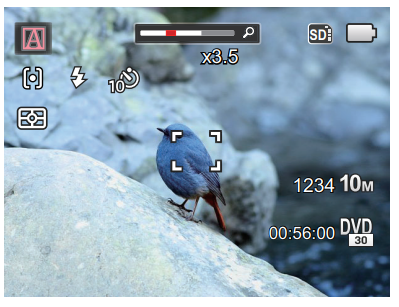
Auto mode is the most common and easiest mode to take photos. While operating in this mode, the camera automatically optimizes numerous camera settings to take photos and videos with the best possible results.
Follow these steps:
- Press the button to select Auto Mode and then press the button to confirm.
- Hold the camera steadily and aim at the subject. The optimum scene mode will be selected automatically.
- Compose your picture in the LCD and press the shutter button halfway down to focus on your subject(s).
- The LCD will show a green focus frame when the subject is in focus.
- Fully press down the shutter button to take your photo.
The camera will automatically detect the most suitable scene to capture the best pictures.
Program AE
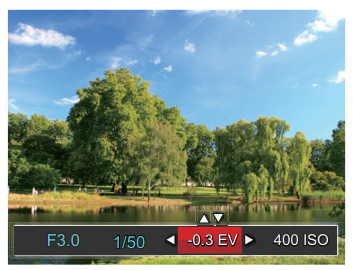
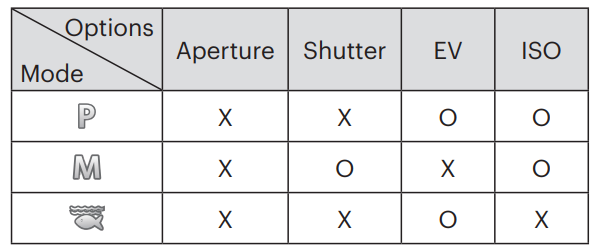
When selecting Program AE mode, you can adjust the EV value and ISO value.
- Press the button to select Program AE press the button to confirm.

- Press the left/right arrow buttons to select an adjustment setting.
- Press the up/down buttons to adjust the parameters.
- Press the button to confirm the settings and enter the shooting screen.
Manual Mode
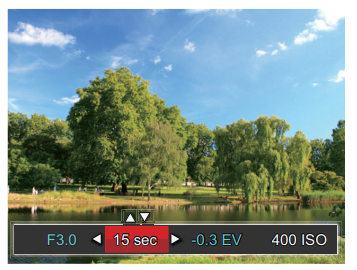
When selecting ( Manual Mode ), you can adjust the shutter speed manually and the ISO value.
- Press the button to select Manual Mode press the button to confirm.

- Press the left/right arrow buttons to select an adjustment setting.
- Press the up/down buttons to adjust the parameters.
- Press the button to confirm the settings and enter the shooting screen.
Please refer to the table below for unavailable options in modes: (O: Available, X: Not..
Available)
Movie Mode
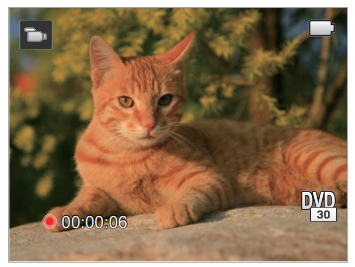
Switch to this mode to record videos.
- Press the button to select Movie Mode and then press the button to confirm.
- Press down the Shutter Button to start recording.

- Once you are finished, press the Quick Video Recording Button or the Shutter Button to stop recording and return to the shooting screen.
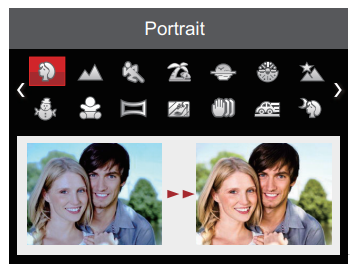
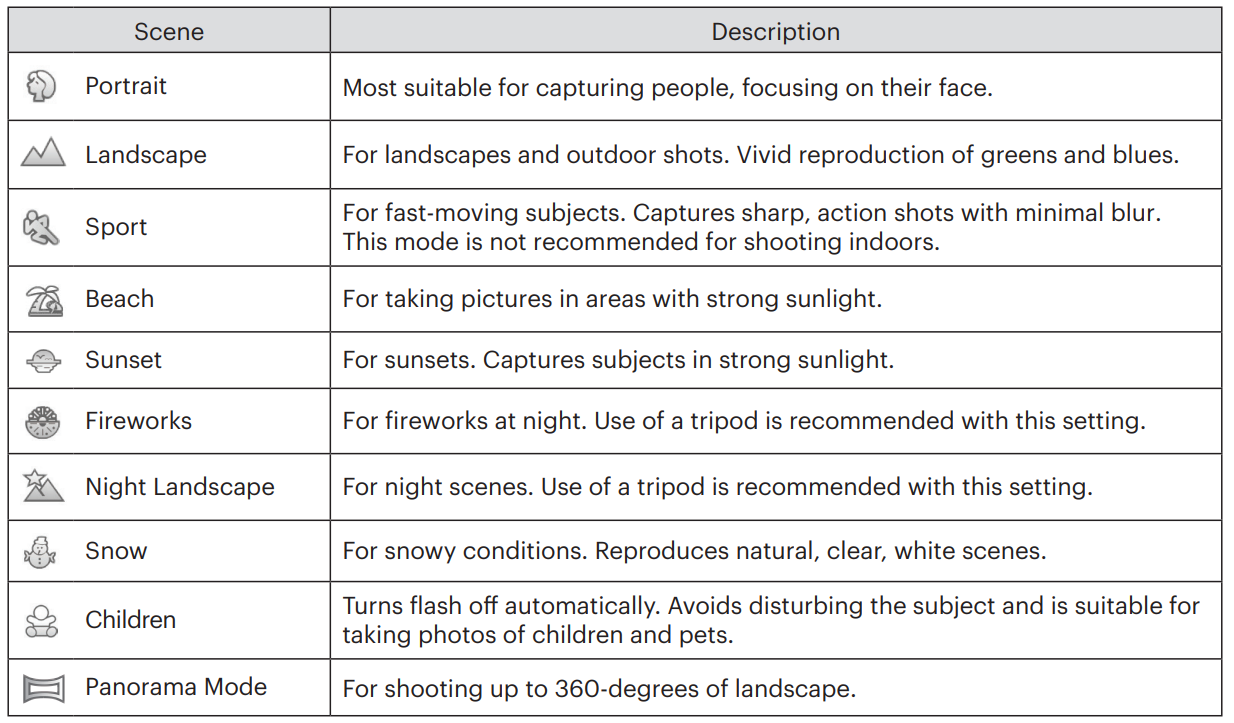
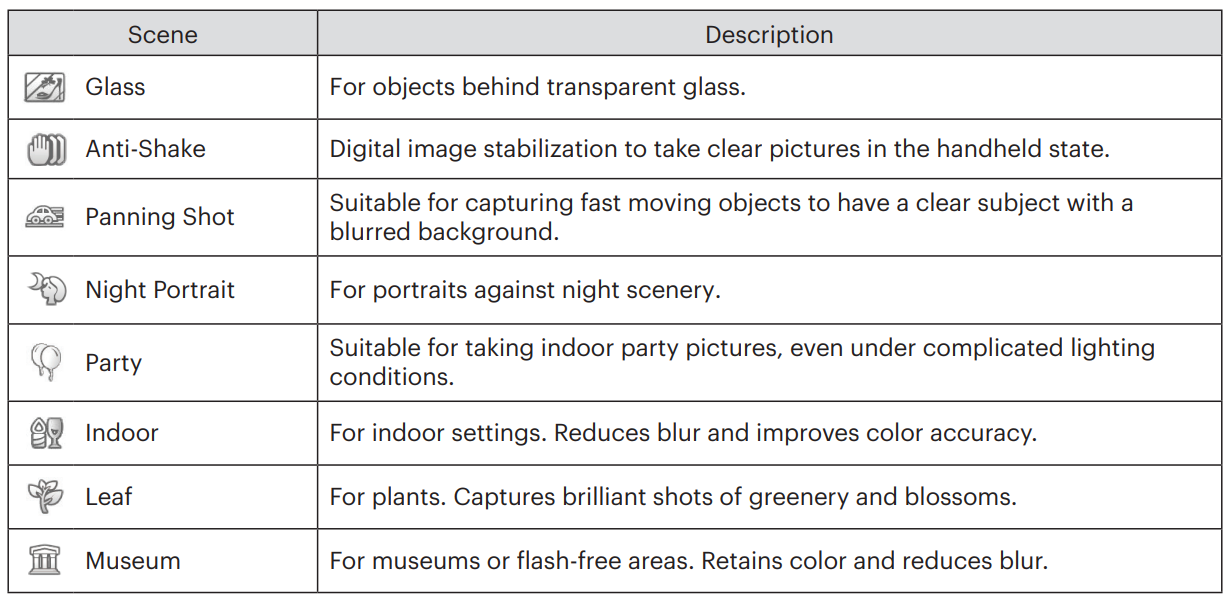
Scene Mode (SCN)
You can select an appropriate mode from the 18 scene modes according to the type of environment you are shooting in. The camera then automatically configures the most appropriate settings for the best possible photos.
- Press the button to select Scene Mo,de and then press the button to enter the Scene Mode menu

- Press the arrow buttons to select a scene and press the button to confirm.
- To change to a different scene, press the button and then the button, and finally the arrow buttons to reselect the scene.
Panorama Mode
This feature allows you to capture a panoramic view that will have significantly more content than a single photograph. Follow the arrow while keeping the camera steady to seamlessly shoot an ultra-wide scene of up to 360 degrees. Follow the steps below:
- Select the Panorama Mode and then press the button to confirm.
- Press the arrow buttons to select a desired shooting direction. Should you not select a direction, the default shooting direction is “right.” 2 seconds later, the camera will be ready to take pictures. You can also press the button or press the shutter button halfway down to get ready to take panoramic pictures.
- Compose your shot on the LCD and half-press the shutter button to focus on the subject. After focusing, fully press the shutter button down to take the first picture. At this time, the process dialog of panorama mode stitching appears on the screen.

- Pan the camera according to the set direction. When the range of motion does not exceed the range that the camera can detect, the progress bar behind the arrow partially turns red. When it completely turns red, panorama mode shooting is finished.
Wi-Fi® Mode
Enable image transmission and remote control by connecting a smart device with Wi-Fi.
Before utilizing Wi-Fi® Mode, please review the following:
- Your smart device operating system version needs to be iOS 10 or higher, or ANDROID 5.0 or higher. If not, please upgrade your smart device before using the APP.
- Please do not use in places that have a high intensity magnetic field, electrostatic and electric wave interference (for example, near a microwave oven), which may cause failure in receiving signals.
- To maintain a connection, please keep the camera within 10 meters (32.8 feet) without signal shielding interference.
- Please do not use Wi-Fi connection functionality on a plane.
- The camera and the smart device can only be connected one-to-one.
BASIC OPERATION
Using the Zoom Function
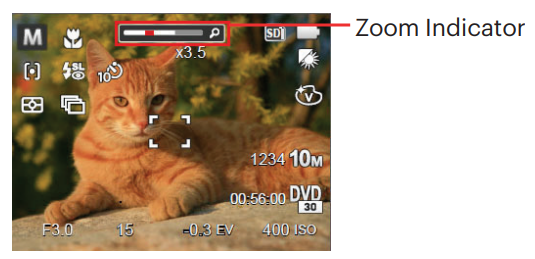
Your camera is equipped with two types of Zoom Functions: Optical Zoom and Digital Zoom. Press the Zoom button of the camera to zoom in or out on the subject while taking pictures.
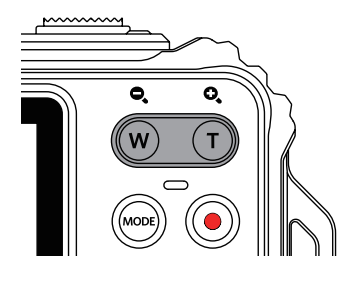
When the Optical Zoom reaches the threshold as Digital Zoom, release and turn the Zoom Button to T to switch between the Optical Zoom and Digital Zoom.
Macro Mode
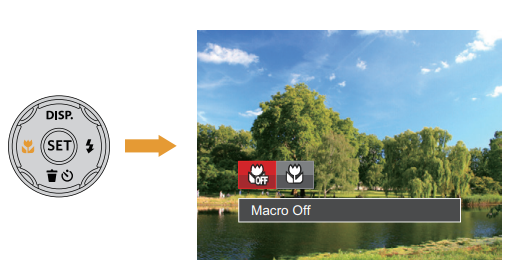
The Macro Setting is ideal for shooting small objects or close-up photos. This mode allows you to focus on subjects very close to the camera.
- Press the left arrow button to enter the Macro Menu.

- Press the left/right arrow buttons to select the following 2 modes:
- Press the button to confirm the settings and exit the menu.
PLAYBACK
Overview of the Screen Icons in Playback Mode
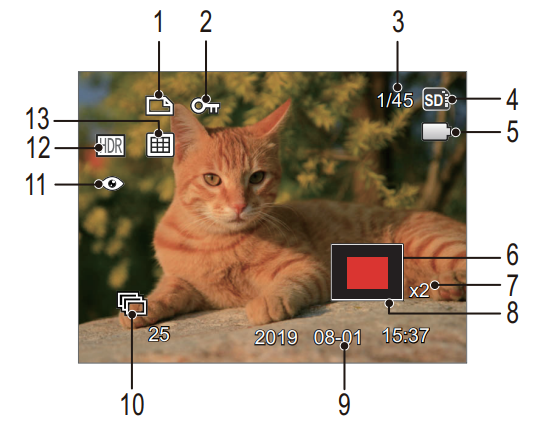
- DPOF File
- File Protection
- Memory space (indicating the current number of photos and the total number of photos)
- Memory Card/Built-in Memory
- Battery Status
- Zoom Magnification Area
- Image Zoom Ratios
- Image Zone
- Shooting Date
- Continuous Capture Group Playback
- Red-Eye Reduction
- HDR
- Date Folder
Transferring Files to Your Computer
The computer will automatically detect the camera as a removable drive. Double-click the “My Computer“ icon on the desktop to locate the removable drive and to copy folders and files in the drive to a directory on your PC as you would copy any typical folder or file. Follow the steps below to connect the camera to a computer:
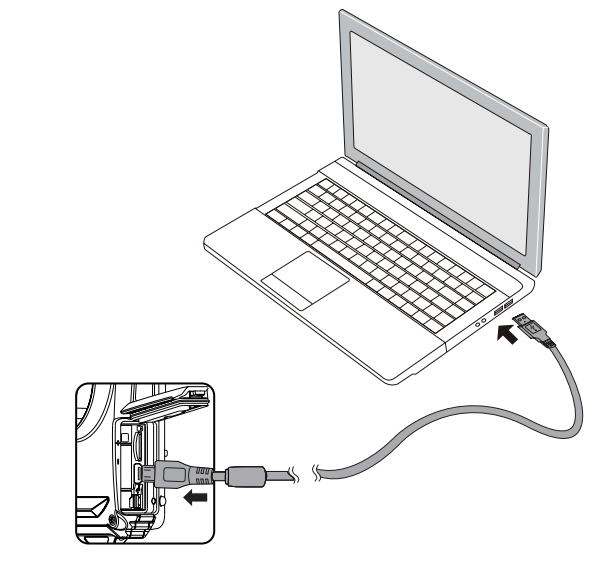
- Make sure both the camera and computer are turned on.
- Connect one end of the supplied USB cable to the USB port on your camera.
- Connect the other end of the cable to an available USB port on your computer.
- After the transmission is complete, disconnect the USB cable according to your
computer manufacturer’s instructions specifying how to safely remove USB devices.
Connecting to PICTBRIDGE™ Compatible Printers
PICTBRIDGE™ technology allows printing of the photos saved on the memory card by a printer. To find out if a printer is PICTBRIDGE™ compatible, simply look for the PICTBRIDGE™ logo on the packaging or check the owner’s manual for specifications. With the PICTBRIDGE™ function on your camera, you can print the captured photos
directly to a PICTBRIDGE™ compatible printer using the supplied USB cable, without the need for a PC.
Setting the USB Mode
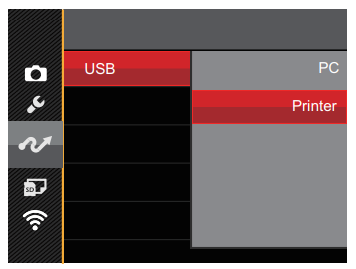
The camera’s USB port can be set to connect with either a PC or a printer. The following steps will ensure that the camera is correctly configured to connect with a compatible printer.
- Press the button, press the up/down arrow buttons to select, and press the button to enter the menu.
- Press the up/down arrow buttons to select and press the button or right arrow button to enter the menu.
- Press the up/down arrow buttons to select [USB] and press the button or right arrow button to enter the menu.
- Press the up/down arrow buttons to select [Printer] and press the button to confirm.
APPENDICES
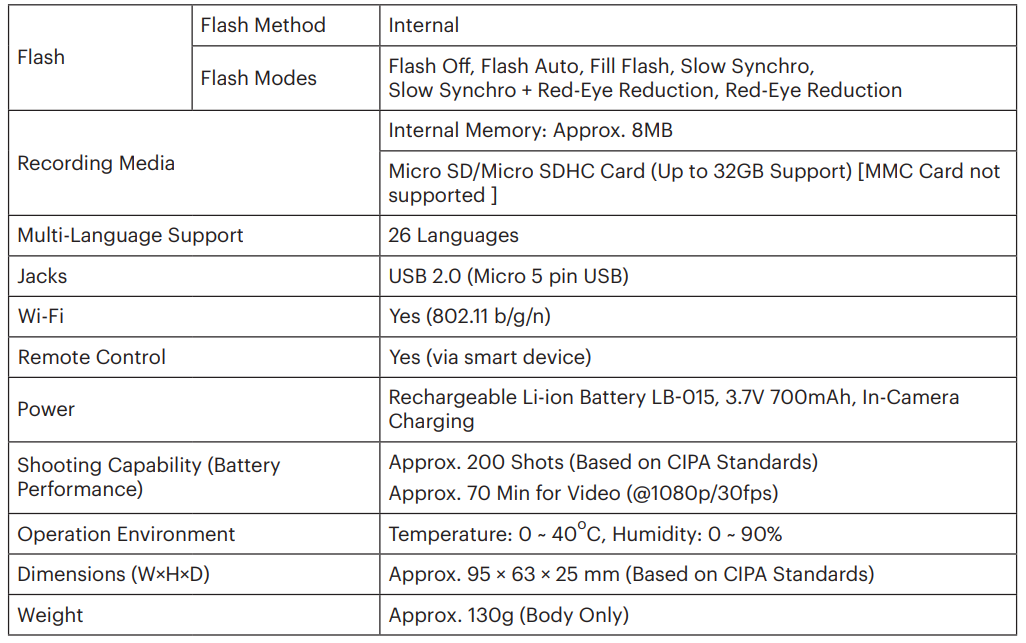
Specifications
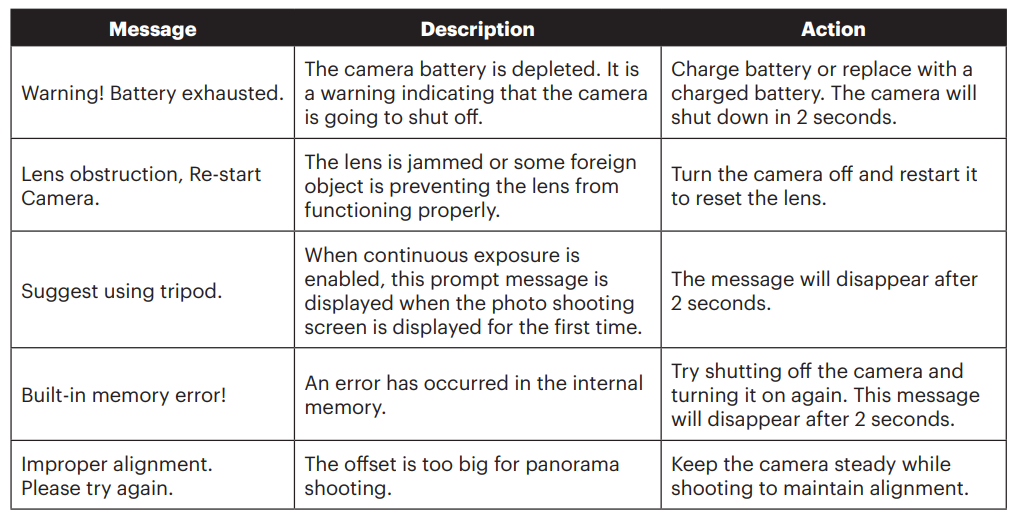
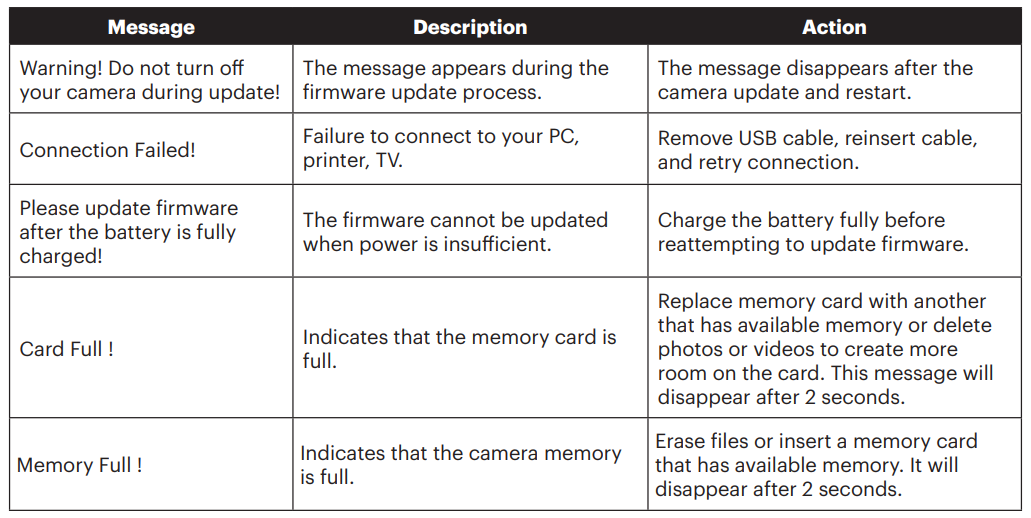
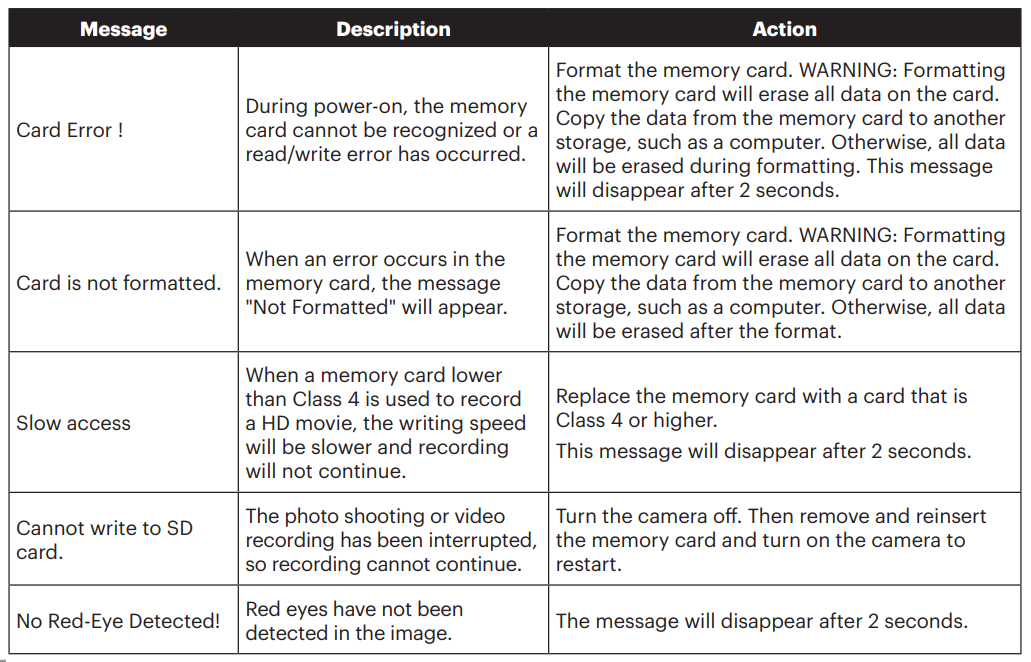
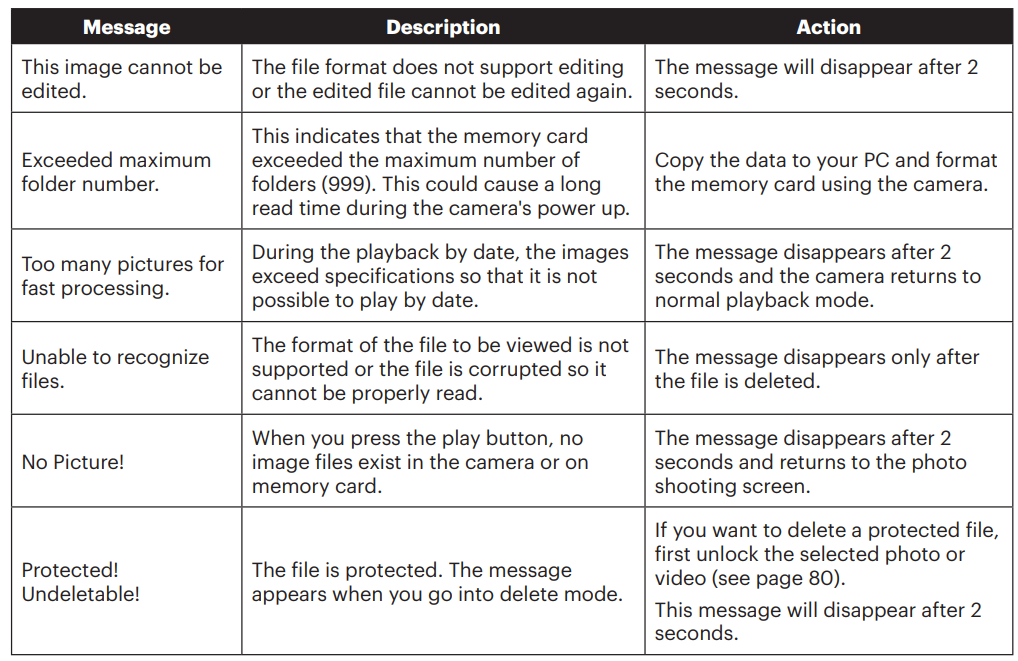
Prompts and Warning Messages
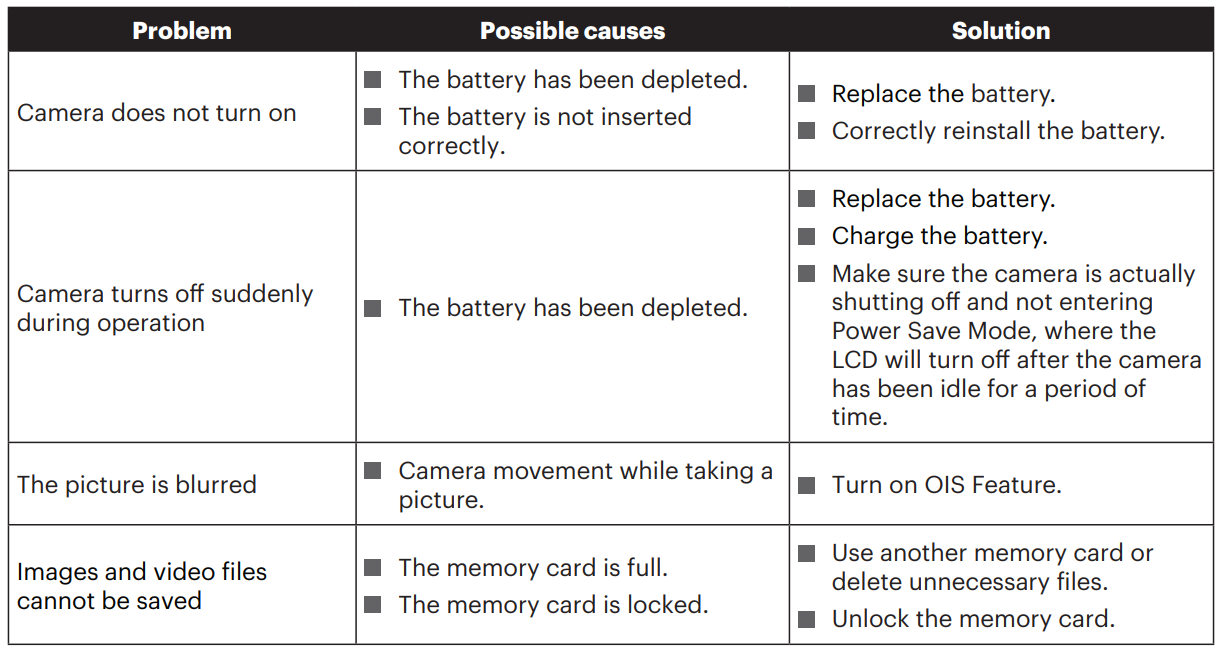
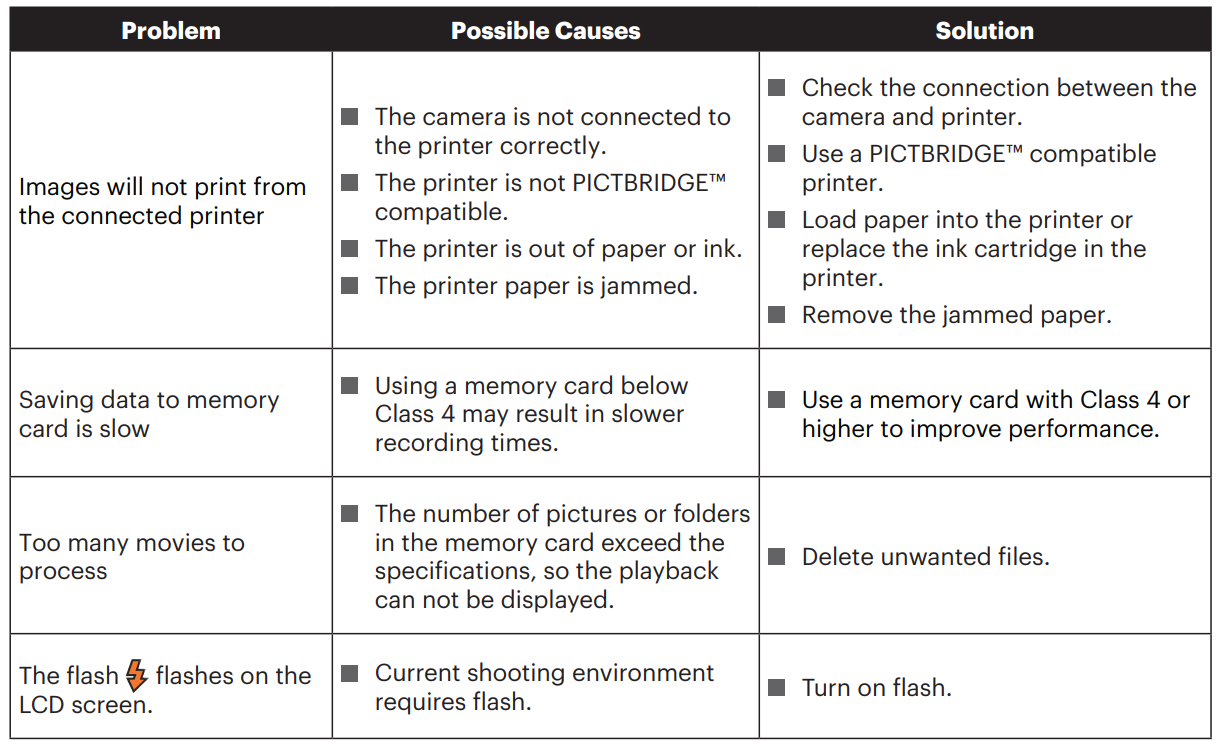
Troubleshooting
FOR MORE MANUALS BY KODAK, VISIT MANUALSLIBRARYY
Kodak PixPro WPZ2 Digital Camera-FAQs
How do I use the MuellerLiving French Press?
Add coffee grounds – Use coarse-ground coffee (about 1-2 tbsp per 6 oz of water).
Pour hot water – Heat water to 195–205°F (90–96°C) and fill the press.
Stir & steep – Let it brew for 4-5 minutes.
Press slowly – Gently push the plunger down to separate grounds.
Serve immediately – Pour and enjoy!
What’s the best coffee grind for a French press?
Use coarse-ground coffee (similar to sea salt). Fine grounds can slip through the filter and make coffee gritty.
How much coffee should I use per cup?
A general rule:
1 tablespoon (7g) of coffee per 6 oz (180ml) of water.
Adjust to taste—stronger coffee? Add more grounds.
Can I use boiling water in a French press?
No! Boiling water (212°F/100°C) can over-extract coffee, making it bitter.
Ideal temp: 195–205°F (90–96°C).
Pro tip: Let boiled water sit for 30 seconds before pouring.
How long should I steep coffee in a French press?
4-5 minutes is ideal for balanced flavor.
Less time = weaker coffee.
More time = stronger, but risk bitterness.
Why is my French press coffee gritty?
Grind too fine – Use coarse grounds.
Plunging too fast – Press slowly to avoid forcing fines into the brew.
Old/worn filter – Check if the mesh needs replacement.
How do I clean my MuellerLiving French Press?
Disassemble – Remove the plunger and filter.
Rinse parts – Use warm water (avoid soap if possible).
Deep clean – For stains, use baking soda + water or a mild detergent.
Dry completely – Prevent odors by air-drying before reassembling.
Can I make tea in a French press?
Yes! Works great for loose-leaf tea:
Add leaves, pour hot water, steep, then press.
Clean thoroughly afterward to avoid coffee-tea flavor mixing.
Why does my coffee taste bitter?
Over-steeping – Don’t exceed 5 minutes.
Water too hot – Stick to 195–205°F (90–96°C).
Dirty press – Residual oils can turn rancid; clean after each use.
Can I reheat coffee from a French press?
Technically yes, but fresh is best. Reheating can make coffee taste stale or burnt.
Alternative: Brew only what you’ll drink, or use a thermal carafe.

