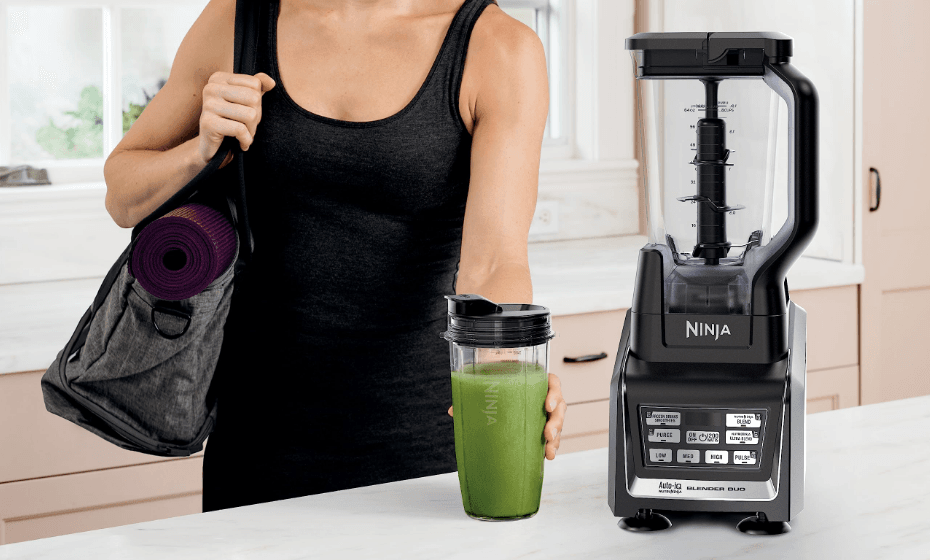
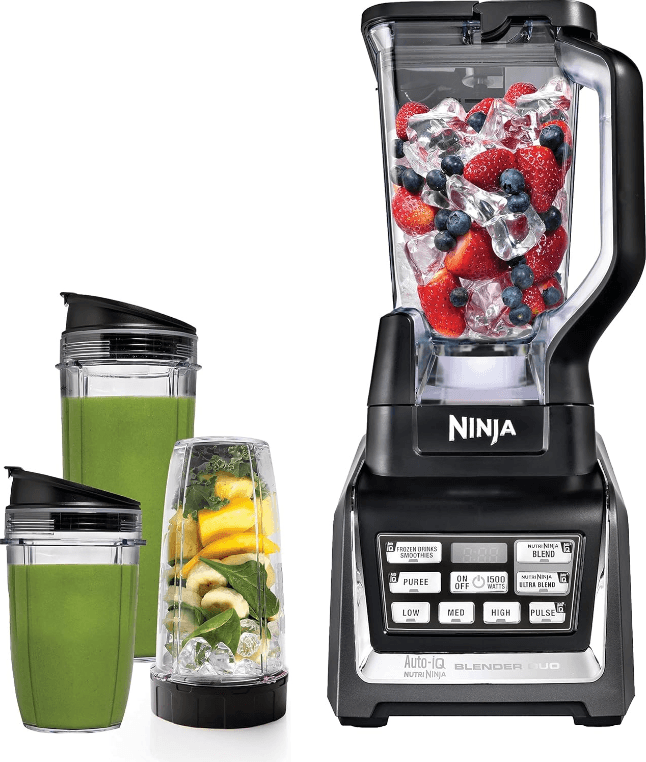
Ninja BL642 Nutri Ninja Personal-Countertop Blender
IMPORTANT SAFETY INSTRUCTIONS
- WARNING: Remove utensils before processing. Failure to remove may cause the jar to be damaged or to shatter, which may cause personal injury.
- WARNING: Stacked Blade Assembly is sharp, not locked in place,,e and removable, handle with care. When handling the Stacked Blade Assembly, always hold it by the shaft. Failure to do so will result in a risk of laceration.
- WARNING: Stacked Blade Assembly is sharp and not locked in place. If using the pour spout, ensure the lid is fully locked onto the pitcher. If pouring with the lid removed, carefully remove the Stacked Blade Assembly first, holding it by the shaft. Failure to do so will result in a risk of laceration.
- CAUTION: Do not blend hot liquids; doing so may cause excessive pressure build-up, resulting in the risk of the user being burned.
- CAUTION: We do not recommend grinding in any of our Nutri Ninja® Cups.
- CAUTION: Remove the Pro Extractor Blades® Assembly from the Nutri Ninja
cup upon completion of blending. Some ingredients have the potential to expand after blending, resulting in excessive pressure buildup that can pose a risk of injury. - To protect against electrical shock, do not submerge the appliance or allow the power cord to come into contact with water or any other liquid.
- DO NOT allow the appliance to be used by children. Close attention is necessary when used near children. This is not a toy.
- Never leave an appliance unattended when in use.
- Appliance accessories are not intended to be used in the microwave, as it may result in damage to the accessories.
- Turn the appliance off and remove the power cord from the electrical outlet when not in use, before assembling or disassembling parts, and before cleaning. To unplug, grasp the plug and pull from the electrical outlet. Never pull from the power cord.
- DO NOT abuse the power cord. Never carry the appliance by the power cord or yank it to disconnect from the electrical outlet; instead, grasp the plug and pull to disconnect.
- DO NOT operate any appliance with a damaged cord or plug, or after the appliance
malfunctions, has been dropped or damaged in any manner. This appliance has no
serviceable parts. Return the appliance to SharkNinja Operating LLC for examination, repair, or adjustment. - DO NOT let the power cord hang over the edge of the table or counter or touch hot
surfaces such as the stove. - Always use the appliance on a dry, level surface.
- Keep hands, hair, clothing, as well as utensils, out of the container while processing to
reduce the risk of severe injury to persons or damage to the appliance. A scraper may be used, but only when the appliance is not running. - Avoid contact with moving parts.
- DO NOT attempt to sharpen blades.
- DO NOT use the appliance if he blade assemblies are bent or damaged.
- To reduce the risk of injury, never place the blade assemblies on the base without the
pitcher or Nutri Ninja cup properly attached. - DO NOT operate this appliance on or near any hot surfaces (such as gas or electric
burner or in a heated oven). - The use of attachments or accessories, including canning jars, is not recommended by
The manufacturer may result in fire, electric shock, or personal injury. - DO NOT remove the container from the motor base while the appliance is in operation.
- To reduce the risk of injury, NEVER operate the appliance without the lid in place; DO NOT try to defeat the interlock mechanism; make sure that the attachment is properly installed before operating the appliance.
- DO NOT expose containers to extreme temperature changes.
- DO NOT overfill.
- DO NOT operate the appliance empty.
- To reduce the risk of burns, always allow the appliance to cool before taking off parts and before cleaning.
- If the unit overloads, the control panel lights will flash, and the unit
will shut down. Unplug the appliance and let it cool down for approximately 15 minutes before using it again. - THIS PRODUCT IS INTENDED FOR HOUSEHOLD USE ONLY. Do not use this
appliance for anything other than its intended use. Do not use outdoors. - The maximum rating is based on the Stacked Blade Assembly (pitcher) that drives
the greatest power, and other recommended attachments may draw significantly less power or current.
Getting To Know Your Nutri Ninja
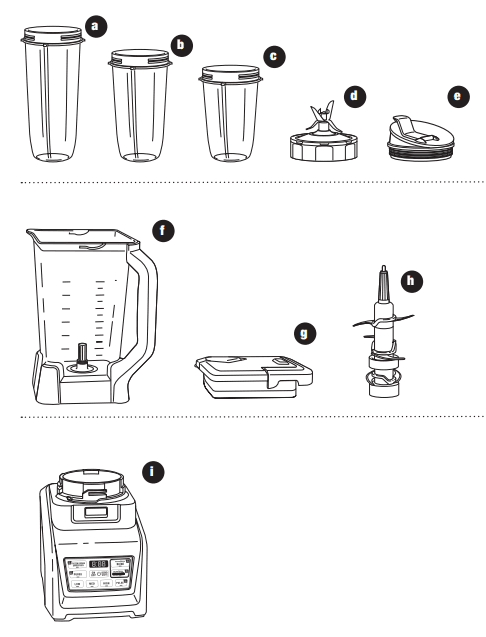
- a Jumbo Multi-Serve 32 oz. Nutri Ninja® Cup
- b Regular 24 oz. Nutri Ninja Cup
- c Small 18 oz. Nutri Ninja Cup
- d Pro Extractor Blades® Assembly
- e Sip & Seal® Lids (x3)
- f Pitcher
- g Pitcher Lid with Locking Handle
- h Stacked Blade Assembly
- I Motor Base
- J Power Cord (not shown)
Nutri Ninja® | Ninja® Blender Duo™ with AUTO-iQ™ Technology Features:
- Ninja® Blade Technology
- BPA Free Pitcher, Nutri Ninja Cups and Lids
- Drip-Free Pour Spout
- LED Control Panel with Timer
- Sturdy, Non-Slip Base
- Smart Lid technology for easy release
- 3 speeds: Low, Medium, & High
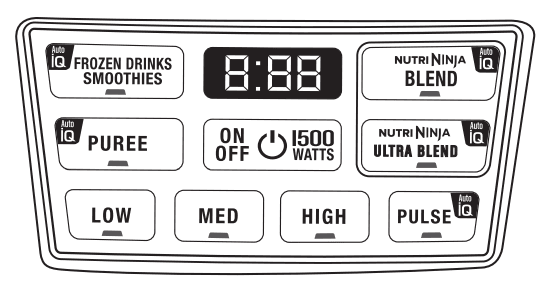
- 5 AUTO-iQ Programs – AUTO-iQ Frozen Drinks/Smoothies, AUTO-iQ Puree, Nutri Ninja AUTO-iQ Blend, Nutri Ninja AUTO-iQUltra Blend and AUTO-iQ Pulse
- Nutri Ninja Nutrient & Vitamin Extraction
Extract a Drink Containing Vitamins & Nutrients From Fruits & Veggies
Assembly and Use of the Pitcher
Assemble
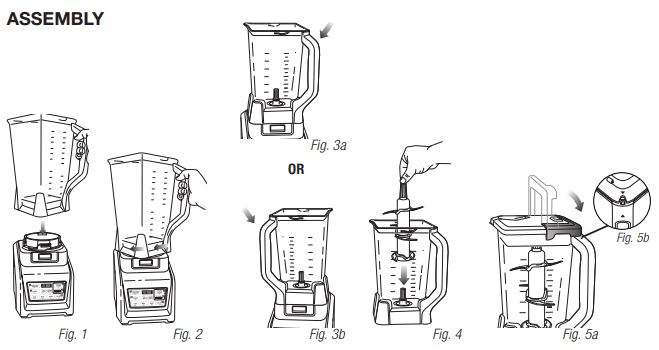
- Review the warning and caution statements above before proceeding to number 2.
- Place the motor base on a clean, dry, level surface such as a counter or tabletop. Press down on the motor base to make sure that the Suction Cups adhere to the
countertop or tabletop - Align and lower the Pitcher onto the motor base. (Fig. 1) The handle should be aligned slightly to the right of the “LOCK” symbol on the motor base.
- Rotate the pitcher clockwise until it clicks in place. As the pitcher rotates, it will lower, and the safety tabs on the bottom of the pitcher will slide under the safety tabs on the top of the motor base. (Fig. 2)
- The pitcher can be placed on the motor base two ways; the handle can be on the front right corner or the front left corner. (Fig. 3a, Fig. 3b)
- Holding the Stacked Blade Assembly by the top of the shaft, place it onto the drive gear inside the pitcher. Ensure that the Stacked Blade Assembly is seated properly and is standing upright. (Fig. 4) NOTE: The Stacked Blade Assembly will fit loosely on the drive gear.
- Add the ingredients to the pitcher, making sure that they do not exceed the highest marked line on the side of the pitcher. NOTE: If you need to add additional ingredients while the appliance is processing, open the pour spout cap and pour the ingredients in through the opening. NOTE: When blending any kind of liquids, such as mixtures of any drinks or smoothies, do not exceed the “MAX” liquid mark (64 oz.) on the Pitcher.
- Plug the power cord into the electrical outlet and press the power button. IMPORTANT: As a safety feature, the power light will flash and the motor will not work if the Pitcher and lid are not installed correctly. When the Pitcher and lid are installed properly, the power light will be solid, indicating that the appliance is ready for use.
- Holding the lid by the handle in the upright position, place it on top of the Pitcher, aligning the triangle located on the lid with the triangle located on the Pitcher’s handle. (Fig. 5a) Press the handle down until you hear a click. The triangles on the lid and the pitcher handle MUST be aligned for the blender to turn on. (Fig. 5b)
Assembly and Use of the Pitcher – cont.
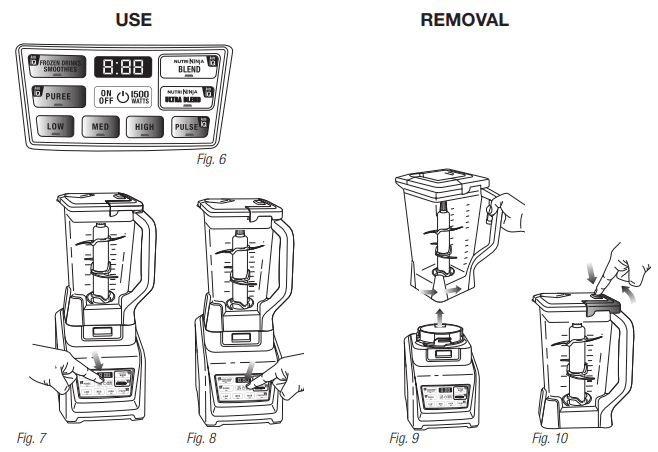
- Review warning and caution statements on page 13 before proceeding. NOTE: The Nutri Ninja | Ninja Blender Duo with AUTO-iQ Technology can sense which jar is on the motor base. The function lights will illuminate depending on which jar is placed on the motor base. (Fig. 6)
- Press the power button to turn on the unit. Select the speed or AUTO-iQ Program that best suits your needs. The AUTO-iQ program will stop the appliance automatically at the end of the program. (Fig. 7)
- To pause the appliance, press the selected speed or AUTO-iQ Program a second time. When the program is paused, the light on the program button will flash until
you press it again to resume the rest of the program. - When you have reached your desired consistency, stop the appliance by pressing the power button and wait for the Stacked Blade Assembly to stop turning. (Fig. 8
- Turn the pitcher counterclockwise to remove and then lift off the base. (Fig. 9)
WARNING: Never insert your hands in the pitcher as the Stacked Blade Assembly is sharp. Always use a spatula to dislodge food that has stuck to the sides of the pitcher. - Open the pour spout cap and use the spout to empty the liquid contents.
- For thicker consistencies, first remove the lid by pressing the release button and pulling the lid handle up to a 90-degree angle to lift the lid off the pitcher. Then, carefully remove the Stacked Blade Assembly from the top of the shaft. Place the Stacked Blade Assembly away from the work area to avoid accidental contact. Finally, empty the contents of the pitcher. (Fig. 10)
- Ensure the unit is unplugged when not in use.
Assembly and Use of the Nutri Ninja™ Cups
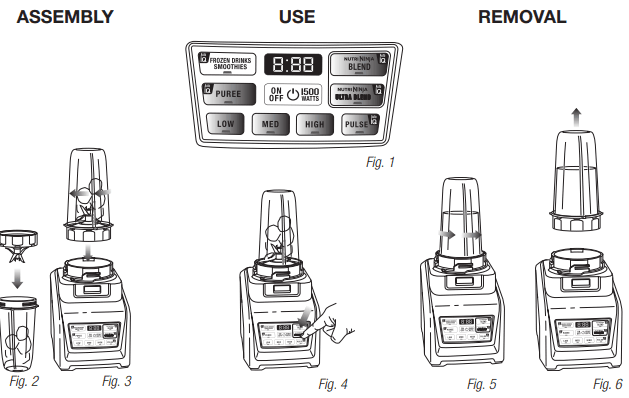
- Review the warning and caution statements above before proceeding to number 2.
- Place the motor base on a clean, dry, level surface such as a counter or tabletop. Press down on the motor base to make sure that the suction cups adhere to the
counter or tabletop - Add ingredients to the Nutri Ninja cup.
- Place the Pro Extractor Blades Assembly onto the cup and tightly screw it on clockwise until you have a good seal. (Fig. 2)
- Turn the Nutri Ninja cup upside down and place it onto the motor base, aligning the tabs on the cup with the motor base. Rotate the Nutri Ninja cup clockwise until
it locks in place. You will hear a click when the lock is engaged. (Fig. 3) - Press the power button on, and select the speed or AUTO-iQ program that suits your needs. The AUTO-iQ program will stop the appliance automatically at the end
of the program. (Fig. 4) - To pause the appliance, press the selected speed or AUTO-iQ Program a second time. When the program is paused, the light on the program button will flash until
You press it again to resume the rest of the program. - Once you have reached your desired consistency, stop the appliance by pressing the power button and wait for the blade to stop turning. Turn the Nutri Ninja cup
counterclockwise and pull straight up to remove. (Fig. 5, Fig. 6) NOTE: Do not overfill! To avoid spilling, do not add ingredients past the “Max Liquid” line. - Turn the cup upright and remove the Pro Extractor Blades Assembly by twisting the blade assembly counterclockwise.
- Place the Sip & Seal® lid onto the Nutri Ninja cup, twist clockwise to seal, and enjoy!
- Make sure that the motor base is unplugged when not in use
Programs, Speed Settings & Uses for the Pitcher
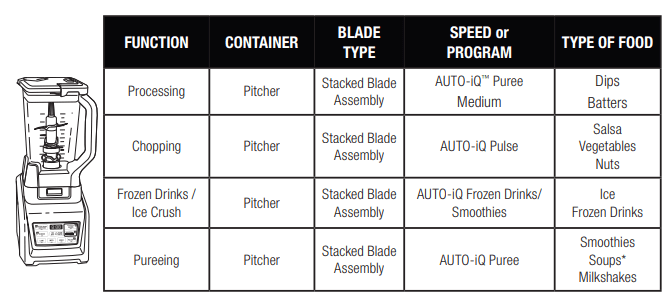
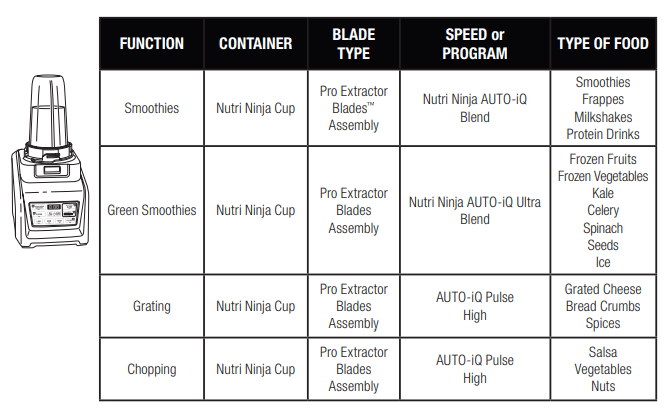
Programs, Speed Settings & Uses for the Nutri Ninja® Cup
Care & Maintenance
HOW TO CLEAN
- Separate/remove all parts from each other.
- Hand Washing: Wash the lids, pitcher, Nutri Ninja® cup, and blade assemblies in warm, soapy water. When washing the blade assemblies, use a dishwashing utensil with a handle to avoid direct hand contact with blades. Handle blade assemblies with care to avoid contact with sharp edges. Rinse and air dry thoroughly. Dishwasher: The containers, lids, blade assemblies, and attachments are all dishwasher safe. The lids and blade assemblies are top rack dishwasher safe.
Ensure that the blade assemblies are removed from the containers before placing them in the dishwasher. WARNING: Handle the Stacked Blade Assembly and Pro Extractor Blade Assembly with care when washing, as the blades are sharp. Contact with the blades’ edges can result in laceration. - Wipe the motor base clean with a damp cloth. Please call customer service if any servicing needs to be performed on the appliance at 1-877-646-5288.
HOW TO STORE
- Store the Nutri Ninja® | Ninja® Blender Duo™ with Auto-iQ™ Technology upright with the blade assembly inside the corresponding container with the lid secured on top. Do not place anything on top. Store the rest of the attachments in a safe place where they will not be damaged and won’t cause harm. Wrap the power cord around the cord wrap on the back of the motor base.
RESETTING THE MOTOR THERMOSTAT
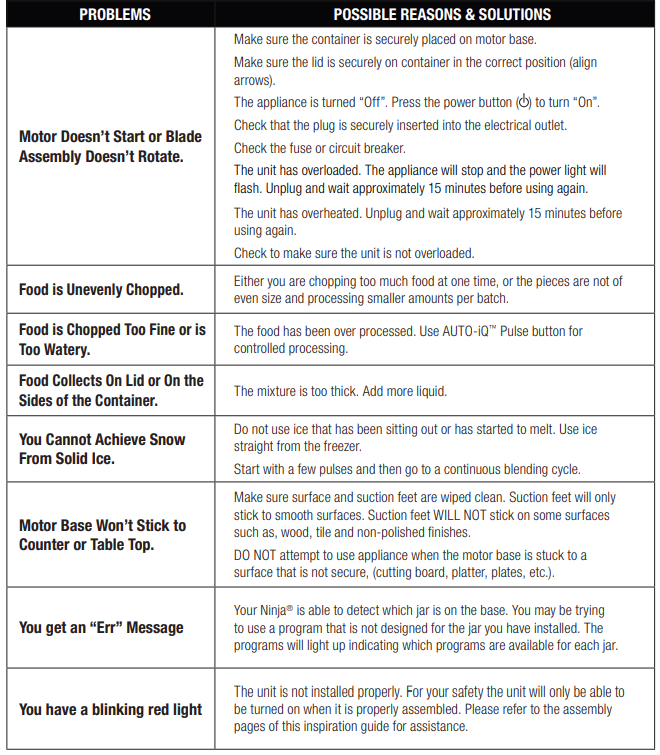
The Nutri Ninja | Ninja Blender Duo with AUTO-iQ Technology features a unique safety system that prevents damage to the unit’s motor and drive system should you inadvertently overload your appliance. If the appliance is being overloaded, the motor
will stop. Allow the appliance to cool for approximately 15 minutes. To reset the appliance, follow the resetting procedure below:
- Unplug the appliance from the electrical outlet.
- Remove and empty the container and ensure that no food is jamming the blade assemblies.
- Allow the appliance to cool for approximately 15 minutes.
- Reinstall the container onto the base and re-plug the appliance into the electrical outlet.
- Proceed to use the appliance as before, making sure not to exceed the recommended maximum capacities.
Troubleshooting Guide
FOR MORE MANUALS BY NINJA, VISIT MANUALSLIBRARYY
Ninja BL642 Nutri Ninja Personal-Countertop Blender-FAQs
Why does my Ninja blender have power but won’t start?
Unplug the blender for 10 minutes to reset the system. Check if the blade assembly is properly seated—not too tight or loose—and ensure no buttons are stuck. Try pressing the Start or Pulse button firmly.
Can I get the Ninja blender base wet?
The motor base and charging port can handle some moisture, but never submerge them in water or place them in the dishwasher.
What does the Pulse function do on a Ninja blender?
Pulse provides short, controlled bursts of power. It helps you chop or crush ingredients with more precision.
Why is the power light on my Ninja blender blinking?
A blinking light usually means the pitcher isn’t properly assembled. Align the arrows on the lid and handle, then press the handle down until you hear a click.
Does the Ninja blender turn off automatically?
Yes, it includes a safety feature that shuts off the motor if it overheats during heavy blending.
How can I unlock the blender lid if it’s stuck?
Press down on the lid lever while pressing the release button to relieve pressure on the latch. Avoid using tools like screwdrivers, which can crack the plastic.
How does the Ninja blender work?
The blades create a vortex that pulls ingredients downward for consistent blending. High-powered models can crush ice and even grind grains.
How do I restart the blender appliance?
Fully quit the operation, return to your device’s home screen or desktop, then relaunch the blender interface or replug the device if needed.

