
![]()
Panasonic HDC-SD9D Full HD Camcorder

Accessories
Check the accessories before using this unit.
Optional accessories
Some optional accessories may not be available in some countries.
| AC adaptor (VW-AD21E-K) |
| Battery pack (lithium/VW-VBG130/1320 mAh) |
| Battery pack (lithium/VW-VBG260/2640 mAh) |
| Battery pack (lithium/VW-VBG6/5800 mAh)*1 |
| Battery pack holder kit (VW-VH04) |
| HDMI mini cable (RP-CDHM15, RP-CDHM30) |
| Tele conversion lens (VW-T3714H) |
| Wide conversion lens (VW-W3707H) |
| Filter kit (VW-LF37WE) |
| Video DC light (VW-LDC102E)*2 |
| Light bulb for video DC light (VZ-LL10E) |
| Shoe adaptor (VW-SK12E) |
| Tripod (VW-CT45E) |
| DVD burner (VW-BN1) |
*1 The battery pack holder kit VW-VH04 (optional) is necessary.
*2 The shoe adaptor VW-SK12E (optional) is necessary.
Features
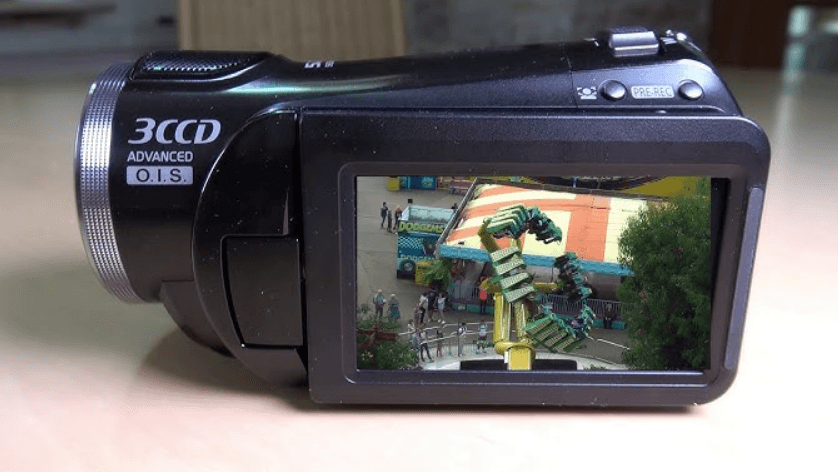
- Very clear definition pictures
This unit can record detailed high-definition images to an SD card.
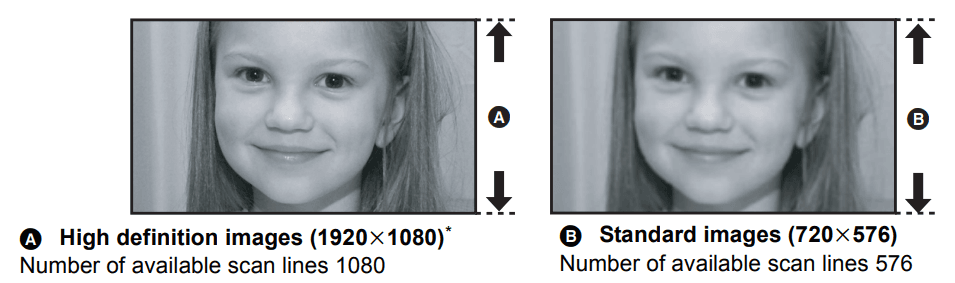
High definition images
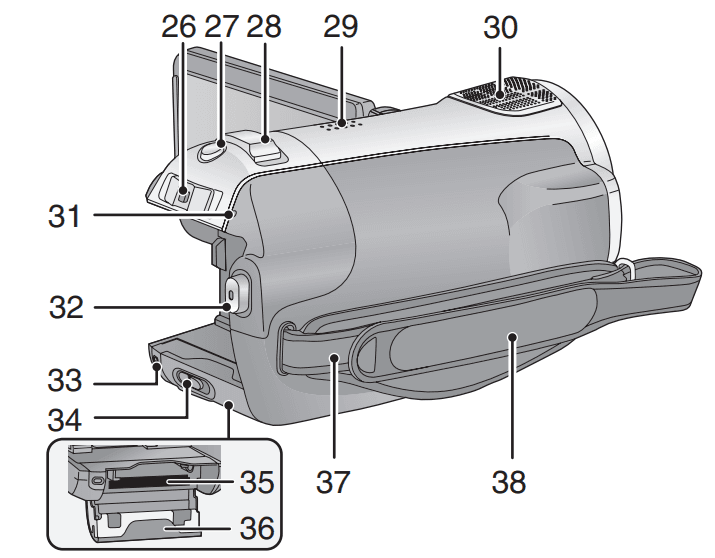
- The still pictures above are images for explanation purposes.
* If the recording mode is HA/HG/HX.
What is the AVCHD?
This is a format for recording and playing back highly detailed high-definition images. Images are recorded based on the MPEG-4 AVC/H.264 codec for compressing images and audio is recorded with the Dolby Digital 5.1 Creator.
- Since the recording method is different from an ordinary DVD video etc., the data are not compatible.
Compatibility with other products
| With other products | Available function | Picture quality |
| Watching Video/ Pictures on your TV | Playback with the HDMI mini cable playback using VIERA Link (HDAVI Control™) | High definition images |
| Playback with the component cable | ||
| Playback with the component cable | Standard images | |
| Playback with the AV cable | ||
| Using a DVD burner | Connecting a DVD burner to copy to/play back a disc playing back the copied disc | High definition images |
| What you can do with a PC
| Copying data to a PC and easy editing | |
| Writing data to DVD discs and SD cards | ||
| Converting the motion picture data to MPEG2 | Standard images | |
| Creating a DVD Video disc | ||
| Dubbing images onto other video device | Dubbing images when connecting with the AV cable |
Preparation
Parts identification and handling
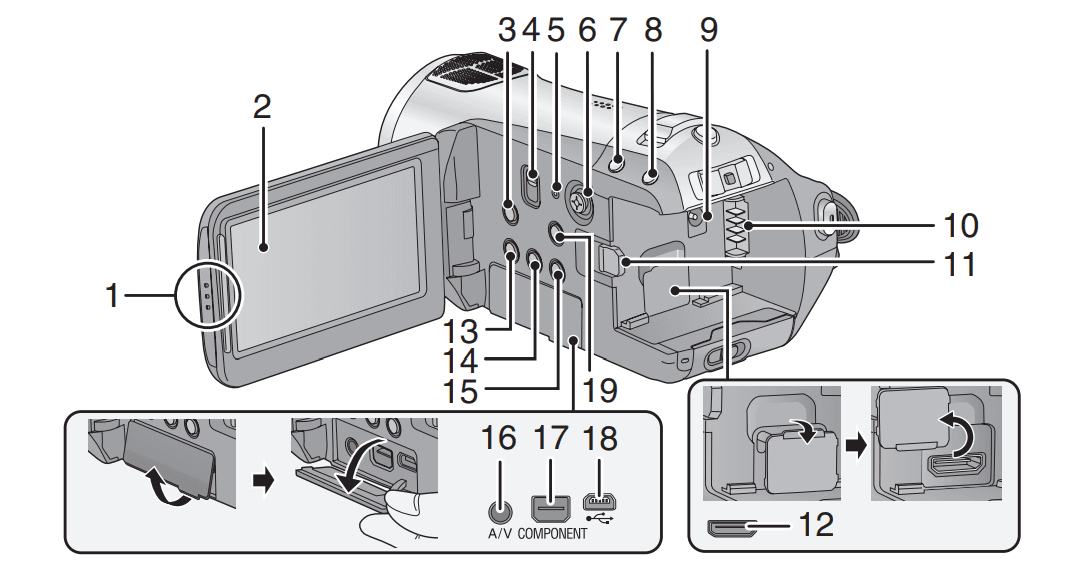
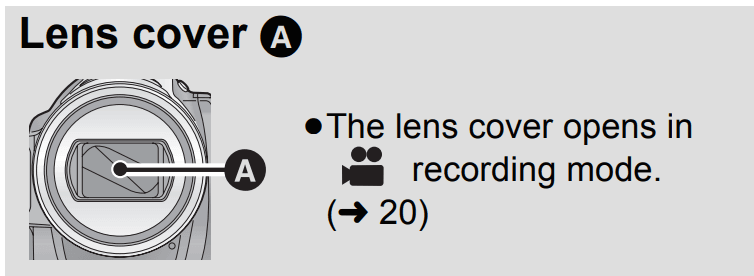
- LCD monitor open part
- LCD monitor (l 27)
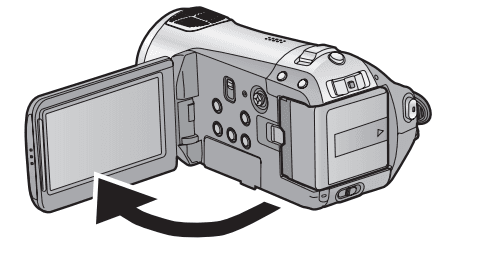
Pull the LCD monitor out in the direction of the arrow with your fingers.
- It can open up to 90°.

- It can rotate up to 180° A towards the lens or 90° B towards the opposite direction.
- It can open up to 90°.
- Optical image stabilizer button [ O.I.S.]
- Mode select switch [AUTO/MANUAL/FOCUS]
- Reset button [RESET]
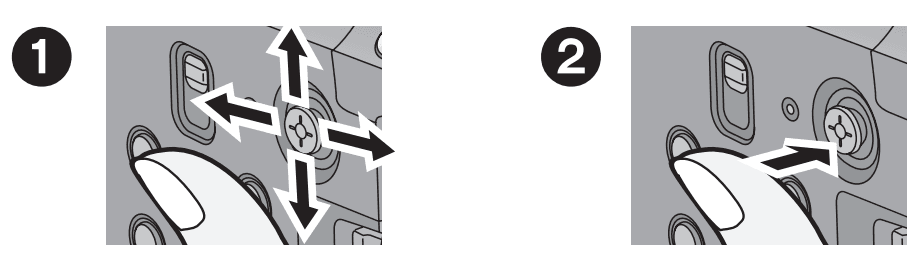
- Cursor button
Use the cursor button to select the recording functions and playback operations, and to operate the menu screen.
- Select by moving up, down, left, right.
- Set by pressing the center.
- Menu screen operations
- Select the recording functions
- To adjust manually
- Playback operations
- Face detection & AE button
- PRE-REC button [PRE-REC]
- DC input terminal [DC IN 9.3V]
- Battery holder
- Battery release lever [BATTERY]
- HDMI mini connector [HDMI]
- Disc copy button [DISC COPY]
- Power LCD Extra button
- [POWER LCD EXTRA]
- Delete button
- Audio-video output terminal [A/V]
- Use the supplied AV cable only.
- Component terminal [COMPONENT]
- USB terminal
- Menu button [MENU]

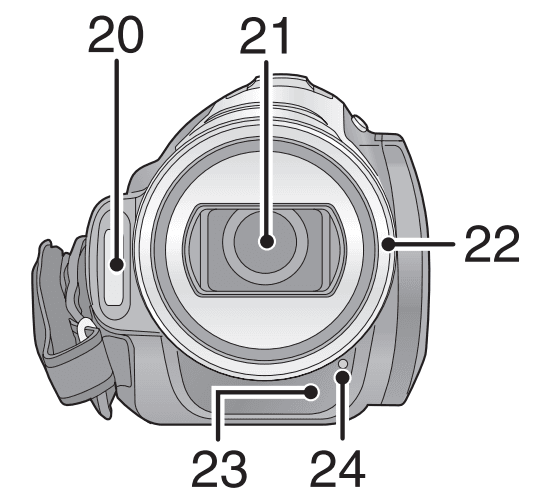
- Built-in flash
- Lens (LEICA DICOMAR)
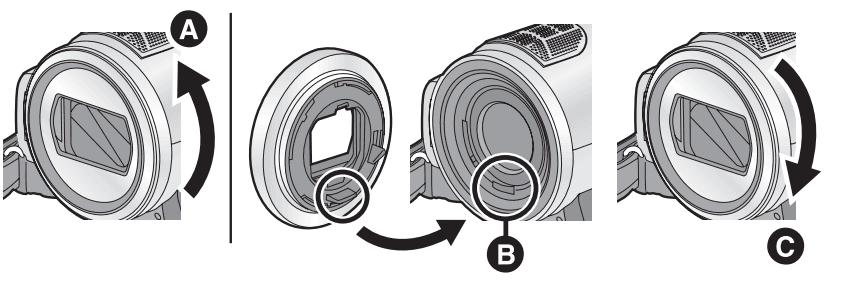
- Lens hood

Rotate the lens hood counter-clockwise A to remove it. In order to attach it, place it into slot B, and then rotate it clockwise C. Attach the MC protector or the ND filter of the Filter Kit (VW-LF37WE; optional) in front of the lens hood.
- When fitting the teleconversion lens (VW-T3714H; optional) or the wide conversion lens (VW-W3707H; optional), first remove the lens hood.
- Remote control sensor
- Recording lamp

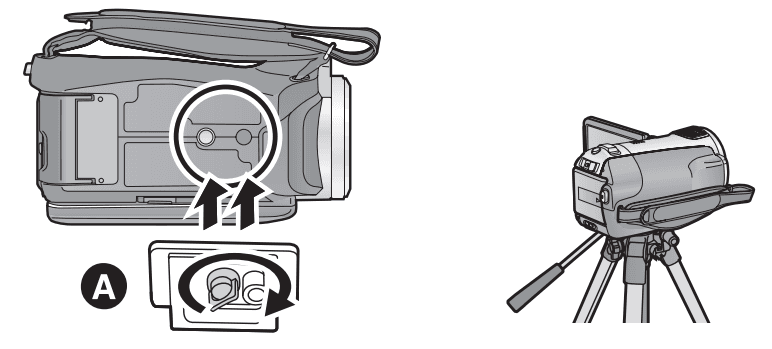
- Tripod receptacle
This is a hole for attaching the unit to the optional tripod. (For details on mounting the tripod, refer to the operating instructions for the tripod.)
- A Camera base

- A Camera base
- Mode switch
- Photoshoot button
- Zoom lever [W/T] (In recording mode)
Volume lever [sVOLr] (In playback mode) - Speaker
- Internal microphones (5.1 channel support)
- Status indicator
- Recording start/stop button
- Card access lamp [ACCESS]
- SD card open lever [SD CARD OPEN]
- Card slot
- SD card cover
- Shoulder strap fixture
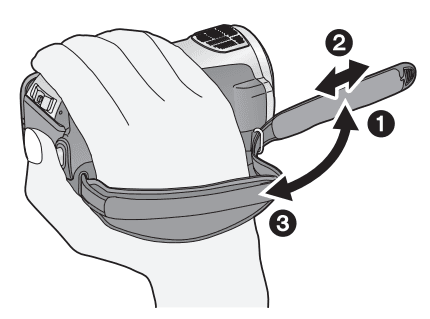
- Grip belt
Adjust the length of the grip belt so that it fits your hand.
- Flip the belt.
- Adjust the length.
- Replace the belt.

 Attach the MC protector or the ND filter of the Filter Kit (VW-LF37WE; optional) in front of the lens hood.
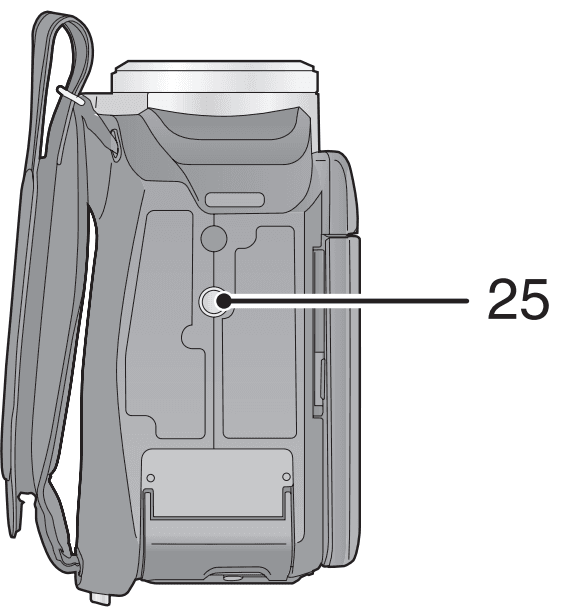
Remote control
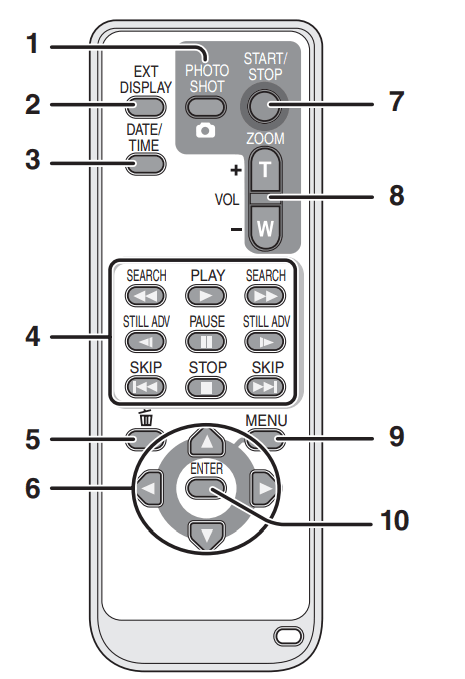
- Photoshoot button
- On-screen display button [EXT DISPLAY]
- Date/time button [DATE/TIME]
- Playback operation buttons
- Delete button
- Direction buttons
These buttons operate similarly to how the cursor button moves up/down/right/left on the unit. - Recording start/stop button [START/STOP]*
- Zoom/volume buttons [ZOOM, VOL]*
- Menu button [MENU]*
- Enter button [ENTER]
This button operates similarly to pressing the cursor button on the unit.
* means that these buttons function in the same manner as the corresponding buttons on the unit.
Remote control usable range
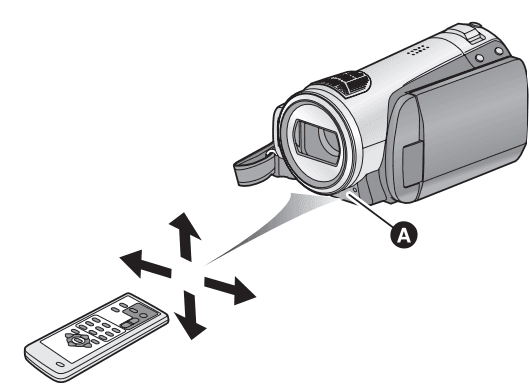
- A Remote control sensor
- Distance: Within approx. 5 m
- Angle: Approx. 10o up and 15o down, left, and right
- The remote control is intended for indoor operation. Outdoors or under strong light, the unit may not operate properly even within the usable ranges.
Power supply
About batteries that you can use with this unit
The Panasonic battery that can be used with this unit is VW-VBG130/VW-VBG260/VW-VBG6.
VW-VBG130/VW-VBG260/VW-VBG6 comes with a function to check whether the battery and unit can
be safely used together.
- To use the VW-VBG6 for this unit, the battery pack holder kit VW-VH04 (optional) is required.
- Batteries made by other companies that have been certified by Panasonic may be used with this unit, but we offer no guarantee as to the quality, performance or safety of such batteries.
- In order to safely use the unit, we recommend that you use genuine Panasonic batteries which have been tested by our quality control process.
- We cannot accept any liability whatsoever for damages to the unit or accidents caused by nongenuine Panasonic batteries (including those that have been certified by Panasonic).
- Exercise care when purchasing batteries. Many fake or imitation batteries have been found among those sold at unusually low prices and those that customers cannot check for themselves before purchasing.
Charging the battery
When this unit is purchased, the battery is not charged. Charge the battery before using this unit.
Important: If the DC cable is connected to the AC adaptor, then the battery will not charge. Remove the DC cable from the AC adaptor.
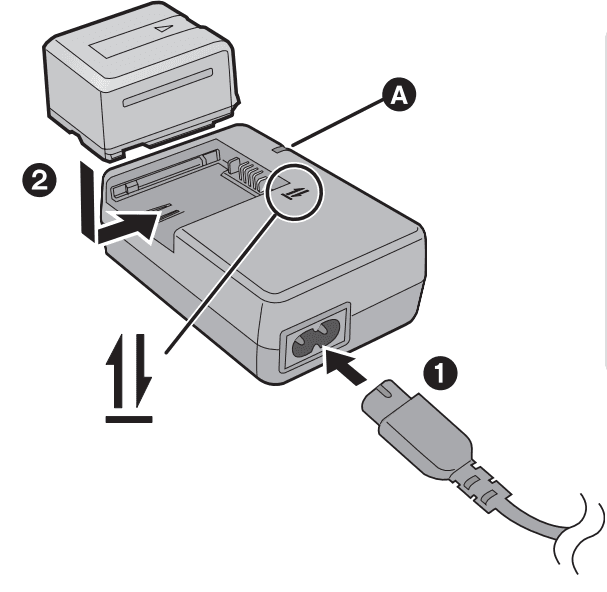
- Connect the AC cable to the AC adaptor and the AC outlet.
- Insert the battery into the battery charger by aligning the arrows.
- We recommend using Panasonic batteries.
- If you use other batteries, we cannot guarantee the quality of this product.
- Do not heat or expose to flame.
- Do not leave the battery(ies) in an automobile exposed to direct sunlight for a long period of time with doors and windows closed.
Charging and recording time
Temperature: 25 oC/humidity: 60%
- Charging time
Battery model number Voltage/capacity Charging time Supplied battery/ VW-VBG130 (optional) 7.2 V/1320 mAh 2 h 35 min VW-VBG260 (optional) 7.2 V/2640 mAh 4 h 40 min VW-VBG6 (optional)* 7.2 V/5800 mAh 9 h 25 min - Recording time
Battery model number Voltage/ capacity Maximum continuously recordable time Actual recordable time Supplied battery/ VW-VBG130 (optional) 7.2 V/1320 mAh 1 h 50 min 1 h 10 min VW-VBG260 (optional) 7.2 V/2640 mAh 3 h 30 min 2 h 10 min VW-VBG6 (optional)* 7.2 V/5800 mAh 8 h 35 min 5 h 20 min The battery pack holder kit VW-VH04 (optional) is necessary.
- These times are approximations.
- The indicated charging time is for when the battery has been discharged completely. The charging time may vary depending on how the battery has been used. The charging time for the battery in hot/ cold environments or a battery that has not been used for long time may be longer than normal.
- The actual recordable time refers to the recordable time when repeatedly starting/stopping recording, turning the unit on/off, moving the zoom lever etc.
- The recordable times will vary depending on the status of use. Be aware that the operating time of the battery will become shorter in low temperatures. We recommend charging a spare battery for use when recording.
- The batteries heat up after use or charging. This is not a malfunction.
- It is not necessary to consume the battery completely. The battery can be recharged even if some capacity remains.
Preparation of SD cards
Cards that you can use with this unit
| Card type | Capacity | Motion picture recording We recommend using SD cards conforming to Class 4 or higher of the SD Speed Class Rating* or the following SD cards made by Panasonic for motion picture recording. | Still picture recording |
| SD Memory Card | 8 MB 16 MB | Cannot be used. | Can be used. |
| 32 MB 64 MB 128 MB 256 MB 512 MB | Cannot be guaranteed in operation. The recording may suddenly stop during motion picture recording depending on the SD card you use. | ||
| 1 GB | RP-SDV01G | ||
| 2 GB | RP-SDV02G, RP-SDM02G | ||
| SDHC Memory Card | 4 GB | RP-SDV04G, RP-SDM04G | |
| 8 GB | RP-SDV08G | ||
| 16 GB | RP-SDV16G |
* The SD Speed Class Rating is the speed standard for successive writes.
- Please confirm the latest information about SD Memory Cards/SDHC Memory Cards that can
be used for motion picture recording on the following website.
http://panasonic.jp/support/global/cs/e_cam
(This website is in English only.) - 4 GB or more Memory Cards that do not have the SDHC logo is not based on Sthe D Memory
Card Specifications. - When the write-protect switch A on the SD card is locked, no recording, deletion, or editing will be possible on the card.

- Keep the Memory Card out of reach of children to prevent swallowing.

Using the menu screen
Basic camera positioning
- When you are outdoors, record pictures with the sunlight behind you. If the subject is backlit, it will
become dark in the recording. - When recording, make sure your footing is stable and there is no danger of colliding with another person or object.

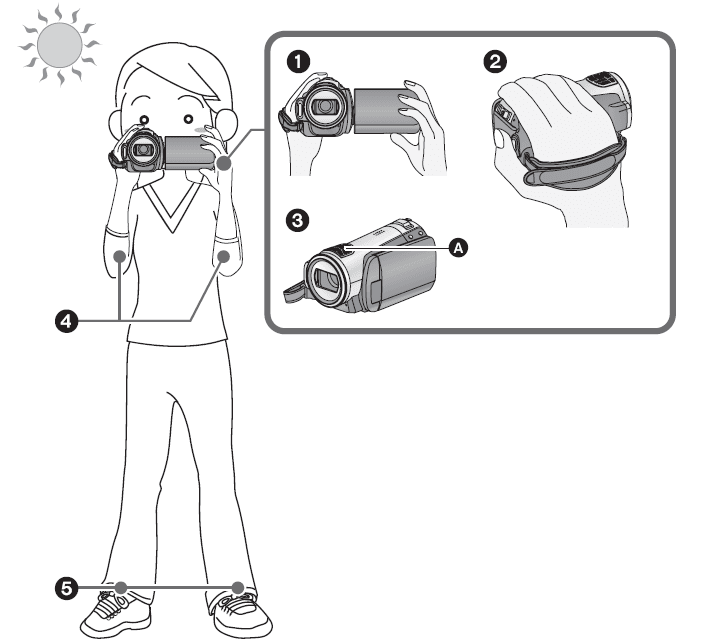
- Hold the unit with both hands.
- Put your hand through the grip belt.
- Do not cover the microphones A.
- Keep your arms near your body.
- Separate your legs for better balance.
Cautions for use
About this unit
The unit and the SD card become warm during use. This is not a malfunction. Keep the High Definition Video Camera as far away as possible from electromagnetic equipment (such as microwave ovens, TVs, video games etc.).
- If you use the High Definition Video Camera on top of or near a TV, the pictures and sound on the High Definition Video Camera may be disrupted by electromagnetic wave radiation.
- Do not use the High Definition Video Camera near cell phones because doing so may result in noise adversely affecting the pictures and sound.
- Recorded data may be damaged, or pictures may be distorted, by strong magnetic fields created by speakers or large motors.
- Electromagnetic wave radiation generated by microprocessors may adversely affect the High Definition Video Camera, disturbing the pictures and sound.
Do not use the unit for surveillance purposes or other business uses.
- This unit was designed for consumer intermittent use. It was not intended for continuous use or for any industrial or commercial application resulting in prolonged use.
- In certain situations, continuous use could cause the unit to overheat and cause a malfunction. Such use is strongly discouraged.
When you are not going to use the unit for an extended time
- When storing the unit in a cupboard or cabinet, it is recommended that you place a desiccant (silica gel) in with it.
About the AC adaptor
- If the temperature of the battery is extremely high or extremely low, charging may take time or the battery may not be charged.
- If the charging lamp keeps flashing, make sure that the terminals of the battery or the AC adaptor are not exposed to dirt, foreign objects or dust, then reconnect them properly. Disconnect the AC cable from the AC outlet when you remove dirt, foreign objects or dust on the terminals of the battery or the AC adaptor. If the charging lamp is still flashing, the temperature of the battery may be extremely high or extremely low or something may be wrong with the battery or AC adaptor. Contact your dealer.
- If you use the AC adaptor near a radio, radio reception may be disturbed. Keep the AC adaptor 1 m or more away from the radio.
- When using the AC adaptor, it may generate whirring sounds. However, this is normal.
- After use, be sure to disconnect the AC adaptor. (If it is left connected, a minute amount of current is consumed.)
- Always keep the electrodes of the AC adaptor and battery clean.
LCD monitor
- When the LCD monitor gets dirty, wipe it with a dry soft cloth.
- In a place with drastic temperature changes, condensation may form on the LCD monitor. Wipe it with a soft dry cloth.
- When the unit has become very cold, for example, due to storage in a cold area, its LCD monitor will be slightly darker than usual immediately after the power is turned on. The normal brightness will be restored when the unit’s internal temperature rises.
Functions that cannot be used simultaneously
Some functions in this unit are disabled or cannot be selected due to the unit’s specifications. The table below shows examples of functions restricted by various conditions.
| Functions | Conditions which disable the functions |
| Motion picture recording | • When the HD hi-speed burst shooting mode is on |
| PRE-REC | |
| Zoom | • When the button is pressed halfway |
| Digital zoom | • When 25p digital cinema is used • When the HD hi-speed burst shooting mode is on |
| Face detection & AE mode | • When the colour night view function is used • When the colour bars are displayed |
| Backlight compensation | • When the colour night view function is used • When the iris/gain is set |
| Intelligent contrast control | |
| Low light | • When the colour night view function is used • When the scene mode is used • When the HD hi-speed burst shooting mode is on |
| Colour night view (Set and cancel) | • While recording • When PRE-REC is used |
| Soft skin mode (Set and cancel) | |
| Tele macro (Set and cancel) | |
| Help mode | |
| Fade | • When PRE-REC is used • When the HD hi-speed burst shooting mode is on |
| Colour night view | • When 25p digital cinema is used • When the HD hi-speed burst shooting mode is on |
| Guide lines | • When the face detection & AE mode is used |
| 25p digital cinema | • When the motion picture recording mode is HX/HE • When the digital zoom is set to [25k] or [700k] |
| HD hi-speed burst shooting mode | • When the digital zoom is set to [25k] or [700k] |
| Shutter sound | • While recording motion pictures • When PRE-REC is used |
| Functions | Conditions which disable the functions |
| Flash | • While recording motion pictures • When PRE-REC is used • When the colour night view function is used • When the HD hi-speed burst shooting mode is on |
| Auto slow shutter | • When the HD hi-speed burst shooting mode is on |
| Digital cinema colour | • When the colour night view function is used • When the HD hi-speed burst shooting mode is on |
| Scene mode | • When the low light mode is used • When setting the AUTO/MANUAL/FOCUS switch to AUTO • When the colour night view function is used • When the HD hi-speed burst shooting mode is on |
| MF assist function | • When digital zoom (10k or higher) is used |
| Change of white balance | • When digital zoom (10k or higher) is used • When the colour night view function is used |
| Adjusting the shutter speed, iris/gain | • When the colour night view function is used • When the low light mode is used • When the scene mode is used • When the HD hi-speed burst shooting mode is on |
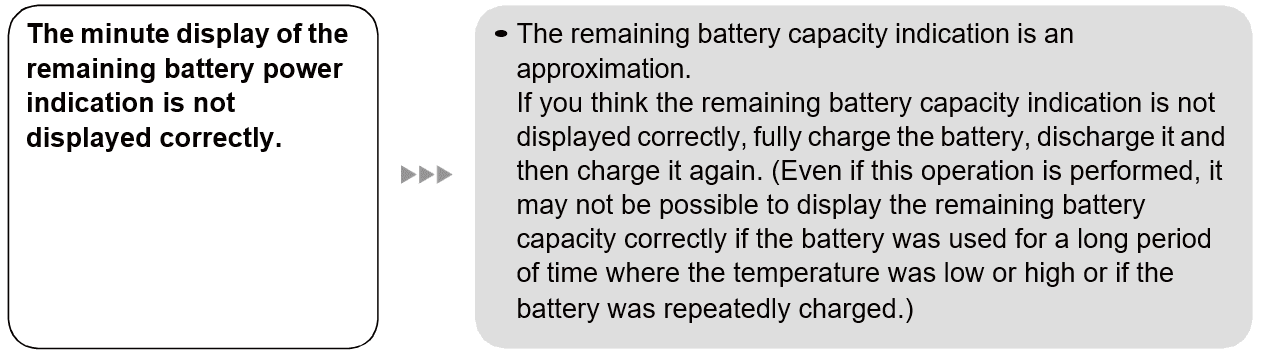
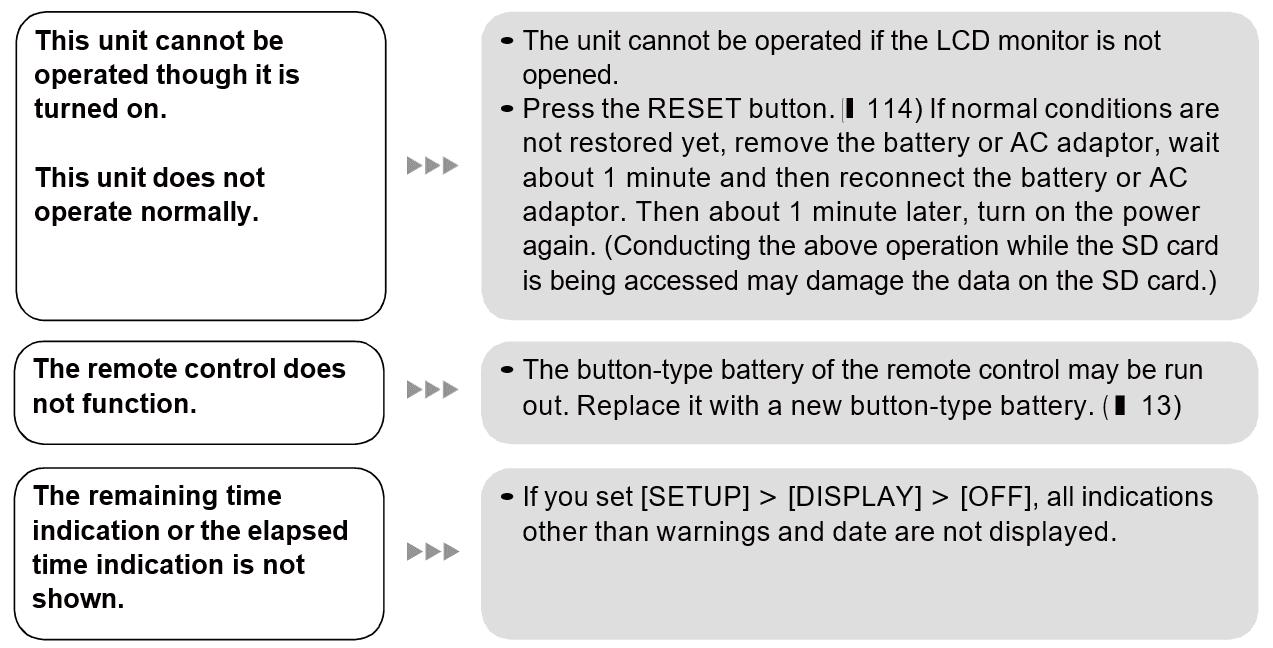
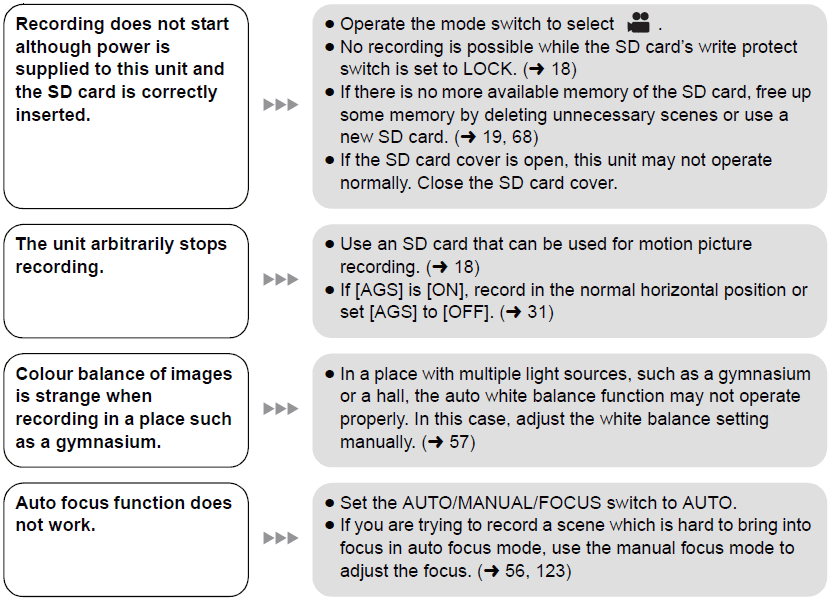
Troubleshooting

Specifications
High-Definition Video Camera
Information for your safety
| Signal system | 1080/50i |
| Recording format | AVCHD format compliant |
| Image sensor | 1/6z 3CCD image sensor Total: 560 Kk3 Effective pixels: Motion picture: 520 Kk3 Still picture: 520 Kk3 |
| Lens | Auto Iris, F1.8 to F2.8 Focal length: 3.0 mm to 30.0 mm Macro (Full range AF) |
| Filter diameter | 37 mm |
| Zoom | 10k optical zoom, 25k/700k digital zoom |
| Monitor | 2.7z wide LCD monitor (approx. 300 K pixels) |
| Microphone | 5.1 channel surround microphone (with a zoom microphone/focus microphone function) |
| Speaker | 1 round speaker ‰ 20 mm |
| White balance adjustment | Auto-tracking white balance system |
| Standard illumination | 1,400 lx |
| Minimum required illumination | Approx. 5 lx (1/25 in low light mode) Approx. 1 lx with the colour night view function |
| A/V terminal video output level | 1.0 Vp-p, 75 h, PAL system |
| Component terminal video output level | Y: 1.0 Vp-p, 75 h Pb: 0.7 Vp-p, 75 h Pr: 0.7 Vp-p, 75 h |
| HDMI mini connector video output level | HDMI™ (x.v.Colour™) 1125i (1080i)/625p (576p) |
| A/V terminal audio output level (Line) | 316 mV, 600 h, 2 ch |
| HDMI mini connector audio output | 5.1 ch (AC3)/2 ch (Linear PCM) |
| USB | Card reader function (No copyright protection support) Hi-Speed USB (USB 2.0), USB terminal Type Mini AB PictBridge-compliant |
| Flash | Available range: Approx. 1.0 m to 2.5 m |
| Dimensions | 65 mm (W)k67 mm (H)k126 mm (D) (excluding projecting parts) |
| Mass | Approx. 275 g (without supplied battery and an SD card*) |
| Mass in operation | Approx. 337 g (with supplied battery and an SD card*) |
| Operating temperature | 0 °C to 40 °C |
| Operating humidity | 10% to 80% |
| Battery operation time | See page 16 |
* SD card is supplied only for HDC-SD9D.
Motion pictures
| Recording media | SD Memory Card: 1 GB, 2 GB (FAT12 and FAT16 system compliant) SDHC Memory Card: 4 GB, 8 GB, 16 GB (FAT32 system compliant) |
| Compression | MPEG-4 AVC/H.264 |
| Recording mode and transfer rate | HA: Approx. 17 Mbps (VBR) HG: Approx. 13 Mbps (VBR) HX: Approx. 9 Mbps (VBR) HE: Approx. 6 Mbps (VBR) Refer to page 34 for the recordable time. |
| Picture size | HA/HG: 1920k1080/50i, 1920k1080/25p HX: 1920k1080/50i HE: 1440k1080/50i |
| Audio compression | Dolby Digital (Dolby AC3)/5.1 ch |
Still pictures
| Recording media | SD Memory Card: 8 MB, 16 MB, 32 MB, 64 MB, 128 MB, 256 MB, 512 MB, 1 GB, 2 GB (FAT12 and FAT16 system corresponding) SDHC Memory Card: 4 GB, 8 GB, 16 GB (FAT32 system corresponding) |
| Compression | JPEG (Design rule for Camera File system, based on Exif 2.2 standard), DPOF corresponding |
| Picture size | 1920k1080 Refer to page 39 for the number of recordable pictures. |
For more manuals by Panasonic, visit ManualsLibraryy
Panasonic HDC-SD9D Full HD Camcorder-FAQs
How do I connect my Panasonic camcorder to my computer?
You can either:
1. Remove the SD card and insert it directly into your computer.
2. Use a micro USB to USB cable for data transfer. If using a USB cable, select “PC” on the LCD monitor when prompted.
How do I check if my Panasonic camcorder is charging?
A green indicator light will turn on while charging and will switch off once the battery is fully charged.
Why won’t my camcorder turn on?
The battery may need to be replaced. If using a different battery does not resolve the issue, servicing may be required.
How can I transfer camcorder tapes to a computer?
Connect your camcorder to your computer using a USB or AV cable. Then, use video capture software to convert and save the footage to your computer, an external drive, or the cloud.
What is the best software for capturing video from a camcorder?
1. Overall best: Riverside
2. For PC: OBS (Windows & Mac), Camtasia (Windows)
3. For Mac: QuickTime
4. For mobile: Blackmagic Camera App, ProShot
Can I use my camcorder without a battery?
Yes, you can use the supplied AC adapter to power the camcorder directly from a wall outlet.
Why is my camcorder screen black?
If the LCD screen goes dark when adjusted, there may be a wiring issue between the screen and the camcorder body. In this case, professional repair may be needed.
Can camcorder tapes be converted to USB?
Yes, camcorder tapes can be converted to USB, DVD, or cloud storage. Services are available for Hi8, Mini DV, and Video 8 formats.