![]()
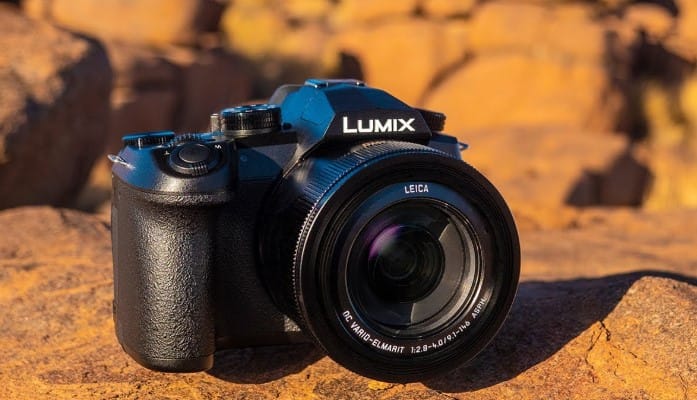
Panasonic LUMIX FZ1000 II Digital Camera

WARNING
To reduce the risk of fire, electric shock or product damage,
- Do not expose this unit to rain, moisture, dripping or splashing.
- Use the recommended accessories.
- Do not remove covers.
- Do not repair this unit by yourself. Refer servicing to qualified service personnel.
About the battery pack
CAUTION
Battery pack (Lithium ion battery pack)
- Use the specified unit to recharge the battery pack.
- Do not use the battery pack with equipment other than the specified unit.
- Do not get dirt, sand, liquids, or other foreign matter on the terminals.
- Do not touch the plug terminals (+ and −) with metal objects.
- Do not disassemble, remodel, heat or throw into fire.
If any electrolyte should come into contact with your hands or clothes, wash it off thoroughly with water.
If any electrolyte should come into contact with your eyes, never rub the eyes. Rinse eyes thoroughly with water, and then consult a doctor.
CAUTION
- Danger of explosion if battery is incorrectly replaced. Replace only with the type recommended by the manufacturer.
- When disposing of the batteries, please contact your local authorities or dealer and ask for the correct method of disposal.
- Do not heat or expose to flame.
- Do not leave the battery(ies) in a car exposed to direct sunlight for a long period of time with doors and windows closed.
Warning
Risk of fire, explosion and burns. Do not disassemble, heat above 60 °C (140 °F) or incinerate.
About the AC adaptor (supplied)
CAUTION!
To reduce the risk of fire, electric shock or product damage,
- Do not install or place this unit in a bookcase, built-in cabinet or in another confined space. Ensure this unit is well ventilated.
Cautions for Use
- Do not use any other USB connection cables except the supplied one.
- Use a “High Speed HDMI micro cable” with the HDMI logo. Cables that do not comply with the HDMI standards will not work. “High Speed HDMI micro cable” (Type D – Type A plug, up to 2 m (6.6 feet) long)
- Always use a genuine Panasonic shutter remote control (DMW-RS2: optional).
- Do not use the Stereo microphone cables with the length of 3 m (9.8 feet) or more.
- To clean your camera, remove the battery, the DC coupler (DMW-DCC8: optional) or a card, or disconnect the power plug from the outlet, and wipe with a soft, dry cloth.
- Do not press the monitor with excessive force.
- Do not press the lens with excessive force.
- Do not allow camera to come into contact with pesticides or volatile substances (can cause surface damage or coating to peel).
- Do not keep rubber or plastic products in contact with the camera for a long period of time.
- Do not use solvents such as benzine, thinner, alcohol, kitchen detergents, etc., to clean the camera, since it may deteriorate the external case or the coating may peel off.
- Do not leave the camera with the lens facing the sun, as rays of light from the sun may cause it to malfunction.
- Always use the supplied cords and cables.
- Do not extend the supplied cord or cable.
- While the camera is accessing the card (for an operation such as picture writing, reading, deletion, or formatting), do not turn off the camera or remove the battery, card, AC adaptor (DMW-AC10PP: optional) or DC coupler (DMW-DCC8: optional). Furthermore, do not subject the camera to vibration, impact or static electricity.
- The data on the card may be damaged or lost due to electromagnetic waves, static electricity or breakdown of the camera or the card. We recommend storing important data on a PC etc.
- Do not format the card on your PC or other equipment. Format it on the camera only to ensure proper operation.
- The battery is not charged when the camera is shipped. Charge the battery before use.
- The battery is a rechargeable lithium ion battery. If the temperature is too high or too low, the operating time of the battery will become shorter.
- The battery becomes warm after using and during and after charging. The camera also becomes warm during use. This is not a malfunction.
- Do not leave any metal items (such as clips) near the contact areas of the power plug or near the batteries.
- Store the battery in a cool and dry place with a relatively stable temperature.
(Recommended temperature: 15 °C to 25 °C (59 °F to 77 °F), Recommended humidity: 40%RH to 60%RH). - Do not store the battery for a long time while fully charged. When storing the battery for a long period of time, we recommend charging it once a year. Remove the battery from the camera and store it again after it has completely discharged.
Before use
Camera handling
Keep the camera away from excessive vibration, force, or pressure.
Avoid using the camera under the following conditions, which may damage the lens, monitor, viewfinder, or camera body. This may also cause the camera to malfunction or prevent recording.
- Dropping or hitting the camera against a hard surface.
- Pushing with excessive force on the lens or monitor.
The camera is not dust resistant, splash resistant, or waterproof.
Avoid using the camera in places with excessive dust or sand, or where water can come into contact with the camera.
If sand, dust, or liquids such as water droplets adhere to the monitor, wipe them off with a dry soft cloth.
Condensation (When the lens, the monitor, or viewfinder, is fogged up)
- Condensation may occur when the camera is exposed to sudden changes of temperature or humidity. Avoid these conditions, which may make the lens, monitor, or viewfinder dirty, cause mold, or damage the camera.
- If condensation does occur, turn off the camera and wait about two hours before using it. Once the camera adjusts to the surrounding temperature, the fogging will clear naturally.
Standard accessories
Check that all the accessories are supplied before using the camera. Part numbers are as of February 2019. These may be subject to change.

- Cards are optional. (SD Memory Card, SDHC Memory Card and SDXC Memory Card are indicated as card in the text.)
(For U.S.A. only)
- If accessories are lost, customers can visit us at http://shop.panasonic.com/support for further information about obtaining replacement parts.
(For Canada only)
- If any accessories are lost, customers in Canada should visit our support page at www.panasonic.ca/english/support for further information about obtaining replacement parts.
Digital Camera Accessory System
Description | Accessory# |
| Battery pack | DMW-BLC12 |
| Battery charger | DMW-BTC12 |
| AC adaptor* | DMW-AC10 |
| DC coupler* | DMW-DCC8 |
| Flash | DMW-FL200L, DMW-FL360L, DMW-FL580L |
| Shutter remote control | DMW-RS2 |
| LED video light | VW-LED1 |
| Stereo shotgun microphone | DMW-MS2 |
| Stereo microphone | VW-VMS10 |
| MC protector | DMW-LMCH62 |
| PL filter (Circular type) | DMW-LPL62 |
| Shoulder Strap | DMW-SSTG9 |
To order optional accessories please visit http://shop.panasonic.com or your local Photo Specialty Dealer.
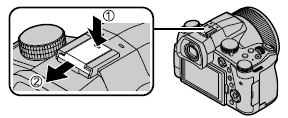
Removing the Hot Shoe Cover
Remove the hot shoe cover by pulling it in the direction indicated by arrow 2 while pressing it in the direction indicated by arrow 1.
Names and Functions of Main Parts

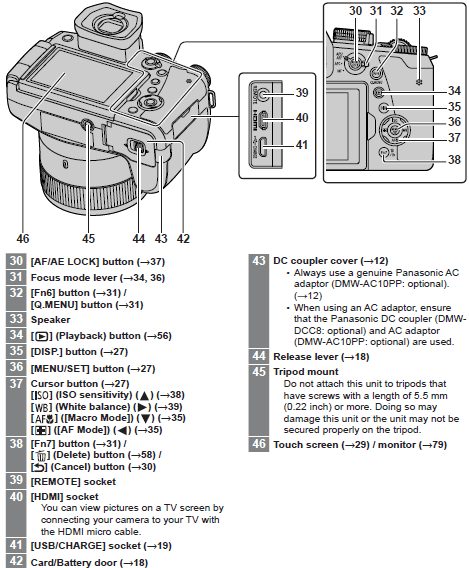
Function buttons [Fn9] to [Fn13] are touch icons. They can be displayed by touching the [Fn] tab on the recording screen.
About the Card
| Type of Card | Capacity | Notes |
| SD Memory Cards | 512 MB – 2 GB | • This unit is compatible with UHS-I UHS Speed Class 3 standard SDHC/SDXC memory cards. • Operation of the cards listed on the left has been confirmed with Panasonic brand card. |
| SDHC Memory Cards | 4 GB – 32 GB | |
| SDXC Memory Cards | 48 GB – 128 GB |
About motion picture/4K photo recording and speed class ratings
Use a card that meets the following ratings of the SD Speed Class or UHS Speed Class.
- SD Speed Class and UHS Speed Class are the speed standards regarding continuous writing. Confirm the SD speed by checking the card label or other card related materials.

Latest information:https://panasonic.jp/support/global/cs/dsc/ (This site is available in English only.)
Quick Start Guide
Attaching the Lens Cap
Cover the lens with the lens cap to protect it when you are not taking pictures.
- Do not hang or swing around the camera with the lens cap string.
- Make sure to detach the lens cap when turning this unit on.
- Be careful that the lens cap string does not become entangled with the shoulder strap.
- Use the lens cap string (supplied) to attach the lens cap to the camera

- Attach the lens cap
(A) Pinch here to attach or detach the cap. 
- Keep the lens cap string out of reach of children to prevent swallowing.
Attaching the Shoulder Strap

Perform steps 1 to 6 and then attach the other side of the shoulder strap.
- Use the shoulder strap around your shoulder.
– Do not wrap the strap around your neck. It may result in injury or accident. - Do not leave the shoulder strap where an infant can reach it.
– It may result in an accident by mistakenly wrapping around the neck.
- Use the shoulder strap around your shoulder.
Attaching the Lens Hood
- Do not hold the lens hood in such a way that it will be bent.
- Make sure that the camera is turned off.
- Be sure to close the flash beforehand.

- Align the mounting mark on the lens hood a little above the mounting mark on the tip of the lens(A) Mounting mark on the tip of the lens(B) Mounting mark on the lens hood

- Turn the lens hood in the direction of the arrow to secure it
- Continue to rotate the lens hood until you hear a “click” even if you feel some stiffness, and then align the mark on the bottom of the camera
Make sure the lens hood is secured properly and its reflection does not fall on images.
(C) Rotate until the marks are aligned
- If you attach the lens hood while using the flash, the flash light would be blocked by the lens hood causing the bottom part of images to be darkened (vignetting) and also making it impossible to modulate the light. It is recommended to remove the lens hood before using the flash.
- Temporarily Storing the Lens Hood.

Inserting the battery and/or SD memory card (optional)

Make sure that the camera is turned off.
- Slide the release lever (A) to the [OPEN] position and open the card/battery door
- Insert the battery and card, making sure that their orientation is correct
Battery: Insert the battery all the way firmly and check that it is locked by lever (B).
 Card: Insert the card all the way firmly until it clicks. Do not touch the terminal.
- Close the door
Slide the release lever to the [LOCK] position.
To remove

To remove battery
Move lever (B) in direction of arrow

To remove card
Press the center of the card.
- Always use genuine Panasonic batteries (DMW-BLC12PP).
- If you use other batteries, we cannot guarantee the quality of this product.
- Turn the camera off and wait for the “LUMIX” display on the monitor to clear before removing the card or battery.
Charging the battery
- The battery that can be used with this unit is DMW-BLC12PP.
- We recommend charging in a location where the ambient temperature is between 10 °C and 30 °C (50 °F to 86°F) (same for the battery temperature).
Insert the battery into the camera. Make sure that the camera is turned off.

Charging from the power outlet
Connect the AC adaptor (supplied) and this camera with the USB connection cable (supplied), and insert the AC adaptor (supplied) into the power outlet.
Charging from a computer
Connect the computer and this camera with the USB connection cable (supplied).
Charging lamp indication

Opening the Monitor

- Place your finger in the cleft on the right side of the monitor and open the monitor toward the left side (maximum 180°)
- It can be rotated 180° to the direction of the lens
- Return the monitor to its original position
Setting the clock
The clock is not set when the camera is shipped.
- Turn the camera on
- Press [MENU/SET]
- Press up, down arrow to select the language and press [MENU/SET]
- Press [MENU/SET]
- Press left, right arrow to select the items (year, month, day, hour, minute), and press up, down arrow to set
- Press [MENU/SET]
- When [The clock setting has been completed.] is displayed, press [MENU/SET]

- When [Please set the home area] is displayed, press [MENU/SET]
- Press to set your home area and press [MENU/SET]
[LVF] button (Recording pictures using the viewfinder)

Automatic switching between viewfinder and monitor
The eye sensor (B) automatically switches the display to viewfinder when your eye or an object moves close to the viewfinder. When the eye or object moves away from the viewfinder, the camera returns to monitor display.
About diopter adjustment
Rotate the diopter adjustment dial to adjust until you are able to clearly see the characters displayed in the viewfinder.
- If [LVF Display Speed] is set to [ECO 30fps] when the viewfinder is used, the camera can be operated for a longer period since battery drainage is reduced.
Shutter button (Taking pictures)
- Set mode dial to [iA]
The camera automatically optimizes the main settings.
For details on the recording modes, refer to (→25).![]()
- Press the shutter button halfway (press lightly) to focus on the subject
(A) Shutter speed
(B) Aperture value
(C) Focus display (Green)
( When focus is aligned: illuminated, When focus is not aligned: flashing)
- Press the shutter button fully (push the button all the way), and take the picture

Pictures can be taken only when the image is correctly focused as long as the [Focus/Release Priority] is set to [FOCUS].
Check the picture you have taken
Press the Playback button.
Basic operations
Zoom lever (Use zoom)

Mode dial (Select the recording mode)

- Set to the desired recording mode
Rotate the mode dial slowly to select the desired mode.

Front dial/Rear dial
Rotating
Selection of items or setting of values is performed during the various settings.
- (A) Front dial
- (B) Rear dial

During recording
You can switch the viewfinder/monitor display method.

- Live View Finder style display layout (Example of viewfinder style display)

- Monitor style display layout (Example of monitor style display)
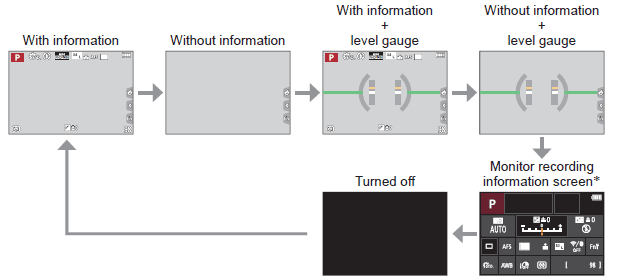
This screen is displayed only when [Monitor Info. Disp.] in the [Custom] ([Monitor / Display]) menu is set to [ON]. Settings can be adjusted directly by touching each of the items displayed on the screen.
Taking pictures with automatic settings (Intelligent Auto Mode)
This mode is recommended for those who want to point and shoot as the camera optimizes settings to match the subject and recording environment.
- Set mode dial to [iA]

At the time of purchase, the mode is set to Intelligent Auto Plus Mode.
- Point the camera at the subject
When the camera identifies the optimal scene, the icon switches to the one for that scene. (Automatic Scene Detection)
Taking pictures with Auto Focus
Set the focusing operation to be performed when the shutter button is pressed halfway.
- Set the focus mode lever to [AFS/AFF] or [AFC]
- It is fixed to [AFS] when Panorama Shot Mode is set.
| Settings | The movement of the subject and the scene | |
|
[AFS/AFF] | [AFS] (Auto Focus Single) | Subject is still (Scenery, anniversary photograph, etc.) Focus is set automatically when the shutter button is pressed halfway. Focus will be fixed while it is pressed halfway. |
| [AFF] (Auto Focus Flexible) | Movement cannot be predicted (Children, pets, etc.) If the subject moves while the shutter button is pressed halfway, the focus is corrected to match the movement automatically.* | |
| You can switch the setting with [AFS/AFF] in the [Rec]/[Motion Picture] menu. | ||
| [AFC] (Auto Focus Continuous) | Subject is moving (Sport, trains, etc.) While the shutter button is pressed halfway, focusing is constantly performed to match the movement of the subject.* | |
Taking close-up pictures (Macro recording)
This mode allows you to take close-up pictures of a subject, e.g. when taking pictures of flowers.
- Press [AF Macro] button (down)
- Press right, left to select the item and press [MENU/SET]

Selecting a Drive Mode ([Burst] / [Self Timer]
You can switch the operation to be performed when you press the shutter button.
Rotating the drive mode dial

Taking pictures with self-time

Adjusting the focus after recording ([Post Focus] / [Focus Stacking])
You can record 4K burst pictures while changing the focus point and then select a focus point after recording. This function is best for non-moving subjects.
- To record pictures, use a UHS Speed Class 3 card.
- We recommend using a tripod to perform [Focus Stacking].
- During recording, the angle of view will be narrower.
- Set the drive mode dial to

- Determine the composition and press the shutter button halfway

Auto Focus activates and automatically detects the focus point on the screen. (While the shutter button pressed halfway, shake may be seen on the screen.)
If there is no focus point on the screen, the Focus indicator (A) blinks and you cannot record.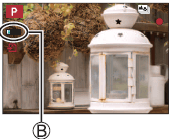
- Press the shutter button fully to start recording
The focus point changes automatically while recording. When the recording progress bar (B) disappears, recording automatically ends.
- The data will be saved as a single file in the MP4 format.
- If [Auto Review] is set, a screen will automatically appear that lets you select the focus point.
Taking Pictures with Time Lapse Shot/Stop Motion Animation

You can take pictures with Time Lapse Shot or Stop Motion Animation.
- The pictures are recorded as a set of group pictures.
- Complete the date and time settings in advance.
Taking pictures automatically at set intervals [Time Lapse Shot]
The camera can automatically take pictures of subjects such as animals or plants as time elapses and create a motion picture.
- Set the drive mode dial to [Time lapse]
- Set the menu

- Press the shutter button halfway to exit the menu
- Focus on the subject and take a picture
For more manuals by Panasonic, visit ManualsLibraryy
Panasonic LUMIX FZ1000 II Digital Camera-FAQs
Is the Panasonic LUMIX FZ1000 II a good camera?
Yes, it offers SLR-style design with a versatile zoom lens, eliminating the need to carry multiple lenses. It is a strong competitor to the Sony RX10 for those looking for an all-in-one camera.
How do I turn on my LUMIX camera?
1. Insert the SD card into the slot located under the camera next to the battery.
2. Open the viewfinder and press the power button to turn it on.
What is the battery life of the FZ1000 II?
The rechargeable lithium-ion battery provides approximately 360 shots per charge (CIPA-rated), including 50% flash usage.
Is the Panasonic LUMIX FZ1000 II a professional camera?
While not a full professional model, it offers advanced features suitable for filmmakers and photographers, with a lightweight, mirrorless design.
Does the LUMIX FZ1000 II have a touchscreen?
No, the rear LCD monitor is not touch-sensitive. Menu navigation and settings are controlled through buttons and dials.
Where are Panasonic LUMIX cameras made?
Panasonic cameras are designed in Japan and manufactured in China. If purchased from an authorized LUMIX dealer, it is a genuine product.
Does the LUMIX FZ1000 II have Bluetooth?
Yes, it features Bluetooth connectivity for seamless pairing with smart devices, along with an improved 3-inch touchscreen.
Is the LUMIX FZ1000 II good for beginners?
For beginners, the LUMIX G100 is a better option as it is more compact and beginner-friendly. The FZ1000 II is ideal for those wanting advanced features with an easy-to-use interface.
Why is my LUMIX camera screen black?
The camera has a power-saving feature that turns off the LCD after inactivity. Press the shutter button to reactivate the screen.

