
Peavey PV i6500 Mixer Amplifier
FEATURES
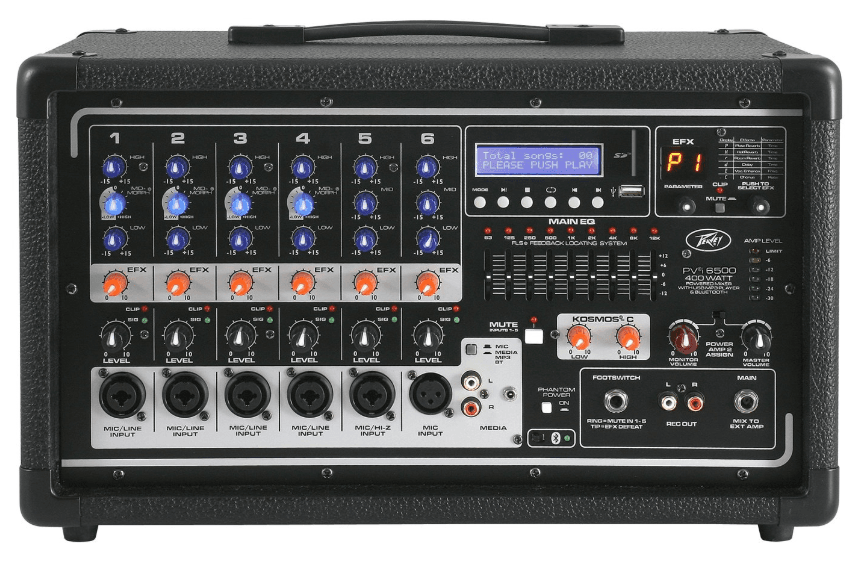
- FLS Feedback Locating System
- Mid-Morph EQ
- Kosmos-C
- On-board 24-bit digital effects with mute button
- Digital effects parameter control
- Combination XLR and 1/4” input jacks
- 9-Band Graphic EQ with FLS
- Master Mute for channels 1-5
- Foot switchable effects defeat
- 15 Volt Phantom Power
- RCA, 1/8” Media input
- Selectable Main or Monitor dual power section
- RCA Record outputs
- LED Meter bridge
- Power amp sub-sonic filtering
- Clip light and signal presence indicator
- Main line level 1/4” output
- DDT™ Speaker protection circuit
- SD card & USB MP3 player
- Bluetooth® player
VENTILATION: For proper ventilation, allow 6” (15.5 cm) clearance on all sides.
Channel Strip
CHANNEL CONTROLS
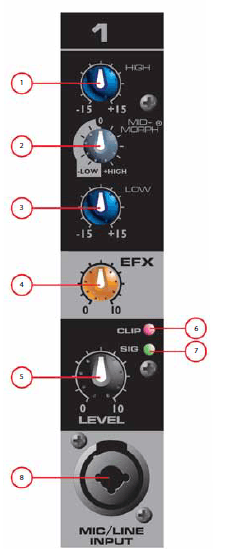
HIGH EQ
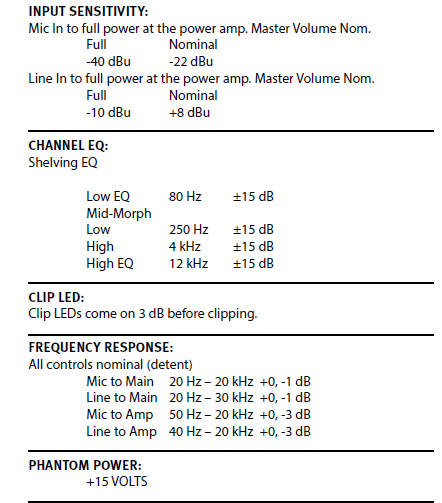
This High EQ shelving type of active tone control varies the treble frequencies (+/- 15dB at 12kHz) and is designed to remove noise or add brilliance to the signal, depending on the quality of the source.
MID-MORPH® EQ
Where most mid-range controls work at just one frequency, the Mid-Morph works at two. When turned counterclockwise, it cuts at 250 Hz to reduce frequencies that muddy the sound. When turned clockwise, it boosts at 4 kHz to add intelligibility to vocals. Either way, improved vocal or instrument definition can be achieved.
LOW EQ
A shelving type of EQ that varies the bass frequency levels (+/- 15dB at 80Hz). Low EQ adds depth to thin-sounding signals or cleans up the muddy ones. As with any EQ, use sparingly. Too much of this EQ can give you a booming bottom end.
EFX – DIGITAL EFFECTS
This control adjusts the level of the channel signal added to the effects mix. The signal is sent to the internal effects processor. Turning the knob to the left (0) will turn off effects on the associated channel, while turning the knob to the right will increase the amount of the selected effect.
LEVEL
This control sets the signal level sent to the main mix.
CLIP
When this LED turns or blinks red, it is an indication that the signal coming into the channel is too strong, potentially causing distortion. Turn down the Level control (5) until the Clip light is no longer present. If you are having difficulty getting a clean signal, try varying the output of the connected device.
SIG
When this LED is green, it is an indication the mixer is receiving signal at the input of the channel. If you are having trouble getting sound out of the mixer and this LED is not on, check the microphone, instrument or cable that is connected to the channel.
MIC/LINE INPUT
This combination input jack can accept either a 1/4” (balanced or unbalanced) input or an XLR balanced, low impedance connection. The tip is positive on the 1/4” balanced input, and pin 2 is positive on the XLR.
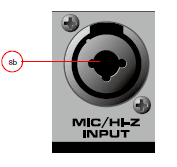
MIC/HI Z INPUT
Channel 5 line input is a Hi-Z unbalanced input for use with high impedance microphones, acoustic/electric guitars or other high impedance sources equipped with a 1/4″ plug (TS).
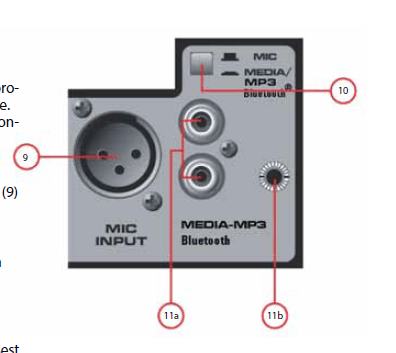
XLR BALANCED INPUT
Channel 6 is designed specifically for pre-recorded (program) music, but can also be used with a microphone. This XLR input provides a balanced low impedance connection.
MIC OR MEDIA SELECT BUTTON
This control selects between the low impedance XLR (9) and the RCA / 1/8”, or USB MP3/Bluetooth® input . 11a/11b. MEDIA INPUT These RCA and 1/8” inputs accept a stereo input from the output of an MP3 player, CD player, tape deck or other similar device.
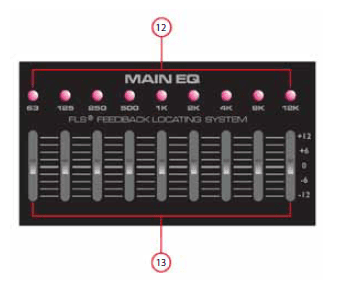
FLS®
When feedback occurs, the LED of the frequency closest to the frequency that is feeding back will illuminate over the slider to be adjusted. Slowly bring the corresponding slider down until feedback is gone. The LED will remain illuminated for a few seconds after the feedback is gone.
GRAPHIC EQ
These 9-band EQs are designed for 12dB cut or boost. These EQs are used to make minor adjustments to the overall mix and should be used sparingly.
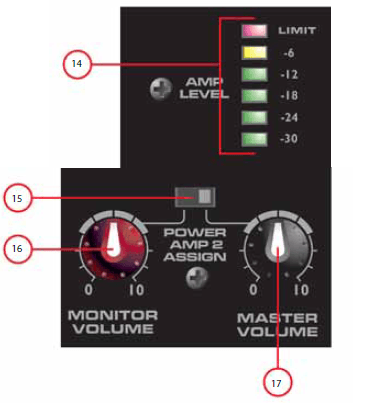
AMP LEVEL LED LADDER
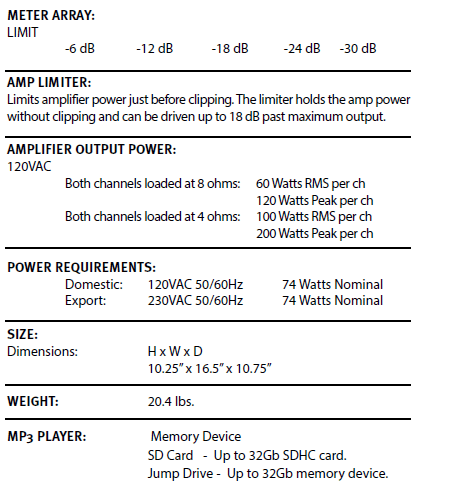
These LEDs indicate the signal level going to the power amplifier. The top LED indicates LIMIT and activation of our revolutionary DDT™ speaker protection circuit. Peavey’s award winning speaker protection circuit is built into the PV®6500MP3 and activated automatically to maximize the power amplifier without fear of distortion.
POWER AMP INPUT SELECT
This control allows the user to select whether the 2nd power amplifier receives its signal from the Master Volume (17) control or from the Monitor Volume (16) control. This allows the user to run both power amps for mains at the same level, or use power amp 1 for mains and power amp 2 for monitors with independent level controls.
MONITOR VOLUME
An independent volume control that is active only when switch 15 is placed in the LEFT position. This allows the user independent volume control over the two internal power amplifiers. This is especially convenient when using power amp 2 to drive monitor speakers.
MASTER VOLUME
The master level control for the main mix and the overall volume of the powered mixer. When switch 15 is in the RIGHT position, the master volume controls both internal power amplifiers.
MASTER MUTE LED
When the LED is ON it indicates the master mute is activated.
MASTER MUTE
Depressing this button mutes channels one through five, preventing signal from passing to the power amplifier. This button does not affect channel 6.
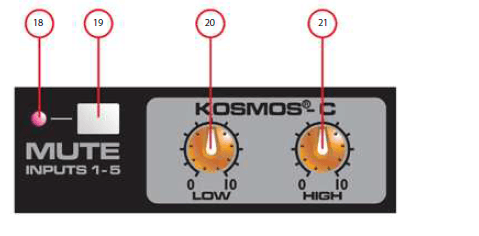
KOSMOS®-C
The Kosmos -C module uses special circuitry to enrich the sound of your system. The LOW control is not just a simple bass boost. It provides ‘natural bass enhancement’ by adding harmonically related bass signals that track envelope of the original signal. The Kosmos-C HIGH control can be used to add clarity to dull signals.
EFFECTS TYPE TABLE
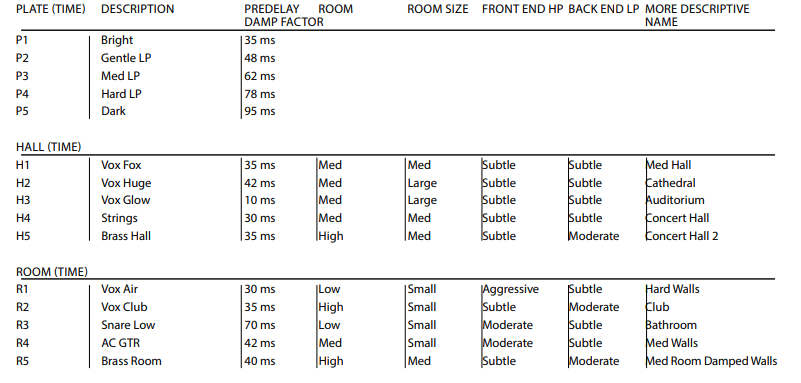
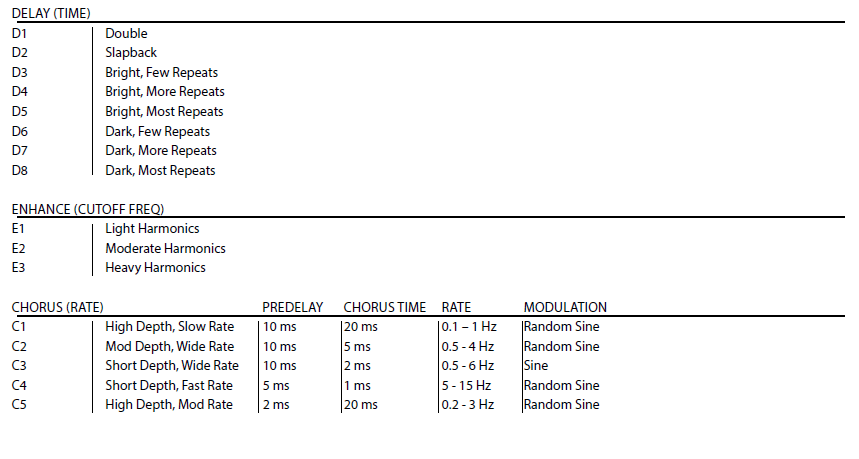
This table lists the types of effects available and the abbreviation used for each effect in the first character of the LED display. The chart also lists the parameter associated with each effect, which is controlled by turning encoder 24. A more detailed list of effects can be found at the end of this manual.
EFX LED
This LED indicates the type of effect currently selected. When turning encoder 27 the display will flash until the encoder is depressed, selecting a new effect.
PARAMETER CONTROL
This encoder controls the parameter associated with the selected effect, listed both on the mixer (22) and in this manual. The parameter control is used to make adjustments to the sound of the effect.
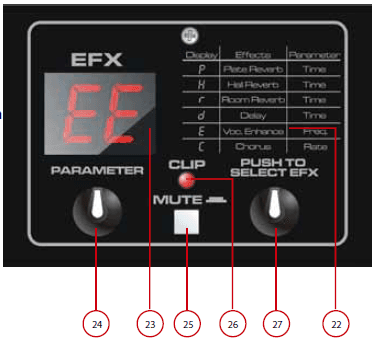
EFX MUTE
When pushed this button bypasses the effects section, letting the user listen to the dry signal. When depressed and muted, LED 23 displays two dashes “–”.
CLIP LED
This LED blinks RED when the signal to the effects section is too hot and is causing distortion. Find the source of the hot signal by reducing the EFX SEND (4) on each channel until the LED is no longer clipping (blinking red).
EFFECTS SELECT
Turn and push this encoder to select the desired effect.
Front Panel
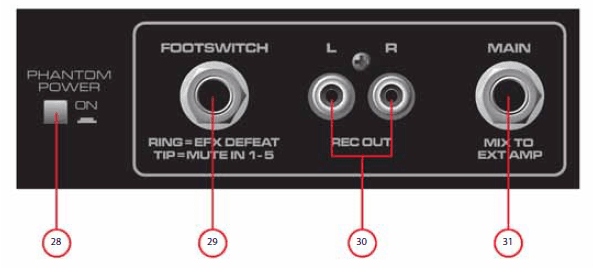
PHANTOM POWER
When depressed, this switch applies +15 VDC to all input XLR connectors to power microphones that require phantom power.
Caution: When phantom power is switched on‚ make sure that any channel you are plugging a microphone into is turned down and the Master Main and Monitor controls are set to minimum. Otherwise‚ there will be a loud pop in the system. For best results, first plug all microphones into their respective channels before phantom power is switched on.
This reduces noise through the system and reduces the chance of damage to the microphones. If, phantom power is used‚ do not connect unbalanced‚ dynamic microphones or other devices to the XLR inputs that cannot handle this voltage. (Some wireless receivers may be damaged. Consult their manuals.) The line input jacks are not connected to the phantom supply and are safe for all inputs (balanced or unbalanced). An unbalanced to balanced impedance converter such as the Peavey 5116 or a Peavey 1:1 Interface Adapter may also be used to isolate a microphone from phantom voltage.
FOOTSWITCH
This 1/4” TRS (tip ring sleeve) jack accepts a momentary 1/4” TRS dual button footswitch (Peavey part number 03014070) designed to defeat the effects on all channels and activate the MASTER MUTE switch (19).
RCA RECORD OUT
This pair of RCA jacks provides a signal to the recording inputs of a CD recorder, stereo tape deck, or other
recording device.
MAIN OUT
This 1/4” jack provides a signal from the main mix (after the graphic EQ) for an external power amplifier. An external power amp, such as our IPR series of amplifiers, can then drive additional speakers.
USB/SD MP3 Player
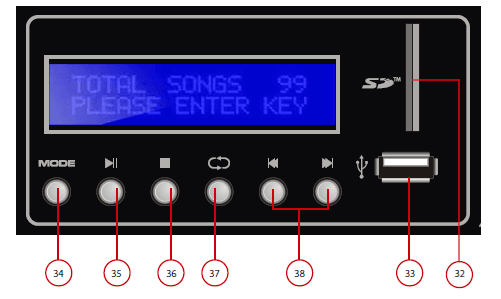
SD CARD SLOT
To connect the SD card, push the card completely in the slot until it clicks into place. The player will accept a SD card up to 32Gb in size.
USB disk SLOT
On the right side of the device is a USB drive slot where a USB memory stick can be connected. The player will accept a memory stick up to 32Gb.
MODE
If both, a memory stick and SD card are present, a short press of the MODE button will change between the USB input and the SD card input. A long press of the MODE button will shut off the MP3 player. Another long press is needed to turn it back on.
PLAY/PAUSE
A short press of the PLAY/PAUSE button causes the operation to change from PLAY to PAUSE or from PAUSE back to PLAY. A long press of the PLAY/PAUSE button will put the player into navigation mode. When in navigation mode the player can toggle between multiple folders on the memory device.
The file folder num is displayed at the top of the screen while the file folder name is at the bottom. The “track skip (38)” buttons can be used to toggle between the folders on the memory device. Once the desired folder is found, press “PLAY/PAUSE” to select the folder. The first song in the folder will begin playing.
STOP
Press the STOP button to stop a file that is playing.
REPEAT
Pressing the REPEAT button toggles the function between ALL, RANDOM and SINGLE.
ALL: Repeats all songs.
RANDOM: Plays songs in random order.
SINGLE: Repeats a single song.
TRACK SKIP
In playback mode the TRACK SKIP buttons let you select the track to play. A short press skips to the next track. A long press allows you to fast forward/rewind through a song. Hold the button down until the desired playback point is found. Release the button and the song will start playing. In navigation mode, the TRACK SKIP buttons are used to increment/decrement through the folders on the memory device.
Bluetooth® Player
Bluetooth® Switch
Turns the Bluetooth on and off. Slide the switch to the right to turn the Bluetooth feature on.
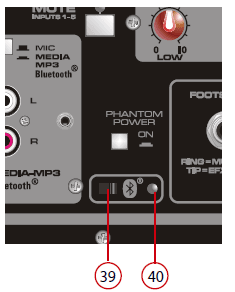
Bluetooth® indicator LED
Indicates the status of the Bluetooth function.
To listen to your music via Bluetooth wireless connection, you need to pair (link) your PV®i 6500 with your Bluetooth phone and/or music device.
- Turn off any Bluetooth devices previously paired with your PV®i 6500.
- Turn on the Bluetooth feature on your phone or music device.
- Slide the switch (39) to the right to turn on the Bluetooth feature. The Bluetooth LED will flash to indicate your PV®i 6500 is in discoverable mode.
- Place your phone or music device in Bluetooth search mode. The phone or music device will now begin, searching for your PV®i 6500.
- Select Bluetooth audio from search results on your phone or music device.
- Select OK or Yes to pair your speaker system with your phone or music device. When your PV®i 6500 successfully pairs and connects with your phone or music device, the Bluetooth indicator changes from flashing green to steadily lit. You will now be able to play music from your connected music source through your PV®i 6500. The level can either be adjusted from the connected source or by the level control in Channel 6.
- Wireless range can vary depending on Bluetooth class of source device, and be subject to interference from obstructions such as walls or other electronic devices.
Back Panel
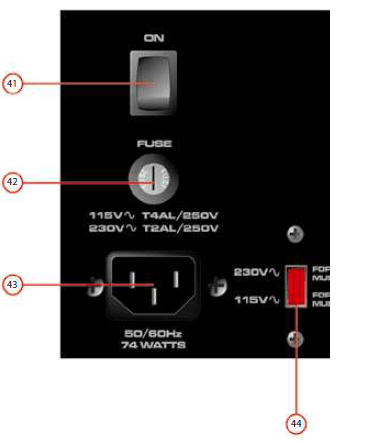
POWER SWITCH
This is the main power switch.
FUSE
This is the main safety fuse for the AC line voltage. Only replace with a fuse of the exact type and rating. If the fuse continues to open, do not over fuse. Take the unit to an authorized Peavey service center.
AC POWER INLET
This is the receptacle for an IEC line cord, which provides AC power to the unit. Connect the line cord to this connector to provide power to the unit. Damage to the equipment may result if improper line voltage is used. (See line voltage marking on unit). Never break off the ground pin on any equipment. It is provided for your safety. If the outlet used does not have a ground pin, a suitable grounding adapter should be used and the third wire should be grounded properly.
To prevent risk of shock or fire hazard, always make sure that the amplifier and all associated equipment is properly grounded. As the colors of the wires in the mains lead of this apparatus may not correspond directly with the colored markings identifying the terminals in your plug, proceed as follows:
- The green and yellow wire must be connected to the terminal which is marked with the letter E, or by the earth symbol, or is colored green, or green and yellow.
- The blue wire must be connected to the terminal which is marked with the letter N, or the color black.
- The brown wire must be connected to the terminal which is marked with the letter L, or the color red.
VOLTAGE SELECTOR SWITCH
This switch allows the user to select between 115VAC / 60Hz or 230VAC / 50Hz. To change the voltage selector, you must first unscrew and remove the plastic cover that protects the switch. After changing the voltage, please replace the plastic cover to ensure the voltage level is not inadvertently altered.
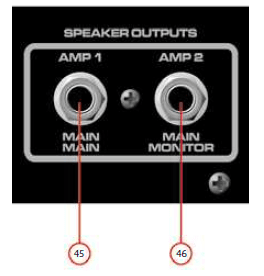
MAIN / MONITOR SPEAKER OUTPUTS
These are two-conductor 1/4″ speaker outputs. Each one is rated at 4 ohms minimum impedance. You may connect either one 4-ohm, one 8-ohm or two 8-ohm speakers to each output. Do not operate below rated minimum impedance. For maximum power transfer, be sure to use speaker cables and not instrument cables to connect to the speakers. We recommend the use of 18-gauge or larger speaker wire.
Effects (parameter)
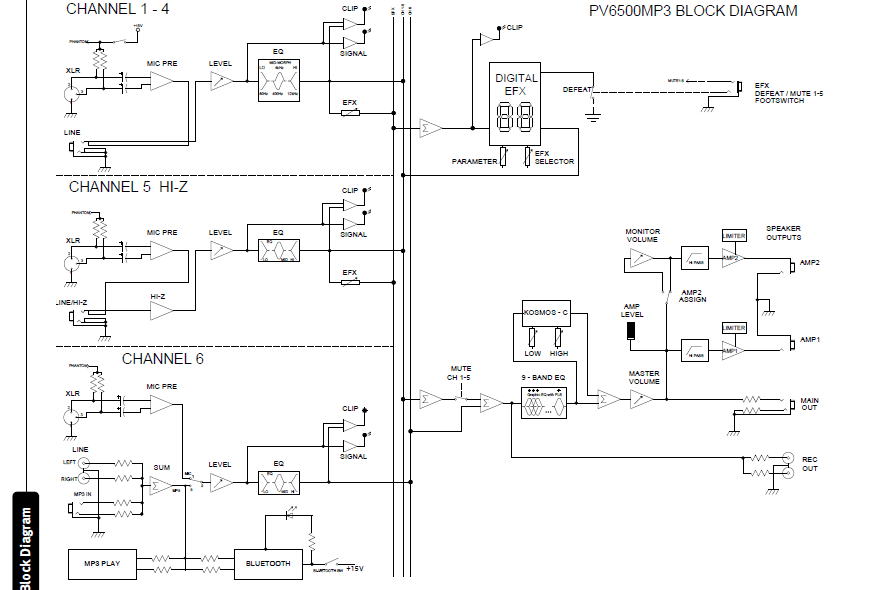
Specifications
For more manuals by Peavey visit, ManualsLibraryy
Peavey PV i6500 Mixer Amplifier-FAQs
What is the Bluetooth code for the Peavey mixer?
To pair your device, select “Peavey Mixer” from the Bluetooth search results. When prompted for a PIN, enter 7878. Once paired, the Bluetooth Active LED will stop blinking and remain lit.
How do I connect my Peavey mixer to my computer?
Connect the USB port on the back of the mixer to your computer using a standard USB cable. The Peavey Aureus mixer is class-compliant, so no drivers are needed for Mac or PC.
How does a load box work?
A load box acts as an attenuator, reducing the power amp’s output to a line-level signal while preserving the amp’s sound. It allows tube amplifiers to be recorded at manageable volumes.
What is the function of a mixer amplifier?
A mixer amplifier combines the functions of a mixer and an amplifier. It can control multiple input sources, adjust volume, bass, treble, and amplify audio for playback through speakers.
What is the difference between a mixer amplifier and a power amplifier?
A mixer amplifier includes mixing controls and amplification in one unit, suitable for managing inputs and directly powering speakers. A power amplifier focuses solely on powering loudspeakers, requiring a mixer to handle input adjustments.
What should you turn on first, an amplifier or a mixer?
Turn on the mixer first, followed by the amplifier to avoid noise. When powering down, turn off the amplifier first, then the mixer.
What is the difference between a mixer and a powered mixer?
A powered mixer is an analog mixer with a built-in power amplifier, allowing direct speaker connection. Digital mixers offer more functionality but require external amplifiers or powered speakers.
What is the difference between an amplifier and a power amplifier?
An amplifier processes low voltage signals with low collector current, while a power amplifier handles high voltage signals with high collector current, often exceeding 100 mA.
What is wattage in a mixer?
The wattage of a mixer refers to its power capacity. Mixers typically range from 500-750 watts. Higher wattage supports heavy-duty tasks, while lower wattage is sufficient for everyday use.
What is pair mode in Bluetooth?
Pair mode allows Bluetooth devices to connect. Activate the phone’s discoverable mode and press the headset’s pairing buttons to establish the connection.

