Petwant F13-W 6-Meal Smart Wifi Pet Feeder
Important Safety Information
- APP connection must be plugged in; otherwise, the WiFi function will stop working.
- This product is only applicable to cats and small dogs.
- Do not allow small children to play with, in, or around the pet feeder.
- The filling in the ice pack is not edible. If it is damaged, do not use it.
- Do not immerse the control board in water. The device should not be submerged in water at any time, as this may damage electronic components.
- Do not disassemble the pet feeder other than the components.
- Do not place or store an appliance in a tub or sink.
- Please avoid the charging port from getting wet. If the charging port is wet, it should be fully dried before charging.
- Always make sure you use the original charger that came with your device.
- Always unplug the feeder when not in use.
- Do not allow pets to chew on or swallow any parts.
- Do not use the pet feeder for any purpose other than feeding pets.
Components

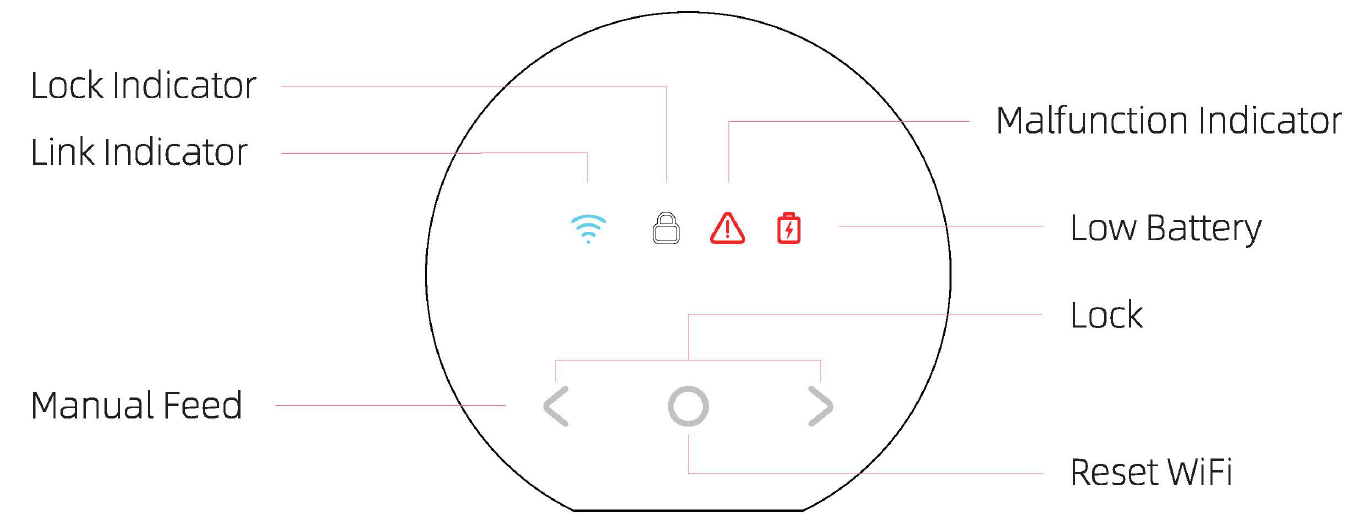
Display Pannel
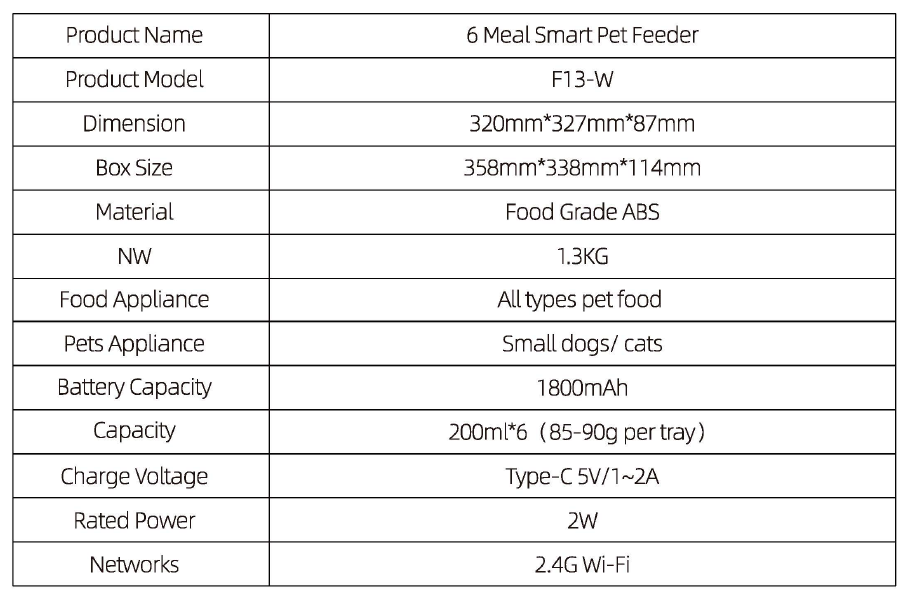
Parameters
Installation and Setup
Open the Lid
Lay the feeder flat, pull up the ring lock at the back of the feeder with one hand, and lift the whole top lid.

Place the Ice Pack
Take out the ice packs, place the ice packs horizontally in the refrigerator freezer (- 18 ° C), and freeze them for at least 6 hours, then take them out for use.

Fill up Pet Food
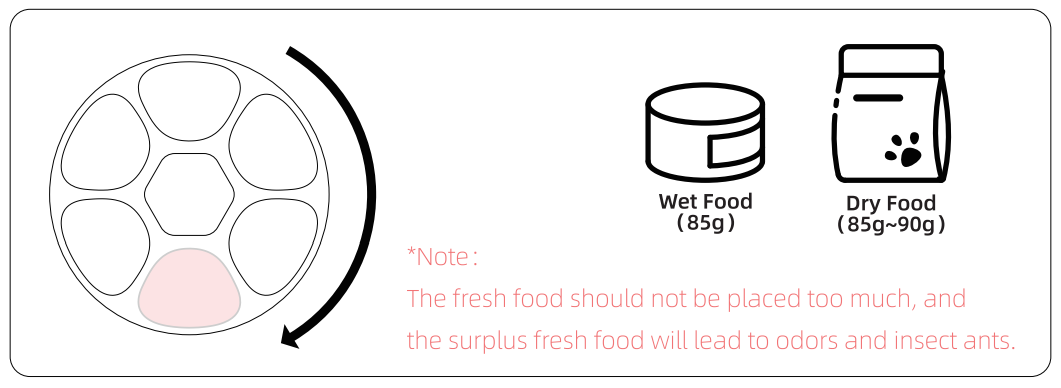
- Place the food bowl into the base unit, and then fill it up with pet food in turn.
- Cover the top lid and lock it.
App Download
Scan the QR code to download the APP.

Unlock the Display
Press ![]() and
and ![]() button for 3 seconds at the same time to unlock the display, and then the screen will light up. Press the
button for 3 seconds at the same time to unlock the display, and then the screen will light up. Press the ![]() and
and ![]() button for 3 seconds at the same time again to lock the display, and then the screen darkens and the lock indicator will light up.
button for 3 seconds at the same time again to lock the display, and then the screen darkens and the lock indicator will light up.
Instant Feed
Unlock the display, long-press the” ![]() ” button to do instant feed once.
” button to do instant feed once.
ResetWiFi
Unlock the display, long-press ![]() the button for 7 0 seconds to reset WiFi.
the button for 7 0 seconds to reset WiFi.
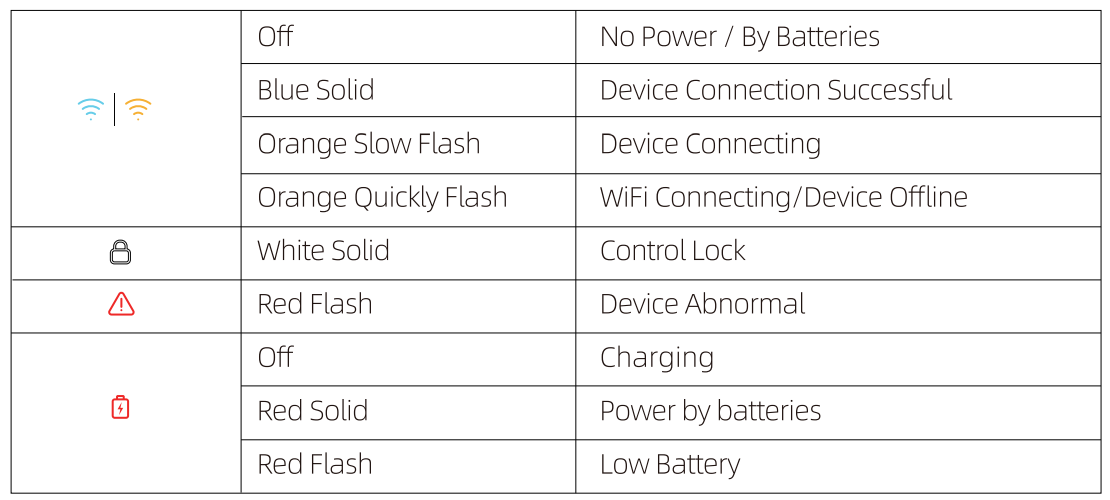
Indicator Information
App Specific Operation
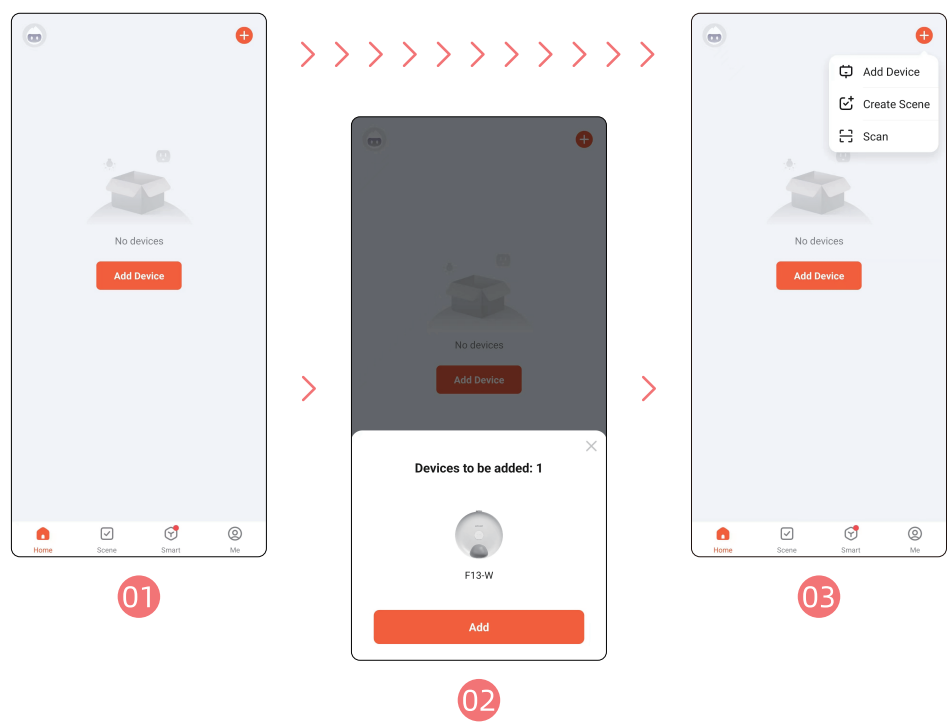
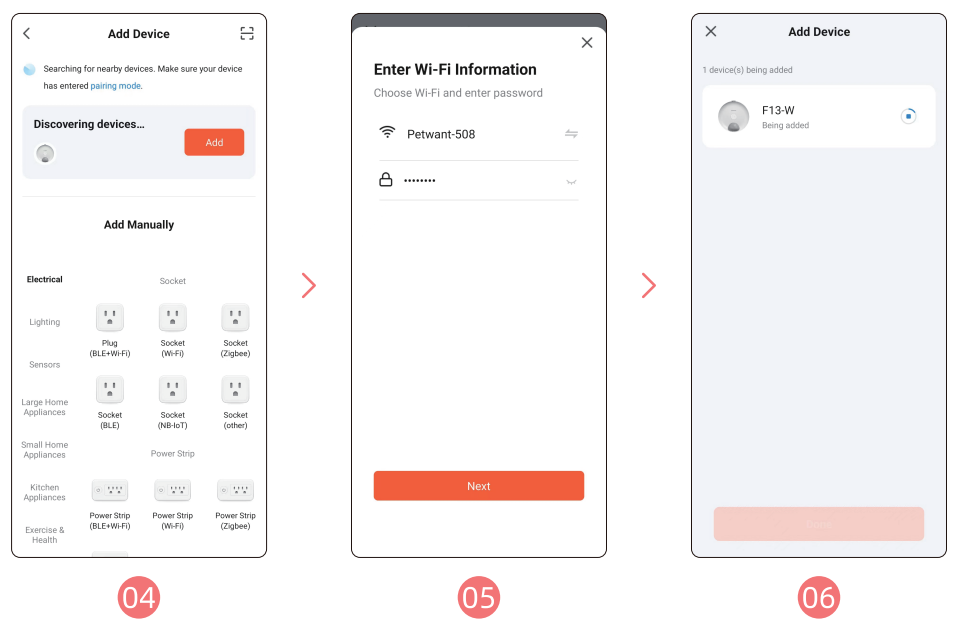
- Download the app and sign in with your exclusive account.
- After entering the interface, if the device automatically discovers, click “Add” and go to step 5.
- Or you can click “+” in the top right corner and click “Add Device”

- After entering the interface, wait for the device to be discovered automatically, and click “Add”
- Input WiFi password ( user name cannot use Chinese, password cannot use special symbols)
- Waiting to connect to the network.

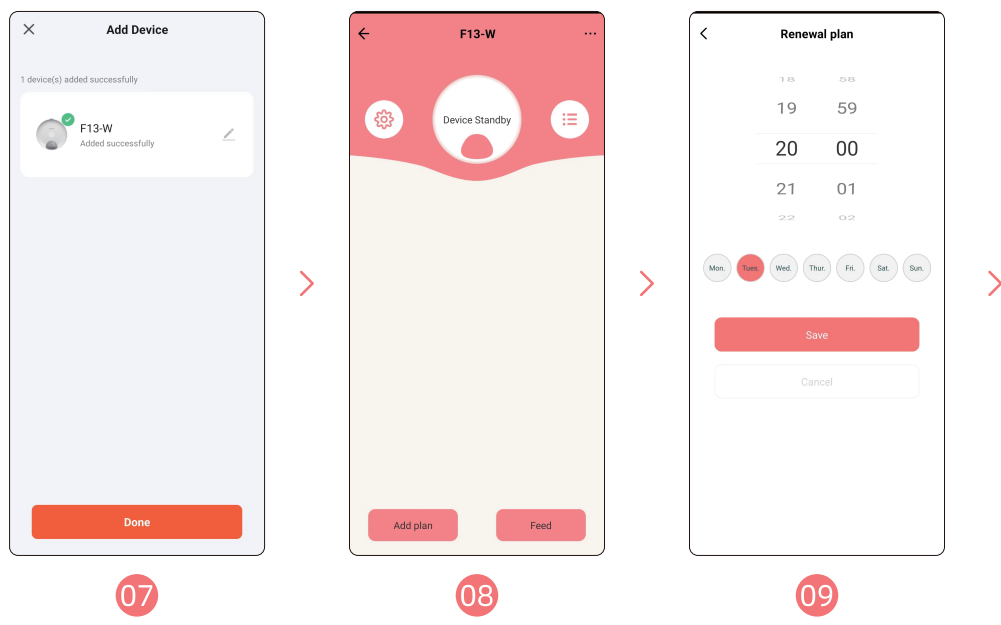
- Add successfully, you can customize the device name, click “Done”
- Click “Feed” to feed a meal immediately. Click “Add plan” to set the feeding plan.
- You can set the time according to your pet’s eating pattern. You can choose from Monday to Sunday and click “Save”

- You can delete or add plans, but you can set up five meals.
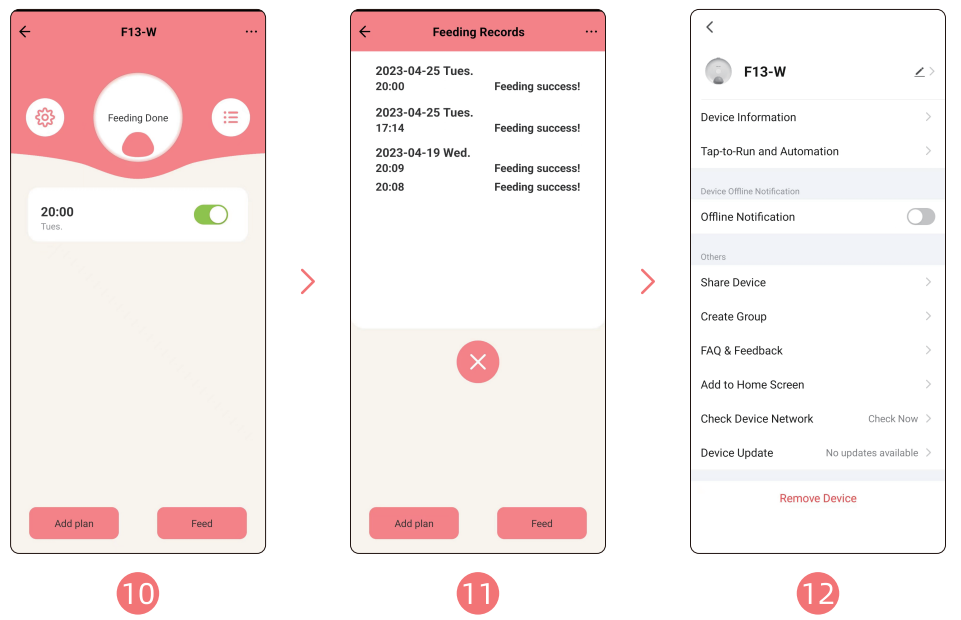
- You can check the feeding records at any time.
- In the Settings menu, you can click “Share Device” to share the device with multiple people
Cleaning & Maintenance
Clean the product interior and the food bowl
- Rotate the control board clockwise, and take it out.
- All parts are washable except the control board. Do not use metal stuff for cleaning to avoid damaging the product surface.

Clean the Main Board
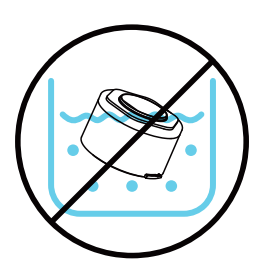
Take out the main board, wipe the outside with a soft wet cloth.
Install the Control Board
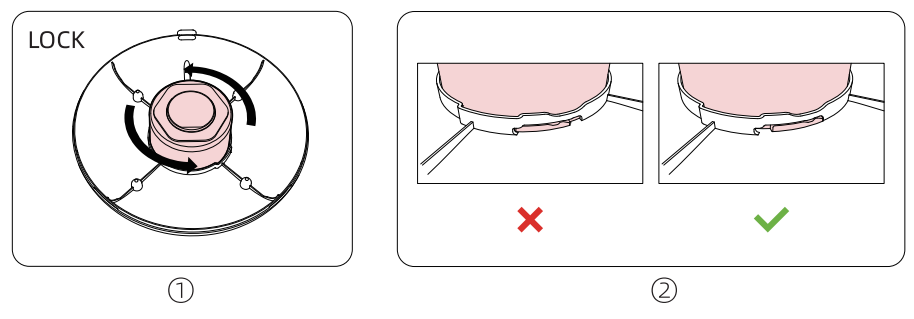
- Align the main board buckle with the bottom housing installation slot, hold and rotate it counterclockwise to hear a “click” sound.
- Check whether the main board is installed in place
FOR MORE MANUALS BY PETWANT, VISIT MANUALSLIBRARYY
Petwant F13-W 6-Meal Smart Wifi Pet Feeder-FAQs
Q1. How do I use the Petwant F13-W automatic feeder?
Simply load the feeder with up to 6 meals, schedule feeding times through the app, and let it dispense food automatically for your pet.
Q2. How do I connect my Petwant feeder to Wi-Fi?
Open the app, tap Add Device → Pet Feeder, choose your 2.4GHz Wi-Fi network, and enter the password. If the indicator isn’t blinking, hold the SET button for 5 seconds to reset.
Q3. Why is my Petwant feeder not working?
Check that the power cord is plugged into a working outlet. If using batteries, remember they act only as a backup. Test the outlet with another device to confirm power.
Q4. How do I reset the Petwant feeder?
Press and hold the Feed button on the front for about 5 seconds until you hear a beep. This restores the feeder to factory settings.
Q5. How do I pair the feeder with my phone?
Scan the QR code at the bottom of the feeder in the app, then enter your 2.4GHz Wi-Fi details. Make sure your Wi-Fi and password are entered correctly.
Q6. Can the Petwant feeder connect to 5GHz Wi-Fi?
No, it only supports 2.4GHz Wi-Fi networks. Switch your router to 2.4GHz mode if needed.
Q7. Can I put wet food in the Petwant F13-W feeder?
This model is designed for dry food only. Using wet food may cause blockages and hygiene issues.
Q8. What are the disadvantages of automatic pet feeders?
Some pets may be startled by the sound, cleaning can be tricky, and occasional overfeeding may occur if not set properly. Regular maintenance is important.


