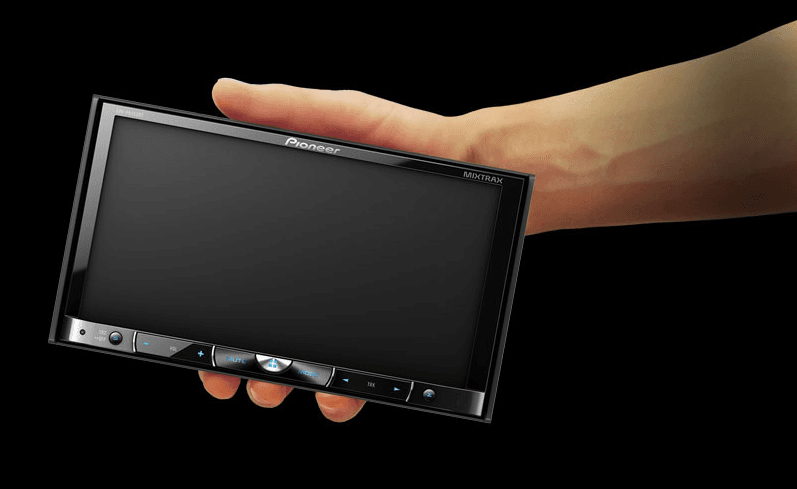
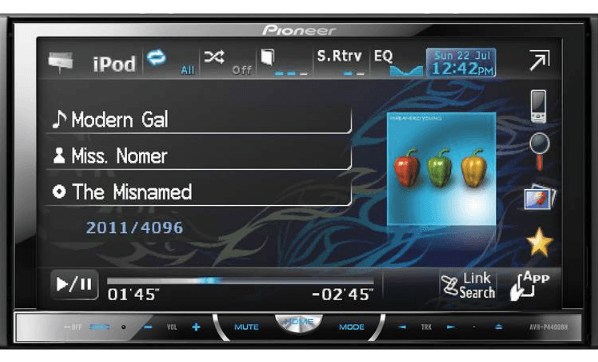
Pioneer AVH-P4400BH Car DVD Receiver
IMPORTANT SAFEGUARDS
Please read all of these instructions regarding your display and retain them for future reference.
- Read this manual fully and carefully before operating your display.
- Keep this manual handy as a reference for operating procedures and safety information.
- Pay close attention to all warnings in this manual and follow the instructions carefully.
- Do not allow other persons to use this system until they have read and understood the operating instructions.
- Do not install the display where it may (I) obstruct the driver’s vision, (ii) impair the performance of any of the vehicle’s operating systems or safety features, including air bags, hazard lamp buttons, or (iii) impair the driver’s ability to safely operate the vehicle.
- Do not operate this display if doing so in any way will divert your attention from the safe operation of your vehicle. Always observe safe driving rules and follow all existing traffic regulations. If you experience difficulty in operating the system or reading the display, park your vehicle in a safe location and make necessary adjustments.
- Please remember to wear your seat belt at all times while operating your vehicle. If you are ever in an accident, your injuries can be considerably more severe if your seat belt is not properly buckled.
- Never use headphones while driving.
- To promote safety, certainly. N functions are disabled unless the parking brake is on, and the vehicle is not in motion.
- Never set the volume of your display so high that you cannot hear outside traffic and emergency vehicles.
Before You Start
- FCC 10: AJDK044
- MODEL NO: AVH-P4400BH/AVH-P3400BH/AVH-P2400BT
- IC: 775E-K044
This device complies with Part 15 of FCC Rules and Industry Canada licence-exempt RSS standard(s). Operation is subject to the following two conditions: (1) this device may not cause interference, and (2) this device must accept any interference, including interference that may cause undesired operation of this device. This transmitter must not be co-located or operated in conjunction with any other antenna or transmitter.
The antenna for Bluetooth cannot be removed (or replaced) by the user. This equipment complies with FCC/IC radiation exposure limits set forth for an uncontrolled environment and meets the FCC radio frequency (RF) Exposure Guidelines in Supplement C to OET65 and RSS-102 of the IC radio frequency (RF) Exposure rules. This equipment has very low levels of RF energy that it deemed to comply without maximum permissive exposure evaluation (MPE). But it should be installed and operated keeping the radiator at least 20 cm or more away from a person’s body (excluding extremities: hands, wrists, feet, and ankles).
- MODEL NO: AVH-P1400DVD
This device complies with Part 15 of the FCC Rules. Operation is subject to the following two conditions:
- This device may not cause harmful interference, and
- This device must accept any interference received, including interference that may cause undesired operation.
Information to User
Alteration or modifications carried out without appropriate authorization may invalidate the user’s right to operate the equipment.
Note
This equipment has been tested and found to comply with the limits for a Class B digital device, under Part 15 of the FCC Rules. These limits are designed to provide reasonable protection against harmful interference in a residential installation. This equipment generates, uses, and can radiate radio frequency energy, and if not installed and used according to the instructions, may cause harmful interference to radio communications.
However, there is no guarantee that interference will not occur in a particular installation. If this equipment does cause harmful interference to radio or television reception, which can be determined by turning the equipment off and on, the user is encouraged to try to correct the interference by one or more of the following measures:
- Reorient or relocate the receiving antenna.
- Increase the separation between the equipment and receiver.
- Connect the equipment into an outlet on a circuit different from that to which the receiver is connected.
- Consult the dealer or an experienced radio/TV technician for help.
The Safety of Your Ears is in Your Hands
Get the most out of your equipment by playing it at a safe level-a level that lets the sound come through clearly without annoying blaring or distortion and, most importantly, without affecting your sensitive hearing. Sound can be deceiving. Over time, your hearing “comfort level” adapts to higher volumes of sound, so what sounds “normal” can be loud and harmful to your hearing. Guard against this by setting your equipment at a safe level BEFORE your hearing adapts.
ESTABLISH A SAFE LEVEL
- Set your volume control at a low setting.
- Slowly increase the sound until you can hear it comfortably and clearly, without distortion.
- Once you have established a comfortable sound level, set the dial and leave it there.
BE SURE TO OBSERVE THE FOLLOWING GUIDELINES
- Do not turn up the volume so high that you can’t hear what’s around you.
- Use caution or temporarily discontinue use in potentially hazardous situations.
- Do not use headphones while operating a motorized vehicle; the use of headphones may create a traffic hazard and is illegal in many areas.
About this unit
The tuner frequencies on this unit are allocated for use in North America. Use in other areas may result in poor reception.
![]() WARNING
WARNING
Handling the cord on this product or cords associated with accessories sold with the product may expose you to chemicals listed on Proposition 65 known to the State of California and other governmental entities to cause cancer and birth defects or other reproductive harm. Wash hands after handling.
CAUTION:
USE OF CONTROL OR ADJUSTMENT OR PERFORMANCE OF PROCEDURES OTHER THAN THOSE SPECIFIED HEREIN MAY RESULT IN HAZARDOUS RADIATION EXPOSURE.
CAUTION:
THE USE OF OPTICAL INSTRUMENTS WITH THIS PRODUCT WILL INCREASE EYE HAZARD.
![]() CAUTION
CAUTION
- Do not allow this unit to come into contact with liquids. Electrical shock could result. Also, damage to this unit, smoke, and overheating could result from contact with liquids.
- Keep this manual handy for future reference.
- Always keep the volume low enough to hear outside sounds.
- Avoid exposure to moisture.
- If the battery is disconnected or discharged, any preset memory will be erased.
Important (Serial number)
The serial number is located on the bottom of this unit. For your security and convenience, be sure to record this number on the enclosed warranty card.
DVD video disc region numbers
Only DVD video discs with compatible region numbers can be played on this player. You can find the region number of the player on the bottom of this unit and in this manual (refer to Specifications on page 1 08).
About this manual
This unit features a number of sophisticated functions to ensure superior reception and operation. All the functions have been designed for the easiest possible use, but many are not self-explanatory. This operation manual will help you benefit fully from this unit’s potential and to maximize your listening enjoyment.
We recommend that you familiarize yourself with the functions and their operation by reading through the manual before you begin using this unit. You must read and observe WARNINGS and CAUTIONS in this manual.
Operating environment
This unit should be used within the temperature ranges shown below.
Operating temperature range: -10 octo +60 oc (14°F to 140 oF)
EN300328 ETC test temperature: -20 oc and +55 oc (-4 oF and 1131°F). J
After-sales service for Pioneer products
Please contact the dealer or distributor from where you purchased this unit for after-sales service (including warranty conditions) or any other information. In case the necessary information is not available, please contact the companies listed below:
Please do not ship your unit to the companies at the addresses listed below for repair without advance contact.
U.S.A.
Pioneer Electronics (USA) Inc.
CUSTOMER SUPPORT DIVISION
P.P.O.Box 1760
Long Beach, CA 90801-1760
800-421-1404
CANADA
Pioneer Electronics of Canada, Inc.
CUSTOMER SATISFACTION DEPARTMENT
340 Ferrier Street
Unit 2
Markham, Ontario L3R 2Z5, Canada
1-877-283-5901
905-479-4411
For warranty information, please see the Limited Warranty sheet included with this unit t.(!)
Visit our website
Visit us at the following site:
http://www.ploneerelectronlcs.com
in Canada
http://www.pioneerelectronlcs.ca
- Register your product. We will keep the details of your purchase on file to help you refer to this information in the event of an insurance claim such as loss or theft.
- Receive updates on the latest products and technologies.
- Download owner’s manuals, order product catalogues, research new products, and much more.
- Your feedback is important in our continual effort to design and build the most advanced, consumer-focused product in the industry.
Serial number: _________
Demo mode
The feature demo automatically starts when you select Off for the source and continues while the ignition switch is set to ACC or ON. To cancel the feature demo, press and hold MUTE. Press and hold MUTE again to restart. Operating the feature demo while the car engine is turned off may drain the battery power.
Important
Failure to connect the red lead (ACC) of this unit to a terminal coupled with ignition switch on/off operations may lead to battery drain..
Adjusting the response positions of the touch panels
(Touch Panel Calibration)
If you feel that the touch panel keys on the screen deviate from the actual positions that respond to your touch, adjust the response positions of the touch panel. Refer to Adjusting the response positions of the touch panels (Touch Panel Calibration) on page 75.
Use and care of the remote control
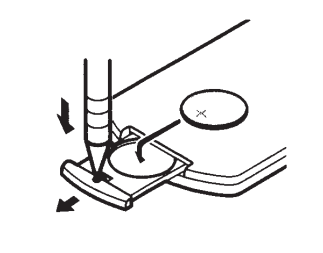
Installing the battery
Slide the tray on the back of the remote control out and insert the battery with the plus (+) and minus(-) poles aligned properly.
- When using for the first time, pull out the film protruding from the tray.
![]() WARNING
WARNING
- Keep the battery out of the reach of children. Should the battery be swallowed, consult a doctor immediately.
- Batteries (battery pack or batteries installed) must not be exposed to excessive heat such as sunshine, fire, the like.
![]() CAUTION
CAUTION
- Use one CR2025 (3V) lithium battery.
- Remove the battery if the remote control is not used for a month or longer.
- There is a danger of explosion if the battery is incorrectly replaced. Replace only with the same or equivalent type.
- Do not handle the battery with metallic tools.
- Do not store the battery with Meta II IC objects.
- If the battery leaks, wipe the remote control completely clean and install a new battery.
- When disposing of used batteries, comply with governmental regulations or environmental public institutions’ rules that apply in your country/area.
- “Perchlorate Material- special handling may apply.
See www.dtsc.ca.gov/hazardouswaste/perch I orate. (Applicable to California, U.S.A.)”
Using the remote control
Point the remote control in the direction of the front panel to operate.
- The remote control may not function properly in direct sunlight.
Important
- Do not store the remote control in high temperatures or direct sunlight.
- Do not let the remote control fall onto the floor, where it may become jammed under the brake or accelerator pedal.
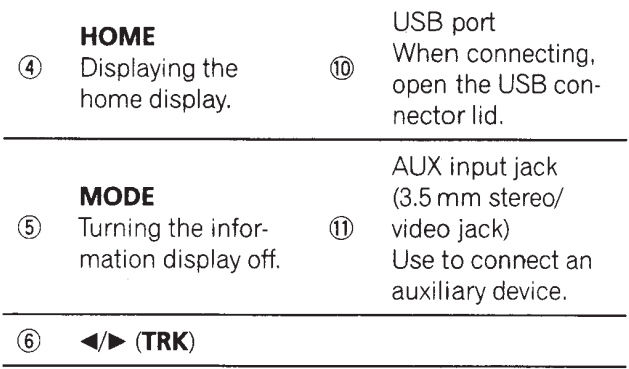
Head unit
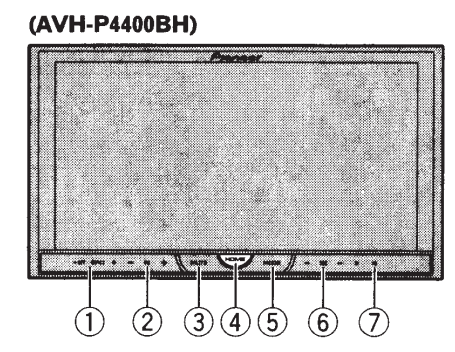
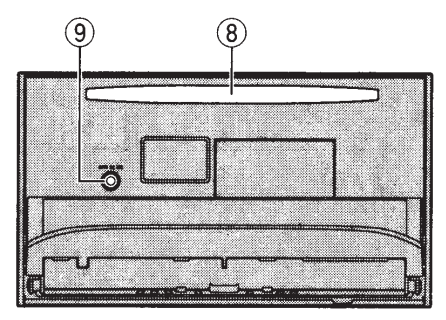
(AVH-P3400BH/ AVH-P2400BT /AVHP1400DVD)
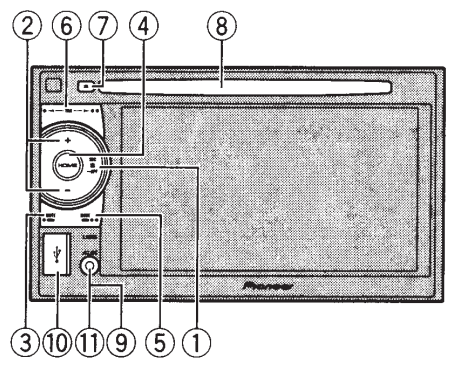
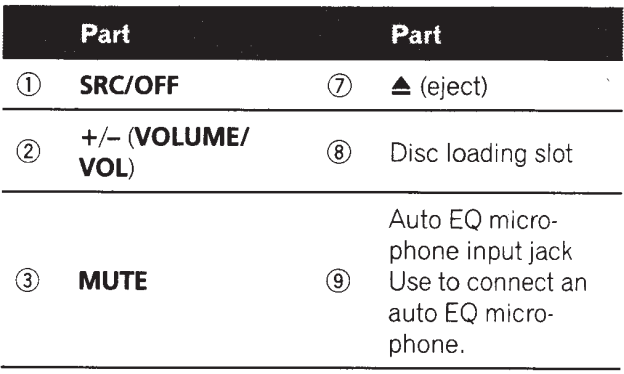
![]() CAUTION
CAUTION
- (AVH-P3400BH/AVH-P2400BT/AVHP1400DVD)
Use an optional Pioneer USB cable (CD-U50E) to connect the USB audio player/USB memory, as any device connected directly to the unit will protrude out from the unit and may be dangerous. - Do not use unauthorized products.
Notes
- When the navigation system is connected, press MODE to switch to the navigation display. Press MODE and hold to turn the display off. Press MODE again to turn the display on.
- For details on how to operate a navigation system from this unit, refer to its operation manual.
Remote control
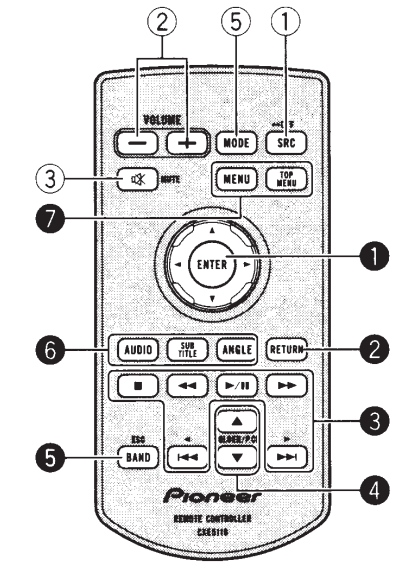
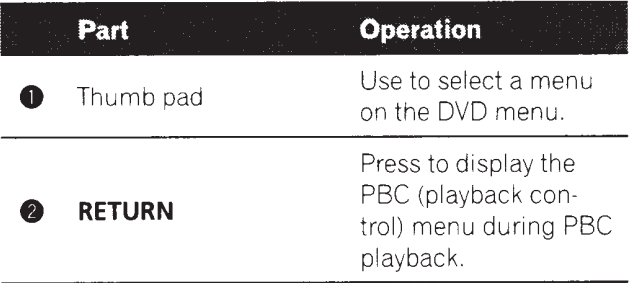
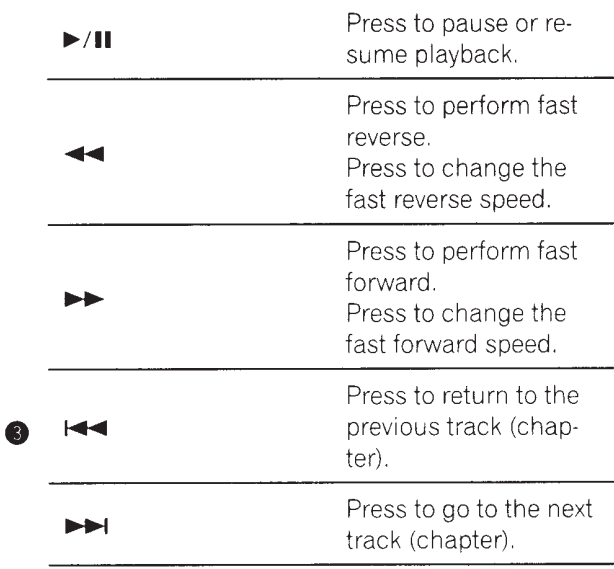
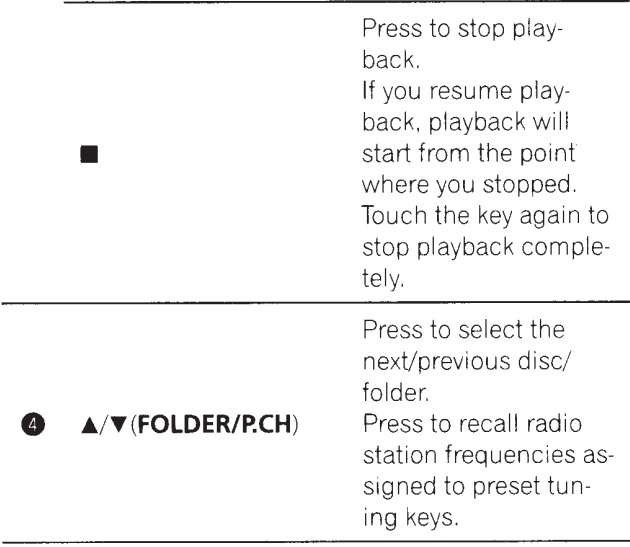
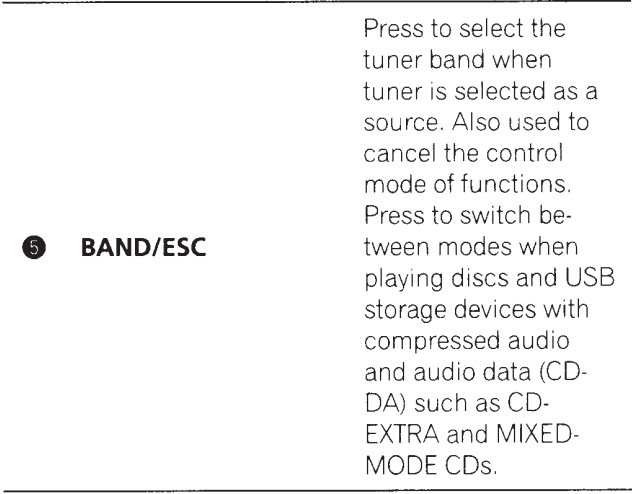
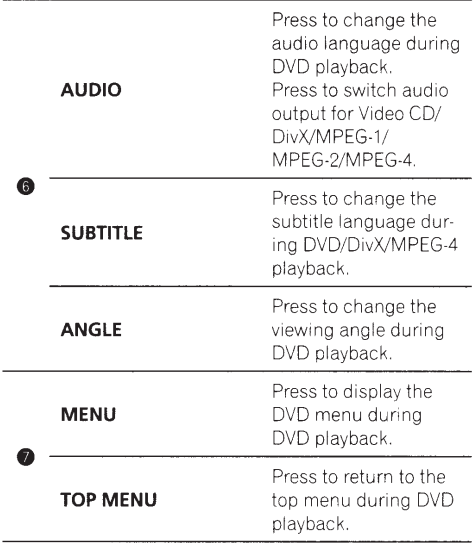
Basic operations
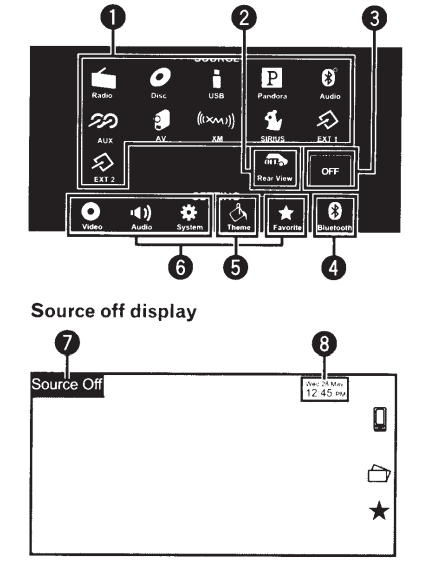
Touch panel keys
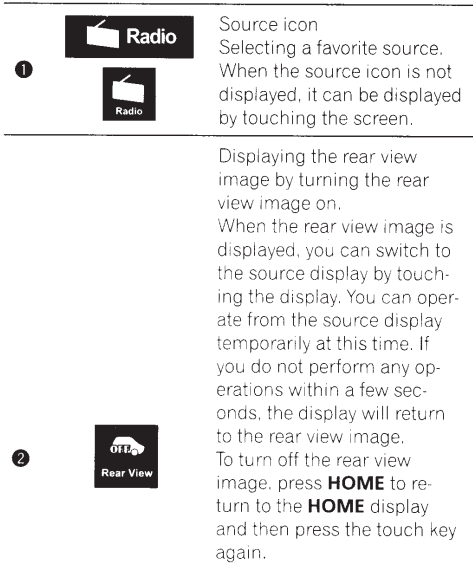
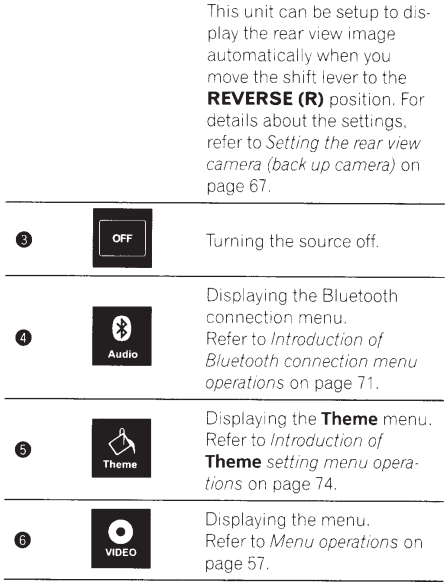
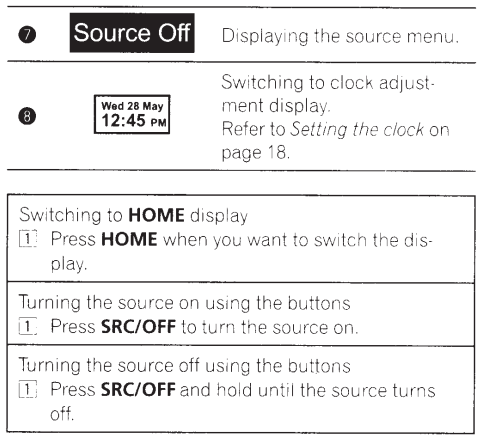
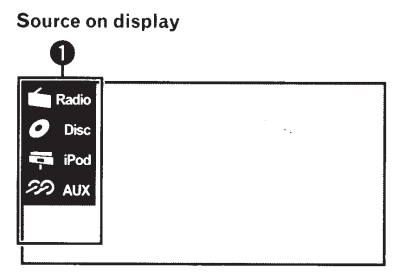
Selecting a source using the buttons
- Press SRC/OFF to cycle through the sources listed below
Selecting a source using the touch panel keys
- Touch the source icon and then touch the desired source name
- XM- X~v1 tuner
- SIRIUS- SIRIUS tuner
- Radio/ Digital Radio- Rad lo/DIQi ta! Rad1o tuner· (Fun ction of AVH-P2400BT/ AVH-P 1 400DVDl
- Digital Radio – Bu i lt-1n D1 gita l Rad 1o tuner (Funct ion of AVH- P44 00BH; LVH -P3400 BH J
- Disc- Built -1n DVD pl ayer
- USB/iPod – USB/ :Pod
- Pandora – Pandora
- TEL/Audio – Biuetooth te lepho ne’ aud io (Fu r1cti o1l of AVH-P 14COD VD)
- Audio- Bu1lt-1n Bluetooth aud 😮 (Functio n of AVH P4400BH ,t,’ v’H- P3400B H/ AVHP2400BTl
- AUX – A U X
- AV- AV 1nput
- EXT 1- Ext erna l un1t 1
- EXT 2- Exte rna l un :t 2
When the source: con 1S not d is not displayed, it can be displayed by touching the screen. - While operating the menu. You can select source by touching the source icon
- When an HD Radio tun er (so ld separate ly) IS con nected t o the unit. You can select Digital Radio instead of Radio. (AVH P2400BT/AVH-P1400DVD)
- You can select Digital Radio instead of Radio with these models (AV H P4400 BH/AVH-P3400BH)
Adjusting the volume
- Press+/- (VOLUME/VOL) to adjust the volume
Notes
- In this manual, iPod and iPhone will be referred to as “iPod”.
- The USB/iPod icon will change as follows:
- USB is displayed when a USB storage device is connected.
- iPod 1s d1splayed when an 1Pod is connected.
- USB!iPod is displayed when the device is connected.
An external unit refers to a Pioneer product, such as those which will be available in the future. Although incompatible as a source, the basic functions of up to two external units can be controlled with this unit. When two external units are connected, the external units are automatically allocated to external unit 1 or external unit 2
Operating the scroll icon and the scrubber bar
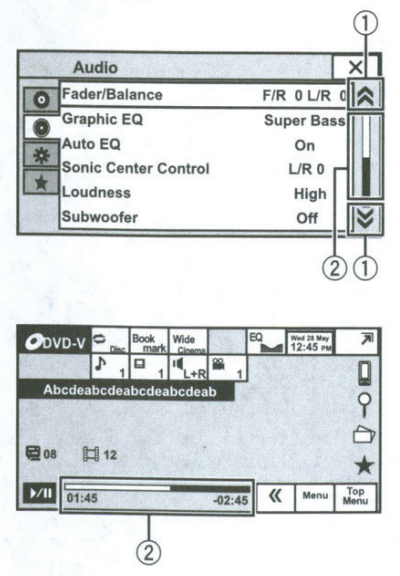
- Scroll icon
Appears when selectable items are hidden. - Scrubber bar
Appears when items cannot be displayed on a single page only.
Viewing the hidden items
- Touch the scroll icon or drag the scrubber bar to view any hidden items.
- Also, you can drag the list to view any hidden items.
Specifying the playback point
- Drag the scrubber bar on the screen.
(Not available when the scrubber bar is grayed out.)
Adjusting the touch panel keys
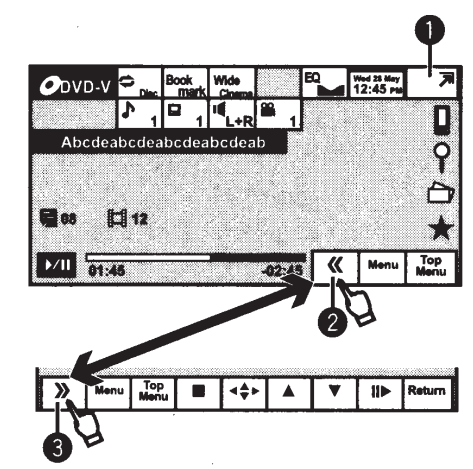
Touch panel keys
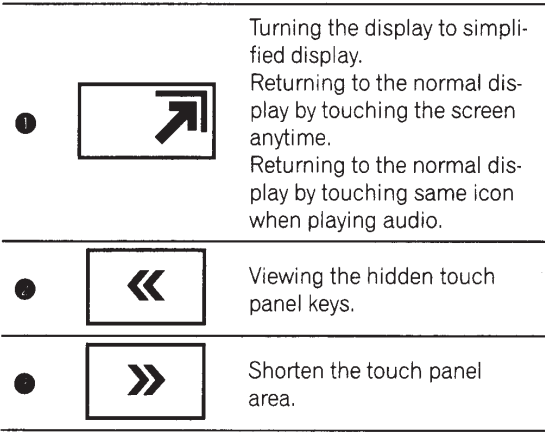
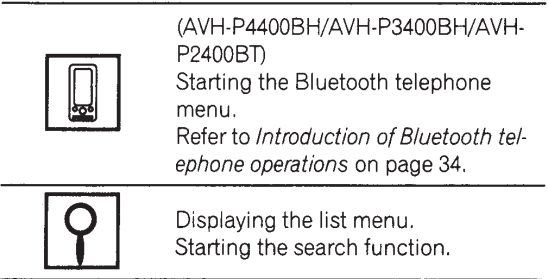
Common operations for menu settings/lists
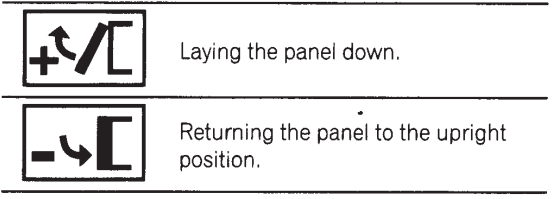
Adjusting the LCD panel angle
(Function of AVH-P4400BH)
![]() CAUTION
CAUTION
Keep hands and fingers clear of the unit when opening, closing, or adjusting the LCD panel. Be especially cautious of children’s hands and fingers.
- Press
 (eject) to display the ejecting menu.
 - Adjust the LCD panel to an easily viewable angle.

- As the set angle is saved, the LCD panel will automatically be adjusted to the same position the next time the LCD panel is opened.
Ejeding a disc
(AVH-P4400BH)
![]() CAUTION
CAUTION
Keep hands and fingers clear of the unit when opening, closing, or adjusting the LCD panel. Be especially cautious of children’s hands and fingers.
- Press
 (eject) to display the ejecting menu.
 - Eject a disc.

Ejecting a disc
(AVH-P3400BH/AVH-P2400BT/AVHP1400DVD)
- Press
 (eject).
Setting the clock
- Switch to Clock Adjustment display. Refer to Basic operations on page 14.
- Select the item to set.
- Touch ▲or ▼ tap to set the correct date and time.
For more manuals by Pioneer, visit ManualsLibraryy
Pioneer AVH-P4400BH Car DVD Receiver- FAQs
Why is my DVD not playing audio?
Check if the TV/receiver is muted.
Ensure HDMI/audio cables are properly connected.
Try a different disc (may be scratched or corrupted).
Can I use a USB drive for music/videos?
Yes! Supported formats:
Music: MP3, WAV, AAC, FLAC
Video: MP4, AVI, WMV
Max capacity: Check manual (usually up to 64GB FAT32).
How do I adjust bass/treble settings?
Press “Audio” or “Sound Settings”.
Select “Bass,” “Treble,” or “EQ”.
Adjust using the +/- buttons.
Can I add a rearview camera to this receiver?
Yes!
Connect the camera to the “Rear Camera Input” port.
Enable “Camera View” in settings.
Why won’t my Bluetooth connect?
Ensure Bluetooth is enabled on your phone.
Delete old pairings and re-pair.
Restart both the receiver and phone.
How do I update the firmware?
Download the latest firmware from Pioneer’s website.
Save it on a USB drive (FAT32 format).
Insert into the receiver and follow on-screen prompts.
Can I play music from my phone via AUX?
Yes!
Connect a 3.5mm aux cable to the “AUX IN” port.
Select “AUX” as the source.
How do I improve FM radio reception?
Ensure the antenna is properly connected.
Use an FM booster if needed.
Manually tune stations for better clarity.

