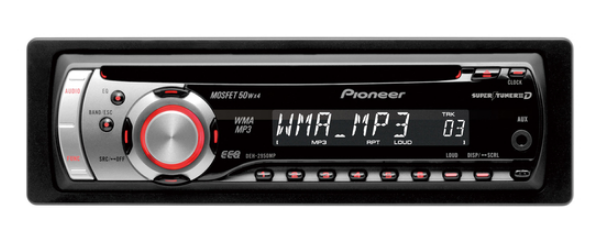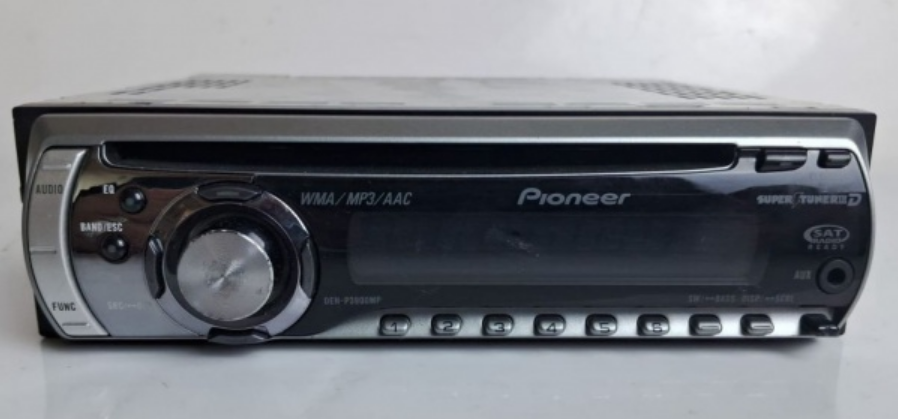
Pioneer DEH-P3900MP CD Receiver

Before You Start
Protecting your unit from theft
The front panel can be detached to deter theft.
Important
- Never use force or grip the display and the buttons too tightly when removing or attaching
- Avoid subjecting the front panel to excessive shocks.
- Keep the front panel out of direct sunlight and high temperatures.
Removing the front panel
- Press DETACH to release the front panel.
- Grab the front panel and remove.
Attaching the front panel
- Slide the front panel to the left until it clicks.
The front panel and the head unit are joined on the left side. Make sure that the front panel has been joined to the head unit.
- Press the right side of the front panel until it is firmly seated.
If you can’t attach the front panel to the head unit successfully, try again. The front panel may be damaged if you attach the front panel forcefully.
Use and care of the remote control
Installing the battery
Slide the tray out on the back of the remote control and insert the battery with the plus (+) and minus (–) poles pointing in the proper direction.
WARNING
Keep the battery out of the reach of children. Should the battery be swallowed, immediately consult a doctor.
CAUTION
- Use only one CR2025 (3 V) lithium battery.
- Remove the battery if the remote control is not used for a month or longer.
- Danger of explosion if the battery is incorrectly replaced. Replace only with the same or equivalent type.
- Do not handle the battery with metallic tools.
- Do not store the battery with metallic materials.
- In the event of battery leakage, wipe the remote control completely clean and install a new battery.
- When disposing of used batteries, please comply with governmental regulations or environmental public institutions’ rules that apply in your country/area.
Using the remote control
Point the remote control in the direction of the front panel to operate.
Important
- Do not store the remote control in high temperatures or direct sunlight.
- The remote control may not function properly in direct sunlight.
- Do not let the remote control fall onto the floor, where it may become jammed under the brake or accelerator pedal.
What’s What
Remote control
The operation is the same as when using the buttons on the head unit. See the explanation of the head unit about the operation of each button, with the exception of ATT and PAUSE, which are explained below.
Head unit
- AUDIO button: Press to select various sound quality controls.
- EQ button: Press to select various equalizer curves.
- SOURCE button, VOLUME: This unit is turned on by selecting a source. Press to cycle through all the available sources. Rotate it to increase or decrease the volume.
- Disc loading slot: Insert a disc to play.
- EJECT button: Press to eject a CD from your built-in CD player.
- CLOCK button: Press to change to the clock display. Press and hold to change the channel select mode when the XM tuner or SIRIUS tuner is selected as the source.
- AUX1 input jack (3.5 mm stereo jack): Use to connect auxiliary equipment.
- DETACH button: Press to remove the front panel from the head unit.
- DISPLAY button: Press to select different displays.
- SW button to select the subwoofer setting menu. Press and hold to select the bass boost setting menu.
- 1 to 6 buttons: Press for preset tuning and disc number search when using a multi-CD player.
- ∧/∨, </> buttons: Press to perform manual seek tuning, fast forward, reverse, and track search controls. Also used for controlling functions.
- BAND button: Press to select among three FM bands and one AM band and to cancel the control mode of functions.
- FUNCTION button: Press to select functions.
- VOLUME button: Press to increase or decrease the volume.
- SOURCE button: This unit is turned on by selecting a source. Press to cycle through all the available sources.
- PAUSE button: Press to turn pause on or off.
- ATT button: Press to quickly lower the volume level by about 90%. Press once more to return to the original volume level.
Power ON/OFF
Turning the unit on
Press SOURCE to turn the unit on.
When you select a source, the unit is turned on.
Selecting a source
You can select a source you want to listen to. To switch to the built-in CD player, load a disc in the unit (refer to page 13).
- Press SOURCE to select a source. Press SOURCE repeatedly to switch between the following sources:
XM tuner—SIRIUS tuner—Tuner—Television—Built-in CD player—Multi-CD player—iPod—External unit 1—External unit 2—AUX1—AUX2
Notes
In the following cases, the sound source will not change:
- When there is no unit corresponding to the selected source connected to this unit.
- When there is no disc in the unit.
- When there is no magazine in the multi-CD player.
- When the AUX (auxiliary input) is set to off (refer to page 34).
- AUX1 is set to on by default. Turn off the AUX1 when not in use (refer to Switching the auxiliary setting on page 34).
- External unit refers to a Pioneer product (such as one available in the future) that, although incompatible as a source, enables control of basic functions by this unit. Two external units can be controlled by this unit. When two external units are connected, the allocation of them to external unit 1 or external unit 2 is automatically set by this unit.
- When this unit’s blue/white lead is connected to the vehicle’s auto-antenna relay control terminal, the vehicle’s antenna extends when this unit’s source is turned on. To retract the antenna, turn the source off.
Turning the unit off
Press SOURCE and hold until the unit turns off.
Tuner
Listening to the radio
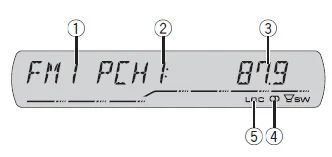
- Band indicator: Shows which band the radio is tuned to, AM or FM.
- Preset number indicator: Shows which preset has been selected.
- Frequency indicator: Shows the frequency to which the tuner is tuned.
- Stereo (5) indicator: Shows when the selected frequency is being broadcast in stereo.
- LOC indicator: Shows when local seek tuning is on.
- Press SOURCE to select the tuner. Press SOURCE until you see TUNER displayed.
- Use VOLUME to adjust the sound level. Rotate it to increase or decrease the volume.
- Press BAND to select a band. Press BAND until the desired band (FM1, FM2, FM3 for FM or AM) is displayed.
- To perform manual tuning, briefly press < or >. The frequencies move up or down step by step.
- To perform seek tuning, press and hold < or > for about one second and release. The tuner will scan the frequencies until a broadcast strong enough for good reception is found.
You can cancel seek tuning by briefly pressing <or >.
If you press and hold < or >, you can skip stations. Seek tuning starts as soon as you release the button.
Introduction of advanced tuner operation
- Press FUNCTION to display the function names. Press FUNCTION repeatedly to switch between the following functions:
BSM (best stations memory)—LOCAL (local seek tuning)
- To return to the frequency display, press BAND.
- If you do not operate the function within about 30 seconds, the display is automatically returned to the frequency display.
Storing and recalling broadcast frequencies
If you press any of the preset tuning buttons 1 to 6, you can easily store up to six broadcast frequencies for later recall with the touch of a button.
- Up to 18 FM stations, six for each of the three FM bands, and six AM stations can be stored in memory.
- When you find a frequency that you want to store in memory, press one of the preset tuning buttons 1 to 6 and hold until the preset number stops flashing. The number you have pressed will flash in the number indicator and then remain lit. The selected radio station frequency has been stored in memory. The next time you press the same preset tuning button, the radio station frequency is recalled from memory.
- You can also use ∧ and ∨ to recall radio station frequencies assigned to preset tuning buttons 1 to 6.
Storing the strongest broadcast frequencies
BSM (best stations memory) lets you automatically store the six strongest broadcast frequencies under preset tuning buttons 1 to 6. Once stored, you can tune in to those frequencies with the touch of a button.
- Storing broadcast frequencies with BSM may replace broadcast frequencies you have saved using buttons 1 to 6.
- Press FUNCTION to select BSM.
- Press ∧ to turn BSM on. The six strongest broadcast frequencies will be stored in the order of their signal strength.
To cancel the storage process, press ∨.
Tuning in strong signals
Local seek tuning lets you tune in only those radio stations with sufficiently strong signals for good reception.
- Press FUNCTION to select LOCAL.
- Press ∧ to turn local seek tuning on. Local seek sensitivity (e.g., LOCAL 2) appears in the display. To turn local seek tuning off, press ∨.
- Press < or > to set the sensitivity. There are four levels of sensitivity for FM and two levels for AM:
FM: LOCAL 1—LOCAL 2—LOCAL 3—LOCAL 4
AM: LOCAL 1—LOCAL 2
The LOCAL 4 setting allows reception of only the strongest stations, while lower settings let you receive progressively weaker stations.
Built-in CD Player
Playing a CD
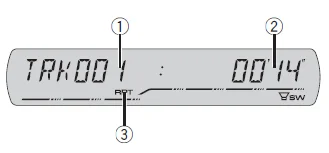
- Track number indicator: Shows the track number currently playing.
- Play time indicator: Shows the elapsed playing time of the current track.
- RPT indicator: Shows when repeat play is turned on.
- Insert a CD into the CD loading slot. Playback will automatically start. Be sure to turn up the label side of a disc. After a CD has been inserted, press SOURCE to select the built-in CD player. You can eject a CD by pressing EJECT.
- To perform fast forward or reverse, press and hold < or >. If you select ROUGH, pressing and holding < or > enables you to search every 10 tracks in the current disc. (Refer to Searching every 10 tracks in the current disc on the next page.).
- To skip back or forward to another track, press < or >.
Notes
- Read the precautions with discs and the player on page 39.
- If an error message such as ERROR-11 is displayed, refer to Understanding built-in CD player error messages on page 39.
- When a CD TEXT disc is inserted, text information currently selected on Using CD TEXT functions on page 16 automatically begins to scroll in the display.
Introduction of advanced built-in CD player operation
- Press FUNCTION to display the function names. Press FUNCTION repeatedly to switch between the following functions:
RPT (repeat play)—RDM (random play)—SCAN (scan play)—PAUSE (pause)—COMP (compression and BMX)—FF/REV (search method)
- To return to the playback display, press BAND.
- If you do not operate the function within about 30 seconds, the display is automatically returned to the playback display.
Repeating play
Repeat play lets you hear the same track or disc over again.
- Press FUNCTION to select RPT.
- Press < or > to select the repeat range.
- DSC – Repeat the current disc
- TRK – Repeat just the current track
Note
If you perform track search or fast forward/reverse during TRK, the repeat play range changes to DSC.
Playing tracks in random order
Random play lets you play back tracks on the CD in a random order.
- Press FUNCTION to select RDM.
- Press ∧ to turn random play on. RDM: ON appears in the display. Tracks will play in a random order.
To turn random play off, press ∨.
Scanning tracks of a CD
Scan play lets you hear the first 10 seconds of each track on the CD.
- Press FUNCTION to select SCAN.
- Press ∧ to turn scan play on.
SCAN: ON appears in the display. The first 10 seconds of each track are played.
- When you find the desired track, press ∨ to turn scan play off.
If the display has automatically returned to the playback display, select SCAN again by pressing FUNCTION.
Note
After scanning a CD is finished, normal playback of the tracks will begin again.
Pausing CD playback
Pause lets you temporarily stop the playback of the CD.
- Press FUNCTION to select PAUSE.
- Press ∧ to turn pause on.
PAUSE: ON appears in the display. The play of the current track pauses.
To turn pause off, press ∨.
Using compression and BMX
Using the COMP (compression) and BMX functions lets you adjust the sound playback quality of this unit. Each of the functions has a two-step adjustment. The COMP function balances the output of louder and softer sounds at higher volumes. BMX controls sound reverberations to give playback a fuller sound. Listen to each of the effects as you select through them and use the one that best enhances the playback of the track or CD that you are listening to.
- Press FUNCTION to select COMP.
- Press ∧ or ∨ to select your favorite setting. COMP OFF—COMP 1—COMP 2— COMP OFF—BMX 1—BMX 2
Using disc title functions
You can input CD titles and display them. The next time you insert a CD for which you have entered a title, the title of that CD will be displayed.
Entering disc titles
Use the disc title input feature to store up to 48 CD titles in the unit. Each title can be up to 8 characters long.
- Play the CD on which you want to enter a title.
- Press FUNCTION and hold until TITLE IN appears in the display. When playing a CD TEXT disc, you cannot switch to TITLE IN. The disc title will have already been recorded on a CD TEXT disc.
- Press ∧ or ∨ to select a letter of the alphabet. Each press of ∧ will display alphabet, numbers, or symbols in ascending order (A B C …). Each press of ∨ will display a letter in descending order.
- Press > to move the cursor to the next character position. When the letter you want is displayed, press > to move the cursor to the next position and then select the next letter. Press < to move backwards in the display.
- Move the cursor to the last position by pressing > after entering the title. When you press > one more time, the entered title is stored in memory.
- Press BAND to return to the playback display.
Notes
- Titles remain in memory, even after the disc has been removed from the unit, and are recalled when the disc is reinserted.
- After data for 48 discs has been stored in memory, data for a new disc will overwrite the oldest one.
- If you connect a multi-CD player, you can input disc titles for up to 100 discs.
Displaying disc titles
You can display the text information of any disc that has had a disc title entered.
- Press DISPLAY.
Press DISPLAY repeatedly to switch between the following settings:
Play time—DISC TITLE (disc title)
When you select DISC TITLE, the title of the currently playing disc is shown in the display.
- If no title has been entered for the currently playing disc, NO DISC TITLE is displayed.
For more Manuals by Pioneer, visit ManualsLibraryy
Pioneer DEH-P3900MP CD Receiver-FAQs
How do I change the color on my Pioneer DEH-P3900MP receiver?
Go to the receiver’s menu and navigate to “Illumination” or “Display Settings.” From there, select your preferred color option and save the setting. This lets you match the receiver’s lighting to your car’s interior.
Does the Pioneer DEH-P3900MP support Bluetooth?
No, the DEH-P3900MP model doesn’t include built-in Bluetooth. However, you can add Bluetooth functionality by using a compatible Pioneer Bluetooth adapter or FM transmitter.
How do I eject a CD from my Pioneer receiver?
Press the Eject (⏏) button located on the front panel. If the CD doesn’t eject, turn the unit off and on again, then retry. Avoid forcing the disc out.
How can I eject a CD if the eject button doesn’t work?
Turn off the power, insert a second CD about halfway, and gently push and pull to help release the stuck disc. If this fails, seek professional service.
How do I change the language on a Pioneer CD receiver?
Press and hold the Function or Menu button, navigate to Language Settings, and choose your preferred language. Confirm and exit to save the change.
How do I change the language from Japanese to English on a Pioneer Carrozzeria receiver?
Enter the setup menu, select the option that resembles “言語” (language), and choose “English.” If unsure, refer to your model’s manual for icon-based guidance.
How do I reset the Pioneer DEH-P3900MP CD player?
Press and hold the Source button to power off the unit. Use a pointed object to press the small Reset button near the faceplate or behind the front panel. This restores factory settings.
Why isn’t my Pioneer stereo reading CDs?
Check the CD for dust, scratches, or smudges and clean it gently. Make sure the disc is inserted label-side up. If issues persist, try resetting the unit or cleaning the CD lens.
How do I clean the CD player lens?
Use a CD lens cleaning disc designed for car audio systems. Insert it and follow the on-screen or audio prompts. Avoid using liquid cleaners directly inside the unit.
Does the Pioneer DEH- have an AUX input?
Yes, it includes a front AUX input that allows you to connect devices like smartphones or MP3 players using a standard 3.5mm audio cable.


