![]()
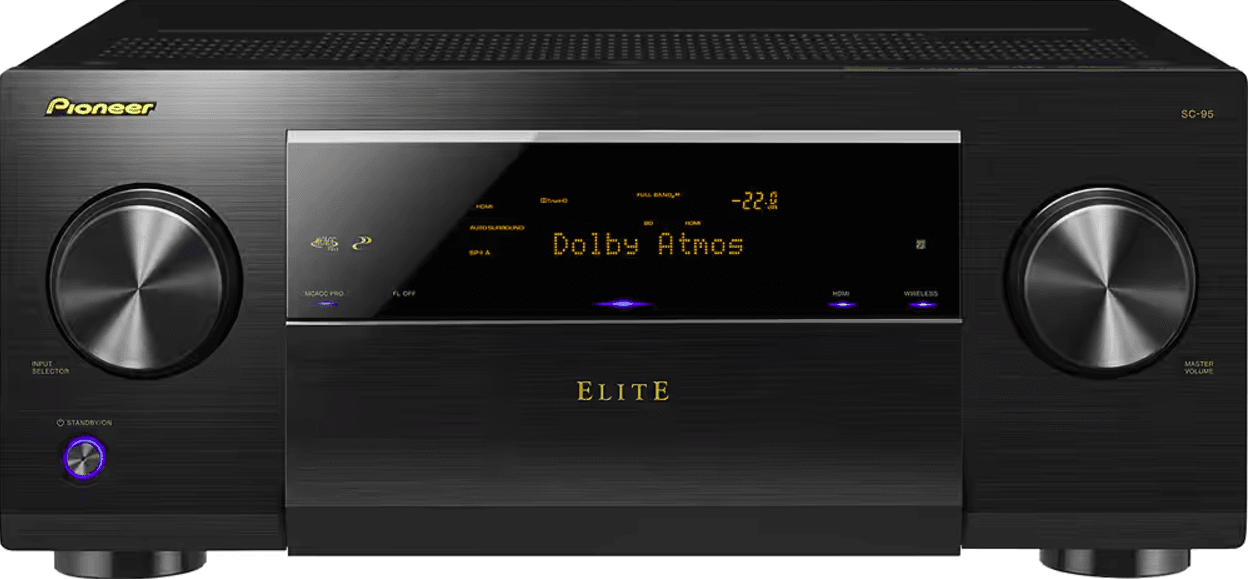
Pioneer Elite SC-95 Network AV Receiver
Before you start
Our philosophy
Pioneer is dedicated to making your home theater listening experience as close as possible to the vision of the moviemakers and mastering engineer when they created the original soundtrack. . We do this by focusing on three important steps:
- Designing with carefully selected components so as to transmit the original soundtrack accurately
- Allowing for customized acoustic calibration according to any listening area
- Tuning that transmits soul
Features
Audio
- Dolby Atmos
This AV receiver supports the latest Dolby Atmos surround sound system. Dolby Atmos is a new technology in which, through real time calculation of audio data and meta data (position and time information) included in the
audio signal, a surround sound space is achieved irrespective of the speaker layout and number of speakers. Dolby Atmos contents are required to enjoy Dolby Atmos. For Blu-ray discs with Dolby Atmos, Dolby Atmos car be played by connecting most conventional Blu-ray discs with this receiver using HDMI.
- Class D Amplifier
This unit is an AV receiver developed based on the latest high performance Class D amplifier and integrating the essence of Pioneer’s high sound quality designs. This new generation reference amplifier offers outstanding performance with high sound quality and reproduces the latest in multi-channel digital contents.
- ESS-32bit-DAC-equipped
All channels are equipped with ESS SABRE 32 Ultra Audio DACs. The Jitter Eliminators achieve clearer sound.
- Audio Scaler
The combined effect of Hi-bit 32 Audio Processing, the digital filter and the up-sampling function can be used to convert the signals of music files or CDs to up to 192 kHz/32 bits to achieve even clearer sound with higher definition.
- Hi-Bit 32 Audio Processing
Creates a wider dynamic range with digital sources like CDs, DVDs or BDS. 16-, 20- and 24-bit PCM as well as compressed audio is dequantized to 32 bits, and the high frequency component is interpolated upon data pro- ceasing to enable smoother, more subtle musical expression.
- Easy setup using MCACC PRO
The Auto MCACC Setup provides a quick but accurate surround sound setup, which includes the advanced features of Professional Acoustic Calibration EQ.
- Auto Phase Control Plus
For discs created with standards other than Phase Control, the LFE channel is delayed upon recording in the first place. This function automatically corrects phase shifting on such discs and broadcasts. This function is particularly effective when playing multi-channel music containing low frequency effects (LFE).
- Full Band Phase Control (compatible with FRONT ALIGN)
The further advanced Full Band Phase Control technology focuses on the group delay in the speaker network filter, and compensates with special digital signal processing (DSP), to adjust the phase of each unit as well as the group delay for each speaker. Full Band Phase Control gives multi-range speakers the sound coherence of full-range speakers, while retaining the wide frequency range advantage. This is compatible with the FRONT ALIGN function for matching the characteristics of the speakers other than the front speakers with those of the front speakers.
- PQLS Bit-stream
Jitter less high quality playback is possible by connecting a PQLS-compatible player with HDMI connections. This feature is only available when the connected Pioneer Blu-ray Disc Player supports the PQLS function.
- Independent dual subwoofer output
The output for two subwoofers can be adjusted and set independently. When using two subwoofers, more ideal low-frequency playback can be realized by properly adjusting the output to each woofer.
- Subwoofer EQ
The EQ for subwoofer output can be corrected. In addition to the results of MCACC automatic adjustment, the subwoofer output can be adjusted to match the viewing environment or your taste by manual correction.
- Virtual Speakers
By turning on the ‘Virtual Surround Back’, ‘Virtual Height’, and ‘Virtual Wide’ modes, it is possible to realize a maximum of 11.1 channels combining the speakers that are actually installed and the virtual speakers. This makes for a smoother connection between the sounds and an improved 3D feel.
- dts Neo: X compatible
This receiver supports the latest DTS processing format. The quality of Neo: X, originally designed for 9 channels or more, can be enjoyed in a 7-channel environment.
Installation
- Built-in A Navigator
With the built-in A Navigator embedded in this receiver, Wiring Navi can be used to interactively connect and set initial settings of this receiver with a smart phone, tablet, PC, and Mac through a home network. In addition, Interactive Operation Guide can also be used, which visually explains the functions and operation by actually experiencing the operation with contents linked with the main device.
- ControlAV5 Remote Application
This is an application that allows intuitive operation of many of the receiver’s functions. This application is available on the App Store for iPhone, iPod touch and iPad. You can also get it on Google Play for Android smart- phones. The application can be downloaded free of charge.
- HDZONE output
This receiver supports output of the HDMI output to a subzone room. Powerful images can be enjoyed simply by connecting this receiver to a TV supporting 4K/Full-HD/3D. In addition, a multi-channel environment can be created by connecting this receiver to another AV receiver in the subzone room.
- ZONE Ready
This receiver is equipped with HDZONE, ZONE 2 and ZONE 3. HDZONE supports HD audio/video streaming to a separate room via HDMI. Multi-Zone enables music and movie playback from different sources in three zones at the same time. With HDZONE, you can select not only HDMI input but also INTERNET RADIO or iPod/USB and the like.
- Energy Saving Design
This AV receiver has an ecological design. In addition to even lower power consumption in standby, the receiver is equipped with an ‘eco mode’ for low power consumption when playing contents as well. Furthermore, the eco mode can easily be set with a dedicated button on the remote control of using iControlAV5.
Loading the batteries
The batteries included with the unit are to check initial operations; they may not last over a long period. We recommend using alkaline batteries that have a longer life.
- The remote control setting may be restored to the default after the batteries are replaced. If this happens, reset it (page 99).

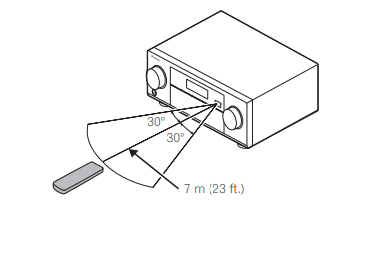
Operating range of remote control unit
The remote control may not work properly if:
- There are obstacles between the remote control and the receiver’s remote sensor.
- Direct sunlight or fluorescent light is shining onto the remote sensor.
- The receiver is located near a device that is emitting infrared rays.
- The receiver is operated simultaneously with another infrared remote control unit.
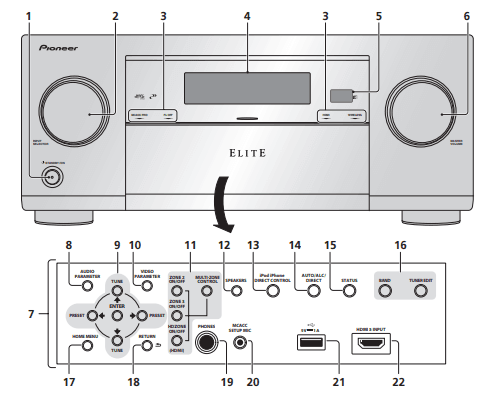
Front panel
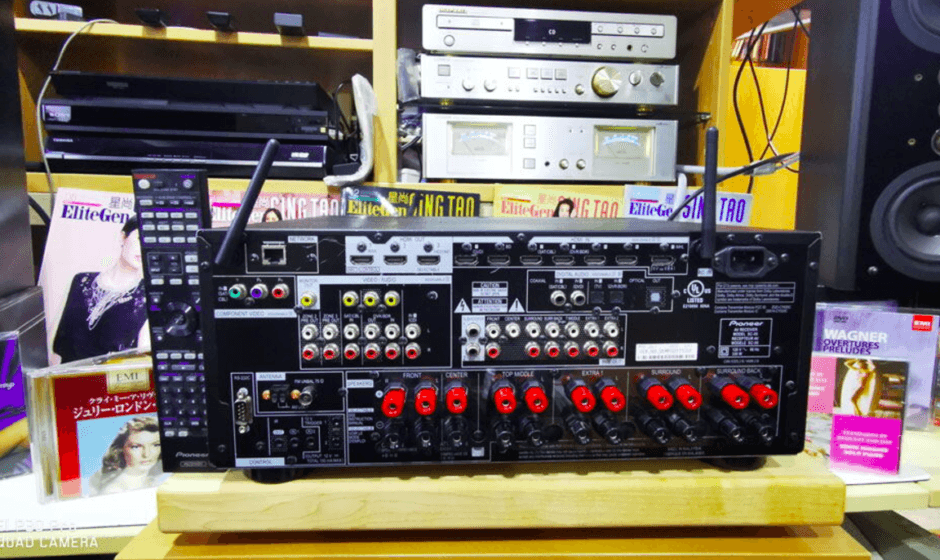
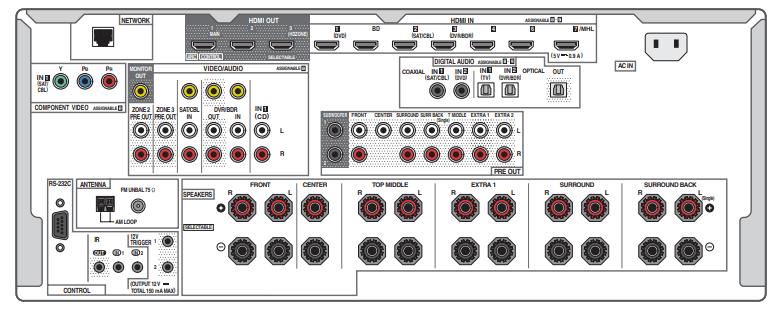
Rear panel
Determining the speakers’ application
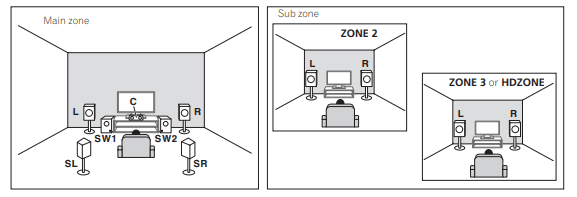
This unit is equipped with speaker terminals for 11 channels, allowing users to select a variety of speaker layouts/ usage patterns according to their tastes. The terminals to which the speakers should be connected differ according to the speaker layout/usage pattern. Select one speaker layout/usage pattern before connecting the speakers.
However, the 5.2 +ZONE 2+ZONE 3 and Multi-ZONE Music settings can be used separately according to the situation. Normally set this to 5.2 +ZONE 2+ZONE 3 and use this for multi-zone/multi-source playback, and when
using the system for home parties for example, set this to Multi-ZONE Music to associate all zones with the main zone.
- Be sure to connect speakers to the front left and right channels (L and R).
- It is also possible to only connect one of the surround back speakers (SB) or neither.
- If you have two subwoofers, the second subwoofer can be connected to the SUBWOOFER 2 terminal. Connecting two subwoofers increases the bass sound to achieve more powerful sound reproduction.
- When none of the top middle, top forward + top backward, front height, front wide, and surround back speakers are connected, Dolby Atmos does not play. Choose one from Plans (A) to [N] below.
Important
- The Speaker System setting must be made it you use any of the connections shown below other than [A] (see Speaker system setting on page 110).
- The speakers from which sound is output can be switched according to the speaker layout/usage pattern (sound is not necessarily output from all connected speakers). Use the OUT P. button to switch the speakers from which sound is output.
channel surround system (Surround back/Top middle) connection
- Speaker System setting: 7.2.2/5.2.2/7.2ch
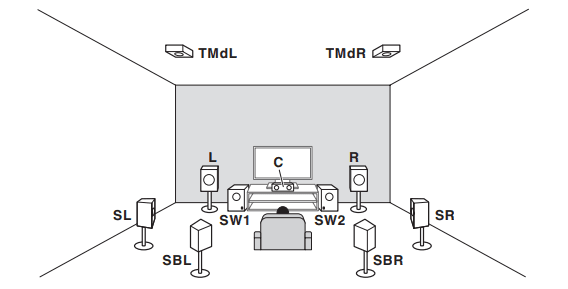
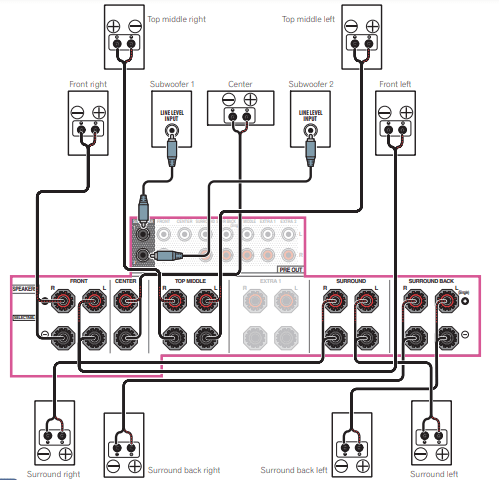
A 7.2.2 ch surround system connects the left and right front speakers (L/R), the center speaker (C), the left and right top middle speakers (TMDL/TMDR), the left and right surround speakers (SL/SR), the left and right surround back speakers (SBL/SBR), and the subwoofers (SW 1/SW 2). This surround system produces a more true-to-life sound from above. Playback of Dolby Atmos requires a connection with surround back speakers or top middle speakers.
[N-1] Multi-ZONE Music connection
[N-2] 5.2 channel surround system & ZONE 2/HDZONE connection (Multi Zone)
[N-3] 5.2 channel surround system & ZONE 2/ZONE 3 connection (Multi Zone)
- (N-1) Speaker System setting: Multi-ZONE Music
- (N-2) Speaker System setting: 5.2 +ZONE 2+HDZONE
- (N-3) Speaker System setting: 5.2 +ZONE 2+ZONE 3
Installing your speaker system
At the very least, front left and right speakers only are necessary. Note that your main surround speakers should always be connected as a pair, but you can connect just one surround back speaker if you like (it must be connected to the left surround back terminal).
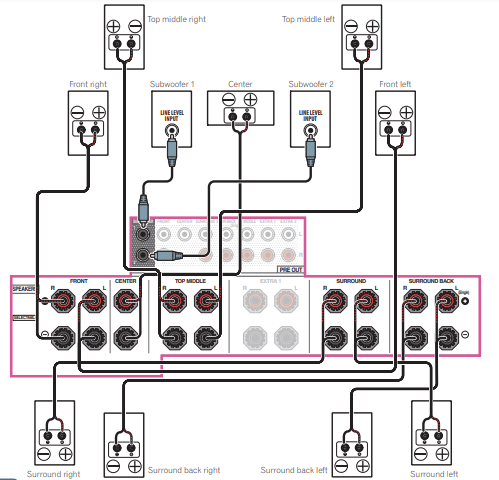
[A] 7.2.2 channel surround system (Surround back/Top middle) connection
- If necessary, select ‘7.2.2/5.2.2/7.2ch’ from the Speaker System menu. See Speaker system setting on page 110 to do this.
- When only connecting one surround back speaker, connect it to the SURROUND BACK L (Single) terminals.
- In Speaker Setting. when TMD is set to Dolby SP (Front), Dolby SP (SURR), or Dolby SP (SB), connect the top middle channel to Dolby Enabled Speaker.
7.2.4 channel surround (Surround back Pre Out) connection
- Select ‘7.2.4ch SB Pre out from the Speaker System menu.
- Surround back is output from the PRE OUT EXTRA 2 terminals of the receiver. Connect the EXTRA 2 terminal to the external amplifier, and connect the external amplifier to the surround back speaker.
- When TFW is set to Dolby SP (Front) in Speaker Setting, connect the top forward channel to Dolby Enabled Speaker.
- When TBW is set to Dolby SP (SURR) or Dolby SP (SB) in Speaker Setting, connect the top backward channel to Dolby Enabled Speaker.
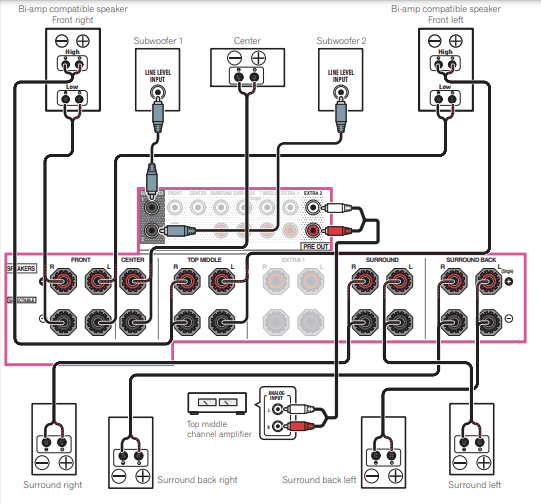
7.2.2 channel surround system & Front Biamping connection (High quality surround)
- Select ‘7.2.2ch Front Bi-Amp’ from the Speaker System menu.
- When only connecting one surround hack speaker, connect it to the SURROUND BACK L (Single) terminals
- Top middle is output from the PRE OUT EXTRA 2 terminals of the receiver. Connect the EXTRA 2 terminal to the external amplifier, and connect the external amplifier to the top middle speaker.
- In Speaker Setting. when TMD is set to Dolby SP (Front), Dolby SP (SURR), or Dolby SP (SB), connect the top middle channel to Dolby Enabled Speaker.
About the audio connection
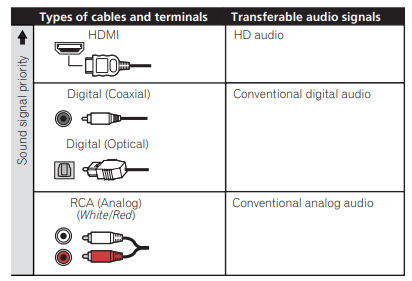
- With an HDMI cable, video and audio signals can be transferred in high quality over a single cable.
- For HD audio, see About HDMI on page 37.
About the video converter
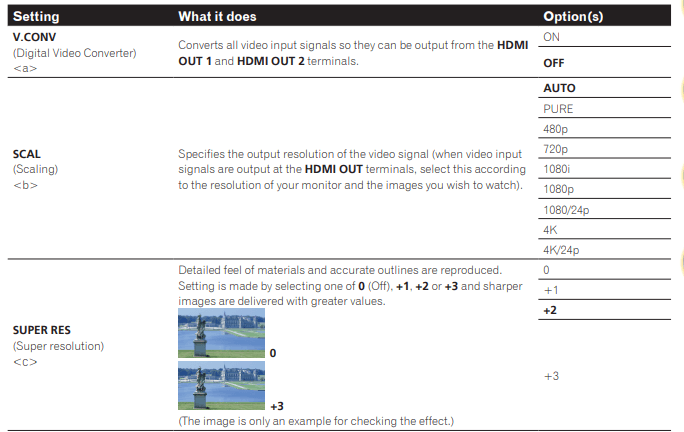
The video converter ensures that all video sources are output through the HDMI OUT 1 and HDMI OUT 2 terminals. If the TV is only connected to the receiver’s composite VIDEO MONITOR OUT jacks, all the other video devices must be connected through composite connections. If several video components are assigned to the same input function . the converter gives priority to HDMI, component, then composite (in that order).
Connecting your TV and playback components
Connecting using HDMI
If you have an HDMI or DVI (with HDCP) equipped component (Blu-ray Disc player (BD), etc.), you can connect it to this receiver using a commercially available HDMI cable. If the TV and playback components support the Control with HDMI feature, the convenient Control with HDMI functions can be used.
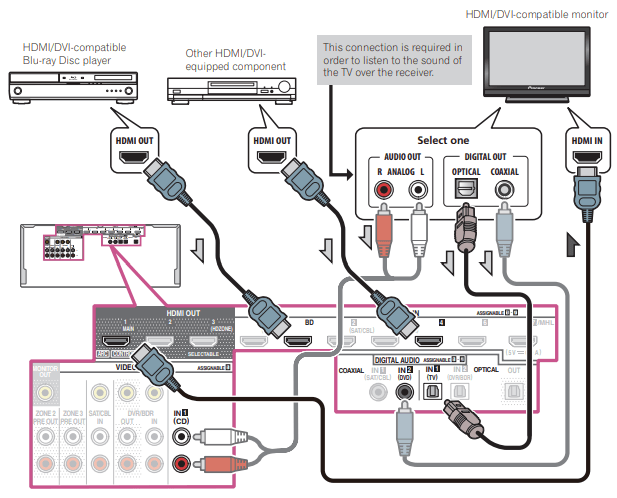
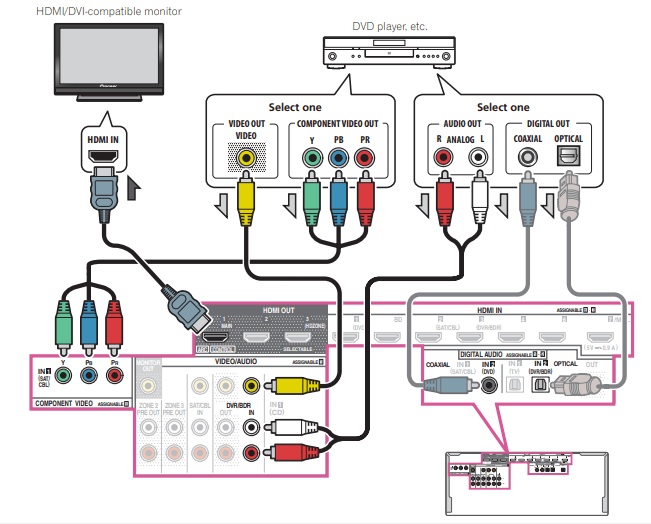
Connecting your DVD player with no HDMI output
This diagram shows connections of a TV (with HDMI input) and DVD player (or other playback component with no
HDMI output) to the receiver.
Making MULTI-ZONE connections
Equipment connected to this receiver in a different room (sub zone) from a room with this receiver (main zone) can be played by operating this receiver (multi-zone function). Not only can the same source be played simultaneously in the main and sub zones, different sources can also be played.
By preparing a different amplifier with a HDMI input terminal in the sub zone, the other amplifier and TV monitor
can be connected to this receiver. When there is no other amplifier, the speaker terminal of this receiver can be used. High resolution via HDMI can be enjoyed in the sub zone (HDZONE function).

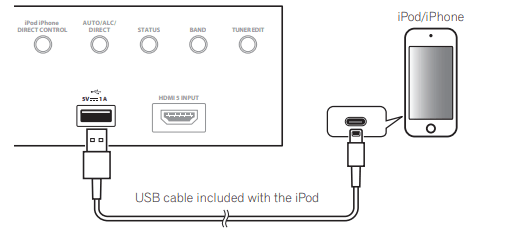
Connecting an iPod
This receiver has a dedicated iPod terminal that will allow you to control playback of audio content from your iPod
using the controls of this receiver.
Perform settings using the AV Navigator built into this receiver
If you have a Windows PC or Mac, the settings can be performed using the AV Navigator built into this receiver.
How to use the built-in AV Navigator?
The built-in AV Navigator is equipped with Wiring Navi, which allows you to perform connection of this receiver and initial settings in interactive mode. By simply following the screen prompts to connect and set the unit, highly accurate initial settings can be performed easily. Additionally, in order to use various functions easily, contents linked to the receiver can be used.
Setting network connection
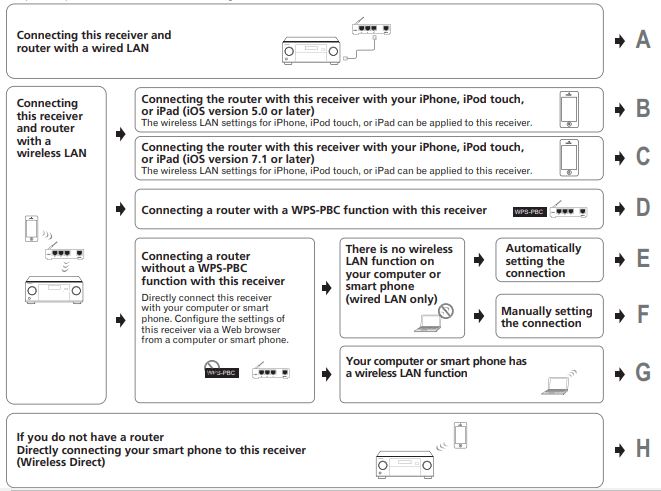
- When connection method B, C, D, E, F, or G is selected, check that the LAN cable is not connected to this receiver.
- Warning when connecting a wireless LAN router with this receiver SSID is compatible only with single-byte alphanumerical characters and some symbols such as the under bar. If characters other than these are used, change the SSID before executing network settings. Refer to the user’s manual for your router for information on SSID.
- Some network functions may not be used with Wireless Direct. iControlAV5, AirPlay, and HTC connect can be
used. - SSID is compatible only with single-byte alphanumerical characters and some symbols such as the underbar.
If characters other than these are used, change the SSID before executing network settings. Refer to the user’s
manual for your router for information on SSID.
• Some network functions may not be used with Wireless Direct. iControlAV5, Air Play, and HTC connect can be used. When setting this receiver by A-H, first show the settings screen using the following procedures.
- Press MAIN RECEIVER to switch the remote control to the receiver operation mode, and then press HOME MENU. A Graphical User Interface (GUI) screen appears on your TV. Use 1/4/+/→ and ENTER to navigate through the screens and select menu items. Press RETURN to exit the current menu.
- Select ‘Network, Bluetooth’ from the HOME MENU.
- Select the setting you want to adjust.
If you are doing this for the first time, you may want to adjust these settings in order:
- Network Information – The setting status of the following network-related items can be checked (page 57).
- Network Type – Select the network connection method.
- Network Connection – Connect to the network.
- Network Option – Set the network other than for connection .
- Bluetooth Setup – Set Bluetooth .
Basic playback controls
This receiver’s remote control buttons can be used for basic playback of files stored on USB memory devices.
- Press iPod USR to switch the remote control to the iPod/USB operation mode.

Music Files

Listening to the radio
The following steps show you how to tune in to FM and AM radio broadcasts using the automatic (search) and manual (step) tuning functions. If you already know the frequency of the station you want, see Tuning directly to a station below. Once you are tuned to a station you can memorize the frequency for recall later-see Saving station.
- Press TUNER to select the tuner.
- Use BAND to change the band (FM or AM), if necessary.
- Tune to a station.
There are three ways to do this
- Automatic tuning – To search for stations in the currently selected band, press and hold TUNE +/- for about a second. The receiver will start searching for the next station, stopping when it has found one. Repeat to search for other stations.
- Manual tuning – To change the frequency one step at a time, press TUNE +/-.
- High speed tuning – Press and hold TUNE +/- for high speed tuning. Release the button at the frequency you want.
Saving station presets
If you often listen to a particular radio station, it’s convenient to have the receiver store the frequency for easy recall whenever you want to listen to that station. This saves the effort of manually tuning in each time. This receiver can memorize up to 63 stations, stored in seven banks, or classes (A to G) of 9 stations each.
- Tune to a station you want to memorize.
- Press TOOLS (TUNER EDIT)
The display shows PRESET MEMORY, then a blinking memory class. - Press CLASS
to select one of the seven classes, then press PRESET +/- to select the station preset you want. You can also use the number buttons to select a station preset. - Press ENTER
After pressing ENTER, the preset class and number stop blinking and the receiver stores the station.
Listening to station presets
- Press TUNER to select the tuner.
- Press CLASS to select the class in which the station is stored. Press repeatedly to cycle through classes A to G.
- Press PRESET +/- to select the station preset you want.
• You can also use the number buttons on the remote control to recall the station preset.
Music playback using Bluetooth wireless technology
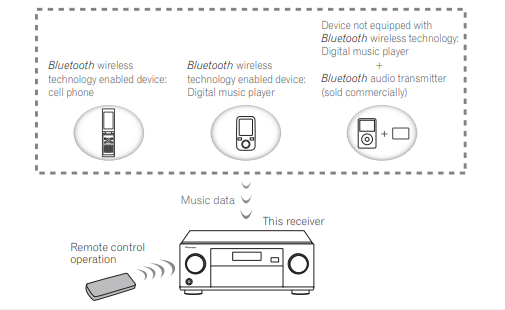
Listen to music on the unit from a Bluetooth capable device
- A Bluetooth connection will be created between the Bluetooth capable device and the unit. Procedures for connecting to the unit should be performed from the Bluetooth capable device.
• Please refer to the user’s manual for your Bluetooth capable device for details of the connection procedures. - Playback music from the Bluetooth capable device. This receiver’s remote control buttons can be used for basic playback of files stored on Bluetooth wireless technology devices.
• When the Network Standby and Bluetooth Setup for Network, Bluetooth settings are set as ON. the main power of this receiver will automatically be on by playing the equipment using the Bluetooth function. However, when network communication becomes disconnected, it will switch from the network standby mode to normal standby mode. In such case, turn the power on with the remote controller and play.
• When play is started on the equipment with the Bluetooth function, the zone input set at Play ZONE Setup will automatically switch to BT AUDIO.
• Depending on the Bluetooth wireless technology device you use, operation may differ from what is shown in the remote control buttons.
- While listening to a source, set the remote control to the receiver operation mode, then press ADV repeatedly to select SOUND RETRIEVER AIR.
Scope of operation
Use of this unit is limited to home use. (Transmission distances may be reduced depending on communication environment).
In the following locations, poor condition or inability to receive radio waves may cause the audio to be interrupted or stopped:
- In reinforced concrete buildings or steel framed or iron-framed buildings.
- Near large metallic furniture.
- In a crowd of people or near a building or obstacle.
- In a location exposed to the magnetic field, static electricity or radio wave interference from radio communication equipment using the same frequency band (2.4 GHz) as this unit, such as a 2.4 GHz wireless LA N device (IEEE802.11b/g) or microwave oven.
- If you live in a heavily populated residential area (apartment, townhouse, etc.) and if your neighbor’s microwave is placed near your system, you may experience radio wave interference. If this occurs, move your unit to a different place. When the microwave is not in use. there will be no radio wave interference.
Radio wave reflections
The radio waves received by this unit include the radio wave coming directly from the device equipped with Bluetooth wireless technology (direct wave) and waves coming from various directions due to reflections by walls, furniture and building (reflected waves). The reflected waves (due to obstacles and reflecting objects) further produce a variety of reflected waves as well as variation in reception condition depending on locations.
Enjoying various types of playback using the listening modes
Using this receiver, you can listen to any source in surround sound. However, the options available will depend on your speaker setup and the type of source you’re listening to. To play with surround sound, check “Standard surround sound” or “Using the Advanced surround effects” below and select the desired mode. To play with the optimum mode for the input signal, see “Auto playback” or “Using Stream Direct”. The sound is played in stereo when 2-channel signals are input, in surround when multi-channel signals are input.)
Auto playback
There are many ways to listen back to sources using this receiver, but the simplest, most direct listening option is the Auto Surround feature. The receiver automatically detects what kind of source you’re playing and selects multichannel or stereo playback as necessary.
- While listening to a source, press AUTO (AUTO SURR/ALC/STREAM DIRECT) for auto playback of a source.
AUTO SURROUND shows briefly in the display before showing the decoding or playback format. Check the digital format indicators in the front panel display to see how the source is being processed. - If the source is Dolby Digital, DTS, or Dolby Surround encoded, the proper decoding format will automatically be selected and shows in the display.
- When listening to the BT AUDIO input, the SOUND RETRIEVER AIR feature is selected automatically. ALC In the Auto level control (ALC) mode, this receiver equalizes playback sound levels. Also, the low and high frequency sounds, dialogs, surround effects, etc., that are difficult to hear when the volume is low are adjusted to be optimal for the volume level. This mode is particularly optimum when listening at night.OPTIMUM SURR – In the Optimum Surround mode, this receiver automatically optimizes sound balance in each scene based on actually set volume. The sound balancer controls three major theater sound elements dialogue, bass and surround with original algorithm.
Better sound using Phase Control
This receiver’s Phase Control feature uses phase correction measures to make sure your sound source arrives at the listening position in phase, preventing unwanted distortion and/or coloring of the sound. Phase Control technology provides coherent sound reproduction through the use of phase matching for an optimal sound image. The default setting is on and we recommend leaving Phase Control switched on for all sound sources.
- Press MAIN RECEIVER to switch the remote control to the receiver operation mode, and then press AUDIO P…
- Use
 to select ‘PHASE’.
 - Use
 to switch on phase correction. The PHASE CONTROL indicator on the front panel lights.
Playback with NETWORK features
About playable DLNA network devices
This unit allows you to play music on media servers connected on an identical Local Area Network (LAN) as the receiver. This unit allows for the playing of files stored on the following devices:
- PCs running Microsoft Windows 7 or Windows 8 with Windows Media Player 12 installed
- DLNA-compatible digital media servers (on PCs or other components) Files stored in a PC or DMS (Digital Media Server) as described above can be played via command from an external Digital Media Controller (DMC). Devices controlled by this DMC to play files are called DMRs (Digital Media Renderers).This receiver supports this DMR function. When in the DMR mode, such operations as playing and stopping files can be performed from the external controller. Volume adjustment and the muting control are also possible. The DMR mode is canceled if the remote control unit is operated while in the DMR mode (aside from certain buttons, including the VOLUME +/-, MUTE and DISP).
- Depending on the external controller being used, playback may be interrupted when the volume is adjusted from the controller. In this case, adjust the volume from the receiver or remote control.
Listening to Internet radio stations
Internet radio is an audio broadcasting service transmitted via the Internet. There are a large number of Internet
radio stations broadcasting a variety of services from every corner of the world. Some are hosted, managed, and broadcast by private individuals while others are by the corresponding traditional terrestrial radio stations or radio networks.
Whereas terrestrial, or OTA (over-the-air), radio stations are geographically restricted on the range of radio waves broadcast from a transmitter through the air, Internet radio stations are accessible from anywhere in the world, as long as there is a connection to the Internet, as services are not transmitted through the air but are delivered over the World Wide Web. On this receiver you can select Internet radio stations by genre as well as by region. Depending on the Internet line conditions, the sound may not be smooth when playing Internet radio.
Basic playback controls
You can perform the following operations with the remote control of this receiver. Note that some buttons are not available for operation depending on the category currently being played back.
- Press NET to switch the remote control to the network operation mode.

Content playable over a network
- Even when encoded in a compatible format, some files may not play correctly.
- Movie or Photo files cannot be played back.
- There are cases where you cannot listen to an Internet radio station even if the station can be selected from a
list of radio stations. - Some functions may not be supported depending on the server type or version used.
- Supported file formats vary by server. As such, files not supported by your server are not displayed on this unit.
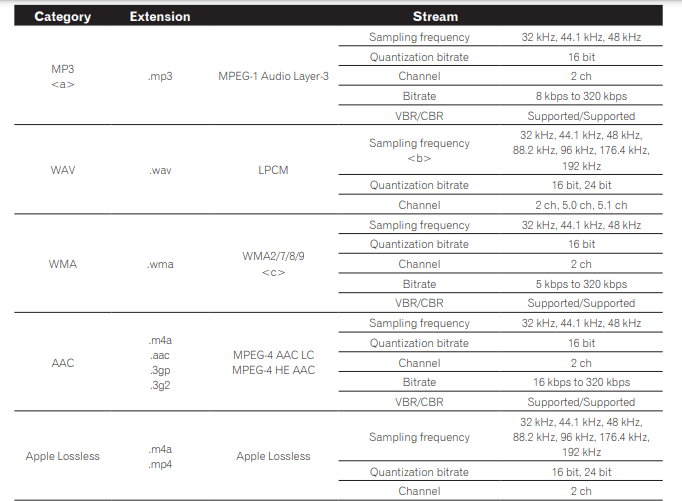
About playable file formats
The NETWORK feature of this receiver supports the following file formats. Note that some file formats are not available for playback although they are listed as playable file formats. Also, the compatibility of file formats varies depending on the type of server. Check with your server to ensure the compatibility of file formats supported by your server.
- Internet radio playback may be affected by the Internet communications environment, and in this case play- back may not be possible even with the file formats listed here.
- With MP3, WAV, AAC, FLAC, AIFF and Apple Lossless files, when music files with the same format, sampling
frequency, quantization bit number and number of channels are played successively, they are played with no gap.- Gapless playback is not possible when the format is being converted (transcoded) by the server.
- Gapless playback is not possible in the DMR mode.
- When AAC or MP3 format is used, sound is reproduced with the minimum gap. If you are conscious about gaps, use WAV or FLAC files.
Control with HDMI function
About the Control with HDMI function
Synchronized operations below with a Control with HDMI-compatible Pioneer TV or Blu-ray Disc player are possible when the component is connected to the receiver using an HDMI cable.
- The receiver’s volume can be set and the sound can be muted using the TV’s remote control.
- The receiver’s input switches over automatically when the TV’s input is changed or a Control with HDMI- compatible component is played.
- The receiver’s power is also set to standby. when the TV’s power is set to standby.
HDMI Setup
You must adjust the settings of this receiver as well as the connected Control with HDMI-compatible components in order to make use of the Control with HDMI function. For more information see the operating instructions for each component.
- Press MAIN RECEIVER to switch the remote control to the receiver operation mode, and then press HOME MENU.
- Select ‘System Setup’, then press ENTER.
- Select ‘HDMI Setup’, then press ENTER.
- Select the ‘Control’ setting you want.
Choose whether to set this unit’s Control with HDMI function ON or OFF. You will need to set it to ON to use the Control with HDMI function. When using a component that does not support the Control with HDMI function, set this to OFF.
• ON – Enables the Control with HDMI function. Set Control Mode, ARC and PQLS in the subsequent setting items to the desired values. Also, by setting this to ON, the Sound Retriever Link and Stream Smoother Link functions can be operated automatically by connecting a player supporting the respective functions.
• OFF – The Control with HDMI is disabled. The Control Mode, ARC and PQLS functions in the subsequent setting items cannot be used. - Select the ‘Control Mode’ setting you want.
Choose whether you want to enable synchronized operations.
• ON – Enabled for the synchronized operations.
• OFF – The synchronized operations disabled. - Select the ‘ARC’ setting you want.
When a TV supporting the HDMI ARC (Audio Return Channel) function is connected to the receiver, the sound of the TV can be input via the HDMI OUT 1 terminal. After setting the ARC, some time may be required for the connected device to be recognized and the sound to be produced.
• ON – The TV’s sound is input via the HDMI terminal.
• OFF – The TV’s sound is input from the Audio input terminals other than HDMI inputs. - Select the ‘PQLS’ setting you want.
Choose whether to set this unit’s PQLS function AUTO or OFF.
• AUTO – PQLS is enabled. A precision quartz controller in this receiver eliminates distortion caused by timing errors (jitter), giving you the best possible digital-to-analog conversion when you use the HDMI interface. This is valid as an HDMI function for PQLS-compatible players.
• OFF – PQLS is disabled.
Making receiver settings from the MCACC PRO menu
The MCACC (Multi Channel Acoustic Calibration) PRO system was developed in Pioneer’s laboratories with the aim of making it possible for home users to perform adjustments of the same level as in a studio easily and with high precision. The acoustic characteristics of the listening environment are measured and the frequency response is calibrated accordingly to allow high precision, automatic analysis and optimal calibration of the sound field to bring it closer to a studio environment than ever before.
Furthermore, while it was previously difficult to eliminate standing waves, this receiver is equipped with a standing wave control function using a unique process to perform acoustic analysis and reduce their influence. This section describes how to calibrate the sound field automatically and fine-adjust the sound field data manually.
- Press Power Button STANDBY/ON to switch on the receiver and your TV. Make sure that the TV’s video input is set to this receiver.
- Press MAIN RECEIVER to switch the remote control to the receiver operation mode, and then press HOME MENU. A Graphical User Interface (GUI) screen appears on your TV. Use
 and ENTER to navigate through the screens and select menu items. Press RETURN to exit the current menu.
• Press HOME MENU at any time to exit the HOME MENU. - Select ‘MCACC PRO’ from the HOME MENU, then press ENTER. Select the setting you want to adjust.
• Full Auto MCACC – See Automatically conducting optimum sound tuning (Full Auto MCACC) .
• Auto MCACC – See Automatic MCACC (Expert) .
• Manual MCACC – Fine-tunes your speaker settings and customizes the Acoustic Calibration EQ .
• MCACC Data Check – This displays the MCACC PRO measurement results. Use it to check the MCACC memory.
• Data Management – Use this to manage the data in the MCACC memory.
• Demo – No settings are saved and no errors occur. When the speakers are connected to this receiver, the test tone is output repeatedly. Press RETURN to cancel the test tone.
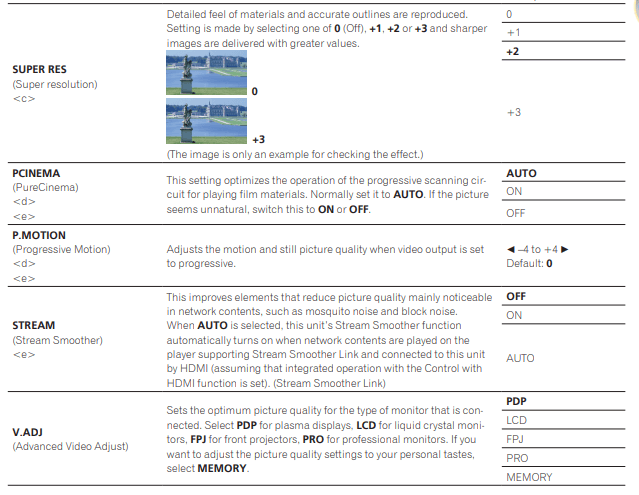
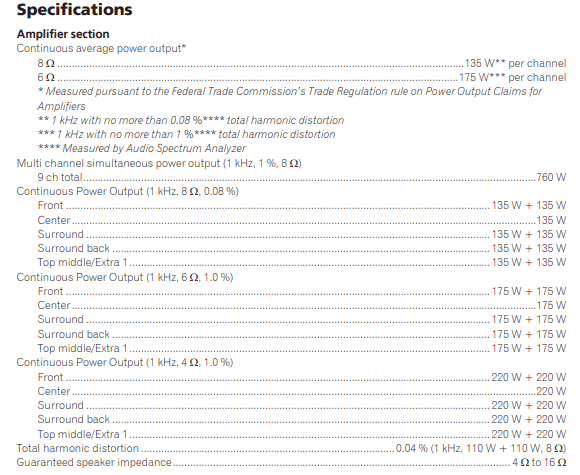
Video parameter menu
For more manuals by Pioneer visit, ManualsLibraryy
Pioneer Elite SC-95 Network AV Receiver-FAQs
How do I reset my Pioneer AV receiver?
1.Switch the unit to “Source Off.”
2.Access the menu via the settings icon.
3.Select “Restore Settings” > “All Settings” > “Restore.”
4.Wait for the process to complete, and the receiver will reboot.
How do I troubleshoot my AV receiver?
No Video or Poor Quality:
1.Check HDMI or other video connections for secure and undamaged cables.
2.Ensure the correct input source is selected.
Why does my Pioneer receiver keep shutting off?
Check speaker wiring. A single strand in the wrong place may cause a short circuit, leading to the receiver shutting off.
What is phase control on a Pioneer receiver?
Phase control adjusts for crossover delays in speakers and subwoofers, ensuring better audio alignment and clarity.
What is HDMI ARC mode?
HDMI-ARC (Audio Return Channel) allows a single HDMI cable to send and receive audio, connecting your TV to soundbars or home theater systems.
How do you turn on a Pioneer record player?
Press the [START] button for over 1 second to begin playback automatically.
How do I restart my receiver?
1.Unplug the power cord for 15 seconds.
2.Plug it back in and press the Power button.
3.Wait for the receiver to reboot.
How do I tune my AV receiver?
Use test tones and an SPL meter (or an SPL app) to adjust speaker levels until they match.
Why do receivers stop working?
Common causes include low power, wrong source selection, faulty wiring, broken speakers, or malfunctioning source devices.
What is an audio phase problem?
Phase problems occur when signals are out of sync, reducing audio clarity and depth.

