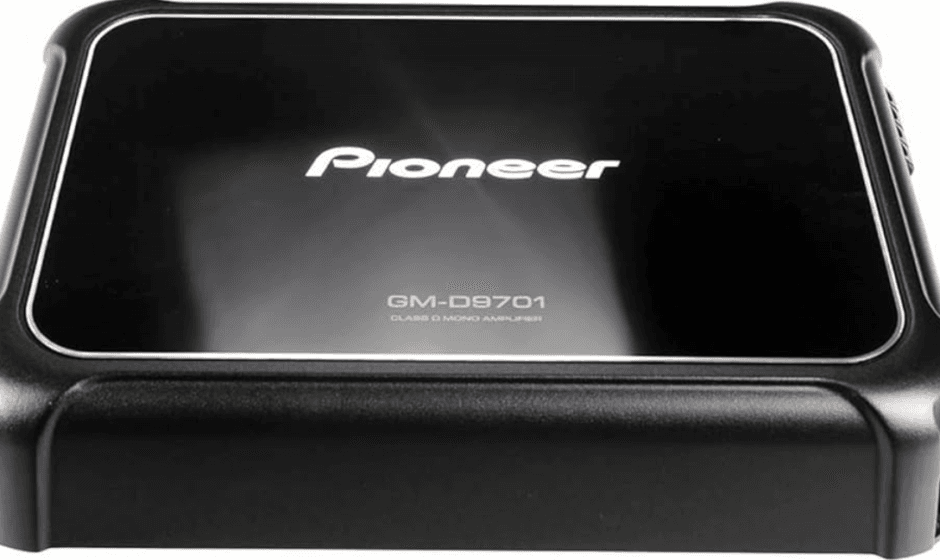
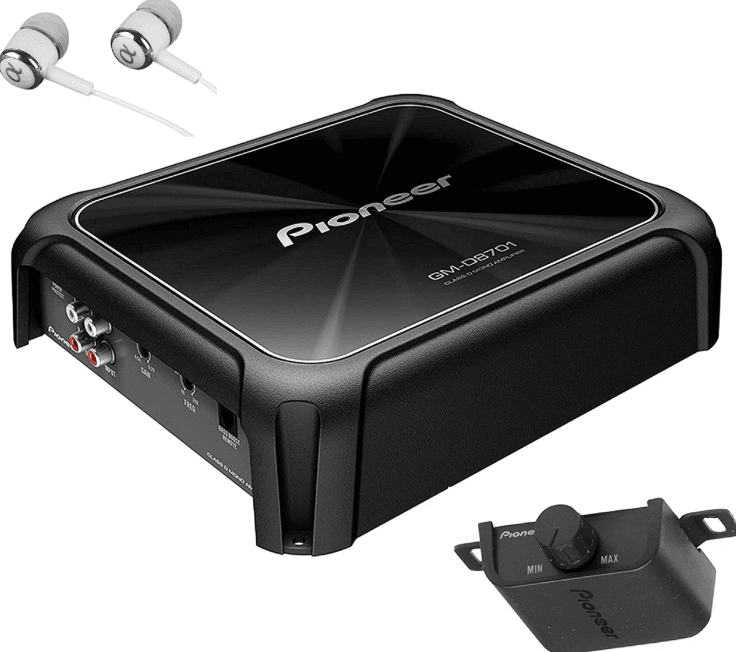
PIONEER GM-D8601 500W Mono Class-D AMP
Before you start
If you experience problems
Should this product fail to operate properly, please contact your dealer or nearest authorized Pioneer Service Station.
About This Product
This product is a mono amplifier for a subwoofer. If both L (left) and R (right) channels are connected to the RCA input of this product, the output is mixed because this product is a mono amplifier.
Before connecting/installing the amplifier
WARNING
- This unit is for vehicles with a 12 V battery and negative grounding. Before installing in recreational vehicles, trucks, or buses, check the battery voltage.
- When installing this unit, make sure to connect the ground wire first. Ensure that the ground wire is properly connected to metal parts of the car’s body. The ground wire of one of these units must be connected to the car separately with different screws. If the screw for the ground, wire loosens or falls out, it could result in fire, the generation of smoke, or malfunction.
- Be sure to install the fuse to the battery wire. Always use a fuse of the rating prescribed. The use of an improper fuse could result in overheating and smoke, damage to the product, and injury, including burns.
- Check the connections of the power supply ‘and speakers if the fuse of the separately sold battery wire or the amplifier fuse blows. Determine and resolve the cause, then replace the fuse with an identical equivalent.
- Always install the amplifier on a flat surface. Do not install the amplifier on a surface that is not flat or on a surface with a protrusion. Doing so could result in malfunction. When installing the amplifier, do not allow parts such as extra screws to get caught between the amplifier and the automobile. Doing so could cause malfunction.
- Do not allow this unit to come into contact with liquids. Electrical shock could result. Also, damage to this unit, smoke, and overheating could result from contact with liquids. The surfaces of the amplifier and any attached ‘speakers may also heat up and cause minor bums.
- In the event of any abnormality, the power supply to the amplifier is cut off to prevent equipment malfunction. If this occurs, switch the system power off and check the power supply and speaker connections. If you are unable to determine the cause, please contact your dealer.
- Always disconnect the negative – terminal of the battery beforehand to avoid the risk of electric shock or short circuit during installation.
- Do not attempt to disassemble or modify this unit. Doing so may result in fire, electric shock or other malfunctions.
Setting the unit
What’s what
M-D8601
GM-D9601
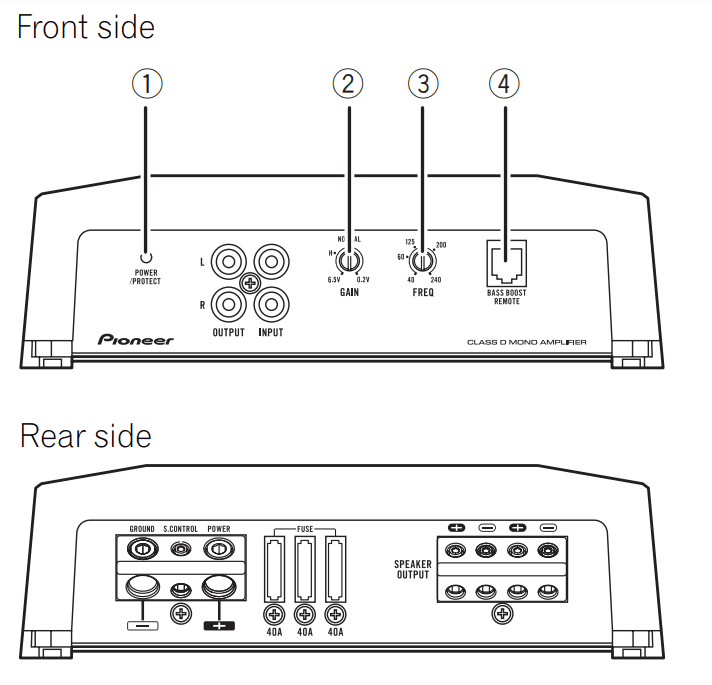
To adjust the switch, use a flathead screwdriver if needed.
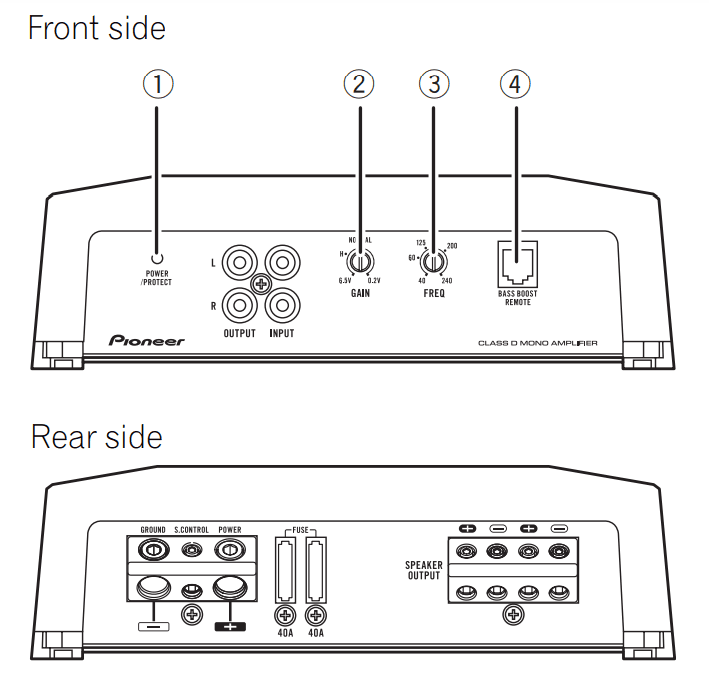
- POWER/PROTECT indicator: The power indicator lights up to indicate power ON.
- If something is not normal, the indicator turns red.
- GAIN (gain) control: If output remains low, even when the car stereo volume is turned up, turn controls to a lower level. If distortion occurs when the car stereo volume is turned up, turn these controls to a higher level.
- For use with an RCA-equipped car stereo (standard output of 500 mV), set to the NORMAL position. For use with an RCA-equipped Pioneer car stereo, with a maximum output of 4V or more, adjust the level to match that of the car stereo output.
- For use with an RCA-equipped car stereo with an output of 4V, set to the H position
- If you hear too much noise when using the speaker input terminals, turn the gain control to a higher level.
- LPF (low-pass filter) cut-off frequency control: You can select a cut-off frequency from
40 Hz to 240 Hz. - BASS BOOST REMOTE (bass boost level remote control) jack: By connecting the Bass boost level remote control to the jack on the main unit, you will be able to select a bass boost level from 0dB to 18 dB. For instructions on connecting the bass boost remote control to the amplifier, see the Connection diagram on page 6.
Setting gain properly
- Protective function included to prevent malfunction of the unit and/or speakers due to excessive output, improper use or improper connection.
- When outputting high-volume sound etc., this function cuts off the output for a few seconds as a normal function, but output is restored when the volume of the head unit is turned down.
- Acutin sound output may indicate improper setting of the gain control. To ensure continuous sound output with the head unit at a high volume, set amplifier gain control to a level appropriate for the preset maximum output level of the head unit, so that volume can remain unchanged and to control excess output.
- Despite correct volume and gain settings, the unit sound still cuts out periodically. In such cases, please contact the nearest authorized Pioneer Service Station.
Gain control of this unit
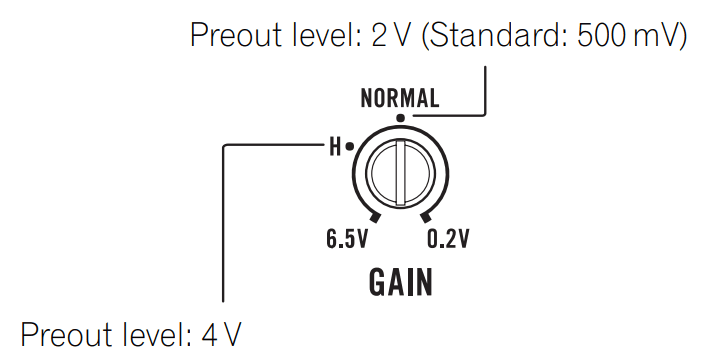
The above illustration shows a NORMAL gain setting.
Relationship between amplifier gain and head unit output power
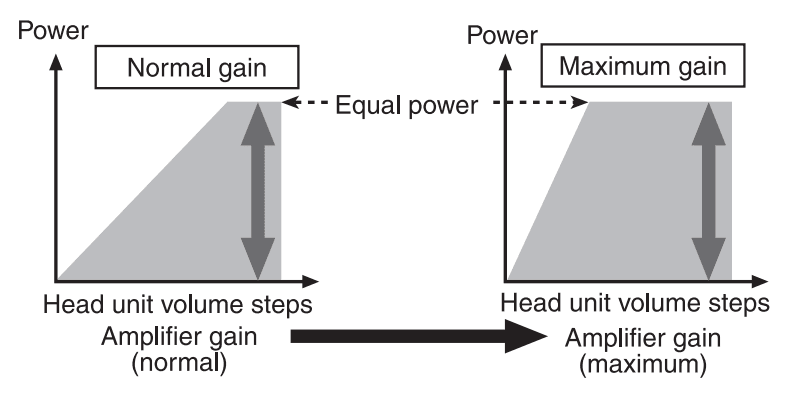
If amplifier gain is raised improperly, this will simply increase distortion, with little increase in power.
Signal waveform when outputting at high volume using amplifier gain control
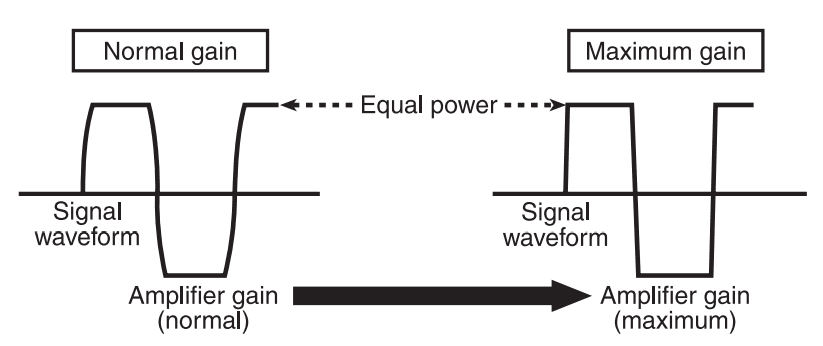
The signal waveform is distorted with high output, if you raise the gain of the amplifier the power changes only slightly.
Connecting the units
Connection diagram
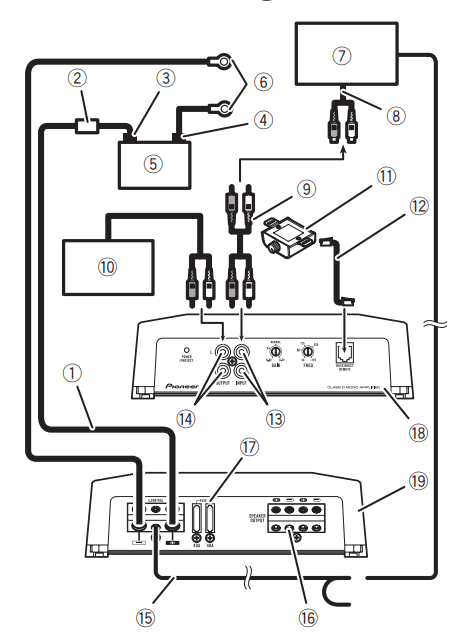
- (Battery wire (sold separately)
- The maximum length of the wire between the fuse and the positive + terminal of the battery is 30 cm.
- For the wire size, refer to Connecting the Power Terminal on page 8. The battery wire, the ground wire, and the optional direct ground wire must be the same size. After making all other connections at the amplifier, connect the battery wire terminal of the amplifier to the positive + terminal of the battery.
- Fuse 100A (GM-D8601) / 150 A (GM-D9601) (sold separately) Each amplifier must be separately fused at 100A (GM-D8601) / 150 A (GM-DI601).
- Positive (+) terminal
- Negative (-) terminal
- Battery (sold separately)
- Ground wire, Terminal (sold separately). The ground wires must be the same size as the battery wire. Connect to metal body or chassis.
- Car stereo with RCA output jacks (sold separately)
- External output
- Connecting wire with RCA pin plugs (sold separately)
- Amplifier with RCA input jacks (sold separately)
- Bass boost level remote control
- Bass boost level remote control wire (5m)
- RCA input jack
- RCA output jack
- System remote control wire (sold separately) Connect the male terminal of this wire to the system remote control terminal of the car stereo. The female terminal can be connected to the auto-antenna relay control terminal. If the car stereo lacks a system remote control terminal, connect the male terminal to the power terminal via the ignition switch.
- Speaker output terminals Please see the following section for speaker connection instructions. Refer to Connections when using the speaker input wire on page 8.
- Fuse 40A x 2 (GM-D8601) / 40A x 3 (GM-DOO)
- Front side
- Rear side.
Before connecting the amplifier
WARNING
- Secure the wiring with cable clamps or adhesive tape. To protect the wiring, wrap sections in contact with metal parts in adhesive tape.
- Never cut the insulation of the power supply to feed power to other equipment. The current capacity of the wire is limited.
CAUTION
- Never shorten any wires, the protection circuit may malfunction.
- Never wire the speaker negative cable directly to the ground.
- Never band together multiple speaker’s negative cables.
- If the system remote control wire of the amplifier is connected to the power terminal via the ignition switch (12V DC), the amplifier will remain on with the ignition whether the car stereo is on or off, which may exhaust the battery if the engine is at rest or idling.
- Install and route the separately sold battery wire as far as possible from the speaker wires. Install and route the separately sold battery wire, ground wire, speaker wires, and the amplifier as far away as possible from the antenna, antenna cable, and tuner.
Connecting the speaker
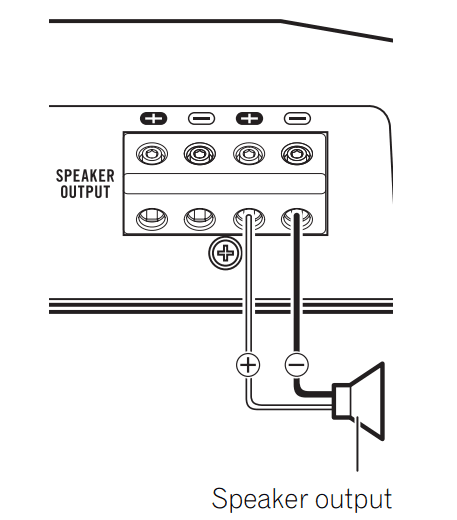
This amplifier can be connected to two speakers in parallel. Connect the speaker leads to suit the mode according to the figure shown below.
Precautions for parallel connection
- When wiring two speakers in parallel, make sure that the synthetic impedance is from 1Ω to 8Ω to prevent the amplifier from catching fire, generating smoke, and/or being damaged.
- When connected in parallel with a synthetic impedance less than 1€Q, as a normal function, this amplifier may automatically be set on mute if outputting high-volume sound. Turn down the volume until the mute function is canceled.
When connecting to one speaker
When connecting to two speakers
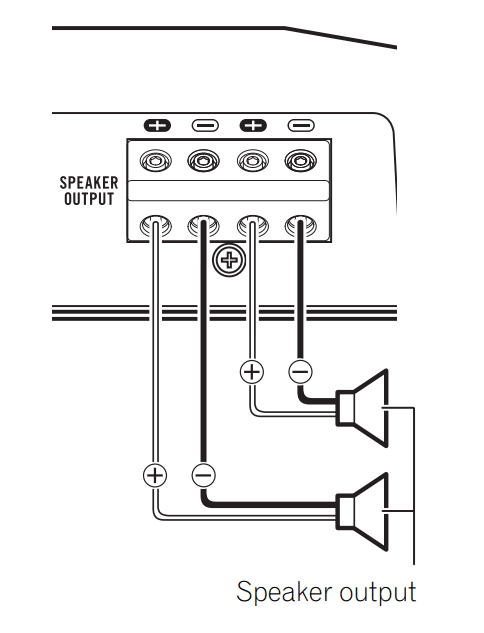
The output from two speakers is the same as that of one speaker.
Connections when using the speaker input wire
Connect the car stereo speaker output wires to the amplifier using the supplied speaker input wire with an RCA pin cord.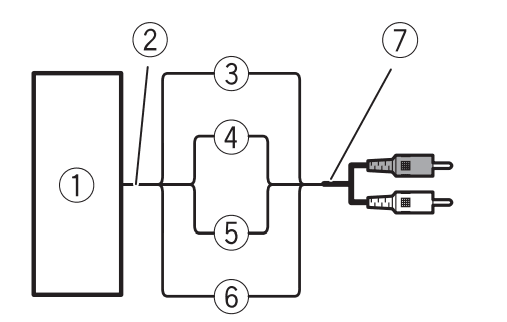
- Car Stereo
- Speaker output
- Red: Right +
- Black: Right –
- Black: Left –
- White: Left +
- Speaker input wire with RCA pin cord To the RCA input jack of this unit
Notes:
- If speaker wires with an RCA pin cord from a head unit are connected to this amplifier, the amplifier will automatically turn on when the head unit is turned on. When the head unit is
turned off, the amplifier turns off automatically. This function may not work with some head units. In such cases, please use a system remote control wire (sold separately). If multiple amplifiers are to be connected together synchronously, connect the head unit and all amplifiers via the system remote control wire. - Connect the system remote control wire when you wish to only turn on the car stereo, not the amplifier.
- This amplifier automatically selects an input signal mode between the RCA level and the speaker level by detecting an input signal.
Solderless terminal connections
- Since the wire will become loose over time, it must be periodically inspected and tightened as necessary.
- Do not solder or bind the ends of the twisted wires.
- Fasten while making sure not to clamp the insulating sheath of the wire.
- Use the supplied hexagonal wrench to tighten and loosen the terminal screw of the amplifier and use it to securely fasten the wire. Be careful to avoid excessive tightening of this screw, which may damage the wire.
Connecting the power terminal
WARNING
If the battery wire is not securely fixed to the terminal using the terminal screws, there is a risk of overheating, malfunction, and injury, including minor burns.
- Always use the recommended battery and ground wire, which is sold separately. Connect the battery wire directly to the car battery positive (®) terminal and the ground wire to the car body.
- The recommended wire size (AWG: American Wire Gauge) is as follows. The battery wire, the ground wire, and the optional direct ground wire must be the same size.
- Use a wire of 8AWG to 16 AWG wire for the speaker wire.
Battery wire and ground wire size

Before installing the amplifier
WARNING
- To ensure proper installation, use the supplied parts in the manner specified. If any parts other than those supplied are used, they may damage internal parts of the amplifier, or become loose causing the amplifier to shut down.
- Do not install in:
- Places where it could injure the driver or passengers if the vehicle stops suddenly.
- Places where it may interfere with the driver, such as on the floor in front of the driver’s seat.
- Install tapping screws in such a way that the screw tip does not touch any wire. This is important to prevent wires from being cut by the vibration of the car, which can result in fire.
- Make sure that wires do not get caught in the sliding mechanism of the seats or touch the legs of a person in the vehicle as a short-circuit may result.
- When drilling to install the amplifier, always confirm no parts are behind the panel and protect all cables and important equipment (e.g. fuel/brake lines, wiring) from damage.
Attaching the Bass boost remote control
Attach with tapping screws (3mm x 10 mm) at an easily accessible location such as under the dashboard.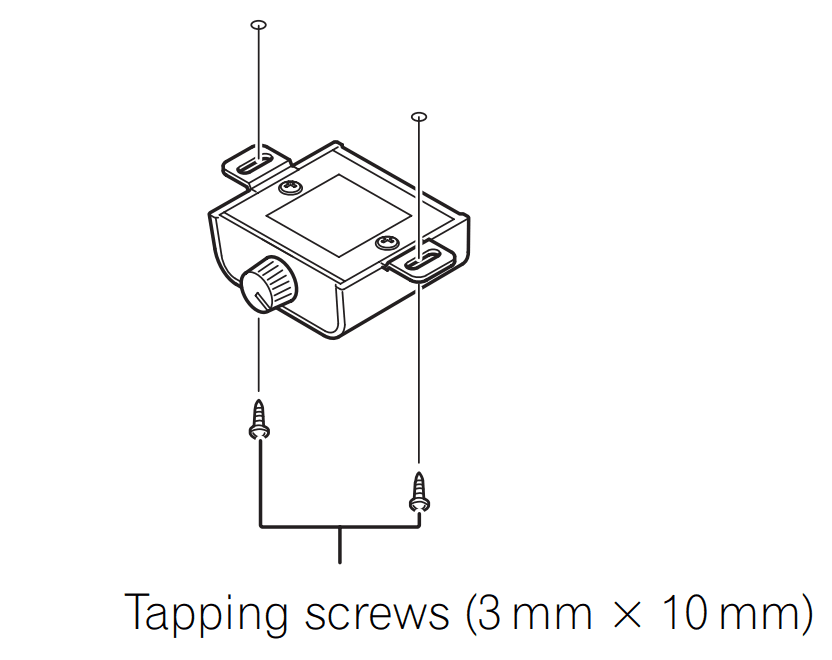
Example of installation on the floor mat or chassis
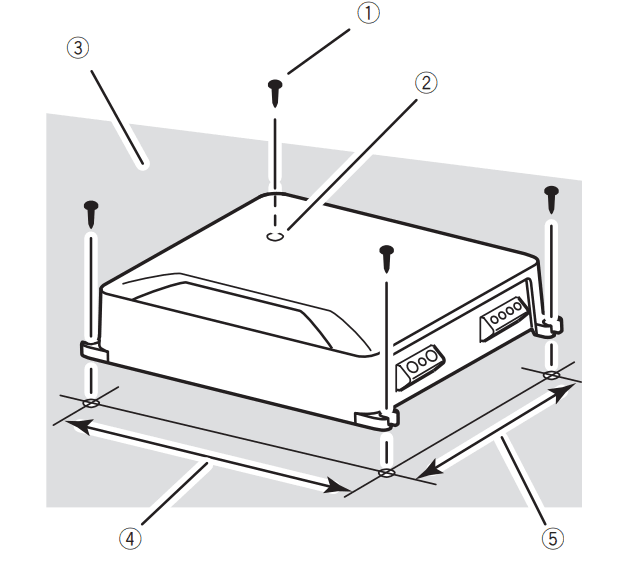
- Place the amplifier in the desired installation location. Insert the supplied tapping screws (4 mm x 18 mm) into the screw holes and push on the screws with a screwdriver so they make an imprint where the installation holes are to be located.
- Drill 2.5 mm diameter holes at the imprints either on the carpet or directly on the chassis.
- Install the amplifier with the use of supplied tapping screws (4 mm x 18 mm).

- Tapping-screws (4mm x 18 mm)
- Drill a 2.5mm diameter hole
- Floor mat or chassis
- Hole-to-hole distance: 257 mm (GM-D8601)/ 307 mm (GM-D9601)
- Hole-to-hole distance: 181 mm (GM-D8601)/181 mm (GM-D9601)
Specifications
GM-D8601
- Power source verses 14.4 V DC (10.8 V t0 15.1 V allowable)
- Grounding system …………. Negative type
- Current consumption …… 24 A (at continuous power, 4Ω)
- Average current drawn …….2.9A (4Ω for one channel) 4.0A (2Ω for one channel) 6.0A (1Ω for one channel)
- Fuse—————— 40A×2
- Dimensions (W x H x D) …265 mm x 60 mm x 200mm
- Weight …………………………………. 2.7 kK (Leads for wiring not included)
- Maximum power output ……600W x 1 (4Ω)/1600W x 1Ω)
- Continuous power output ..300W x 1 (at 14.4V, 4Ω, 20 Hz to 240 Hz, ≤ 1% THD) 500W x 1 (at 14.4V, 2Ω, 100Hz, 1% THD) 800W x 1 (at 14.4V,1Ω, 100Hz, ≤1% THD)
Notes
- Specifications and the design are subject to modifications without notice.
- The average current drawn is nearly the maximum current drawn by this unit when an audio signal is input. Use this value when working out the total current drawn by multiple power amplifiers.
For more manuals by Pioneer, visit ManualsLibraryy
PIONEER GM-D8601 500W Mono Class-D AMP-FAQs
How many watts does the Pioneer GM-D8701 amplifier have?
The Pioneer GM-D8701 is a monoblock Class-D amplifier with an RMS power rating of up to 800W and a maximum power output of 1600W.
How powerful is the Pioneer GM-DX871 amplifier?
The Pioneer GM-DX871 is a mono Class-D amplifier with a maximum power output of 1600W, delivering high-efficiency performance for deep bass.
How much power does an amplifier consume?
A typical Class A/B amplifier operates at about 25% efficiency, meaning a 100W amp consumes around 25W at idle, while a 500W amp may consume 125W per hour.
How many watts is a 24V 100Ah battery?
A 24V 100Ah battery stores 2,400 watt-hours (Wh) of energy.
How much power does a car stereo amplifier need?
1. Factory stereo-powered speakers: 50 to 200W RMS is usually sufficient for bass.
2. Aftermarket receiver-powered speakers: 200 to 300W RMS for the subwoofer ensures optimal performance.
How many watts does a drone charger require?
For DJI drones, it’s best to use a DJI 65W Portable Charger or a USB PD charger with at least 30W output. A 5V/2A charger is also recommended for safe and efficient charging.
How much power does a mini electric fan use?
Mini electric fans generally consume between 3W and 200W, depending on the model and power settings.
What size amplifier do I need for 500W speakers?
For four 500W subwoofers, a 1,000W to 1,200W amplifier is ideal. This setup provides strong bass while keeping the subs within safe operating limits for longevity and sound quality.
Is a 1000W amplifier good for a speaker?
Yes, but only for peak power handling. A speaker rated at 250W continuous power can typically handle 1000W peaks, as long as the amplifier isn’t pushing 1000W continuously, which could damage the speaker.

